Today we’ll have a fairly easy article, one that won’t be too long, as we discuss a couple of ways to show mounted partitions. This isn’t anything complicated. A new user should be able to follow along, so long as they’re not too afraid of the terminal.
Even if a new user was afraid of the terminal, none of these commands perform actions other than providing information. If you are careful, even using copy and paste, you won’t risk harming anything. Then again, this is pretty basic stuff. You can handle it just fine! (I have faith!)
Did you notice how I said “a couple of ways”? Well, I said that because there are all sorts of ways to show mounted partitions.
If you don’t know what a partition is, it’s pretty easy to understand. You have a storage drive. By itself, it’s pretty useless. You have to decide on a filesystem and add at least one partition for that storage drive to be useful. There are also virtual partitions that are created by, and used by, the operating system.
Additionally, that partition must be mounted to be accessible for normal read and write operations. Sometimes, you may need to unmount a drive to perform certain operations. For example, you can’t change the size of the partitions on a mounted drive.
All we will be doing in this article is showing the mounted partitions. I haven’t just picked two commands, I’ve picked the two commands that I think have the most easily processed output.
Show Mounted Partitions:
The very first paragraph mentioned the terminal. That’s because we’ll be using the terminal for these exercises. So, go ahead and press
We shouldn’t need to install any new software for the tasks covered in this article. We will be using two different applications, but those are going to be installed by default more often than not. I told you that this one will be easy!
Show Mounted Partitions With The ‘df’ Command:
With your terminal open, you can start by verifying that the df command is installed on your system. You’d do that with this command:
1 | df --version |
With that information, you’ll not only get the version you’ll see why it’s probably installed by default. The df command is a part of ‘GNU coreutils’, which is a set of GNU-provided applications that should be installed by default.
When you check the man page, you can also that df is described as being:
df – report file system disk space usage
So, that’s probably a pretty good tool for showing your mounted partitions. The df command we’re going to use is quite simple. It looks like this:
1 | df -aTh |
You can check the man page to see what those flags are doing:
1 | man df |
The command output is nice and easy to understand, but very thorough. The next command we’ll use only shows a subset of the above-mentioned virtual partitions.
Anyhow, that command may look a bit like this:
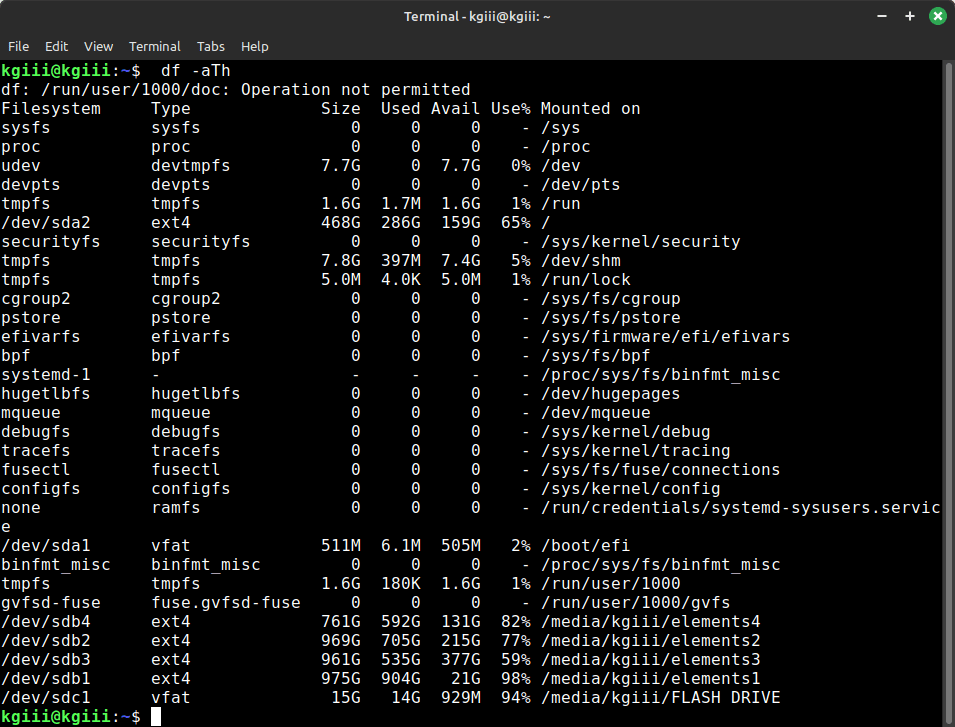
As you can see, the output from this df command is very thorough. You almost certainly won’t need that much information. Fortunately, the next command is more concise and will net you about all the information you might need in your day-to-day computing.
Show Mounted Partitions With The ‘findmnt’ Command:
This too is done in the terminal and is another way to do much of what you did in the previous section. You probably don’t have to install anything. The findmnt application is a part of ‘util-linux’ and will also be installed by default.
You can find out if the findmnt command is available with this command:
1 | findmnt --version |
As you’ll see, is indeed part of the util-linux applications. You might as well check the man page, seeing as we’re already here. To check the findmnt man page, you’d use this command:
1 | man findmnt |
While you’re checking the man page, check to see how findmnt describes itself. It’s described like:
findmnt – find a filesystem
If you recall the introduction, I mentioned how you’d need a filesystem to make a partition useful. Findmnt appears to be a pretty good application for those who want to show mounted partitions.
You can run the command and get a cascade of data, much like the df command. Run this command:
1 | findmnt |
But, you can run this command with a -D flag and get a subset of that partition information and this subset of information is probably all you’re going to need regularly. That command looks like this:
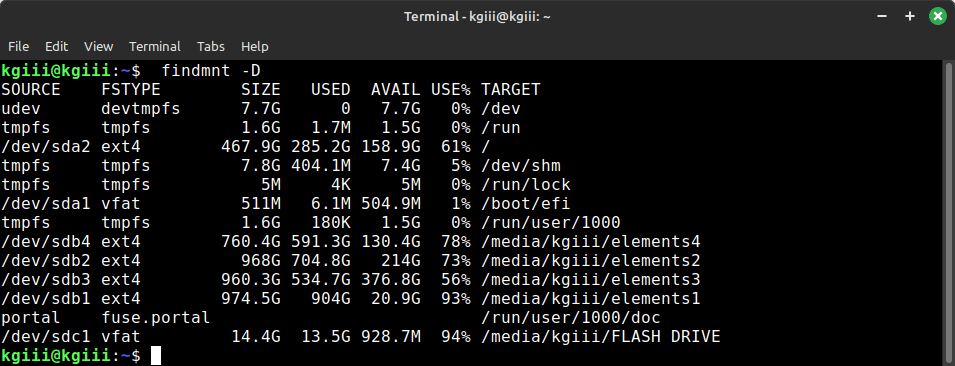
1 | findmnt -D |
The more concise output from that command looks something like this:
(It was kind of broken for a while, but I fixed it so that you can click on the images and have them enlarge properly. The bug was a devious bugger, but I think I’ve nailed it.)
The output from that findmnt command is easy to read and doesn’t contain nearly as many of the virtually mounted partitions. It still contains some and I’m not sure why or what the difference is. You can see that both commands spit out slightly different bits of information – but the essential bits are there and, thankfully, they match one another.
See? I told you that it’d be easy!
Closure:
Well, at some point you may want to show mounted partitions. It’s handy information to have when you want to perform some disk operations. It can also be handy to ensure a drive is mounted properly.
There are all sorts of reasons why you might want this information. Then again, there are also a zillion ways to get this information (such as running the sudo fdisk -l command). I’ve just picked a couple of ways, though I had a preference for outputs that are easiest to read.
Thanks for reading! If you want to help, or if the site has helped you, you can donate, register to help, write an article, or buy inexpensive hosting to start your site. If you scroll down, you can sign up for the newsletter, vote for the article, and comment.