Today we’re going to revisit a previous subject and share a couple more ways to find your file system type. I’ve covered this subject before, but I only shared a couple of ways. This being Linux, there are multiple file system types and multiple ways to find the details. So, let’s cover it again but with different options.
If you did your installation manually, you probably already know this information. You probably know the file system types you chose to use during the installation process. On the other hand, if you did your installation by just letting the installer use the defaults, you might not know this information. This may also be something like an unknown computer you’re tasked with fixing. So, there are real-world reasons why you might want to know the file system types in use.
If you want to visit the previous article, you can find that here:
How To: Find The File System Type
You could easily have multiple file system types in use right now. This is quite likely if you’re dual-booting with Windows or you’re using EFI as your boot method. You could even have external disks formatted in all sorts of file types.
All of these various file types may need specific commands to repair them and maintain them. You don’t want to go using the wrong tool for the wrong file type. That’d likely make your problems even worse. So, this is good information to have and this article will show you how to find your file system type.
Find Your File System Type:
This requires an open terminal. Like many of these articles, we’ll be using a terminal. It’s painless and it’s a good idea to know some of these commands. The terminal is fairly universal, so you can open your terminal (usually) by pressing
In the previous article, we used lsblk and we also used df. Those are both excellent tools and excellent ways to get this information. They’re simple and easily memorized. The two commands we’ll use today will be similar in those regards. This truly is not a complicated task, it’s just fun to cover the different methods that one could use.
Using The mount Command:
The first command we’re going to learn about is the mount command. Don’t worry, this is part of your standard installation and you won’t need to do anything extra to use it. You can check the man page with man mount if you’d like. If you did do so, you’d find that the mount application is described as:
mount – mount a filesystem
No, we won’t be mounting and unmounting anything. We’ll just be using the command to find your file system types. That command’s syntax would look like this:
1 | mount | grep "^/dev" |
That’s the command that will show you all of your drives and all of the drive’s file system types in one go. I plugged a couple of external drives in so that I could run the command and show you the expected output:
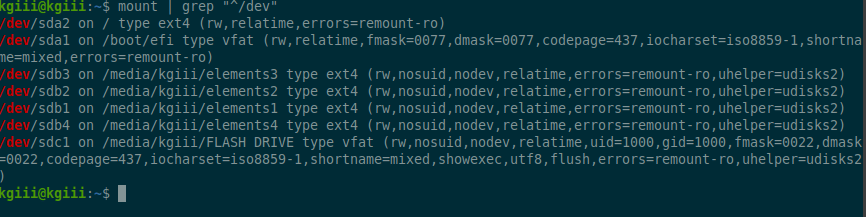
There’s nothing too eccentric in that output. Those are fairly normal file systems as far as Linux systems go. There are more. There are many more. You can check a list of file system types on Wikipedia.
Using The fsck Command:
Yes, you can even use the fsck command to find the file system types. You’re telling the command to not actually run and just spit out some information, so there’s nothing laborious or complicated with this command. You will need to know the path to the disk in question. I’m sure you know how to do that. Heck, the first command in this article will do that for you.
When you do this with the fsck command, you’re doing so on a disk-by-disk method. If you’re unfamiliar with the fsck command, you can check the man page with man fsck. Once again, you won’t have to install anything. The fsck command is a part of the standard base, files you’ll find on pretty much every distro by default. Anyhow, the man page describes fsck as:
fsck – check and repair a Linux filesystem
We will not be repairing a Linux filesystem (I’ve intentionally stylized this as ‘file system’ as it appears both spellings are in common usage) but we will sort of be checking them. We won’t be checking them for errors because that’d take too long and isn’t a part of this article. If you do want to check your file systems for errors with fsck, you should read this article:
How To: Check A Disk For Errors
Or maybe this article:
Repair Your Linux Filesystem With a Live USB or DVD
Anyhow, if you want to find your file system type with fsck, the syntax is simile and is as follows:
1 | fsck -N /drive/path |
This is usually going to start with a /dev and then the drives populate (enumerate?) as is logical. You would have drive sda, then partitions on that drive might be sda1, sda2, etc… So, an example command might be:
1 | fsck -N /dev/sda1 |
An example output is as follows:

See? Pretty useful if you need to know a file system type before working on it.
Closure:
So, we’ve covered a couple of new ways for you to find your file system type. This time around, we’ve used fsck and mount and both of them are perfectly useful for this application. If you work on multiple computers, if you work on someone else’s computers, if you work on remote computers, etc. then these commands may come in useful.
Plus, this seemed like a fun article to write. There are all sorts of older articles that could have more information added to them. Some of the older articles contain errors that should be fixed. Some could use being written again but with a more suitable format.
A couple of the articles are just plain garbage and should have been deleted. They weren’t… They should have been, but they weren’t. I should probably go back and write those over again in their entirety. I’ve completely blown it a few times. I do like to point out that I probably learn more than you do by writing these articles and (importantly) getting feedback on them. I do love some feedback, though it’d be cool if it was left here when it adds something to the article.
Thanks for reading! If you want to help, or if the site has helped you, you can donate, register to help, write an article, or buy inexpensive hosting to start your site. If you scroll down, you can sign up for the newsletter, vote for the article, and comment.