Enable x11 Forwarding With SSH (Remotely Use GUI Applications)

In the last article, I explained how to enable SSH. In today’s article, we’re going to learn how to forward GUI application windows with SSH. x11 forwarding is easy and beneficial. Once you learn how, you may decide to stop using VNC or TeamViewer.

Just to quickly clear up a misconception, x11 forwarding works just fine with Wayland. Way back in the earliest days of Wayland development, it was agreed that it should retain backwards compatibility with x11 forwarding.

What is this strange thing, this x11 forwarding?

Well, when you’re connected to another computer via SSH you can use the terminal to control the computer. That’s great, but what if you want to use a GUI application? Sure, you could set up some sort of remote desktop application, such as VNC. Or, alternatively, and often more simply, you can just forward graphic applications over SSH. It’s remarkably easy!

Perhaps a picture is in order. Check this:

gedit in action
That’s GEdit running on a different computer, but forwarded to this one. Pretty neat, huh?

That’s right. That’s GEdit running on my laptop. I’ve just forwarded the GUI application to this computer. If I write something and save it, it’d be saved on the computer that I’m connected to and not the computer that I’m using.

Amusingly, I used this exact process just recently. I had to move a complex password to my laptop and I was being lazy. So, I opened GEdit remotely and pasted in my password, transferring my new password to the other device. See? It comes in handier than you might think.

Let’s Enable x11 Forwarding:

How do you do this? Well, first you need to crack open your terminal. To do that, you just press CTRL + ALT + T on your keyboard and your default terminal emulator should open.

Now, in said terminal, you need to run the following command:

Once you have that file opened with nano, you just need to remove the appropriate pound sign (“uncomment” it out) for the right line. Look for the line that says:

And change it to:

Then save the file with nano by pressing CTRL + X, then Y, and then ENTER. (You may want to learn that, as that’s how you save files in nano.)

Next up, you’ll restart the SSH service and be done with it:

And that’s it! You can now use x11 forwarding over SSH. To do so, you just need to add the -X switch. That’s not as complicated as you might think. Nothing in this article is all that difficult.

To try to make sense of that above command, if I were to remotely connect to the MSI laptop, then my command would look just like:

You can also use the IP address, instead of the hostname, just like we discussed in the previous article about SSH. To do that, it looks like this:

x11 Forwarding in Action:

Once you’re there, just go ahead and start an application. For example, open gedit by typing just that into the terminal. You may find some applications won’t work, often due to ownership and permissions issues, but you’ll find many that work just fine. If you find one that doesn’t work, you can always check any errors thrown and go from there.
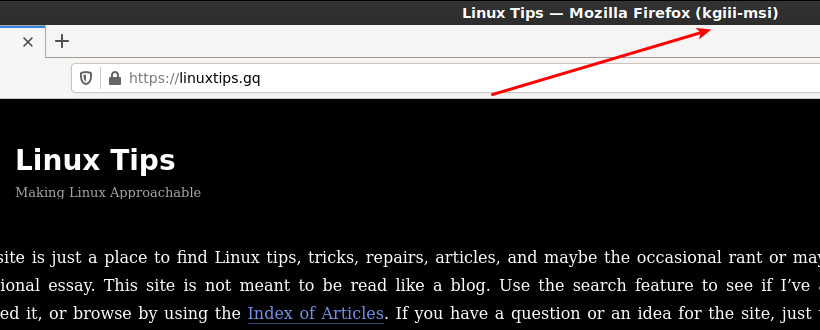
Firefox forwarded over SSH
See? Note the carefully drawn arrow that shows where it was forwarded from. Tada!

That’s an example of Firefox forwarded over SSH using x11 forwarding and you may notice the washed out look. I haven’t really dug into it, but I am reasonably confident that washed out look is because of compression. I’ve never needed to dig into that and, amazingly enough, I don’t know everything.

Conclusion:

Anyhow, there you have it. One more article in the books and one more bit of knowledge plastered across the internet. Thanks for reading! If you want to help, you can donate, you can share the site on social media, you can vote to show what type of articles you enjoy, and sign up for the newsletter. You can even buy inexpensive hosting and start your own site while supporting this site or write your own article!
Install SSH to Remotely Control Your Linux Computers

If this article’s headline looks vaguely familiar, it’s probably because I previously wrote an article that told you how to install SSH. That article was on the earlier site. This article will show you how to install SSH, so that you can remotely control your Linux computers.

The old site, while up, will redirect to this address. It’s also a bit of a misnomer. We’ll be installing ‘OpenSSH‘ and enabling SSH. SSH is the protocol, OpenSSH is the application, specifically the ‘openssh-server’.

Let’s say your computer is in another room, in another state, over in another country, or perhaps on another continent entirely. How are you going to manage it? Servers are scattered across the world and it is not even remotely economical to send a person to administer each one of them in person. You’ll need to manage these devices remotely.

One of the best tools for this job is SSH.

As a home-use note; SSH is perfectly suitable to manage my own router. It’s quick, easy, lightweight, effective, doesn’t require an attached monitor, and more. What’s not to like? I SSH into my computers all the time! In fact, right this minute I’m connected to two other computers via SSH!

SSH has been around since 1995 and it lets you issue commands on a remote computer. In fact, the man page describes it like this:

ssh — OpenSSH remote login client

Which, as you can guess, means it lets you login to remote computers so that you can control them. It’s a pretty handy tool to have in your toolbox and it’s actually simple to install.

Install SSH:

SSH is really the protocol, and you can do many things over it. OpenSSH is the application that we’ll really be installing. Once that’s installed, you can login to the computer remotely and manage it that way. I use it quite often.

My homemade router doesn’t have a keyboard attached. It doesn’t even have a monitor attached. It’s not like I can just easily walk over and deal with it. I just got a laptop that, and it’s only used to test Lubuntu. I don’t always want to have to go over to the device and physically use it to start the test.

There’s also my dedicated server in Las Vegas – and I live in Maine. It wouldn’t be practical to fly out to Vegas every few days to run updates on the server. It wouldn’t make financial sense to go out there every time the server needed to be rebooted!

Those are all situations where you can use SSH. It’s available in pretty much every default repository out there. I’m surprised more people don’t use it. To get started, you just open your terminal (press CTRL + ALT + T on your keyboard) and enter the following:

If you’re using a distro with apt:

If you’re using a distro with yum:

Simply adjust that for your distro. For example, in OpenSUSE you may have installed it during the OS installation process. If it wasn’t installed during the initial OS installation then it’s just called ‘openssh’ – if you want to install a few of the applications surrounding openssh. You can also do a ‘sudo zypper install openssh-server’ like the rest of us.

Anyhow, once you’ve installed it, you may not even need to start it. If you install it on Ubuntu, you can go right ahead and test it immediately. If your distro requires that you start it manually, you should do that.

Once you’re done, you can test it easily enough. Try this:

If that works, you’ve properly installed openssh-server and can now make use of SSH. You may also need to enable it in  your firewall. Chances are that your firewall knows what SSH is.

To connect to your device from a remote computer, you’d do:

You can use a specific username in that command, like demonstrated in the testing command just above this command. It’s not mandatory, but doing so will skip a step.

Closure:

You can expect a couple more SSH articles, as this is woefully incomplete. A lot more can be done with SSH, plus SSH should be properly secured. For most of you, behind a NATed router, you don’t really have to worry too much unless you enable port forwarding. If you’re making the port available to the world-wide-web, you’re definitely going to need to add some security. Otherwise, there are a few nifty things you can do once SSH is enabled. We’ll cover those in future articles.

You can also connect with your hostname – probably. In many instances, you’d do this (distro-dependent):

For example, to connect to my testing laptop, I use the following command:

Go ahead and play around with it. There’s a number of ways to help secure SSH and we’ll go over some of that in a future article. I’ve been maintaining the ‘article every two days’ thing for a while now. I see no reason to expect that to not continue.

Y’all have been chewing through bandwidth, so if you’d like to donate that’d be awesome. There are also ads that you can unblock. It’s very much against Google’s rules to ask people to click on them, but I can ask you to unblock them!

You can also register to help, write an article of your own, leave comments, vote on articles, sign up for the newsletter below, or even help support the site by buying inexpensive hosting. Equally important, please share these articles on social media! The more traffic, the happier I am – even if I’ve gotta pay for it myself! Until next time…

What is my Hostname in Linux?

For most of you, your hostname in Linux is going to be the same as your username. This article will help you figure out your hostname in Linux, and it should be a relatively short article. If this article looks familiar, it’s because it existed at the old site, but with far less information.

Let’s start at the beginning, by learning what a hostname is.

A hostname is generally meant to be a human-readable way to identify a computer. Yes, the computer is truly identified by the associated IP address, but the hostname resolves to that computer. It is meant to be easily remembered instead of having to remember a bunch of IP addresses. Without it, the web (and your own local networks) would be more difficult to navagate.

In many instances, it’s a FQDN (Fully Qualified Domain Name), such as a domain name like linux-tips.us. However, this site doesn’t have a dedicated IP address, so it’s known by a virtual hostname as a FQDN. If the site had been constructed differently, you’d be able to access it with the IP address. For example, https://172.217.10.14 will take you to Google (after some warnings).

So, your hostname in Linux isn’t always going to be the same as your username. For most of the readers here on L-T.us, it will be. You probably don’t really need to worry a whole lot about things like virtual hosts and stuff like that. But, even as a home user, you can make use of this information.

How is it useful? Well, if I want to SSH into my MSI laptop, I don’t have to use the IP address. Not only that, if the IP address changes then I don’t need to look it up. I just connect with something like:

You may notice that I added the .local. You too can just add .local with many distros, in others the default might be something like .localdomain – which you can keep as the default or change it easily enough.

So, let’s figure out how to find your hostname in Linux.

Find your hostname:

Let’s start by cracking open the terminal. You can use your keyboard to do this, just press CTRL + ALT + T and your default terminal should open up.

Now, we can try the following:

Or you can try:

Or you can also try:

As near as I can tell, one of those should work on all major distros. If it none of them work for you, please leave a comment letting me know what does work – helping those who come behind you.

Using Your hostname in Linux:

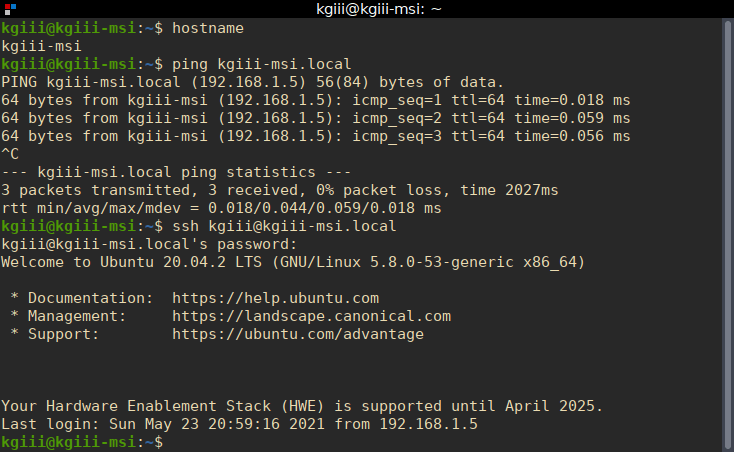
There are a number of ways that this information can be used. With many distros, as mentioned above, you can add .local to the hostname and just use that instead of IP addresses. Here’s a picture that shows a few examples:

using hostname in Linux
Instead of using the IP address, use the hostname. It’s a pretty handy feature.

There are, of course, other things you can do with this information. Those are just a few examples. The great thing about using a hostname in Linux is that you’ll not have to recall IP addresses. You’ll only need to recall a name – a name that you picked.

You can change your hostname, but that goes beyond the scope of this article. I’d expect to see an article about that in the future! In the meantime, if you can think of any ways that you’d use the hostname, please leave a comment.

Closure:

Thank you, my dear reader, for your viewership. Your comments and feedback keep me motivated and your feedback helps to improve this site. For those who have been keeping track, you can actually now click on large images to see the larger versions. This will only be for future articles, as I’m unlikely to go back through every previous article and change it. But, it was direct feedback that resulted in the change.

If you’d like to contribute, there are a number of ways. You can donate, write an article, unblock ads, buy hosting, and sign up for the newsletter. I promise, I’ll never share your email address with anyone and I won’t send you any spam. Until next time…

Linux Tips
Creative Commons License
This work is licensed under a Creative Commons Attribution 4.0 International License.