How To: Encrypt A USB Drive

So, today’s article will be a bit different, as I answer a question posed to me by way of the contact form – which is how to encrypt a USB drive. Being the nice guy I am, I answered the question. As I’m also often busy (or lazy), I also decided to turn this into an article. Why not?

I normally frown on people asking me questions directly. My usual suggestion is that they visit a forum and ask there. I usually direct them to Linux.org, where there’s a good forum filled with all sorts of smart people. That’s usually a sufficient answer, but this time I had a few spare minutes and typed out a response to them.

First of all, this was their question (I’ve removed all the superfluous stuff):

How would you encrypt a USB drive?

There were several sentences, a preemptive thanks, and some commentary about reading the site regularly. I decided to tackle this question but I was limited strictly to text because I was using email as my format.

But, if we start with the question, we can see an immediate problem. The question was ‘how would you’… Well, I’d crack open the terminal and use a tool called cryptsetup. That’s what I’d do. It’s a great tool and I’m familiar with its use.

However… That’s not what I’d suggest to the person asking the question. I did mention this to them in my reply, leaving the door open for more questions or for them to hit up their favorite search engine. Instead, I detailed another way to encrypt a USB drive. Yes, they used the word ‘drive’ and not ‘thumbdrive’. That doesn’t matter.

How To Encrypt A USB Drive:

The first thing you’re going to need for this is ‘Gnome Disks’. So, let’s go ahead and ensure you’ve got that installed, open your terminal by pressing CTRL + ALT + T and install the application. If you’re using apt you’d use the following command, but you’ll need to edit it for your package manager. (It’s almost certainly available in your default repos.)

Using Gnome Disks is a good idea. It’s fairly ubiquitous, easy to install, and doesn’t pull in a ton of dependencies when you install it. That means you can easily use Gnome Disks with pretty much any desktop environment out there with ease and very little fanfare.

Now, insert the USB drive. Don’t worry if it automatically mounts. Gnome Disks is smart enough to deal with that. Any data on this disk will be lost. It will be irrevocably lost. There’s no ‘oops’ button involved.

With Gnome Disks now installed (do not ask me why the command to open the application is different than the command to install the application), you can open it with the following:

There you go, you’re in a GUI now. You won’t need the terminal for anything else. (This would be easier with images, but I couldn’t really include images in the email reply without a lot of work and them potentially never even seeing the images due to reading the email in plain text format.)

On the lefthand part of the Gnome Disks window, pick the USB drive you want to encrypt.

On the right-hand part of Gnome Disks, click on the ‘gears’ icon and select the ‘Format Partition’ option.

Add a name for your encrypted USB drive in the next window. Then, say it is an internal disk (it’s all good) and tick the button to password-protect the volume.

In the next window, you will type your password twice. You’ll type it once and then type it again below that. This is to make sure you typed it properly. It’s a good idea to remember this password, ’cause this isn’t something you can just back out of and still have your data.

At this point, Gnome Disks will give you a warning about data loss. In the upper right, click the ‘Format’ button. Be certain about what you’re doing because this will erase data. Gnome Disks doesn’t care if the drive contained the only copies of your child’s birthday pictures.

Gnome Disks is kinda like a wolverine. Approach it with caution because it does not give a crap about your feelings.

Assuming the winds are in your favor, you should now have an encrypted USB drive. Test this by unplugging your USB drive and plugging it back in. When you plug it back in, it should ask you for a password. Enter your password to ensure you typed it properly in an earlier step. If all goes well, enjoy your encrypted USB drive.

Closure:

By the way, happy Mother’s Day (for those who qualify).

And so, that was more or less my answer to the inquisitive user. I don’t mind questions. I just don’t always have time for that, and often don’t know the answers. Of course, I did make a few changes. The actual reply I sent them was worded a bit differently in places. I think the above reads better and is more concise.

In this case, I think I got it right and they were able to encrypt their USB drive. I haven’t heard back from them since. It’d be nice if they let me know but they left me hanging. Ah well… If it’s wrong, someone will leave me a comment!

Thanks for reading! If you want to help, or if the site has helped you, you can donate, register to help, write an article, or buy inexpensive hosting to start your site. If you scroll down, you can sign up for the newsletter, vote for the article, and comment.

Disable Specific Terminal Commands

In today’s article, we’re going to learn how to disable specific terminal commands. It’ll be an interesting article because we get to explore some different tools. It might get a bit verbose, but I’ll do my best! It’s going to be a long article, but I’ll try to keep it at under 1500 words.

It should be noted that this is for people using the bash shell. As I don’t sway too far in that direction, I can’t vouch for it working with something like ZSH or similar. I simply haven’t tested. Feel free to try. I know some of the shell alternatives are compatible so you can check.

Read on to learn how to disable specific terminal commands!

Let’s say you don’t want your computer users (or you yourself)  to run a command in the terminal. Well, you can stop that command from being run easily enough. To do this, we’ll explore some new concepts and tools. One of those topics is ‘aliases’. Let’s just start there…

About Bash Aliases:

In short, bash aliases are alternate ways to enter in a terminal command. You type one thing and the system interprets it as an alias for another command. Let me explain this bit further.

Let’s say you want to run the following command:

Well, if you wanted to, you could assign an alias for those commands. If you wanted, you could even change your aliases so that all you had to type is:

You’ll run the full command when you’ve entered the alias. Aliases are basically little shortcuts to other commands, often used when you want to enter the command quickly and it’s a longer command. You can more or less alias anything with anything if you put enough effort into it.

Getting Ready For Aliases

Still with me? Alright, now you need an open terminal. If you don’t know how to open the terminal, you can do so with your keyboard – just press CTRL + ALT + T and your default terminal should open.

With your terminal now open, let’s check to see if you already have the necessary file. I am aware that you can just add aliases to your ~/.bashrc file, but this way avoids clutter and is more easily portable.

So, we need to check to see if you have ~/.bash_aliases. You can run the following command (from your home directory) to see if you already have the file you need. Simply run:

Now, scan the output from that command. Do you see a .bash_aliases? If so, skip ahead. If not, you will need to create the file yourself. One way to do so is by using the following command:

That command will create a blank file (named .bash_aliases) in your ~/ directory. It is the only file we needed to create and will be the only file we need to edit. You’ll also use nano, which my readers should be familiar with already. Don’t close your terminal yet, we’re still going to need it in the following section.

With just a few tools, we’ll learn how to stop specific terminal commands.

So then…

Disable Specific Terminal Commands:

I had to write that giant intro just to get a newbie up to speed. I’ve been meaning to explain aliases for a while, but I suspect the topic will get its own dedicated article. It’s a pretty broad subject.

For this next session, we’ll use a harmless ‘uptime’ command. Let’s just run that in the terminal just once:

Now, for whatever reason, we will have to pretend that you have decided you want to disable specific terminal commands and uptime is one of those commands. To do that, you’ll start with the following, editing the file you just created:

You will want to start a new line and the command is formatted like so:

For example, you can have an alias like this one:

Save the file with nano. It’s not too daunting a task to save the file. To save a file in nano, all you need to do is press CTRL + X, then Y, and then ENTER

In the above example, if you were to type ‘myip’ into the terminal and run it, it’d almost run the command you told it to run.

You’re almost there. There’d be just another step.

You’ll have to reload the aliases before the system recognizes it as such. I’ll explain how to do that in a second.

Now, if you want to disable specific terminal commands all you need to do is fill the <command> section with a blank space or two. As it is our example, we don’t want the user running this uptime command, it’d look like this:

See? Not all that complicated and we’re almost reaching the end – just one step further and your new alias will work as you’d expect – or not work, as one would expect in this case.

Make Your Alias Permanent:

First, to make that alias stick around you need to have saved the updated ~/.bash_aliases file as was explained above. At this point, the alias will not work. The file you wrote isn’t loaded into memory. It takes a bit more than that.

From here, you could close all your open terminals, log out and back, or reboot – any of those will reload your bash aliases. Alternatively, you can run the following command, which will refresh your terminal’s list of aliases. Like so:

If you’ve done everything properly, you’ll find that this happens when you try to next run the uptime command:

the user is unable to run a specific command - in this case the uptime commnd
That’ll teach ’em from trying to run that pesky uptime command! Catastrophe averted!

But…

If you want to disable specific terminal commands, you might be wanting to do so for security reasons. The ~/.bash_aliases file is owned by the user, so the user can just edit the .bash_aliases file to remove your edit.

So, what can you do? You can make it permanent for everyone. You can add it to /etc/.bashrc, and a user with limited rights won’t be able to edit the file. If they can’t edit the file, they won’t be able to remove the alias. They won’t be able to use the terminal command(s) you’ve aliased to nothing. If you were to simply edit the /etc/bash.bashrc you’d just start a new line at the bottom and then insert the aliases using the same format. 

I haven’t tested it, but I’d wonder if /etc/.bash_aliases might also do the trick in preventing user edits to override your changes. Feel free to test and then let us know. It’d be interesting if you could do something with /etc/skel/ and changing the file permissions – effectively for new users created.

Closure:

There… I think I’ve covered everything. I’ve wanted to write about the bash aliases subject for a while, but it’s just a bit complicated to explain. So, I figured I’d write this article. It’s a long one, but there’s a whole lot to cover. This goes into it pretty heavily, but an aliases-specific article might be nice to have.

Either way, you can now disable specific terminal commands. You can probably temporarily lock yourself out of your own system, so be careful with what aliases you add as system-wide aliases.

If you do lock yourself out, you should be able to boot to a live Linux disk where you’ll mount the drive and just revert your changes. But, anyone with physical access to your computer owns your computer, which is worth keeping in mind.

Thanks for reading! If you want to help, or if the site has helped you, you can donate, register to help, write an article, or buy inexpensive hosting to start your own site. If you scroll down, you can sign up for the newsletter, vote for the article, and comment.
Disallow Directory Listing (in the terminal)

In today’s article, and for no apparent reason, we’re going to learn how to disallow directory listing in the terminal. This seems like a good article for beginners to learn, and it seems like something most folks might like to know. So, if you want to disallow directory listing read on!

You never know when you might want some additional privacy, though I’d definitely not confuse this for strong privacy measures like encryption, amongst your files. Perhaps you’re planning on releasing a memo and you don’t want anyone to read it until you’re done?

I dunno? It’s up to you as to why you’d want the potential privacy from making it so that the files in a directory can’t be listed. Your reasons are your own. I just share tidbits of knowledge.

We will be using ‘chmod’ in this exercise. The man page for ‘chmod’ describes itself like:

chmod – change file mode bits

But, for our purposes and generally speaking, it’s used to adjust the file permissions. As you should know, files have various permissions in Linux – and everything in Linux is a file. There are read, write, and executable bits that can be set (with said chmod, for example) and there’s also file ownership (for another day). We’ll be using those permissions to prevent listing the files in a directory.

Ready? It really won’t take long – and it should be easy enough for anyone…

Disallow Directory Listing:

As the title suggests, this is another ‘in the terminal’ application. So, of course, you’ll need an open terminal. You should open a terminal now. If you don’t know how to open the terminal, you can do so with your keyboard – just press CTRL + ALT + T and your default terminal should open.

With your terminal now open, let’s first start by making a directory – just so that we can then use that to disallow directory listing. We’ll just do this in your /home directory. Start with:

Now, let’s move to the new ‘sample’ directory and make a couple of files.

Now, what we’re going to do is change the permissions of the ‘sample’ directory, like so:

You don’t need ‘sudo’ or anything, because these files belong to you. But, you can now test it. While still in the folder, try any of the following:

Or (from outside the directory, if you’d like):

In all cases, it should give you a ‘permission denied’ error, because you no longer have permission to list files from within that directory.

If you wish to reverse this, you can simply try changing the permissions again. You can just:

With that command, you can resume directory listing. So, it’s pretty easy to reverse the process. It’s also not the greatest security measure you can take, because of that. So, do what you will with it, as you now know how to disallow directory listing in the terminal.

Closure:

There you have it, it’s yet another article. This one seemed like an interesting one to write, so I figured I’d write it. You never know when you want to disallow directory listing, but now you know how to do so. If you have any questions, feel free to ask…

Thanks for reading! If you want to help, or if the site has helped you, you can donate, register to help, write an article, or buy inexpensive hosting to start your own site. If you scroll down, you can sign up for the newsletter, vote for the article, and comment.

How To: Access Tor While Using T-Mobile

Today’s article is going to be a fairly trivial article, one aimed at specific people, where you’ll learn how to access Tor while using T-Mobile. This article might be easy enough for a new user, so there’s that. Even if you’re not using T-Mobile, if your access to Tor is blocked, this article might get you sorted;

Where to begin?

Well, Tor stands for ‘The Onion Project’, which is a way to browse the internet in a more anonymous fashion. If you’re unfamiliar with Tor, it’s easiest if you just read the Tor history page.

Basically speaking, the Tor browser is a more secure way to access the Onion network. It’s a way to stay fairly anonymous online, but nothing is completely secure – so keep that in mind. You use the Tor browser (based on Firefox) to browse dark web sites with .onion domain names and have a good chance at anonymity if you stay within the .onion network.

I’ve lately used a phone as a mobile hotspot. The provider is T-Mobile. For reasons known only to them, T-Mobile blocks Tor, preventing it from connecting. At the same time…

There are some underground ‘hacker’ forums that I like to monitor. As T-Mobile is blocking access to that site, I had to figure out how to access Tor while using T-Mobile. It took a few tries, but I have now figured it out. I write this article to save you some time and me some memory…

Access Tor While Using T-Mobile:

First, you’re going to need the Tor browser (though you could manually mess around with connecting and then use another browser). You can download the Tor project browser here. If you’re unfamiliar and using Linux, you don’t actually install the Tor browser (unless you want to), you just extract it and use the shortcuts the archive includes. However, the Tor browser project is where I’d go and I’d adhere to their defaults.

Now, try as hard as you want to connect…

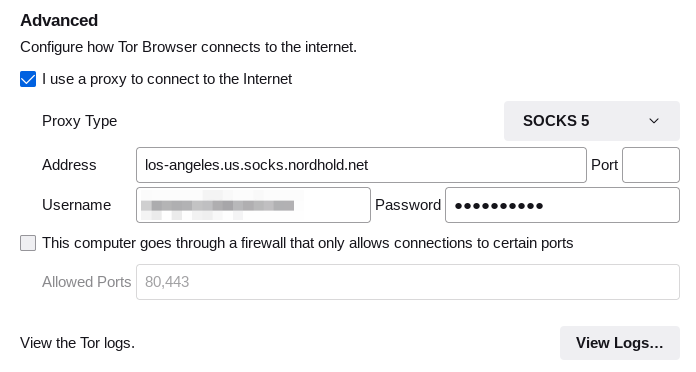
T-Mobile isn’t going to allow you to connect and access Tor. If you follow these directions, you probably violate T-Mobile’s ToS, you can work around it. In my case, I used NordVPN – but any free proxy that lets you set the connection manually will let you do the same. To be clear, I am using NordVPN as a proxy.

Open the hamburger menu. Select the Support option. When you open Settings, the Tor settings section should be the first section  you see. That’s good, it will save a lot of time. All you need to do is configure your VPN to work like a proxy. That’s pretty easy. So is finding a free proxy service.

I tried the bridge options and none of those worked. So, instead I decided to use the VPN option. Sure enough, that worked! So, find a free proxy (or VPN) that you can configure manually, You should check your paid VPN settings as they should let you manually configure it like a proxy. You can also try any one of the zillion free proxy lists out there.

Try this:

change the settings and use your VPN like a proxy.
Check your VPN provider for a ‘proxy’ setting and use that.

Be sure to set the proxy type correctly. If your VPN is even a little modern, SOCKS 5 is likely to be what you want. You should end up with something that looks like this:

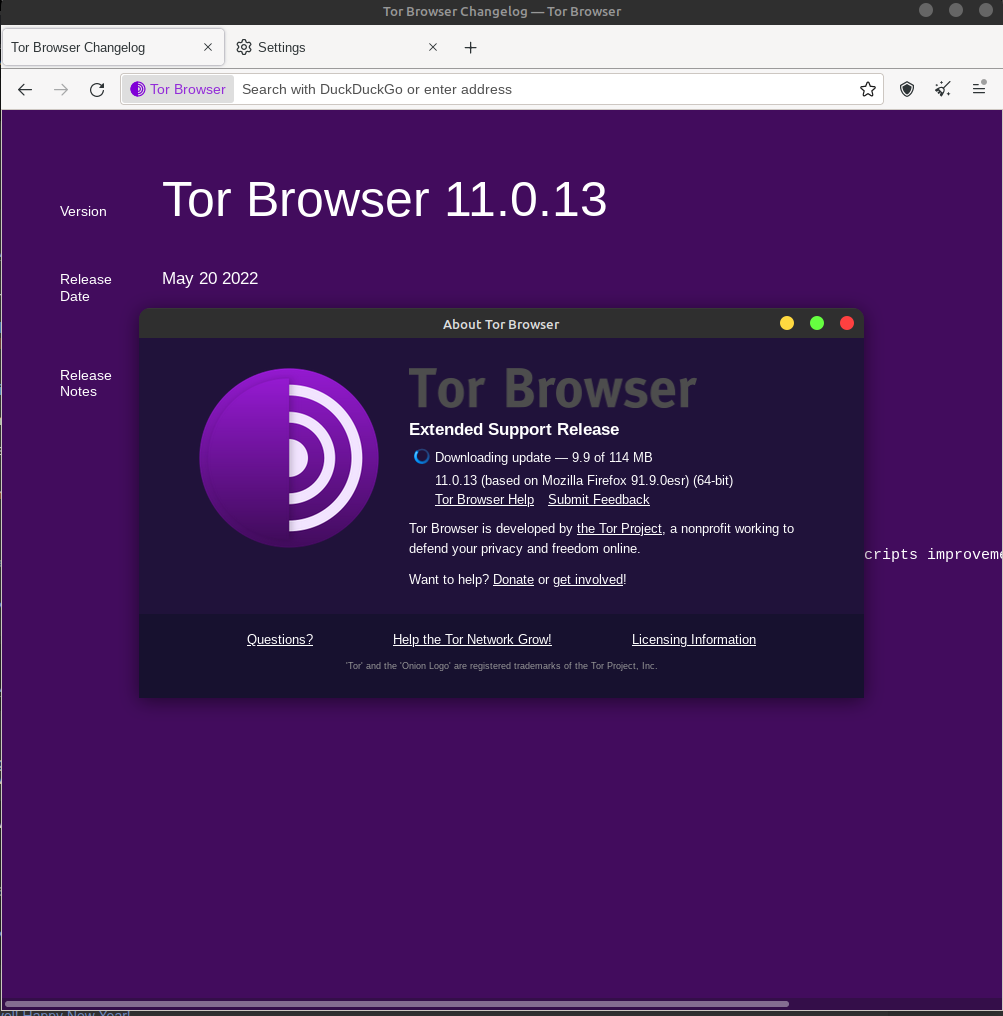
Tor browser connected with T-Mobile
You can indeed use Tor with T-Mobile. You can access Tor while using T-Mobile.

Also, you may need to reload Tor or grab a new identity, and then just be patient. Wait a minute to access Tor while using T-Mobile, as it can be a little slow. Adding the proxy means another layer, so it can take a little while longer. Plus, Tor has never been known for speed.

Closure:

There you have it, but you’ll only find this useful if you are wanting to access Tor on T-Mobile. This should work the same regardless of what OS your using. This article should work for Windows users, actually. If you want to access Tor while using T-Mobile, just use a proxy.

Thanks for reading! If you want to help, or if the site has helped you, you can donate, register to help, write an article, or buy inexpensive hosting to start your own site. If you scroll down, you can sign up for the newsletter, vote for the article, and comment.

How To: Cancel Your LastPass Account

This is just a PSA type of article, about how to cancel your LastPass account. Below are the reasons why you might want to cancel your LastPass account and how you can go about actually canceling that account.

Below is a copy of a recent email from LastPass:

Dear LastPass Customer, 

We recently notified you that an unauthorized party was able to gain access to a third-party cloud-based storage service which is used by LastPass to store backups. Earlier today, we posted an update to our blog with important information about our ongoing investigation. This update includes details regarding our findings to date, recommended actions for our customers, as well as the actions we are currently taking.

We thank you for your patience and continued support of LastPass.

The Team at LastPass

Click the link in the quoted text for more information.

I can no longer trust LastPass with my passwords and wanted to quit their services, closing my account. The only link I could easily find was at the bottom of their email – and that would simply unsubscribe you from their email list.

With the help of @Condobloke on Linux.org, I was eventually able to find how to close my LastPass account (so I’m told by LastPass). When closing my account, they asked for a reason. The reason I gave was:

I no longer have faith in your security

For the record, I had never used LastPass for anything. I had just signed up for an account. I never actually used the extension or their services.

Cancel Your LastPass Account:

The first link you’ll see is in their email, and all that option does is remove you from their mailing list. You’re ONLY unsubscribing to their email list, not actually removing your account. 

That’s this link:

http://417-klk-478.mktoweb.com/lp/logmeintransact/UnsubscribePage.html?mkt_unsubscribe=1

Link left plain on purpose. That link will ONLY remove you from their mailing list. It will not delete your account. So, I recommend deleting your account before removing yourself from the mailing list.

To delete your account, you need a link provided by @Condobloke:

https://lastpass.com/delete_account.php

Again, the link is left plain on purpose. That link will only get you started.

When you have logged in and clicked the button to remove your account, your account is still not deleted. You need to check your email and they send you an additional link. You can use that link to remove your account, remembering to confirm it when they ask time and time again.

When they ask you for a reason as to why you’re removing your account, you might want to tell them that it’s because you can no longer trust their security. They had the chance to be secure and failed. They might be making the ‘right steps’ now, but those steps should have been made before now.

What You Can Do:

If you’re going to use a password manager, you are better off getting one where you control the data. That means you want an ‘offline password manager’ that’s free and (hopefully) open source (so it can be audited, if need be).

I do not have enough experience with offline password managers to make a recommendation. I also am not going to be the one to suggest a specific product only to find out I sent you barking up the wrong tree. So, my suggestion is that you use your favorite search engine and look up ‘offline password manager’. Then, pick what you think works best for you.

I’ve done some looking and this article looks solid. I make no recommendations based on that link, it just looks pretty thorough to me. The article may contain errors and I’m not responsible for that, as I lack the time to dig deeper into this due to a rather impressive winter storm.

Good luck and do due diligence before deciding on a specific offline password manager platform. Read reviews, check security history, make sure it’s easy enough for you to use, and make sure it works with the software you intend it to work with.

Closure:

Well, I don’t use the ‘News’ category often, but this seemed like an important article to get out there. It’s time sensitive so it’s not going to be scheduled for publication, it’ll be published as soon as I’m done proofreading it.

Stay safe out there. Remember, “Practice safe hex!”

Thanks for reading! If you want to help, or if the site has helped you, you can donate, register to help, write an article, or buy inexpensive hosting to start your own site. If you scroll down, you can sign up for the newsletter, vote for the article, and comment.

EDIT: Fixed a typo.

Subscribe To Our Newsletter
Get notified when new articles are published! It's free and I won't send you any spam.
Linux Tips
Creative Commons License
This work is licensed under a Creative Commons Attribution 4.0 International License.