How To: Scan A Remote Host For Open Ports

In today’s article, we’re going to learn another way to scan a remote host for open ports. It’s actually going to be an easy article to follow, suitable even for beginners. Read on, I promise it’s not all that complicated! We can make this pretty simple.

There are a couple of reasons why you’d want to scan for open ports. You may want to know what ports you have open, or you may be interested in penetrating a remote host and want to know what ports are open (and things like what services are running on them).

This may seem  a little familiar. We recently used the ‘nc’ command to check if a specific port is open. You can (and should) read that article (it goes into describing ports, so it’s worth reading as I don’t want to duplicate the work) here:

How To: Check If A Specific Port Is Open

Again, if you’re not all that familiar with ports, you should read that article. It explains them in more detail.

The tool we’re going to use is ‘nmap‘, a familiar tool that’s used by security professionals, but can be used for our purposes just fine. It’s not all that daunting, which is why I feel even a beginner can learn to scan a remote host for open ports.

Installing nmap:

Alas, nmap is seldom installed by default. As such, you’ll need to install it. We’ll do that in the terminal. If you need to open a terminal, just press CTRL + ALT + T and your default terminal should open.

So, let’s get nmap installed:

Fedora/Derivatives:
Debian/Ubuntu:
RHEL/CentOS:

I know those should work, but nmap will certainly be in most default repositories. You should be able to install it with your package manager. Once you have nmap installed, you can check the man page to see how nmap describes itself:

There, you’ll see:

nmap – Network exploration tool and security / port scanner

Which, as you can guess, is a pretty good description. You’ll also notice that there are a whole lot of options. It’s a pretty complicated command. Don’t worry, we’ll make it easy for our goal, which is too…

Scan A Remote Host For Open Ports:

You should have an open terminal from the previous section. You’ll need that. While there are graphical tools for scanning for open ports, nmap is not one of them. You use nmap in the terminal, like so many of the great Linux applications.

So, then let’s start with the basics. If you want to scan a remote host for open ports, your best starting point will be:

For example, you could use Linux-Tips.us as a test:

Or you can use a computer on the same network via the hostname or IP address. That’d look like:

However, that command won’t actually scan all the possible ports. It only scans the 1000 most common ports, which is usually what you’re after. You can scan the entire range of ports if you want. That’d look like:

If you want, you can actually scan for a specific port to see if that port is open on the remote host. That’s a bit more complicated, but not much. Try a command that looks like this:

To try to make that more clear, see the following example to check to see if the default SSH port is open:

I’ve even made you an example image of the above commands:

a number of nmap commands being used to scan a remote host for open ports
As you can see, it’s pretty easy to use nmap to scan a remote host for open ports.

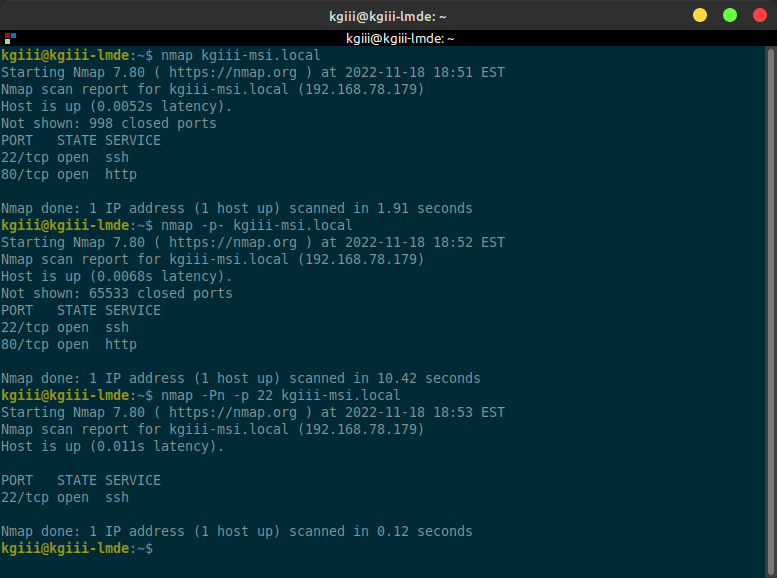
See? While nmap may seem daunting when you first check the man page, it’s pretty easy to use nmap to scan a remote host for open ports. It’s even easy enough for a newbie to use!

Closure:

Well, that’s another article. I have yet to run out of notes and I have yet to run out of ideas for articles. So, there are likely to be even more articles written. Eventually, I’m sure to run out – or need a break. But, for now, you have an article that tells you how to scan a remote host for open ports. It’s even easy enough for a beginner.

The nmap application is one of the first tools you’ll learn when you decide to learn about network security. If you want to probe a site for security holes, it’s important to know which doors are open and available for you to explore. Well, that’s where tools like nmap come into play and this article will get you started.

Thanks for reading! If you want to help, or if the site has helped you, you can donate, register to help, write an article, or buy inexpensive hosting to start your own site. If you scroll down, you can sign up for the newsletter, vote for the article, and comment.

How To: Check If A Specific Port Is Open

In today’s article, we’re going to learn how to check if a specific port is open. The command is simple, but versatile. It’s also pretty quick to check and see if a port is open. Read on, as I try to make it easy!

From a security standpoint, it’s a good idea to identify what ports are open, and what function those open ports have. From a usability standpoint, it’s good to know which ports are open so that you can connect to the device.

I suppose, as a general rule, you could probably assign ports to do all sorts of things. However, it’s actually standardized (in many cases) and specific ports will be open for specific things. 

You may have found yourself using different ports. If you owned a website, then the address to your control panel might be something like https://example.com:9000 or similar. Your server will have open ports for other things, like port 80 for HTTP or port 22 for SSH.

If you are curious, you can click this link to learn more about standard ports. If you’re new to the concept, then that link might actually help explain things better than I can. We do rely on standardized port numbers quite a bit.

When you’re browsing the regular web, you’re not necessarily aware but you’re using the site’s port 80 to get the public-facing web data. While you could host your site on a different port, it’d take some configuration changes on the back end. I suppose you could just do some work with htaccess if that was your goal, but it’s a pretty pointless goal.

Check If A Specific Port Is Open:

You should think of open ports as public information! They’re not secrets. It’s easy to find open ports, so you’ll need to secure them properly. It’s a good idea to know what traffic is happening on what port, as ports are open for a reason.

For example, there’s no security lost if I point out this site’s running on a server with port 80 open. Of course it’s open. That’s how you browse it. There are ways to hide your open ports, but that’s beyond the scope of this article. This article is just going to show you how to check if a specific port is open.

Like much of the time, you will need to have an open terminal. Of course, if you want to open your default terminal emulator, just press CTRL + ALT + T and your default terminal should open.

With your terminal open, you can just use ‘localhost‘ to test your own computer. For example, you might have an open port 80 or port 22 for SSH. So, to check those, your commands would look like:

You can also check remote servers. You can even check those on your network by using their IP address or their hostname. You’re familiar with my usage of ‘kgiii-msi.local‘, so we’ll use that.

That also works with this site and other sites on the internet. Just use the fully qualified domain name (FQDN) instead of an IP address. As an example, try the following command:

See? You have now confirmed that this site has port 80 open. Congratulations, you’re a 1337 h4X0R! But, now you can check if a specific port is open, a valuable skill to have. 

By the way, if the command appears to stop and not give you a result, press CTRL + C to halt the process. If the port isn’t open, and the server doesn’t respond to tell you that it’s closed, the command will keep running indefinitely. So, it’s good to know how to stop it.

Closure:

Again, this article has shown you how to check if a specific port is open. An open port doesn’t mean anything bad, necessarily. The command you’re using in this article will also try to tell you what traffic is expected on the open port. It looks a little something like this:

linux-tips.us has an open port 80 - just like every other site on the planet...
Oh no! Linux-Tips.us has an open port! (It’s fine. It’s how you’re seeing the site!)

Of course, that’s just http traffic, so try running the following command to see where you’re getting the https (secure) content:

That’ll show you that not only is the port open, but that that port (443) is used for https traffic, which is really what the site uses for you the reader. I obviously have https configured, updated, and properly implemented. I want you to have a secure connection, as secure a connection as you want.

Anyhow, this is getting to be a long postscript… This is turning into a fairly long article. We’ll see how many people read past the ‘CLOSURE:’ text! 

Think of ports like doors. Just because it’s open doesn’t mean you can go in and help yourself. Also, it’s not polite to go around knocking on random doors just to see if they’re open. Feel free to check this site, as I’m confident about the security.

Well, I hope you’ve learned how to check if a specific port is open. This seemed like a good thing to share. It’s also useful if you want to SSH into a remote computer and need to make sure the port is open as one of your debugging steps! (See?!? All the articles can be SSH articles!)

Thanks for reading! If you want to help, or if the site has helped you, you can donate, register to help, write an article, or buy inexpensive hosting to start your own site. If you scroll down, you can sign up for the newsletter, vote for the article, and comment.

Find Files Modified On A Specific Day

In today’s article, we’re going to do exactly what the title says, we’re going to find files modified on a specific day. Imagine that! We’re doing what it says in the title! I dunno why I write the things I do. But, I do have quite a few people reading, and hardly any of ’em complain!

So, why would you want to do this? Well, let’s say Big Bad John logged into your system on Friday. He was fired for drinking at lunch, but still had access to the system for another hour before security got around to hauling his butt out of the building.

Wouldn’t you like to know what files were changed on his computer that day, just to see if he’d done anything malicious? You might also have some weird system errors and want to know what files have changed today so that you can narrow down your search for the culprit. There are all sorts of reasons why you might want to know how to find files modified on a specific day.

We’re going to be using a simple command, and just one command. We’ll be using the ‘find’ function. There are surely other ways to do this, but we’ll use the find command. It works and it means you have a relatively short article.

How To: Find Files Modified On A Specific Day:

This article requires an open terminal, like many other articles on this site. If you don’t know how to open the terminal, you can do so with your keyboard – just press CTRL + ALT + T and your default terminal should open.

With your terminal now open, let’s say you want to find files edited on the day this article is published. To do that, you’d run this command:

For the sake of simplicity, the format is YYYY-MM-DD. You could use other date formats that are recognized by the system, but we’ll just stick to this date format as it’s nice and easy.

Now, you can also adjust your ‘maxdepth‘ value. If it’s a 1, it will dig down one directory deep. So, if you’re in your home directory, it’ll dig into ~/Downloads, ~/Pictures, ~/Documents, etc… If you change it to 2, it’ll dig into the sub-directories, like ~/Downloads/foo and ~/Documents/bar.

If you want to find files modified on a specific day, simply change the date in the command and start searching. It’s handy if you edited a file and can’t recall which file it was you edited. The command can be used for all sorts of things like that. Good luck!

Closure:

There you go… You have another article and this one teaches you how to find files modified on a specific day. It’s a short article with just one command. There’s no reason to pad the article further. It’s just the one command. Thanks for reading!

Thanks for reading! If you want to help, or if the site has helped you, you can donate, register to help, write an article, or buy inexpensive hosting to start your own site. If you scroll down, you can sign up for the newsletter, vote for the article, and comment.

Who is, Simply whois

Today, we’re going to learn about whois. There’s not much to it, so it won’t be a very long article. Think of this article as some of the others, where it’s not so much about the tool (the tool is simple to use) it’s about making folks aware of the tool and the capability.

Have you ever wondered about a domain name? Maybe you want to see if it’s registered? Perhaps you want to see who has registered it? Maybe you’ve noticed they have great uptime and want to see the name servers so that you can deduce the hosting company? Perhaps you want to file an abuse report, or you just want to know who the owner is so that you can send them an email. Maybe you’re a stalker and just need to narrow it down a little! (I kid, please don’t stalk anyone.)

Well, you can do that and more with whois! Want to know when the domain name expires so that you can swoop in and steal it? Well, you might be able to do that with help from the handy whois command! You can at least see the expiration date. I tend to keep things registered well in advance, ’cause I’m forgetful and don’t want to lose a domain name.

Unfortunately, quite a bit of information in whois databases is intentionally wrong. Sometimes, the information is quite useless. Certain domains, like this one, have requirements – so I have to use my real name in the registration information (though they never actually check). Other domain names aren’t so particular and you can lie, use email forwarders for abuse complaints and contact info, and generally hide that sort of stuff from whois databases. Ah well…

So, who is whois?

whois:

You might just as well crack open a terminal. If you don’t know how to open the terminal, you can do so with your keyboard – just press CTRL + ALT + T and something useful should happen.

With your terminal open, go ahead and install whois. It’s surely in your default repositories, so just install it like you’d install any other software. As is the tradition, I’ll show you how to do it in Ubuntu or any apt-using distro:

Now, all you need to know is:

You don’t need the http, nor the www, just use the domain name. For example, you can:

I should point out that that’s not really my phone number. You probably shouldn’t call it. If you somehow need my phone number, just ask in private and I’ll share it with you – assuming there’s justification for doing so. Also, please don’t stalk me.

Anyhow, you can see when the domain expires, tell that I use a CDN and which one I use, see when the domain was registered, find out who the registrar is, etc… You can learn quite a bit of information from just that one command. Combined with something like traceroute and you can learn a lot.

Closure:

Anyhow, now you know about ‘whois’ and a bit about what you can do with it. If you want to go digging around, you can learn quite a bit – even if the domain’s behind a privacy fence. There are other tools, like MTR and dig (which we haven’t covered).

Thanks for reading! If you want to help, or if the site has helped you, you can donate, register to help, write an article, or buy inexpensive hosting to start your own site. If you scroll down, you can sign up for the newsletter, vote for the article, and comment.

Subscribe To Our Newsletter
Get notified when new articles are published! It's free and I won't send you any spam.
Linux Tips
Creative Commons License
This work is licensed under a Creative Commons Attribution 4.0 International License.