Install And Secure MariaDB In Ubuntu

I’ve recently purchased a couple of new VPSes (spelling?) and so today’s article is about how you install and secure MariaDB. As mentioned before, some articles are just going to be me scratching my own itch. In this case, I have a couple of virtual private servers that are doing nothing more than costing me money. I might as well put them to good use.

So, what is MariaDB? It’s a database management system that’s a fork of MySQL. Oracle purchased Sun Microsystems in early 2010 and MySQL went with it. Quite a few people didn’t trust Oracle’s stewardship of MySQL, they were already known for their own database management system, and so MariaDB was born.

MariaDB is actually a fork of MySQL. MariaDB is also permissively licensed, while the newer MySQL has an enterprise version with proprietary code in it. MariaDB is completely open and works just fine under a number of FOSS licenses.

MariaDB is just as fast, and faster in some operations. It supports the native languages used with databases. It’s well supported with a vast number of installs running some of the largest databases on the planet. MariaDB is one of many MySQL forks, which is to be expected. After all, MySQL was the first of its kinda – a free database management system that was released at a key  point (mid 1990s) of Internet development.

In my observation, and despite all its goodness, MariaDB a testament to exactly how much people dislike and don’t trust Oracle! So, then, why not…

Install And Secure MariaDB:

As this is server related, you’re likely to be doing this in a terminal and you’re likely to be using SSH to do so. So, I’m going to assume you already have a terminal open, saving us some time.

Make sure you’re fully updated before attempting this, so:

Now, we’ll go about installing MariaDB. It’s trivial, just run:

That’ll take a minute and, when done, you can verify that the MariaDB service is up and running properly. That needs this command:

MariaDB should be installed and running – but it’s woefully insecure. In order to secure the MariaDB installation, you will want to run the following command:

It’s going to first ask you for your root password. You’ll enter your default root (sudo) password. One of the questions will let you assign a different password for MariaDB and it’s strongly recommended that you do so. For the other few questions, you can read them or you can just answer yes to all of them, as all of them are the best choices for securing your databases.

That’s actually all there is to it. You’ve learned to install and secure MariaDB. It’s one of the many steps you might take if you wanted to set up your own server, so be careful when you’re doing so and opt for the best practices.

Closure:

There you have it! It’s another article, this one tells you how to install and secure MariaDB. In some cases, rare cases indeed, you might want to open it up to connections outside of localhost. If you do that, be sure to open up the correct port in the firewall. Other than that, you’re good to go.

Thanks for reading! If you want to help, or if the site has helped you, you can donate, register to help, write an article, or buy inexpensive hosting to start your own site. If you scroll down, you can sign up for the newsletter, vote for the article, and comment.

Guest Article: Kickstart Vol. III

Today is the third guest article in a row, and is one more article about Kickstart. There will be more Kickstart articles, but we’ll release those in time. This is the third one in a row, so we’ll try to mix it up a bit.

By now, we should all have at least a little familiarity with Kickstart. Frankly, I’ve still not had a chance to use it – but it does seem like it’d be fun to play around with it. If I were an admin of anything major, I’d definitely look to Kickstart as a solution. Again, if you read this on day one, be sure to check back later as the author may suggest some edits.

See the previous articles here:

Guest Article: Kickstart Vol. I
Guest Article: Kickstart Vol. II

Kickstart Vol. III

Now we need to create a menu for your Kickstart, so you can select which OS you want to install.

Now edit a new file named grub.cfg. It must be named grub.cfg. Here is an example of what it should look like.

The set-default lets you pick which is the default install, it starts at zero, so the options here would be 0, 1 and 2.

Note the IP address of my Kickstart server is here, the path to my extracted iso directory is here, and the location of my boot kernels is here.You can change all of these to fit your needs.

Now we need the actual anaconda-kickstart.cfg files, this is what actually does all the work.The location of these, is set in the grub.cfg file above. You will want these to be in the extracted iso directory, but not in the “dvd” sub-directory.

Here is an example of what one of these would look like. This one is fairly basic.

Again you see the IP address of my kickstart server here, you see the location of my extracted iso files here.Now there are a few things you will need to know in advance.

What I typically do, is install the OS from a USB the first time.In the case of fedora/redhat/CentOS there will be a file at /root/anaconda.cfg. You can copy this file as a starting template for your kickstart of this OS.

(Yes I am re-naming the file here.)

Also you will need the password has strings for your users.

(Or whatever user name you use.)

You will need to know the name of the LAN interface, and you will need to know the size of your hard, and how big the partitions should be.All of these things will be in your anaconda.cfg file

Now change and edit a few things in your fed35srv/fed35.cfg file now.

Change the graphical install to..testskipx This uses a cli interface, not a GUI when installing.

Change the url line to the location of your extracted iso directory in your web server. Note you don’t put the full path, only the path from your webroot.

I like to turn off seLinux, but you can delete that line if you like.

Change your timezone to whatever is appropriate for you.

Using the two example user lines above (those aren’t real hashes, I just typed a bunch of random characters to simulate what it looks like). Edit the user lines to be whatever your values are.

That’s it, you’re don! Now boot your test computer on the kickstart network. A Kickstart menu should appear. Select the appropriate OS.

I’ve found this usually works best with a few settings on the test computer. CSM should be disabled. Network stack should be enabled. Some UEFI settings let you pick PXEboot IPv4 as a boot option. This is preferred. I’ve found it works best with a freshly formatted hard-drive, that way it doesn’t try to boot into the installed OS.

Good luck!

Closure:

And there you have it! You have a guest article, from dos2unix, about Kickstart. There are now three of them and there are a couple of others sitting in the potential queue. We’ll get to them. These few days off have been a very welcomed respite!

Thanks for reading! If you want to help, or if the site has helped you, you can donate, register to help, write an article, or buy inexpensive hosting to start your own site. If you scroll down, you can sign up for the newsletter, vote for the article, and comment.

Guest Article: Kickstart Vol. I

This is an article about Kickstart written by guest author, dos2unix from the Linux.org Forum. It’s the first of a few articles from them, so let’s give them a warm welcome and enjoy their article!

Kickstart Vol. I

Kickstart is really Redhat/CentOS/Fedora-centric. There are some attempts for parts of this work on Ubuntu and SuSE, but so far there is really little support for this. Kickstart does a lot of the mundane work for you. It sets up the filesystems for you, you control this size and format of them. It creates user accounts for you, sets up your network for you, and installs the packages you want to be installed (or not installed). You can even run a shell script automatically when everything is done.

Now if you only have one computer, and you only install the OS once a year, this isn’t going to save you much time. However if you have quite a few computers, for example a data-center with dozens or hundreds of servers. Or even a few test systems that have to be rebuilt every day or every few days. Then this can save you a lot of time.

The Kickstart computer itself doesn’t have to be anything fancy. In fact, it doesn’t even have to run one of Redhat type OS’s listed above. It can be Debian, Ubuntu, or whatever you like. It’s best if it has two LAN (Ethernet) interfaces. Most computers cannot be Kickstarted over WiFi yet. You can use a single network interface, but it makes things a little more difficult. If you have a lot of computers to Kickstart, I recommend that you get a small un-managed switch. 5 or 8 ports should be plenty, unless you’re at a data-center.I have worked in data-centers, but now I work at a place that writes software, and we test it over and over again, so I have to “rebuild” the OS sometimes several times a day.

Obviously you’ll need a computer to do this. If possible you’ll want a second computer to test on. One that will be the computer that’s being “Kickstarted”. You’ll need about 20 GB of free space on your Kickstart server to install .ISO images of the OS(es) you want to install.

Your Kickstart server will need three items installed. There are multiple ways to do this. We will discuss a couple of the most common ones. Perhaps a follow-up article will offer more options if there is enough interest.

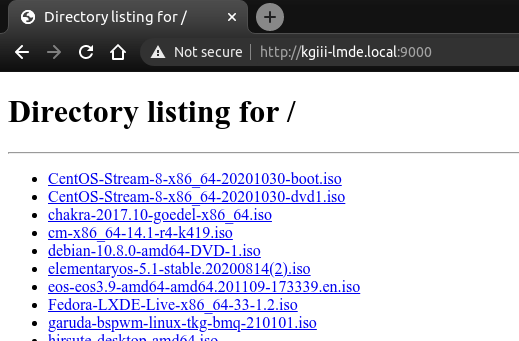
First you need a web server like Apache httpd, or NGINX, you could even use the simple Python web-server, it doesn’t matter that much.

Second you’ll need a DHCP server, again you could use either BIND or dnsmasq, we will discuss both ways. Finally you’ll need a tftp server. If you use dnsmasq,it has a tftp server of sorts built-in.

It’s beyond the scope of this article to teach you how to install these items, it is assumed you already know how to install software.Note that this will have to be on a different network that your normal home/work/datacenter network.

You don’t want Kickstart erasing, wiping out, and re-installing the OS’s on your every day driver. This is why I recommend one with two interfaces. Otherwise, you’ll have to re-configure your network to download packages, install updates,and add more packages if necessary, and then re-configure it back to your Kickstart network. That gets old in a hurry, trust me.

I’m using Fedora as my Kickstart server. I currently have configurations to install Redhat 8, Redhat 9, CentOS 8, Fedora 33, Fedora 34, and Fedora 35. I install all of these on 3 different computer hardware types. You don’t have to install the same OS that your Kickstart server is running. For this first example, I’m going to use NGINX as my web server, dhcpd (BIND) as my DHCP server, and tftp-server, as well… My tftp server. My Kickstart has two LAN interfaces, it doesn’t really matter too much how you have the first interface configured.

Again, it’s beyond the scope of this article to tell you how to configure your network interfaces, it is assumed you already know how to do this. You’ll want a static IP on your second interface.A gateway isn’t required, for this article, we can just 192.168.7.227, try to pick something obscure that no one else will use in the environment you are in. I will go ahead a use a /24 subnet or 255.255.255.0 for those who aren’t familiar with CIDR subnet masks.

Remember this IP address, it will be used in quite a configuration files. Again you can use any IP you like,but remember what it is, because you’ll need it several times.

So for Fedora, it’s a simple dnf install -y nginx dhcpd-server tftp-server, other OS’es may vary.

Once they are installed we will need to configure them.

The first one here is NGINX. On most Linux’s I have used, the nginx.conf file is located in /etc/nginx/nginx.conf. You have a “server section” in this file.It’ll say server with a { after it. Replace the contents of your server section with the content below. This assumes your web content will be at /usr/share/nginx/html you can adjust this accordingly. This will be where your extracted .iso images will live. So make sure you have space here (or do a soft link to another directory that has space). You can use SSL/HTTPS, but again that’s beyond the scope of this article.

I also recommend adding these two lines, below your access_log section. The other lines will likely already be there.

access_log /var/log/nginx/access.log main;

Now enable and start your web server. For Fedora it’s 
systemctl enable nginx
systemctl start nginx

Now we need to configure your DHCP server. For BIND (dhcpd) the conf file is usually located at /etc/dhcp/dhcpd.conf (not to be confused with dhcpd6.conf )

Just mv the dhcpd.conf to something like dhcpd.conf-original or whatever you like, just make sure it doesn’t end with “.conf”. Now make a new files and copy the following to it.

I’m using the entire 192.168.7.x subnet here. The IP address of my Kickstart server is 192.168.7.227.Edit this file and replace the values of your server/network accordingly. The range tells my DHCP server to only give out IP addresses between 10 and 120.

Now you may be wondering about that last line, what is the “next-server” and why does it have the same IP address as my Kickstart/DHCP server? The “next server” after I receive a DHCP address is the tftp server, it’s located at the same IP address. You could run it on a different server, but most people run it on the same server.

Again just like NGINX, let us enable and start the service.
systemctl enable dhcpdsystemctl start dhcpd

For the tftp server, you really don’t have to do much, by default tftp wants tftpboot to be at /var/lib , so…

Note this is a listening socket, not really a server per se.If you want to make sure that your tftp server if pointing to /var/lib/tftpboot you can run..
systemctl cat tftp.service

You should see a line like this somewhere:

ExecStart=/usr/sbin/in.tftpd -s /var/lib/tftpboot

I would recommend not changing this, as several configuration files will like in this directory.

Closure:

Honestly, I edited the above the best that I could – given that I know nothing about the subject. I appreciate the articles, but it means trusting dos2unix – and I’m perfectly willing to do that. If you have any questions, you can post them here or you can post them on the linux.org forum where I share this article (as that’s where dos2unix lives).

Either way, stay tuned – as this is just the first part of a series of articles handily written on this subject. I, for one, am going to probably use the break to get a few articles ahead so that the new year starts off right.

Thanks for reading! If you want to help, or if the site has helped you, you can donate, register to help, write an article, or buy inexpensive hosting to start your own site. If you scroll down, you can sign up for the newsletter, vote for the article, and comment.

How To: Start A Quick Python Server

Today’s article is going to show you how to transfer files between computers by using a quick Python server. It’s remarkably easy! It’s a temporary server (usually) and lasts only as long as you need it to.

Why would you do this? Well, you can transfer files from one computer to another. It also functions as an HTTP server which makes it easy to test things like simple web pages quickly and easily.

Are there better options? Quite probably. If you want to transfer a single file, then SCP is a good way to go about it. If you want to transfer multiple files, you could setup SFTP. If you want to test web pages, you can likely just write the files locally and then open them up with the browser of your choice.

You have options! And, thankfully, Linux provides all sorts of options – including setting up a quick Python server. As I said, it’s actually pretty easy.

A Quick Python Server:

This article requires an open terminal, like many other articles on this site. If you don’t know how to open the terminal, you can do so with your keyboard – just press CTRL + ALT + T and your default terminal should open.

The first command I want you to run will let us know what version of Python you have installed. Many distros have (at present) moved onto version 3, but some still have Python 2 installed. So, for that information you just run:

Now, if you have Python v. 2.x, you would use this command:

If you’re using Python v. 3.x then the command you’d use is:

(If you’re curious, the -m is telling Python which module to open.)

Anyhow,  you can now connect to your server with the following command:

Read how to find your IP address. Instead of an IP address, you can also use your hostname.

Anyhow, you  now have a server running on port 8000. If you want to, you can also change the port number. This is the same for both commands. In both cases, just append your chosen port number to the command. Like this:

It’d look a little like this:

See? It's a different port number.
Note the changed port number. You should probably avoid reserved ports.

When you’re done with the quick Python server, you can just close it by pressing CTRL + C. If you’re planning on running it long term, you can always run the command with nohup. If applicable, you may also need to open the port in your firewall.

Like I said, it’s a quick and easy server in Python. You definitely wouldn’t want to use this as a public facing server, but it’s fine for quick tasks. Feel free to leave a comment letting folks know how you use this in  your day-to-day tasks.

Closure:

There you have it, another article said and done! The site is going well and the schedule seems to be working well enough. It’s a bit demanding to write one every other day, but that’s what I said I’d try to do. So far, so good!

Thanks for reading! If you want to help, or if the site has helped you, you can donate, register to help, write an article, or buy inexpensive hosting to start your own site. If you scroll down, you can sign up for the newsletter, vote for the article, and comment.

Automatically Logout Of Your Shell

For security reasons, you’ll possibly automatically logout of your user sessions. If you didn’t know, you can actually do that with your shell, in the terminal. There’s already a variable (TMOUT) just for this reason, should you want to add it as a layer of security.

Basically, for today, we’re going to set it up so that it automatically logs inactive users out of their shell session. It doesn’t log you out of your complete user session, it just logs you out of your shell – after a set period of activity. It even closes the open terminal windows when it does so.

So, depending on the interval you use, you can set it up to log you out of your shell instances after just a few minutes of inactivity. If you have nosy neighbors, like people physically near your computer, it can be a nice way to make sure things are all locked before you head off to the bathroom.

It’s useful for that sort of stuff. It’s just an added layer of security. I think that it is a pretty handy feature. I’ll explain how to enable it on a user-by-user basis and how to make it system-wide, giving you a choice. It’s actually pretty easy, so read on!

Automatically Logout Of Your Shell:

Like most good things in the Linux world, you’ll need an open terminal to take advantage of this article. If you don’t know how to open the terminal, you can do so with your keyboard – just press CTRL + ALT + T and your default terminal should open.

Both of these ways are pretty simple, in each case you add some text (using nano) to a profile file. The text in either case is the same. If you want to do it for just one user, the user you’re currently using, then run the following:

Add the following:

So, if you wanted it to be 10 minutes of inactivity before being logged out, you’d use TMOUT=600, because 600 seconds is 10 minutes. As you’re using nano, you can press CTRL + X, then Y, and then ENTER to save the file.

You’ll then force the profile to load, the command taking effect immediately, with this:

If you want to do it with the full system, the online guides will tell you to edit /etc/profile and that it’ll work if you do. My experiences are different and this is tested across multiple systems. You’ll be editing /etc/bash.bashrc, just like you did above but with sudo. (Using /etc/profile has not worked for me.)

Again, you add ‘TMOUT=600″ or however many seconds you want to wait. Personally? I scrolled to the bottom of the file, made a new line, and added the text that way. You could be all professional and add a comment indicating when and why you were there. I did nothing of the sort.

Unlike the first command, you’ll not be able to reload the second method (system-wide configuration) with ‘source ~/…’. As near as I can tell, you’ll have to restart the system for the changes to take place. If someone has a way to load it without rebooting, I’ll update the article. Please leave a comment if you do know of a way!

Closure:

There you have it, another article! This one tells you how to automatically logout from your shell. I’m not sure if it works for all shells, so feel free to test and see what sort of results you get. I’m pretty sure the 2nd option could be reloaded without rebooting, but I can’t think of which command. Which service would need restarting? I dunno?

Thanks for reading! If you want to help, or if the site has helped you, you can donate, register to help, write an article, or buy inexpensive hosting to start your own site. If you scroll down, you can sign up for the newsletter, vote for the article, and comment.

Subscribe To Our Newsletter
Get notified when new articles are published! It's free and I won't send you any spam.
Linux Tips