Mastering The Power Of Linux Tee Command

I want to write an article that includes the Tee Command but it was one of those commands that I didn’t seem to be able to write properly. I wrote this article manually before I realized how much I was not too fond of the outcome.

So, I decided to lean on AI again. This seems like a fine article for AI to write, so let’s see how it did. (Hint: It did much better than I did…) I think I’m learning how to use AI as a tool to help me. That’s a good role for AI and is one of the reasons I’m not too worried about our future.

Mastering The Power Of Linux Tee:

In the vast landscape of Linux commands, few hold the versatility and power quite like tee. Often underestimated, the tee command is a true powerhouse for those who dare to delve deeper into its capabilities. If you’re ready to elevate your Linux command line skills, then it’s time to master the art of tee.

Understanding the Basics:

At its core, tee is a simple yet elegant command designed to read from standard input and write to both standard output and files simultaneously. Its syntax is straightforward:

This means you can use tee to capture command output and redirect it to multiple destinations, whether it be a file, a pipeline, or even another command.

The Power of Redirection:

One of the key strengths of tee lies in its ability to redirect output to multiple files. This comes in handy when you need to save the output of a command for later analysis while still seeing it in real time. For example:

This command will display the output of ls -l on the terminal and simultaneously save it to both file1.txt and file2.txt.

Piping Output for Further Processing:

Tee can also be combined with other commands using pipes to create powerful data processing pipelines. For instance:

In this example, the output of cat file.txt is simultaneously filtered by grep to find lines matching a certain pattern and those that don’t. The results are then written to different files.

Appending to Files:

While tee typically overwrites the content of files, it also supports the -a option to append to existing files. This can be useful when you want to continuously add data to a log file without losing previous entries. For instance:

This command will append “New entry” to logfile.txt without deleting its existing content.

Real-World Applications:

The versatility of tee makes it indispensable in various real-world scenarios. Here are a few examples:

Monitoring System Logs:

This command continuously monitors the system log (syslog), saves a backup copy to syslog_backup.txt, and filters out lines containing the word “error” to create a separate error log.

Debugging Scripts:

When debugging a script (script.sh), redirecting both standard output and standard error to a file using tee allows you to analyze any errors or unexpected output more effectively.

Capturing Command Output:

In the realm of Linux command-line utilities, tee stands out as a versatile and powerful tool. Whether you’re redirecting output to multiple files, creating complex data processing pipelines, or simply monitoring system logs, tee proves to be an invaluable ally. By mastering the art of, you unlock new possibilities for efficient data manipulation and analysis on the Linux command line. So, next time you need to capture command output or create intricate data workflows, remember the power of tee and wield it with confidence.

Closure:

Yeah, that sums up the tee command. AI really can do a better job than I can do with certain subjects. I wish I’d had this tool available for some of my more basic articles. AI would do a better job than I, as it certainly did with the tee command. I did have to edit this one quite a bit, but it’s an acceptable article. I might do more with AI but I did want to cover the tee command.

Thanks for reading! If you want to help, or if the site has helped you, you can donate, register to help, write an article, or buy inexpensive hosting to start your site. If you scroll down, you can sign up for the newsletter, vote for the article, and comment.
How To: Remove A PDF Password

This will be a straightforward task for anyone who would like to know how to remove a PDF password in the Linux terminal. If you deal with a lot of PDFs and want to remove the password, it’s a fairly easy task. Read this to learn more!

As mentioned before, PDF stands for Portable Document Format. This is a ratified ISO standard (ISO 32000) and is an open standard. You can see a bit about the PDF standard here on the ISO website. However, unless you have a subscription, they’ll want you to pay for this. I am not paying for this as I do not need to know the specifics.

Many people think that it’s proprietary because it comes from Adobe, but it’s an open standard and there’s a bunch of software available to manipulate and create PDF files. The standard has been open since 2008 which explains the myriad choices for editors.

Seeing as you’re here, you might as well read this interesting Wikipedia article:

History of PDF

PDFs can come with different levels of security. They can have passwords that lock the ability to edit the file and they can have passwords that you need just to open the PDF file.

This article assumes that you know the password! The exercise in this article only applies if you already know the password. I did write an article about cracking a PDF password, but that can take a long time.

How To: Crack A PDF Password

So then, which tools are we going to use?

poppler:

We’ll be installing a meta package known as poppler. This may come pre-installed on your system, or you may need to install poppler manually. We’ll go over installation instructions for a variety of distros, as it’s widely packaged and available in the various distro’s default repositories.

You’ll find that poppler is a meta package. That is, it contains other packages. In this case, poppler contains other applications that are used to manipulate PDF files. There’s no such thing as man poppler for example. It’s just the package name for a package that contains other packages. (That’s a meta-package.)

If you dig into it, you’ll find that poppler contains applications like pdffonts and pdfimages. At this point, we’ve previously covered pdftotext. This time around, we’ll be using pdftops. We’ve not yet used this tool in other articles, so now is as good a time as any to learn about it.

pdftops:

This pdftop application is mostly intended to turn PDF files into PS (PostScript) files but has other uses. Sort of like how a medication can be prescribed off-label, so too can you use this tool for other things. This time around, we’ll be using the pdftops to remove a PDF password.

If you had poppler installed already and checked the man page, you’d see something that should be close to this:

pdftops – Portable Document Format (PDF) to PostScript converter (version 3.03)

We’ll be skipping that whole bit about converting it to a file formatted for PostScript. That’s not necessary for our goal – removing a password from a PDF-formatted document.

But, this tool contains the necessary commands to remove a PDF password. If the file has multiple passwords it will remove the password specified. Your best bet is to remove the password that enables editing. This will also unlock the PDF for viewing purposes.

Remove A PDF Password:

If you want to remove a PDF password, you can use a GUI tool and then choose the ‘export’ option – or maybe the ‘save as’ option. In our case, and as mentioned above, we’ll be using the terminal to remove a PDF password. If you don’t know how to open a terminal, that’s usually accomplished by finding the application in your menu or by pressing CTRL + ALT + T on your keyboard.

With your terminal now open, we need to install the poppler meta package. I’ll include the commands as I understand them but you may need to doublecheck my work. Depending on your package manager, try the following:

Debian/Ubuntu/etc:

RHEL/CentOS/etc:

OpenSUSE/SUSE/etc:

Gentoo:

Arch/Manjaro/etc:

One of those should work with all the major distros out there. If you’re using an obscure distro with an obscure package manager, the poppler utilities should be available to you. You’ll just need to edit your installation command to match your package manager.

Also, if you do need to do that, please let me know. If you let me know, I can include the command in the article, thereby making the article more useful to more people. One of my primary goals is to be useful. It’s good to be useful to more people.

On to the meat of the article:

Removing A PDF Password:

As you’ve already got your terminal open, you might as well keep that terminal open. The application we’re using is pdftops and you can use the following command to ensure that pdftops is properly installed:

The output should look similar to this:

While you’re there, you can check the man page. There are many options available for the pdftops command and you can check them with this command:

Now that we’ve checked the man page, we’re looking for the -upw flag. That’s the flag that’s going to do the heavy lifting and the man page describes it like so:

Specify the user password for the PDF file.

So, you can see where this is going…

The syntax is quite simple. It will look like this:

If you want to specify the owner password, you use the -opw flag. You can pick which password it is that you’re using and the output file will not have that password. Specifying this flag will remove all restrictions, of course.

Let’s try to give you an example…

I wrote an article about how to crack a PDF password and I included a link. For the sake of clarity, you can now download that PDF file.

Example PDF File

The password for that file is ‘abab’ and not one of you took the time to crack it. I made it nice and simple for you, but not one of you took the time to crack the password.

Still, we can use that in our example:

Rather than converting to PostScript, we are just opening and unlocking the file. At that point, we’re redirecting that unlocked content to a new PDF file. In the process, we’re stripping the existing password, meaning you can easily access the file in the future – even if you’ve long since forgotten the password.

Closure:

I’m not sure how often you work with PDF files, but this might be something you can use. You don’t need to remember complex passwords unless you want to. Very few people are interested in maintaining a mental list of all the passwords they use.

It’s not like there’s a password manager for PDF files (as far as I know). You’re stuck referencing the original place the password was shared or keeping some sort of list. Well, you do have another choice. You can learn how to remove a PDF password in the Linux terminal and be done with it. It’s up to you.

Anyhow, I figured this would make a good article. I don’t mention PDFs often and don’t write many articles on the PDF subject. There have been a few of them but there’s always more to cover. Today we just covered how to remove a PDF password. Maybe we’ll cover something else in the next article – but I’m more likely to skip a few articles so that it’s not just PDF content for a week.

Thanks for reading! If you want to help, or if the site has helped you, you can donateregister to helpwrite an article, or buy inexpensive hosting to start your site. If you scroll down, you can sign up for the newsletter, vote for the article, and comment.

Seeing as you’re here, why not visit our friends at Blunix?

Here’s why you might just want to visit Blunix:

“Blunix GmbH offers Debian and Ubuntu focussed Linux Emergency Support 24/7, Project-based Linux Consulting, FOSS-based Managed Hosting on your company IaaS provider account as well as custom Training and Workshops. We prioritize fair business partnerships and employee quality of life over profit. We focus on reasonable security by default and encourage your employees and developers to keep things secure enough to avoid 99% of security issues with automated attack vectors. We focus exclusively on this and do partner with other companies to refer customers that do not fit exactly what we do, or where we require additional help (for example we have a security-focused company that we partner with for higher risk factor hosting setups).”

Click to visit Blunix GmbH

Turn PDF Into Text

Today’s exercise is simple, though it will rely on the terminal because we’re just going to turn PDF into text. This isn’t something complicated and it’s fairly effective. It’s also an exercise anyone can follow along with. So, if you want to turn PDF into text, read this article!

I’m sure this works in multiple distros, but I only have instructions for a few in my notes. Most everyone should be able to follow along with this article and turn PDF into text. You’ll see…

While I’m sure everyone is familiar with PDF, I’ll explain…

PDF stands for Portable Document Format and is one of many standards for documents. Specifically, it’s ISO 32000 and is a file format brought to use by Adobe. Adobe is a proprietary product but the standard is open, meaning you have your choice of PDF readers, editors, and creators.

On the other hand, PDF may not be as easily parsed as other file formats. You may also just want to extract some text from a PDF or turn it into something more information-dense, sans pictures and fluffy formatting. There are any number of reasons why you might want to turn PDF to text and it’s a simple operation that’s going to give you ‘acceptable’ results most of the time.

The tool we’ll be using…

pdftotext:

We’ll use a tool known as ‘pdftotext’ which does as its name implies. It’s a tool that lets you turn PDF into text, so from .pdf to .txt is the goal. Like many Linux tools, this is a terminal-based operation.

You can check to see if pdftotext is already installed with this command:

If the output matches this, you can skip the installation step:

If you want, you can check the man page and see that it is indeed the correct tool for the job if your job is to turn PDF into text. That’s this command:

That command will show you that the description is indeed what we want to accomplish in today’s article. That description is basically:

pdftotext – Portable Document Format (PDF) to text converter

(It may also tell you the version in that section, which is odd but is what it is.)

So, you can see that pdftotext is the correct tool for the job when you want to…

Turn PDF Into Text:

As I mentioned in the intro, if you want to turn PDF into text one of the ways to do so will require using the terminal. There are all sorts of GUI tools you can use to do this very same job, but we’ll do this in the terminal. So, you can usually get away with pressing CTRL + ALT + T to open your default terminal emulator. Otherwise, check your application menu and you’ll find a terminal option in there.

With your terminal open, we first will install a meta package so that we can use pdftotext to turn PDF into text. That application is ‘poppler’. You can pick from the following to match your package manager to install this.

Debian/Ubuntu/etc:

Arch/Manjaro/etc:

RHEL/Fedora/etc:

The poppler package contains pdftotext which is the tool we’re after in our quest to turn PDF into text. It’s a noble quest!

Now, the syntax is quite simple:

That will create a <file_name>.txt file in the same directory.

Now, if you checked the man page above, you’d see that there’s not a whole lot to this application. You can largely ignore all the options (and we will), though there aren’t that many.

The two options we are most interested in would be about just converting single pages into text. For that, you want the -f (first page) and -l last page flags. They do exactly what you’d expect and the syntax is as follows:

I’ll give you an example…

Let’s say you want to print pages 1 through 3. The syntax would be:

Sometimes this whole pdftotext thing doesn’t do a great job. If the PDF file is formatted in a fancy manner, it may just not come out in text all that well. Fortunately, PDF is an open standard and you can help it along with the -layout flag. 

The -layout flag is described like this:

Maintain (as best as possible) the original physical layout of the text. The default is to ´undo’ physical layout (columns, hyphenation, etc.) and output the text in reading order.

So, that flag will do its best to turn the layout into what it was in the original PDF. This is a handy flag for when the output isn’t usable. It’s possible to retain columns, advanced formatting, and all of that stuff, meaning the text file output is more useful. You won’t always need this option, but it can come in handy. You can safely ignore the remainder of the man page for the vast majority of what folks are going to do with this command.

That’s pretty much all you need to know about the pdftotext application. It does what you think it’d do. It’s the tool you use to turn PDF into text, just like it says on the tin! Pretty handy!

Closure:

So, that’s an article… 

If you’ve ever wanted to turn PDF into text, you now know how. You can use this to make a PDF easier to parse, easier to read, etc. It’s up to you how you use pdftotext. You now have the knowledge! You now have the power! Indeed, you have life by the horns. (Which is a rather silly place to grab onto.)

Man, this is a lot of articles… At this point, it’s almost habitual. Technically, I have published something every other day – for a long time. A couple of those articles weren’t really articles. They were placeholders because Mother Nature is a fickle beast and I live in a very remote location. We had a few major (deadly even) storms that took out our infrastructure. I think I can be forgiven for that – and I did upload articles saying that there’d be no article. 

The site has come a long way…

I haven’t done a meta article in a while…

Seriously, without you (my readers) I’d have never kept going this long. It’s obviously not a money-making operation, but it is an educational operation. That’s more important than money.

Thanks for reading! If you want to help, or if the site has helped you, you can donate, register to help, write an article, or buy inexpensive hosting to start your site. If you scroll down, you can sign up for the newsletter, vote for the article, and comment.

Show USB Devices In A GUI In Lubuntu

Today’s article will be easy to follow and is for those who’d like to show USB devices in a GUI in Lubuntu. Though truth be told, this is applicable for other distros. I’ve just tested it on Lubuntu and Linux Mint.

I want to assume that all my readers are familiar with USB. There are all sorts of things that can use USB, which stands for Universal Serial Bus. You can plug in USB storage, fans, power devices, and (with USB C) even connect external monitors or graphics cards. The standard has existed since 1998 and the most recent version is USB4. It has come a long way.

Linux is pretty good at enumerating USB devices and can use many of the various USB-powered tools. It’s possible to show the USB devices in the terminal, of course. I just figured I’d cover a way to do so graphically. You never know who wants to show USB devices in a GUI, so why not cover it in an article?

I’ve covered ways to show USB devices before. I’ve done so multiple times, so it seems. Click one of the links below to view another article.

Show Your USB Devices In The Linux Terminal
A Little About The ‘lsusb’ Command.
How To: List USB Devices

As this article is for Lubuntu, I’ll give directions as though you’re using Lubuntu. This is going to work on any Debian/Ubuntu-based operating system. The tool we’ll be using is also available for Arch and, I assume, other package managers.

So, what will we be using?

usbview:

We’ll be using a small application known as usbview. This is available in your default repositories and is easy to install. I’ll cover the installation methods below.

If one were to check the man page, you’d see it’s the right tool for the job.

usbview – display information on USB devices

Further, you can see this on the man page:

No command line options are accepted by usbview.

So, usbview a graphical (GUI) tool. There are no options for the terminal – but you’ll need to start it from a terminal. For reasons beyond my knowledge, there’s no application menu added when you install usbview. That’s something to keep in mind. It’s a GUI tool – but you start it from the terminal. Got it? Good!

Show USB Devices In A GUI In Lubuntu:

As mentioned above, you’re going to need an open terminal. As you’re using Lubuntu, you can just press CTRL + ALT + T and your default terminal should open.

With your terminal open, you first install usbview…

That’s nice and simple.

Now, you can run usbview with this command:

Yes, you need elevated permissions. It throws an error otherwise.

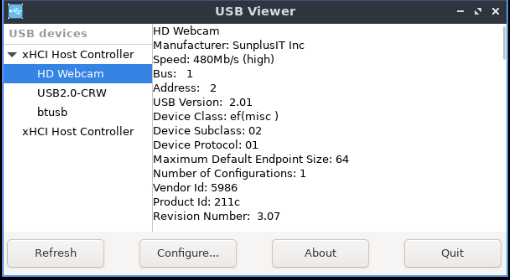
You’ll get a new window that looks something like this:

using usbview to show usb devices
This is pretty self-explanatory, though I don’t have much plugged in.

You can not only view USB devices, you can learn more about them. There’s not much to configure and you can ignore all the buttons except the Quit button. You’ll want that to quit the application.

But, there you go… That’s how you show USB devices in a GUI in Lubuntu!

Closure:

Anyhow, now you’ve learned how to show USB devices in a GUI in Lubuntu. This is a good thing and something you can trivially apply to other distros. I’m sure there’s a way to build usbview if you don’t already have usbview in your repositories. If graphically viewing USB devices is your goal, usbview is a possible solution.

Thanks for reading! If you want to help, or if the site has helped you, you can donate, register to help, write an article, or buy inexpensive hosting to start your site. If you scroll down, you can sign up for the newsletter, vote for the article, and comment.

Seeing as you’re here, why not visit our friends at Blunix?

Here’s why you might just want to visit Blunix:

“Blunix GmbH offers Debian and Ubuntu focussed Linux Emergency Support 24/7, Project-based Linux Consulting, FOSS-based Managed Hosting on your company IaaS provider account as well as custom Training and Workshops. We prioritize fair business partnerships and employee quality of life over profit. We focus on reasonable security by default and encourage your employees and developers to keep things secure enough to avoid 99% of security issues with automated attack vectors. We focus exclusively on this and do partner with other companies to refer customers that do not fit exactly what we do, or where we require additional help (for example we have a security-focused company that we partner with for higher risk factor hosting setups).”

Click to visit Blunix GmbH

Generate A Process Tree

This shouldn’t be a very long (or complicated) article as we’re simply going to cover one way to generate a process tree. This is more useful than it may sound, especially in process management.

We’ll be doing this in distros that support apt. So, that’d be distros like Debian, Ubuntu, Linux Mint, Elementary, and many others. That’s distros within the Debian family. That’s a good chunk of the available distros, so this will apply to many of you.

It’s not that this won’t work on other distros. It’s that I haven’t tested this on other distros. You can likely follow along and figure it out with your package manager, I’ve just not done so. I do have a limited amount of time and the only human resource I have is myself. Man, I could use an editor!

For the record, this seems like something you’ll find installed by default on any major system. You may not need to install anything at all. This might just be already available.

Anyhow… About processes…

Everything running on Linux is a process. There are a whole lot of processes that make up a running system. For the most part, you can ignore all this and keep computing. However, when you troubleshoot a system you may be interested in which processes are running. If you’re recovering from a slow system, you may be interested in killing processes.

One process may spawn other processes. For example, you may have a browser with open tabs. The browser is itself one process. The open tabs may be separate processes. This is a good thing for things like compartmentalization and even security, but that’s outside of the scope of this article.

So, what tools will we be using?

psmisc:

I believe the correct term for psmisc is that it’s a meta-package. That is, psmisc is a package that contains some other tools. If you want to follow along with this article, that’s the package you’ll likely want to install. I’ll cover installing it with apt, which is nice.

If you’re interested in psmisc, here’s the psmisc project page. The package includes the following applications:

  • fuser – Identifies processes using files or sockets
  • killall – kills processes by name, e.g. killall -HUP named
  • prtstat – prints statistics of a process
  • pslog – prints log path(s) of a process
  • pstree – shows the currently running processes as a tree
  • peekfd – shows the data travelling [sic] over a file descriptor

Of these, we’re interested in ‘pstree’. We have mentioned the killall command before and chances are that you won’t need to install anything for this at all. I did mention that above…

pstree:

This is the tool we’ll be using to generate a process tree. It comes with the above package and is one of those tools I think is likely available by default. I’ll cover how to use apt to install it below, but it seems like one of those things that you’re going to find on other distros. You’ll likely find that it’s installed by default on all those distros.

You can verify that you have this available with the following command:

The output should match this:

Don’t worry if that’s not available, we’ll install it below.

If you want to generate a process tree, you’ll see that the man page confirms that this is a good tool to do so, though the name should have clued you in. To read the man page, just run this command:

See? It’s not all that involved. It’s a pretty simple application.

Generate A Process Tree:

To generate a process tree in Linux, you’ll need an open terminal. Well, if you’re going to use pstree to generate a process tree in Linux, you will need an open terminal. Most of you can just open a terminal by pressing CTRL + ALT + T on your keyboard.

With your terminal open, let’s make sure that you have installed psmisc.

Now that you have psmisc installed, you can use the pstree command. Don’t blame me for this, I didn’t do it. 

You can simply run the command as it stands:

However, I previously wrote this article:

How To: Kill Processes By Their PID (Process ID)

I want to tie into that article. You can use the pstree command, which is a nice and easily understood output, to show the PID. That command would look like this command:

However, there’s a more useful command for those dealing with sudden issues. You can use a flag known as --color=age to get an idea about how new the processes are.

Green would be within the past 60 seconds, yellow would be within the past hour – or so I’m told. Every time I try, it shows up red. You can try it if you want, like so:

Good luck with that one! Seriously… Good luck!

Even if that doesn’t work, you can now generate a process tree to show the running processes on your system. This seems like a good thing to know.

Closure:

I was recently asked if I was running out of ideas for articles and the answer I gave them was that I am not. There’s always something to write about, even if it’s just a simple task like generating a process tree. Ideally, these articles will stand as a solution for those with specific problems. This is one of those articles.

Don’t forget that you can sponsor an article!

Thanks for reading! If you want to help, or if the site has helped you, you can donate, register to help, write an article, or buy inexpensive hosting to start your site. If you scroll down, you can sign up for the newsletter, vote for the article, and comment.

Subscribe To Our Newsletter
Get notified when new articles are published! It's free and I won't send you any spam.
Linux Tips
Creative Commons License
This work is licensed under a Creative Commons Attribution 4.0 International License.