Terminology: View Pictures And Video Directly In Your Terminal

Have you ever wanted to view pictures, watch videos, or listen to music directly in the terminal? No? Me either! But, with Terminology you can! The bad news is that it means completely changing your terminal to a new one, or at least using a different terminal when you want to do these things.

If you’re interested, read: Let’s Learn How To Change The Default Terminal

If you can find a way to view media in Terminator, or a ‘regular’ terminal (not to open it in a different application from the terminal), then please let me know. Try as I might, I can’t find a way to do that. If you know a way, please let me know! The idea of quickly checking through images in the terminal appeals to me. None of the rest really appeals to me, but appealing to me isn’t actually a prerequisite for this site!

Anyhow, as near as I can tell, there’s no way to do these things except to pick a terminal that has those features built in. Fortunately, sitting in my notes was a reference to “Terminology”, a terminal emulator that’ll do just that. I suppose this counts as a review of sorts, and so I’ll treat it a bit like that.

About The Terminology Terminal:

Terminology comes from the Enlightenment folks and is built with ELF. ELF, it turns out, stands for “Enlightenment Foundation Libraries”. Those are the base libraries behind the Enlightenment window manager. So, if you’ve used Enlightenment as your window manager, you may have already encountered Terminology. And, if you’re interested in the Enlightenment window manager, click here

Terminology, according to them, has “whole bunch of bells and whistles.” And, well, they’re not wrong. For example, scrollback (the history of commands) is stored in RAM rather than written to disk. This adds some session security and is a great feature – unless you actually want that data stored. 

Not only does Terminology understand email addresses and URLs, you can use it to find the Gravatar associated with an email address. It seems that it can even display files like PDF, PS, DOC, and more directly inside the terminal itself – and it properly scales them. If you take the time, you can also highly customize it to suit your needs.

You can read more about it here. It’s bound to get more features as time goes on, and it’d be just silly for me to copy and paste all the information on that page. Just read it yourself! That’ll save me some time!

Get Terminology Terminal Emulator:

Chances are good that Terminology is already in your default repositories. But, you should be aware, installing Terminology will add a whole lot of dependencies. If you’re worried about disk space or adding system overhead, it should be noted that it pulled in over 80 MB worth of dependencies on a stock Ubuntu build. It relies on the above mentioned “ELF” and that means it’s a lot to add for just a terminal.

Beyond that, it’s likely easy enough to install. Just crack open your current terminal by pressing CTRL + ALT + T and pick the correct command for your system:

Debian/Ubuntu:

Arch/Manjaro:

SEL/OpenSUSE:

RHEL/Fedora:

Pick the right one for your package management system and it should install. If it doesn’t install, if it’s not available for your system, it’s possible to build and install – but that’s a whole lot of work ’cause of all those dependencies.

Use Terminology:

Now that you have installed Terminology, you can open it from your application menu – typically under a heading similar to “System Tools”. If you can’t find it, search for it. You could also open it from the terminal you have opened already by just using the terminology command.

To open a picture, video, or music file, it’s actually pretty simple. To open it directly in the terminal itself, it’s just:

You can also open it in a separate window, though I suppose that kinda defeats the whole purpose of this exercise. To open it in a separate window, you just change the command to:

Those are the commands to open the media files (pictures, videos, and music) in the terminal. They’re pretty neat and I’m sure you’ll get the hang of it. It aims to be fairly similar to xterm, so it should be easy enough to for anyone to get comfortable with it while providing powerful options beyond the ability to play media.

Closure:

As I said I’d review this, or at least treat it like a review, I’ll look at it from my perspective. There are no really compelling features for me to switch. If I did switch, I’d surely be comfortable customizing it to suit my needs.

It’s easy to change features like the default window size, colors, and fonts. You can find a situation where the additional features are beneficial and make it your own. Being able to make it your own is an important feature.

While those features are great, and it’s overall a speedy application, I’m comfortable giving it a solid 8 stars. It’s a bloated piece of software that is only going to appeal to a limited group of users. Yes, the bloat is necessary, but it’s still a terminal at the end of the day. If you’re that interested, you could look into using Enlightenment as your window manager.

So, download Terminology, play with it for a half hour, realize it’s not something you are going to use every day (or maybe decide that it is your new favorite terminal), and forget to uninstall it while it languishes in your application menu until the next major upgrade requires a clean installation. If nothing else, you can have some fun with it.

It may actually have some value for people and systems that are forced to work in the terminal and only in the terminal. Maybe you want to monitor a security camera without installing a full-blown desktop environment, or something like that? I could see situations where it may come in handy.

Thanks for reading! There’s another article in the books! If you want to help, or if the site has helped you, you can donate, register to help, write an article, or buy inexpensive hosting to start your own site. If you scroll down, you can sign up for the newsletter, vote for the article, and comment.
Use Sublime Text On Ubuntu (And Derivatives)

Sublime Text is a proprietary, closed-source, paid application with a free version that has most of the paid features. It’s a pretty solid text editor and it’s worth taking a look at it.

I covered my favorite text editors and Sublime Text got a mention, even though it isn’t in my top 3. It’s actually a very capable text editor, it’s just not in my top 3 list. I don’t have to be the target audience to recognize its potential! It’s great to expose folks to the application. Choice is a good thing and it could be in your top 3 list.

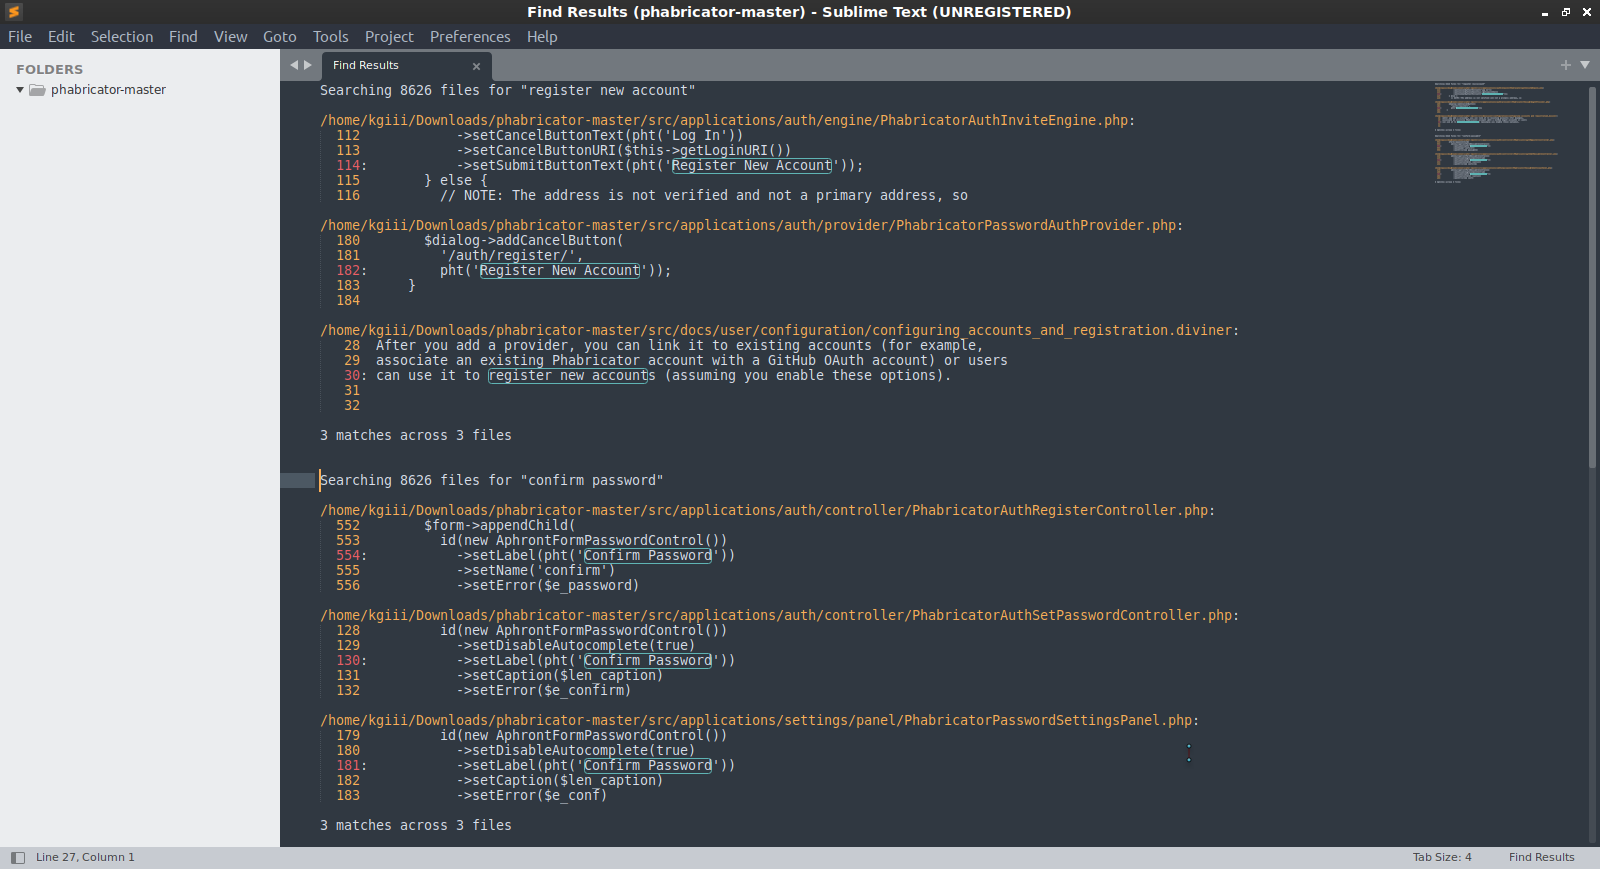
It has a great ‘find in files’ feature that works well and I’ll sometimes start the application just for that. Being able to find (and replace) text across multiple files in a graphical way is pretty great. They’re not alone in that feature, it just works well in Sublime.

In fact, Sublime Text has a tagline that reads:

Text Editing, Done Right

And, they’re not wrong. There are all sorts of ways to be right, as there are as many preferences for text editors as there are text editor users. Here, they’ve been making and selling Sublime Text for 13+ years and have loaded the application up with a ton of features.

And, indeed, there are a lot of features – from multi-tab select, to ‘context-aware’ autocomplete, to GPU rendering, to macros, projects, and more. It’s definitely aimed at programmers who work with large amounts of text.

While I could try to enumerate the many features and benefits, you can just try them for yourself. It’s a time-limited trial, but the application keeps working beyond the trial date. You can continue using it, or you can pay for it.

Install Sublime Text:

When installing Sublime Text in the past, I’ve come across convoluted methods to install it. The reality is that it’s just three (maybe four) commands. You don’t need to install a bunch of prerequisites. There’s no need to install other things to get it to work, it’s a fairly normal installation.

Note: This installs the ‘free trial’ version. It works wonderfully. At the end of the free trial, it’ll happily continue to work with most features still intact. There’s no ‘need’ to pay for the software. However, many people have found it useful enough to pay for it.

Let’s press CTRL + ALT + T to open the terminal and get Sublime Text installed! Remember, if you don’t like it, you can just as easily remove it.

If it’s not obvious, copy each line, paste it into the terminal, press ENTER, and make sure to pay attention to any outputs so that you can act on them. I don’t anticipate any trouble, but you can leave a comment if need help. You can also ask at (I’m a moderator) Linux.org if you get stuck.

Properly installed, it’ll look a little something like this:

sublime text finding text in files
Sublime Text being used to find a phrase in multiple files. It’s a great feature.

You may not need to run the sudo apt update from above. The system may automatically update the database after the repository is added. The other commands are probably all you need. It’s nothing convoluted and it “Just Works!®” Well, it just worked with a few local tests. It’s also worth installing this way to make sure that that Sublime Text gets updated with the rest of the system.

Closure:

And that’s it. Open Sublime Text from the GUI menu, probably entered under “Programming.” If you want to see the text information in your terminal that you already have open, it’s called ‘subl’. So, try subl -h to see what command line options you have. 

Thanks for reading! If you want to help, or if the site has helped you, you can donate, register to help, write an article, or buy inexpensive hosting to start your own site. If you scroll down, you can sign up for the newsletter, vote for the article, and comment.
TeamViewer; My Most-Recent Favorite Alternative To VNC.

Today’s article is going to be about my latest favorite VNC alternative, TeamViewer. It’s a surprisingly handy application that just works. Read on to learn more about it!

I’m a pretty big fan of VNC (Virtual Network Computing, from RealVNC). Actually, it’d be a bit more accurate to say that I’m a pretty big fan of remotely managing devices. Among the ways I do this, VNC is a nice way to do so graphically.

Basically, remote administration software such as this forwards the remote desktop to a window on my local desktop and allows me the control as though I was physically seated at the device. I have quite a few devices, and remotely manage the majority of them. I have computers in my house that I seldom physically use, I manage them all remotely. 

SSH is often adequate for anything I want to do, but not always. I can even forward SSH but not all applications work well with that. Sometimes I just want a GUI, as some things are best done in a GUI.

Besides, TeamViewer is free for personal use, and I like TeamViewer because it just works, even over the world wide web without knowing an IP address. I can use it to help friends and relatives by just talking to them long enough to get started.

Frankly, VNC can be a pain in the butt to configure and my favorite VNC client (RealVNC) is proprietary. So, using the proprietary TeamViewer doesn’t bother me. 

If you insist on opensource, this isn’t the tool for you. If you want something that is easy and just works, read on:

Getting and Using TeamViewer:

I’ll explain how to install it with Debian/Ubuntu/etc, but you can easily install TeamViewer for other Linux package management systems. Start by opening your terminal by pressing CTRL + ALT + T.

Once open, let’s grab the latest .deb with wget and install it. If you don’t have wget installed, you can do that with sudo apt install wget and then proceed with:

Copy and paste all three of those lines individually, of course. Press ENTER after each one. The last command should complete the process and would normally be the last step but this is proprietary software so you’ll need to run TeamViewer at least once in order to accept the license agreement. You can just do that in the terminal with:

That should pop up a window where can accept the license and keep on trucking.

Now, you’ll have to install TeamViewer on each device you want to manage and it’ll need to be installed on any device you wish to use to control the rest. Just be careful and read the prompts. It installs and works like a champ.

You’ll need to configure it on each device as well, allowing remote connections and setting up passwords as needed. It can check a centralized server, so the host doesn’t need to know things like ports and passwords.

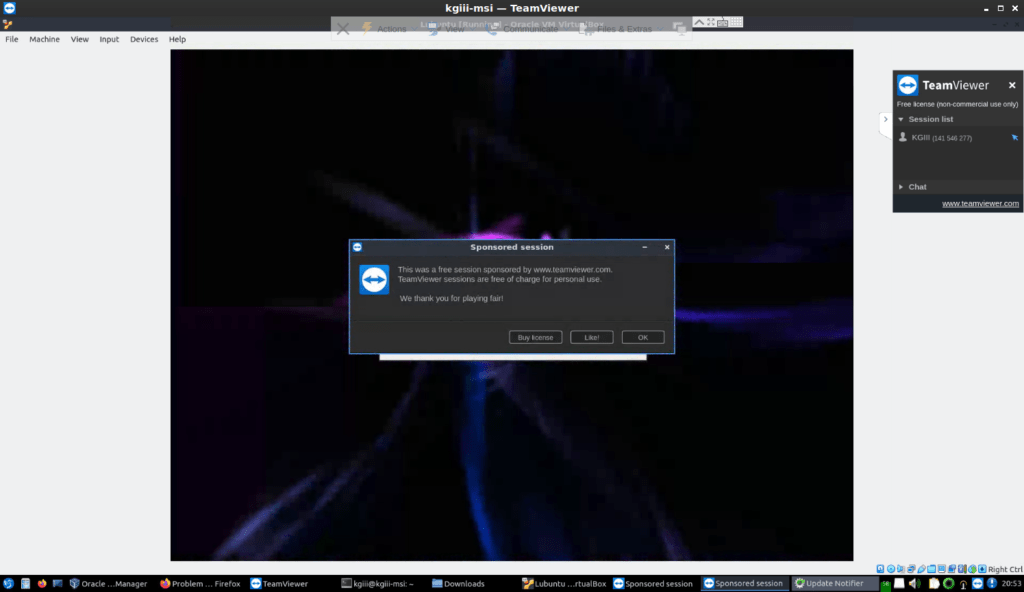
It’s easily configured the first time, and once you’re done it a remote connection will hopefully look a bit like this:

TeamViewer in action.
This is what a connection might look like. It’s what mine looks like at this minute in time.

You can use this as a single instance or you can configure an account online with the management console to keep track of all your connections from a single point. You’ll spend a confusing amount of time making your browsers and devices ‘trusted’ status. All of this, of course, has obvious privacy implications.

Privacy & Security Concerns:

Again, they’re absolutely going to track your usage. They’ll know your IP addresses and the names of the devices you’re connecting to. They will know when you connect, how long you stay connected, and more. On top of that, they’ll know your email address, if you give it to them.

Having used them for a while, I see no spam from them and they’ve been nothing but acceptably and professionally behaved from my perspective. I don’t even get any regular newsletter emails from them. I think it’s safe to assume they’re currently not doing so. They do a whole lot of email verification steps if you want to trust devices.

Being proprietary, we have no idea what the source code looks like. We have no way to be sure that they’re not being malicious. They’re a business and they’d do poorly if it turned out they were malicious and using this information for spying or anything of that nature. 

If you’re running from an oppressive government, I’d probably not use them. They’re a business and that means they’re likely to respond to lawful requests – and laws around the globe can be pretty terrible.

In fact, if you’re doing anything that’s even remotely secure, I’d suggest not doing so over TeamViewer. Sure, when the application is terminated you can verify that it’s down, but at the same time don’t connect to your remote device to do your banking. That’d just be silly regardless.

As I stated above, I’m quite okay with the potential privacy and security implications. I don’t use Linux because of any philosophical reasons, I use Linux because it just works. If you’re different and object in some way, you should probably just move on and use alternative software to remotely manage your devices.

Closure:

And there you have it! It’s yet another article in the books, another article in the records. Traffic has been high lately, and that’s great. Things are growing in a linear feature and I’m okay with that. Even my Reddit sub is growing – at 50 viewers, up from just a few when I first took the sub over. So, things are going great.

Thanks for reading! If you want to help, or if the site has helped you, you can donate, register to help, write an article, or buy inexpensive hosting to start your own site. If you scroll down, you can sign up for the newsletter, vote for the article, and comment.
You Can, And Probably Should, Use VSCodium Instead Of VSCode

This article’s goal is to raise awareness of VSCodium, an open-source alternative to VSCode that has a couple of important benefits and changes. This isn’t the kind of article that I usually write, but it seems important to make people aware of the choices they have here.

This isn’t really a software review, nor is it really news. After all, if you’re in the business you’re already aware of VSCode (Visual Studio Code) and the benefits. If you’re not in the business, VSCode is a source code editor that comes with a bunch of features that make a programmer’s life easier.

VSCode is quite popular, made by Microsoft, and is available to Linux users. Microsoft has made VSCode’s source code mostly open (but not necessarily ‘free’) and VSCode is free-as-in-beer for anyone who wants a source code editor. It’s popular because it’s actually pretty good. 

It was released back in 2015, with most of the source code covered by the MIT license. In the 2019 SE Dev Survey results, it was #1 among respondents, which was the most recent I could actually find. By most accounts, it’s a great piece of software and a valuable tool.

Why VSCodium:

Not all of VSCode is open source and it’s only free as in beer. The source isn’t free as in libre, because it doesn’t preserve all freedoms. It also comes with telemetry, meaning that it reports on things like how you use the software, what software you’re using with it, what kind of hardware you’re using, and things like that. 

Many Linux users care about those two things. They want their software to have a permissive license. They don’t want their software reporting anything about them to anyone. Those are reasonable wants and the community is usually pretty good about providing alternatives.

In this case, they’ve changed the way it is compiled, and what is compiled with it. They’ve also packaged it for most operating systems out there. They’ve made a package available that’s entirely licensed under the MIT License (permissive, free) and made it easy to get.

I’m not going to duplicate a bunch of information by cutting and pasting. That’s also a good practice when the content may change, so I’ll just link to a couple of pages.

Visit the VSCodium home page, click here.
Visit the VSCodium code repo page, click here.

To get a feel for the project, and to see the vast amounts of effort the maintainers put into it, visit the first link. If you just want to find the right package to get for your system, click the second link. Those links will help you get VSCodium properly installed, usually in a pretty painless fashion. Worst case scenario, they show you how to compile it and how to make your own packages.

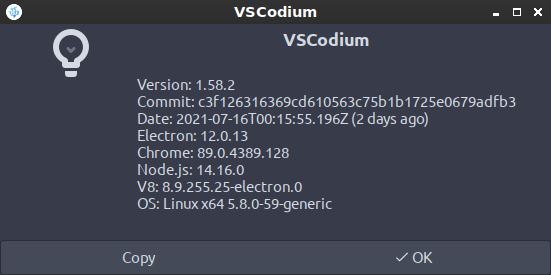
It’s so easy to install that I did so just to have access to it on this system, one I mostly only use for writing and browsing. It took a total of three commands. If you’ve done it properly, it’ll look something like this:

VSCodium's about page
That’s the current version, using the PPA method. It was an easy-enough process.

Just follow the installation instructions for your particular version of Linux and you shouldn’t have any issues. If you do, you can always raise issues at their GitHub link, leave a comment here, or drop us a line at Linux.org. Someone will help get you sorted.

By using VSCodium, you can have all the greatness that is VSCode while preserving the important liberties. It’s a great piece of software!

Closure:

This isn’t my “normal” type of article, but I’ve really wanted to make sure people are aware of the options when it comes to VSCode and VSCodium. This is one of those times when you can have your cake and eat it to. 

By the way, there are all sorts of great pieces of software out there. I’ve written a review, an introduction, and some comparative pieces. I think I may do more of them. They take about the same amount of time to write and edit, but there are some great pieces of software out there and people just aren’t aware of them. Feel free to drop an idea or the name of your favorite software as a comment. If you like these types of article, be sure to vote and comment!

Thanks for reading! If you want to help, or if the site has helped you, you can donate, register to help, write an article, or buy inexpensive hosting to start your own site. If you scroll down, you can sign up for the newsletter, vote for the article, and comment.
balenaEtcher: A Tool To Turn Linux .ISO Files Into Bootable USB Drives

balenaEtcher is a free software tool used to write .ISO files to USBs so that you can boot from them and install Linux. balenaEtcher is just one of many tools to do this, but it is both simple and effective. That makes it fit for purpose and is why it is getting its own article.

You’re going to need a blank USB drive, like a thumb drive. Well, it needn’t be blank but it should be. It needs to be large enough to meet the requirements of your distro – usually 4 GB is adequate. Larger is fine.

You’re also going to need the correct .ISO from the distro you’re trying to install. I have no way of knowing what that is, so here’s an article about picking the distro that’s right for you. You should verify the integrity of the .iso to eliminate it as a source of problems.

You’re also going to need to know how to boot to USB. That link will take you to an article that covers that, and includes DVD. It covers booting to something other than your default drive.

Finally, you’re going to need balenaEtcher. Head to this page and scroll down. If you scroll down, you’ll see many download options. It’s available for everything from Linux to MacOS.

Download the correct version for the operating system you’re currently using. If you download the AppImage, be sure to make it executable before trying to run it. Either way, you’ll need to download balenaEtcher (maybe install it) and then run it. That’ll vary depending on your OS, but they even have .deb and .rpm files available.

All set?

Let’s Use balenaEtcher:

With all those pieces in place, balenaEtcher is fairly self-explanatory. I’m going to assume you got it to work properly. If you can’t get it installed or running from the AppImage, just leave a comment and I’ll talk you through it for your system. You can also ask on Linux.org.

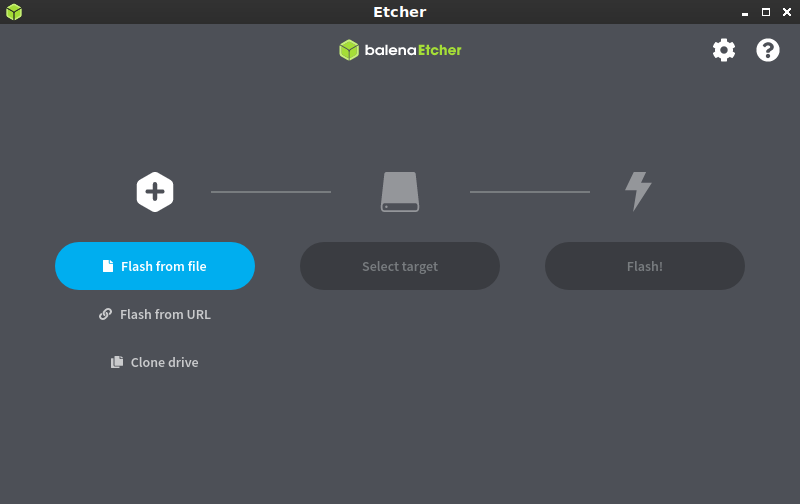
It’ll look something like this when you first open it.

balenaEtcher pick a file
In this case, you’ll pick “Flash from file”.

Then, you’ll click ‘Flash from file’ and doing so will let you navigate to and select the .iso you want to use. Do so, being sure to get it correct.

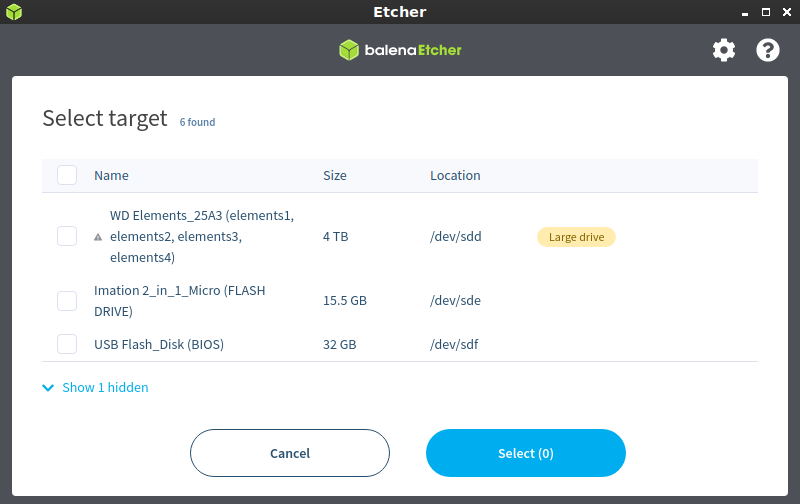
Next, you’ll select the target. The target in this case means the USB drive that you want to write the .iso to. So, that will be the smaller flash drive in most cases and will look something like this:

balenaEtcher in action
Select the right flash drive. Be very careful at this stage! This step can go horribly wrong!

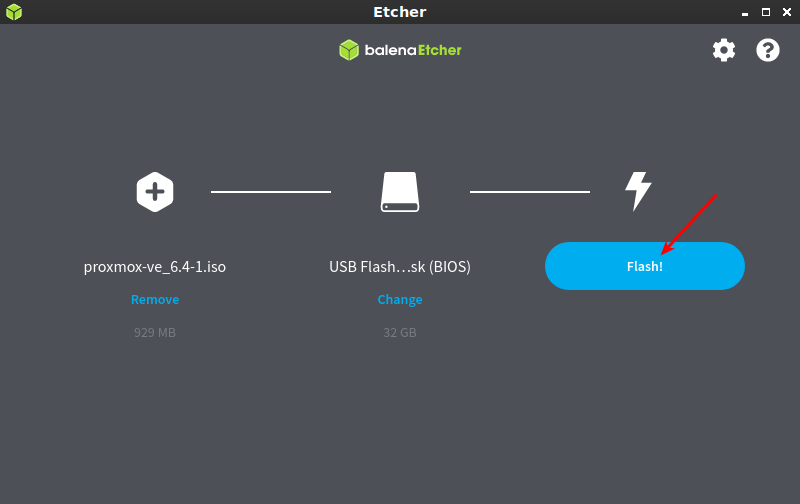
There’s just one step remaining! You need to click the Flash button and wait for it to do its job writing the .ISO to the USB drive. It looks like this:

balenaEtcher in action
Click the ‘flash’ option and wait patiently while it does its job.

That could take a little while, though not all that long if you’re using USB 3.0. On USB 2.0 it takes a bit, so be prepared to wait – but not terribly long. 

When this is all done, just close the program and your new USB device should be ready. You should be able to boot your computer, select the USB drive as the boot device, and then install Linux. Most of the time, it goes just swimmingly. If it doesn’t, ask for help.

Again, don’t forget to verify the integrity of the downloaded .ISO before you do any of this. The process for doing that varies, and the distro will tell you how on their download page. Have fun installing Linux!

I’ll probably eventually take the screenshots of me installing Linux in a virtual machine, but I haven’t done that article yet. It seems like a good future article to write.

Closure:

Well, there’s another article. This is just a nice, quick article. It’s handy for when you need to know how to use balenaEtcher, or when you need to tell someone else how to use it. It’s one of the articles I’d expect to see people linking to on a regular basis. “Hey, this is how you use Etcher!”

Thanks for reading! If you want to help, or if the site has helped you, you can donate, register to help, write an article, or buy inexpensive hosting to start your own site. If you scroll down, you can sign up for the newsletter, vote for the article, and comment.
Linux Tips
Creative Commons License
This work is licensed under a Creative Commons Attribution 4.0 International License.