Well, that’s a long headline, but it’s not easy to compress the idea of restoring Google Search to Chromium when installed in Linux Mint! However, this is another article that is just me scratching my own itch. You’ll understand what I mean soon enough, I hope. I mean, I think I can describe it well enough.
Also, I’m using a new keyboard. I wore the last one out. That always slows me down for a little while. Ah well… I digress, and needlessly so…
So, let’s say you’ve done a fresh install of Linux Mint. Let’s also say that you decided you want to use Chromium. Fortunately, Chromium is in the default Linux Mint repositories. Given the ease of this operation, you go ahead and install Chromium in Linux Mint with the following command:
1 | sudo apt install chromium |
Everything appears well and good – until such a time as you decide you want to search from the search bar. At that point, you’ll notice that Chromium in Linux Mint uses a different search engine. This should be easy to change (and it is) but when you look in the settings you’ll see that Google Search is nowhere to be found.
There’s a resolution for this! We won’t even need the terminal.
I’ll presuppose that you’ve already installed Chromium, so we’ll skip that part. You can figure that out if you haven’t already figured that out and are now curious about adding Google Search.
Restoring Google Search To Chromium:
First, you will want to open Chromium, click the three vertical dots in the upper right, and select ‘Settings’.
From there, you look to the left to find the ‘Search engine’ option and click on that. Chances are good that you already tried this, assuming you’ve wanted to restore Google Search to Chromium.
You next click on ‘Manage search engines and site search’, which is where we want to be to edit search engines in Chromium.
Scroll down to ‘Site Search’ and click on ‘Add’, like so:

That’s going to pop up a new window that looks like this:
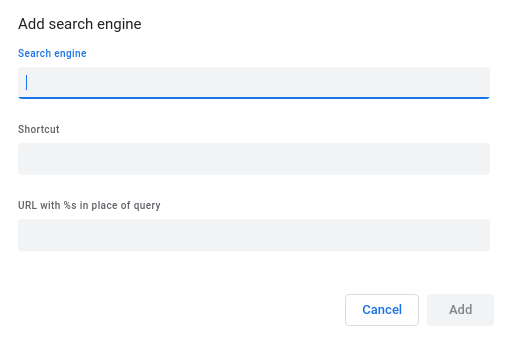
Under ‘Search engine’, add:
Google
Under ‘Shortcut’, add:
google
Under ‘URL’ add:
https://www.google.com/search?q=%s
Note, that the %s is where your search terms would go in the website’s URL. If you wanted to add Ecosia, for example, you’d use this in the last section:
1 | https://www.ecosia.org/search?method=index&q=%s |
Be sure to click the ‘Add’ button when you’re done.
By the way, the ‘Shortcut’ is the text you’d type to manually pick that search engine. You start your address bar query with the shortcut text, add a space, and then add your search terms. That will let you pick among the various search engines manually. In the above example, you’d first type ‘google’ and that’d give you results from Google Search.
Of course, you can just make Google Search the default…
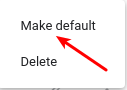
Make The New Search The Default Search:
If you want, you can make the newly added search engine the default search engine. That’s what I did, but it’s entirely up to you. You could always just preface the search with the word/letter you put in the 2nd second and manually select your search engine.
To make the newly added search the default search, simply click the three verticle dots next to the new entry and set it as the default. Like so:
That’s all there is to it. You’ve now made the newly added search the default search. When you search from the address bar, it will use your default search engine. If you highlight and right-click to search, it will now use your new default search engine.
Notes:
I mentioned Ecosia and gave an example. It’s pretty easy to find the right URL. Go to the search engine (or site search engine) and enter ‘example’ into the search bar.
If you did that here on Linux-Tips, you’d get this:
1 | https://linux-tips.us/search/example |
To add this site as a search engine, you’d replace ‘example’ with %s. Like so:
1 | https://linux-tips.us/search/%s |
If you wanted to add Bing, you’d do the same thing:
1 | https://www.bing.com/search?form=&q=example<gibberish> |
Verify that you can remove the gibberish:
1 | https://www.bing.com/search?form=&q=example |
(And you can…)
So, the result needed to add Bing as a search engine would be:
1 | https://www.bing.com/search?form=&q=%s |
You can generally do this with any sites you want – so long as they’re reasonably accessed and have the search term included in the address bar. If you wanted to search Linux.org from the search bar, you’d use:
1 | https://www.linux.org/search/2278682/?q=%s&o=date |
Yes, that will work and it will still properly filter the results according to date. It’s pretty easy. As I mentioned, I’m mostly scratching my own itch with this article. This was a change I needed to make and I thought it’d make a good article. I’ve decided to make it more thorough, showing you that you can do more than just restore Google Search to Chromium.
This will also work with browsers based on Chromium. If you are using Brave, Vivaldi, Edge, Chrome, etc., then you can almost certainly manage your search engines just like this. I tend to have a few search engines configured but I mostly rely on Google Search as it seems to consistently work best for me. You do you, however.
Closure:
Well, there you go. It’s pretty easy to learn about restoring Google Search to Chromium when installed in Linux Mint! (That’s such a long headline…) The concept is easier than trying to make a concise headline out of it. I dare say this is the longest headline I’ve ever had. Search engines are not going to like it. Hopefully, the content makes up for that!
If you’re still reading this far, you might as well know that Google uses a different address in their search settings. It’s a convoluted thing and I hope I get this right…
1 | {google:baseURL}search?{google:RLZ}{google:acceptedSuggestion}{google:originalQueryForSuggestion}sourceid=chrome&ie={inputEncoding}&q=%s |
However, you don’t need all that. You’re fine (as far as I can tell) with the basic option I gave above. But, I figured I’d include this just for the sake of completeness. Good luck restoring Google Search in Chromium when installed in Linux Mint! It’s not that challenging and I’m sure you can figure it out.
Thanks for reading! If you want to help, or if the site has helped you, you can donate, register to help, write an article, or buy inexpensive hosting to start your site. If you scroll down, you can sign up for the newsletter, vote for the article, and comment.