How To: Find The File System Type

Today’s article will be an article that is fairly simple and easy enough for almost anyone, as we discuss how to find the file system type. We’ll discuss a few ways to find this information and we’ll be doing so in the terminal. If that’s something you’re interested in learning, this just might be the article for you!

Before you installed Linux, you formatted the disks. You chose (or didn’t bother choosing) which file system you wanted to go with. There are numerous options, each with its own set of features. Among the choices are file systems like ext4, Btrfs, ZFS, and more!

Here’s a giant list of file system types.

You use file systems on every bit of storage media, even if it’s done behind the scene and not something you manually interact with. If you’re using a thumb drive, it’s formatted with a file system type. This is true even with an SD card, external hard drive, solid-state drive, and all the rest. It’s required for storing and organizing data.

Well, rather than make this a longer article, we can just cut to the chase…

Find The File System Type:

As I mentioned in the intro, we’re going to be using the terminal to find the file system type. So, you’ll need an open terminal. Usually, you can just press CTRL + ALT + T to open the default terminal.

With your terminal open, you can try the following command:

The output of that would look similar to this:

If you look, you’ll see one of the columns is helpfully labeled ‘type’ and that’s the file system type. If you just care about the first two columns, you could run something like this:

You can also use the ‘lsblk’ command to find the file system type. This might be the command most folks are more familiar with and the command you’d want to run would be this:

The output of the command would look similar to this:

Again, the second column is helpfully labeled as “FSTYPE” which stands for ‘file system type’ – which is exactly the information we’re after and exactly the information mentioned in the article’s headline.

See? Pretty neat! You can easily find the system type with just a couple of commands. There are other ways, but these are a couple of quick and easy ways. If you don’t know the file system type, perhaps because you’re new and didn’t pay much attention during OS installation, you can now do so.

Closure:

Well, it’s another article. It’s probably not the most interesting of articles, but not all articles are going to be that interesting. Today we cover file system types and how to find them, who knows what the next article will be? One thing you can be reasonably certain of is that there will be another article in just a couple of days. If this one didn’t interest you much, the next one might be right up your alley!

Thanks for reading! If you want to help, or if the site has helped you, you can donate, register to help, write an article, or buy inexpensive hosting to start your site. If you scroll down, you can sign up for the newsletter, vote for the article, and comment.

Send A Message To Another Logged In User

Today’s article might be useful for system administrators or just for fun, as we learn to send a message to another logged-in user (in the terminal, of course). This shouldn’t be a complicated or lengthy article, though many of my recent articles have been significantly longer than usual.

If you’re just a regular desktop user, this might not be all that interesting, but you can still test it if you want. Besides, you never know when you will want to send a message to another logged-in user! It could happen.

Let’s say you have a server with people logged in via SSH. This could also be a single computer with multiple people logged in, should you wish to test this and play around with sending a message to another logged-in user. Let’s also say that you want to send them a message in the terminal.

Perhaps you’re going to log them off? Maybe you’re going to reboot the server? Who knows, maybe you want to give them some sort of directions and the easiest way to do so is to send them a message that pops up in their terminal. You can do that!

We’ll be using a few tools for this. None of them are all that complicated and these little tools (do one thing and do it well) are tools that make the Linux world go around. 

For starters, we’ll be using the ‘who’ command.

who – show who is logged on

We will also be making use of the ‘awk’ command.

gawk – pattern scanning and processing language

Next, we’ll be using the ‘echo’ command.

echo – display a line of text

There will also be the ‘write’ command.

write — send a message to another user

We will also be using a pipe. We will pipe the output from one command to another command. We’ve done that lots of times on this site, so regular readers will already be familiar with a pipe and how it works.

Briefly speaking, a pipe is just one way to take the output from one command for use in another command. It’s a pretty handy tool to add to your Linux toolbox if you haven’t already done so. It’s a simple tool, which is a good thing.

If all of the above looks complicated, don’t be alarmed. It’s not all that complicated and the commands I share will be simple enough for most anyone to follow. You’ll be able to adjust them to your needs quite easily.

Send A Message To Another Logged In User:

As mentioned in the intro, you’ll want an open terminal for this. So, open your default terminal emulator. You can usually just press CTRL + ALT + T and your default terminal will open. This isn’t always true, but it’s true in many cases. You will otherwise need to open the terminal on your own.

With your terminal now open, let’s find out who is logged in. To do that, we only need the following command:

However, we only care about the first two fields, so let’s narrow that output with the following command:

The output from that command is all we need for the next part. You use the first column to identify the username. That makes them easy to identify, or at least easier for most folks.

The other column is the 2nd one. That identifies their login method, basically which terminal they’re using, and is also what we will use to specify the recipient of our message. Next, to send a message to another logged-in user, you use a command similar to this:

Or, take a look at this:

identify and send a message to a logged in user.
See? It’s not complicated. It’s harder to describe than it is to do.

So, in that case, the syntax of the command is easy, it’s just like this:

You’ll notice that the output of the command isn’t on that screen. It was sent to the other screen, the screen where that user was logged in (specifically over SSH). It quite happily sends the message to the user logged in at that location.

You can’t use usernames alone, as it’s possible for more than one person to use the same username. This method identifies the user and the method/location they’ve used to log in. It’s a pretty handy command like that. It might look a bit complex, but it isn’t.

Closure:

So, if you’ve ever wanted to send a message to another logged-in user, you can now do that. It’s easier done than explained, but hopefully, you get the gist of it and can apply it to your personal computer usage.  

It’s not always that easy to come up with ideas for articles. I often pull them from my notes, but my notes are a mess, and not all of them would make good articles. If there’s something you’d like covered, and I know the subject, feel free to contact me and let me know. Of course, don’t forget that I take guest articles when they’re about Linux.

Thanks for reading! If you want to help, or if the site has helped you, you can donate, register to help, write an article, or buy inexpensive hosting to start your site. If you scroll down, you can sign up for the newsletter, vote for the article, and comment.

Ping With IPv4 Or IPv6

Today we’re going to have a fun article, one easy enough for everyone, where we talk about how to ping with IPv4 or IPv6. You have an option and you get to decide if you want to use IPv4 or IPv6. It’s just a matter of a couple of different flags, so a new user can manage this one.

An IP address is a numerical address assigned to computers, it’s a way to address those computers – meaning to send and receive data. While you normally don’t do much with individual IP addresses, they’re what runs in the background and make this whole networking thing happen.

We had IPv4 and we’re slowly moving to IPv6. We’ve long since run out of IPv4 addresses (though they’re still widely used, often for legacy reasons), but they’re 32-bit addresses while IPv6 is a 128-bit address.

If you’re not good at math:

IPv4 supports 4,294,967,296 addresses.
IPv6 supports 340,282,366,920,938,463,463,374,607,431,768,211,456 addresses.

See the difference?

There was an IPv5 but IPv6 was created before IPv5 was made a standard and so there’s no IPv5 standard. The reasons for this are fairly obvious. After all, IPv6 supports a metric buttload of devices. That’s a seriously big number that we write as 128-bit (2128).

Every human on the planet can have all the addresses they could use, which is important when you consider stuff like IoT (internet of Things) where your home may contain many connected devices in the ‘smart home’ sense of things. We decidedly do not have enough IPv4 addresses for that.

Well, the truth is that we kind of suck at migrating to IPv6. Wh you ping localhost, you’re probably going to see 127.0.0.1. If you’re using IPv6 then you’d see ::1. If there’s any place where we might want to use IPv6, it’s in the home – with all these connected devices.

Even if you don’t have a smart home, smart cameras, a doorbell camera, various routers, a connected refrigerator, or the like, odds are that you’ve got more than one connected device. Fortunately, you still have IPv4 going on and they have some reserved IP addresses to work with. So, you’re good with that – as a general rule.

So, we still use IPv4. Should we? Probably not. But, there are legacy reasons for IPv4 to exist. That shouldn’t include the public web (I don’t believe) but it does. The adoption rate for IPv6 is really slow. After all, IPv6 launched on June 6, 2012. We’ve had more than a decade to move to IPv6!

I am no help… I am just as guilty as anyone else. When I order a VPS, I ensure that I have a dedicated IPv4 IP address. Why? Legacy reasons! Well, more out of habit. I’m quite sure I could migrate to IPv6 by just changing a few things in my process.

Anyhow… This is a long intro!

What is this ‘ping’ thing? Well, ping is you sending a packet to an address and then waiting for the response. You ping a server and the server effectively sends a pong back! It’s ping pong! Ha! I crack me up. 

You send a ping and wait for an acknowledgment from the server when it sends a packet back to your computer. Ping doesn’t always work because you can decide to ignore them (perhaps a future article) and not send a response. Fortunately, the easy-to-remember domain names (remember, they respond on an IP address, they are resolved to an IP address) respond to pings. I use ‘google.com’ as a general rule.

If you check the man page, ping describes itself like this:

ping – send ICMP ECHO_REQUEST to network hosts

We’ll be using ‘localhost’ (your computer) for this article, for the record. I think that’s a better choice than having a bunch of my readers ping any specific website. It should be effective on every modern computer with a modern operating system.

Man, this is a long intro. I’m sure I’ve forgotten something…

Ping With IPv4 or IPv6:

By now you know the routine. You’ll be using a terminal for this exercise. If you don’t know how to open your terminal, try pressing CTRL + ALT + T and (in most cases) and your terminal should pop right up! It’s magic!

Believe it or not, this may also work for other operating systems. I have it on good authority that this works with Windows, where they’ll be using ‘cmd.exe’ as memory serves. From what I can tell, this is also true for MacOS users. It’s a fair assumption to say this also works with the operating systems in the BSD family. Huh… Imagine that?!?

Anyhow, you can try the following command:

That will resolve to an IP address, be it IPv4 or IPv6. You can ping a specific IP address easily enough. To ping an IP address, the syntax is:

The results of those commands will be either an IPv4 or IPv6 address. If you’re new and don’t know the difference, an IPv4 address uses periods. It’d look like 127.0.0.1. An IPv6 address uses colons. It’d look like 2607:f8b0:4006:817::200e. It’s easy to tell the difference.

Now, if you want to use IPv4, the command would be like this:

If you want to use IPv6, the command would be like this:

NOTE: This is likely to work in many instances but, due to the lack of participation, you might find that some sites don’t support IPv6. On the other hand, you might find some sites don’t support IPv4. If one doesn’t work, then you have the other as an option.

Closure:

Well, if you ever wanted to know how to ping with IPv4 or IPv6, you now know. Are there good reasons? Well, there’s still some legacy stuff out there and we’ve poorly adopted IPv6. For all intents and purposes (intensive porpoises) we have limitless IP addresses available with IPv6.

We will move in that direction, just like we’ve currently moved in that direction. Adoption will continue and adoption rates may speed up. After all, we’ve had more than a decade to adopt. The specification is well-supported and it’s almost certainly the future of networking. Or so I’d like to believe…

Thanks for reading! If you want to help, or if the site has helped you, you can donate, register to help, write an article, or buy inexpensive hosting to start your site. If you scroll down, you can sign up for the newsletter, vote for the article, and comment.

How To: Add A New Line With CURL

Today’s article isn’t going to be all that long and it’s definitely not going to be complicated, as we just discuss how to add a new line with curl. It’s just an annoyance factor and something I was reminded of today. Lacking a better idea, I decided I’d use this annoyance and recollection as a reason to write an article about how to add a new line with curl.

First, this obviously requires a terminal.

Second, this obviously requires curl. You almost certainly have curl installed, so you won’t have to install anything. 

If you’re curious, you’ll find that the curl man page defines the application as:

curl – transfer a URL

You’ll understand why I’d use that in a second, but you can imagine that it’s a pretty handy tool to have in your Linux toolbox. We’ve previously used curl in many articles. Here’s a sampling of those articles:

Let’s Have a Limited Look at Linux’s cURL Application
Weather In The Terminal? We can do that!
How To: Find Your IP Address Through Your Terminal

… and more!

So, in this case, I show ads on the site. To do this, Google relies on a file known as ‘ads.txt’ being in your web’s root folder (often called ‘public_html’). If the file is not there, there’s an ad inventory issue and Google won’t show ads.

Well, if you read the previous article you’d know that there was an outage. During this outage, it appeared that the site was still reachable – except it wasn’t. It was during this time that AdSense decided to check and see if the ‘ads.txt’ file is there. (This is nothing private. Everyone using AdSense has an ads.txt file.)

Because of this, I decided to verify that the ads.txt file existed and contained the appropriate information. To do this, I simply used the following command:

It gave me the answer I wanted, but I disliked the formatting of the output. But, it was enough for me to determine that the file existed and that I just had to wait for Google to confirm this.

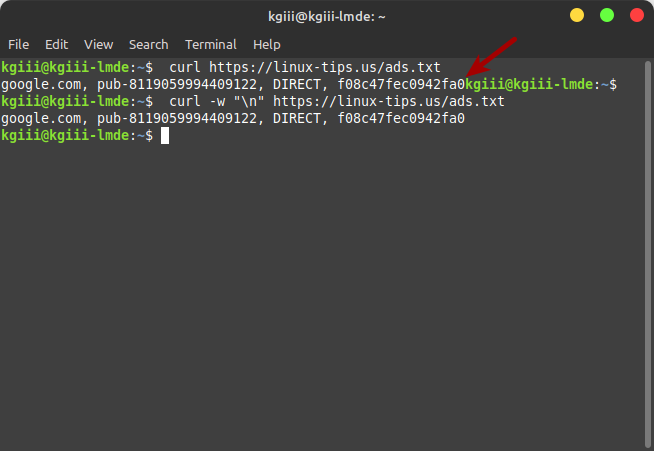
The formatting was horrible. I’ll show you an image in the next section and you’ll see…

Add A New Line With curl:

So, when I saw the output from the above command (feel free to run it on your computer), it just ran the line into the next prompt. I had to dig through my ~/bash_history file because I couldn’t remember how to fix the formatting.

A picture is probably going to describe this best. In the picture, you’ll see the ugly formatting and you’ll see the solution.

adding a new line to the curl output
As you can see, the second command has a much nicer output.

So, to make sure you have a new line, you use the -w (write-out) flag and add the character for a new line in quotes – which is "\n". It’d look like this:

As you can see (and I hit the enter button between commands to start on a fresh new line) the output is much nicer. So, instead of curl starting a new line, a command entry line as it were, you’re starting with a nice fresh new line.

I messed with this way too long before I started digging into my bash history to find other curl commands used over time. Eventually, I found it, but I’d already verified that the file existed and that Google would notice the next time they checked.

Closure:

Well, it’s not the greatest of articles – but it’s useful if you want to know how to add a new line with curl. It’s a much tidier output this way. I just need to remember to do it without having to dig through my bash history each time I want to have a clear curl output.

Meh… I’m sure it’ll eventually be handy for someone…

Thanks for reading! If you want to help, or if the site has helped you, you can donate, register to help, write an article, or buy inexpensive hosting to start your site. If you scroll down, you can sign up for the newsletter, vote for the article, and comment.

Geolocate A Website

Today’s article probably will be more about amusement than it is about education, as we learn to geolocate a website. This will not have a lot of uses for many of you, and the uses I can think of are a bit contrived. So, stand back and watch as we do some science!

Wait, no… No, there will be no science.

What I should have done is write this article ahead of time. Instead, it’s the 4th of July, and will probably be just about the 5th of July before I finish this. Let’s just all agree that I’ve been celebrating.

Anyhow, have you ever wanted to know where a website is located? Have you ever wanted to know where an IP address is located? Well, that’s what geolocation does and let me tell you that it is not excellent. No, it is not.

First, the tool we’ll be using is only going to give you the country. It doesn’t narrow it down very far.

Second, in the world of CDNs (Content Delivery Networks), a server may appear closer to you (or in this case the geolocation server) than it is. 

Relying on this data for anything important is just plain silly. 

But, you could log in to a remote server by name, get the local IP address, and then check the IP address to see what country the server is in. Yeah, see? I told you that any usefulness would be contrived.

Anyhow, you can geolocate by domain name or by IP address. With any luck, you’ll be able to tell which country the server is in. The previously mentioned caveats should make sure you know to not use these results for anything useful. 

Geolocate A Website:

You could almost certainly find an online tool that would do a much better job. Installing software for this is not necessary, but that’s exactly what we’re going to do. So, press CTRL + ALT + T and let’s get this party started.

First, we need to install a piece of software called Geoip. It’s available for all the major distros and describes itself as:

geoiplookup – look up country using IP Address or hostname

To install the software, you’ll enter one of the following commands into your terminal of choice:

RHEL, CentOS, Fedora, etc:

Arch, EndeavourOS, Manjaro, etc:

Debian, Ubuntu, Mint, etc:

When you’re done with that, it’s pretty easy to use. If you want to geolocate a website, the format follows:

And, if you want to geolocate an IP address, the syntax is similar:

An example output follows:

Which, you know, isn’t all that helpful. You can check the man page, but that’s also not all that helpful. To do that, it’s just this command:

The data isn’t entirely useless, for example, you can try this command:

Which, as you can see, appears to accurately geolocate the domain name to Canada, which is where I’d expect the server to be.

Closure:

So, yeah… If you want to geolocate a website then you can more or less do so. You’ll not get a whole lot of useful information and there are better tools for this online, but it can be done. You can indeed geolocate a domain name or an IP address all from the comfort of your terminal.

Just, you know, don’t use this information for anything too important. I use MaxMind for this sort of stuff online. It’s useful for getting meaningful statistics regarding the site’s traffic and is much more accurate, but still not accurate enough to pinpoint a house or anything. It can usually narrow things down to the nearest city, which is more than enough for my needs.

Thanks for reading! If you want to help, or if the site has helped you, you can donate, register to help, write an article, or buy inexpensive hosting to start your site. If you scroll down, you can sign up for the newsletter, vote for the article, and comment.

Subscribe To Our Newsletter
Get notified when new articles are published! It's free and I won't send you any spam.
Linux Tips
Creative Commons License
This work is licensed under a Creative Commons Attribution 4.0 International License.