Visualize Your Network Traffic With ‘darkstat’

Today’s article is a fun one, an article where you’ll learn how to visualize your traffic with darkstat. It’s a fun little tool that lets you graphically visualize your network traffic in your browser. While it’s likely more of an enterprise-level tool, there’s no reason you can’t use it as a home user.

So, if you’d like to learn how to visualize your traffic with ‘darkstat‘, read on and I’ll do my best to explain it. 

There’s a lot to the tool, but darkstat defines itself in the man page as:

darkstat – network statistics gatherer

We’ll only be using darkstat to visualize your network traffic in the browser, but there are quite a few options available. You’ll want to check the man page after you’ve got darkstat installed and have learned its basic usage.

I’ve previously covered tools like VNstat, which lets you monitor your bandwidth usage. You can even helpfully draw some graphs with the tool. This is quite different. You’ll see…

Visualize Your Network Traffic With ‘darkstat’:

This article requires an open terminal, like many other articles on this site. If you don’t know how to open the terminal, you can do so with your keyboard – just press CTRL + ALT + T and your default terminal should open.

First, you need to install darkstat. It should be in your default repositories for many of you. To save time, I’ll show you how to install it in Debian/Ubuntu-based distros. Just adjust the command to suit your system’s package manager:

With darkstat now installed, you need to start it – so that it monitors your network traffic. To do that, you’ll need to know the name of your network interfaces. It just so happens that I wrote that article last time:

How To: Show Your Network Interfaces

Armed with that data, you want to start darkstat and the format is:

So, for example, you might end up with one of the following commands:

Or maybe this type of command for a wireless connection:

After running that command, you’ll then want to open the following URL with your preferred browser:

http://0.0.0.0:<port_number>

If you used the port above, you’d connect to:

http://0.0.0.0:8080

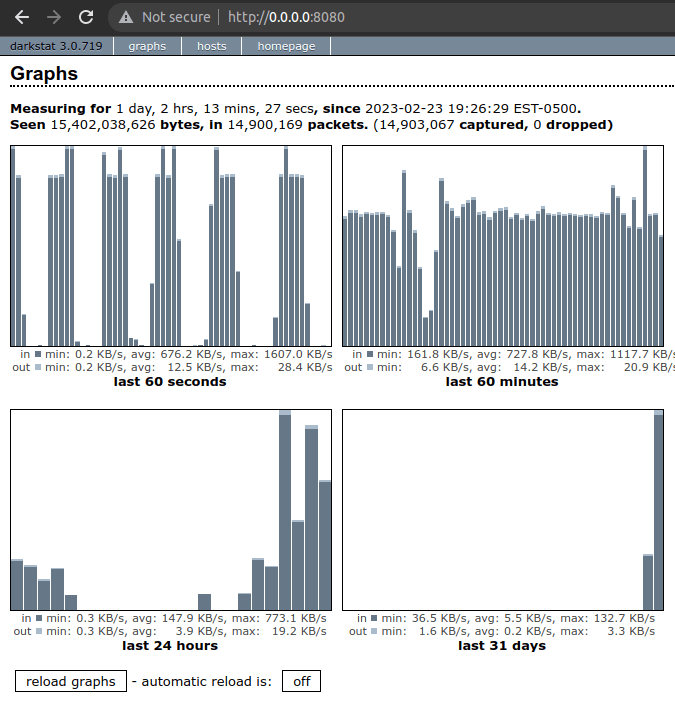
The results should look something like this:

darkstat in operation
The output of the graph should be easy enough to understand.

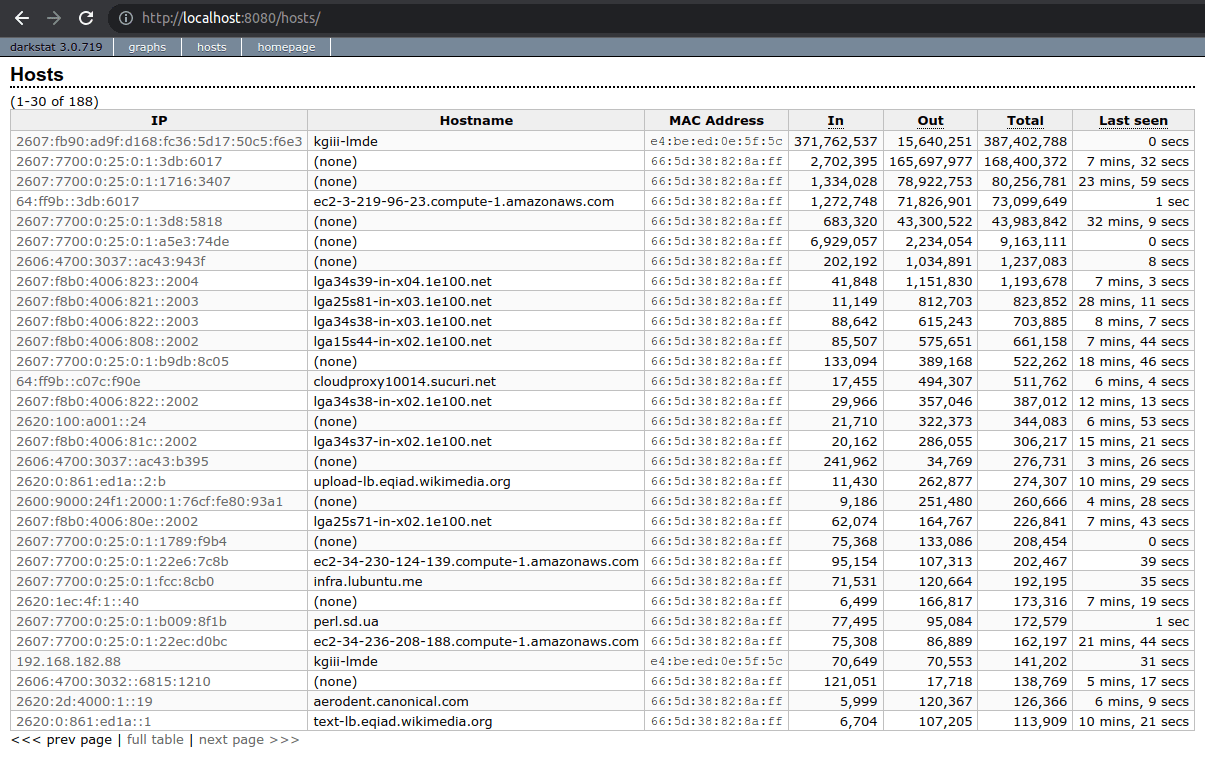
You can also opt to see the hosts, those servers you’ve connected to, by simply clicking on the ‘hosts’ link. That’d look something like:


darkstat in action, showing the hosts
As you can see, this one shows the hosts you’ve connected to.

The darkstar application will run quietly in the background. It’ll keep running until you tell it not to. One way to kill darkstat would be:

As I mentioned above, darkstat has a number of different options. There’s a bunch more to it, but this is about all your regular user will need to visualize their network traffic. Of course, run man darkstat to view those options.

Closure:

There you go. You have another article, this one less short than the recent articles. I am not well, but I presume I will be. In the mean time, we’ll continue to have articles for as long as I’m able. This time, we learned about how you can visualize your traffic with darkstat. Who knows what the next article will be about.

Thanks for reading! If you want to help, or if the site has helped you, you can donate, register to help, write an article, or buy inexpensive hosting to start your own site. If you scroll down, you can sign up for the newsletter, vote for the article, and comment.
How To: Have A Proper Backup Of Your Data

In today’s article, we’re going to show you how to have a proper backup of your data. I’ve wanted to write this article for a while. Few people have a solid backup strategy and many people have no backup strategy at all. Read on while I try to share how to make a proper backup.

In the world of backups, you have some pretty extreme measures. On one hand, you have people who don’t backup any of their data. On the other hand, you have companies that are spending millions of dollars for constant incremental backups sent to disparate sources.

Somewhere between there is a ‘proper backup’. This is a backup of your data that’s reliable and inexpensive. It’s something you can do without investing a whole lot of money. It’s something you can do by just following a few simple rules.

For this exercise, we’re going to be using the ‘3-2-1 backup‘ method. After much research, and some pretty tragic data losses, I’ve concluded that the ‘3-2-1’ method is probably the best way to make a proper backup.

You can do this with any software you want. We won’t actually even discuss software in this article. You can use cut and paste, if you really want. The software process doesn’t matter for this article, oddly enough.

So then, let’s discuss this…

Decide What Data Is Important:

The first thing you need to do is figure out what data is important to you. 

For example, I don’t really backup any of the system’s files. I don’t do drive images. I never perform a backup of my operating system. Instead, I back up my personal files. (I haven’t hosed my OS in ages and I really don’t worry about doing so.)

I back up some text files that I’ve been working on for years. For example, I back up my pictures of friends, family, and locations. If anything, I back up more than I care to, because I’m kinda lazy in these regards. 

See, all I do is backup my /home/<user> directory, and all the directories and files within that directory. That’s it. That’s all of it. Doing it this way does mean I end up with stuff like my ~/Downloads being backed up needlessly, but disk space is cheap these days.

Why? I want my individual config and data files along with my personal files. So, I keep my home directory backed up. If the operating system fails, it’s just a few minutes to install the OS again – and another few minutes to move my backed up home directory to the fresh installation. That saves me all sorts of time configuring the new installation – which is typically done on a new device.

So, you need to decide what data is worth backing up. When you do that, you now need to learn about making a proper backup.

Decide Your Backup Frequency:

It’s up to you to decide how much data you’re willing to risk losing. You can’t sit there backing things up all the time (realistically, you can – if you’re using software to make constant backups in real time, but that’s computationally expensive and financially expensive).

Be realistic about this. You don’t need to be a hoarder in the physical world, and there’s no really good reason to be a hoarder of digital data. (I’m one to talk, one of the biggest bits of data I back up is my email – some of which is more than 20 years old!) I urge you all to be considerate when deciding what is worth preserving. If you’re never going to use the data again, there’s no reason to preserve it. If it can be easily recreated, you may not want to preserve it.

I would say that, as a general rule, I’m willing to lose a week’s worth of data – but I do have some redundancy. If it’s important, like family pictures, there will be the copy on the camera, a copy on external media, and a copy on the computer I’m using. Otherwise, I tend to do my backups once a week, usually on Sunday.

Everything else? Meh… Once a week is a good frequency for me. That’s been my effective schedule for a long time. Sometimes I’ll backup more frequently, because of a major change. Sometimes I’ll not have any special data and will let my backup schedule lapse a little.

This is a decision you’ll have to make. Which data requires redundancy?

Use 3-2-1 To Make A Proper Backup:

The 3-2-1 backup method is basically saying that you should have 3 backups at any one time. So, at any moment in time, you should have 3 backups.

You should have 2 copies of your data at your physical location. You have the one that is on the computer you’re using and another can be an external drive. (In case of drive failure.)

You should have 1 backup that’s off-site. You might think that a garage is a good spot and, for some people, it is. If it’s a detached garage, it’s unlikely to go up in flames if your house burns. But, what if there’s a flood? If there’s a flood, it’s likely to take out your garage at the same time it takes out your house.

Remember, these are the *important* files we’re concerned with. Think of all the worst eventualities and prepare for them.

If you have a friend that lives a distance away, swap disks with them every week/two-weeks/month. This way, you both have backups in separate locations.

Remember, the goal is redundancy. 

You can also use a safe deposit box at your bank. You can also set it up so that you can send your files to your friend’s house (onto your hardware) over the internet. Additionally, you can also use cloud storage. 

If you’re concerned about your private data being out there, learn to use encryption. Use your favorite search engine and learn how to encrypt your data. These days, it’s pretty easy. You can just compress your whole backup and encrypt that file, meaning it can’t be opened without the password.

Test Your Backup!

You need to verify that your backups are working. It is vital that you properly test your backups. In reality, you absolutely need to verify that your backup strategy is effective.

AN UNTESTED BACKUP IS NOT A BACKUP!

You don’t have to write the data back to your drive every time. After all, you have three copies to work with. But, you should consistently and regularly verify the integrity of your backups AND your recovery strategy.

After all, a backup by itself is nothing. You must also have a recovery strategy. That is, how do you get your data back after a catastrophic loss? How are you going to recover after a fire?

It could be as simple as downloading a disk image from the ‘net, to retrieving your drive from the garage and writing the data back to your new computer/fresh installation. But, if you haven’t tested that to ensure it’s working, it’s the same thing as having no backup at all!

For the umpteenth time:

RAID is NOT a backup!

Be Diligent:

A proper backup regimen requires diligence. Once you start on this path to making proper backups, you need to keep doing it. It’s up to you how often you do this, but you do need to adhere to a schedule – if you actually want the system to be effective.

You have a lot of choices to make. You get to decide all the things from frequency to location, from the data you want to preserve to storage devices you will use. We live in great times, as far as hardware is concerned. You can buy additional storage space for dirt cheap. Software choices abound.

Over time, you may find yourself having more confidence and reducing the types of files you that need redundancy. That’s not necessarily a bad thing. For example, you don’t really need to backup your desktop background image, but you do probably want to back up the last pictures you took before a family member passed away.

IMPORTANT:

You can exceed all of this. You can be more diligent. This can be improved upon, if you want to be even more diligent. Increased redundancy can be a great thing.

Think of this as the *minimal* backup strategy. The least you should have is 3-2-1 backup process listed in this article. It’s perfectly okay to have more than that. It’s perfectly okay to have multiple redundant off-site locations. It is absolutely perfectly okay to use both a buddy’s house and a reputable cloud storage company. You do need to be diligent, doing the backups as often as you’ve decided and doing that consistently. 

You get to make all those decisions. They’re your decisions to make. The value of your data should dictate your level of redundancy. The value of your data should dictate your frequency. Find the software that works for you, the locations that work for you, and the file types that you feel need to be preserved.

Closure:

There you have it. You now know about the 3-2-1 backup method. There are other sites that cover this, but I wanted to share it with my readers here and in my own way. It seems important that my readers know how to have a proper backup strategy.

Also, I’ve been meaning to write this article for a while, but I knew it was going to be pretty long. As you can see, this one is definitely one of the longer articles. I hope you enjoyed reading it as much as I enjoyed writing it – but I mostly hope you take this information to create a proper backup process that provides the redundancy you’ll need should you suffer catastrophic data loss.

Hopefully, this is also going to be a useful link for when we see people who have failed to backup their systems and now are facing data loss due to making that decision. Yes, they made a decision to not back up their data. If they didn’t back up their data, they either listened to bad advice or didn’t listen to good advice. Ideally, this link will point ’em back in the right direction.

Thanks for reading! If you want to help, or if the site has helped you, you can donate, register to help, write an article, or buy inexpensive hosting to start your own site. If you scroll down, you can sign up for the newsletter, vote for the article, and comment.

Let’s Have A Happy New Year In The Terminal

Today’s article is going to be just another fun article, where we have a happy New Year in the terminal. Why in the terminal? Because, why not in the terminal? If you want to celebrate the New Year holiday in the terminal, read on and see how.

You won’t learn much in this article, but it can tie back to a couple of previous articles. This is just a fun article. As for articles it might tie into, check these previous articles:

Add A Message Of the Day (MOTD) To SSH
How To: Show An SSH Banner

If you read those two articles, or somehow remember them, you’ll see a common theme mentioned – that is ‘ASCII’. ASCII stands for “American Standard Code for Information Interchange”. Or, in plain language, text.

Text, terminal, and a New Year celebration? Darned right, we’re gonna have fun. Well, maybe not too much fun… But, I promise it won’t be too educational.

Yes, I realize that there are a variety of calendars on the planet. Yes, I know that there are other New Year celebrations. If this isn’t your New Year holiday, though this will technically be posted on my New Year’s Eve day, you can save this article and celebrate it when your holiday rolls around.

So, with all that in mind, let’s go ahead and get into the article…

Happy New Year In The Terminal:

You guessed it, you need an open terminal! So, open one up. If you don’t know how to open the terminal, you can do so with your keyboard – just press CTRL + ALT + T and your default terminal should open.

With your terminal now open, install ‘figlet’.

APT using distros:

YUM using distros:

DNF using distros:

You may find ‘figlet’ available for other distros. If you do, you should install it before going on. You will need ‘figlet’ for the remainder of this article.

With ‘figlet’ now installed, you can check the man page:

We’ll just be using a couple of features available with ‘figlet’, but the man page is pretty informative. You can do quite a bit with ‘figlet’.

Using figlet:

While still in your terminal, you can just use ‘figlet’ in its most basic form:

The output of that command should look similar to this image:

figlet displaying a banner in the terminal
See? You have your terminal saying Happy New Year! Festive, huh?!?

You can also use ‘figlet’ by loading the data from the file. It’s easy enough to use ‘figlet’ to display information from a file, I’ll show you. Let’s use one of my favorites, nano:

Let’s start by making the file:

Add the following text:

Now save the file with nano. That’s pretty easy, but I’ll show you. Just press CTRL + X, then Y, and then ENTER. That should save the file as ‘hny’ in whatever directory you were working in.

So, let’s use ‘figlet’ to show the contents of our ‘hny’ file:

There you have it. If you go back to the article’s introduction, you’ll see a couple of links. In those instances, you can actually call ‘figlet’ to show the contents of a file, for things like an SSH banner. They all kinda tie together, if you want them to.

Closure:

And there you have it. You have another article. This time, you’ve learned nothing – except how to have a happy New Year in the terminal. Well, you’ve also learned a bit about ‘figlet’, which is nice. Either way, enjoy the holiday and thanks for sticking with me throughout the past year!

Thanks for reading! If you want to help, or if the site has helped you, you can donate, register to help, write an article, or buy inexpensive hosting to start your own site. If you scroll down, you can sign up for the newsletter, vote for the article, and comment.
Let’s Have Christmas In The Terminal

Today’s article is just another fun article. In this article, we’re going to learn how to have Christmas in the terminal. You won’t learn much of anything useful, but you may have some mild entertainment. Read on!

As you know, a lot of these articles are things you can do in a terminal. So, what’s better than making a Christmas tree in the terminal? It seems like a reasonable article to write, as today’s article will have been published on Christmas Day.

Not everyone who reads this site will be among those who celebrate Christmas. Personally, I’m an atheist that kinda appreciates the Buddhist philosophies. I celebrate Christmas as an excuse to share good times with friends and family, a chance to give back to those who have enriched my life.

So, if you don’t celebrate Christmas, that’s fine. You don’t have to participate in this article. You could also just call it a Holiday Tree, I suppose. Hopefully you’ll use this opportunity to show your appreciation for those around you, even if you celebrate Festivus!

Alright, that’s enough ‘serious’ stuff for one article. Let’s just get into how to have Christmas in the terminal!

Christmas In The Terminal:

As the title implies, and like so many other articles, you’re gonna need an open terminal in order to have Christmas in the terminal. So, open your terminal of choice. If you don’t know how to open the terminal, you can do so with your keyboard – just press CTRL + ALT + T and your default terminal should open.

With your terminal now open, download a handy script to get started:

Next, we’ll make that file executable:

Now, we’ll run the program/execute the script:

The end result should look a whole lot like this:

That video should not autoplay. You’ll have to press the play button on your own. I too dislike any videos that webmasters deem should be automatically played. I assume you dislike that as well. So… You’re welcome!

Anyhow, there you have it… You have a Christmas tree in your terminal, just as the title suggested you would. Happy Holidays!

Closure and Some Thanks:

When I started this site, I was excited if I got twenty visitors in a single day. Well, the site has grown a whole lot since then. It has become an important part of my life and the thanks goes to you for reading, commenting, encouraging, providing feedback, etc… Without all that, I’d have never kept it up this long. So, thanks!

As for Christmas, I hope you’re all having a great day today. If you want to give me one gift, get offline (after rating the article, of course) and spend some time letting your friends and family know how much you appreciate them. It’s a good day to do so, even if you don’t particularly care for the holiday.

Thanks for reading! If you want to help, or if the site has helped you, you can donate, register to help, write an article, or buy inexpensive hosting to start your own site. If you scroll down, you can sign up for the newsletter, vote for the article, and comment.
How To: Install XnView MP On Ubuntu

Today’s article is going to do exactly what it says in the headline, it’s going to show you how to install XnView MP on Ubuntu. It won’t be a very long article, perhaps a bit longer than some, nor will it be all that difficult. XnView is a great photo viewing and manipulation application that I invite you to try out. I’ll be counting this as a review. That defines it best.

First, let me be clear… XnView is a closed-source application. It is proprietary and you never own the software. That doesn’t make it bad, it’s great software, it just means that some people may choose to ignore this article in favor of truly open software. That’s okay, they have that choice. Yay! Freedom!

So, what is XnView? It’s an image viewing/manipulation tool. It even allows you to do some batch processing on images, while offering some great ways to visualize your image collections. I was a fan back when I used Windows. When they started releasing versions for Linux I was pretty stoked.

In fact, it used to be XnView and now it’s XnView MP with the ‘MP’ standing for ‘multi-platform’. And, well, that’s true. It is mult-platform. And, well, that’s a great thing. I love this program!

I have previously mentioned XnView MP in these articles:

Let’s Reduce The Size Of .png Files
How To: Sanitize Exif Data From Your Digital Images For Privacy Sake

And, while this article is aimed at Ubuntu, it will work for other distros with just a few changes. Feel free to check XnView.com to see if they have a download for you.

More About XnView MP:

See, the greatest thing about XnView MP is exactly how many image files types it can deal with. It works for *all of them*. You’ll have to work REALLY hard to find an image format that doesn’t work properly in XnView.

Lemme find you a link…

Here, XnView handles more than 500 image formats. I wasn’t kidding. You’ll work REALLY hard to find an image format that’s unsupported by XnView MP!

Not only that, you can convert between image formats. You can not only do so, you can batch process them. If you visit the link, everything with the ‘write’ box checked can be converted to. It’s an easy to operate application, as well.

You can also do things like watermark an image – and, again, do so by batch processing your image collection. There are other tools from the same company, including XnConvert which is a more specialized tool. Examine those in your free time, if you’d like.

Anyhow, XnView MP has the usual tools. You can resize and crop. You can edit red eye out of the image. You can adjust contrast and light. Then, there are a variety of effects and filters you can apply. 

Finally, or not, you can view your photo collection in a variety of ways. You have everything from filmstrip view to slideshow options. There’s a bunch of different choices and things like EXIF data are supported. You really can’t go wrong with XnView MP.

How To Install XnView MP:

This article requires an open terminal, like many other articles on this site. If you don’t know how to open the terminal, you can do so with your keyboard – just press CTRL + ALT + T and your default terminal should open.

Once you’re there, let’s change to the Downloads directory:

Next, you’re gonna download XnView MP:

Finally, you’ll want to install XnView MP:

Now, XnView MP updates frequently, so you’ll want to remember this page and these steps. When XnView MP updates, simply run the above commands all over again and you can update XnView MP on Ubuntu. It’s amazing what you can do in the terminal. You can do all the things in the terminal!

Bonus:

By pure happenstance, I happened to check this on a Linux Mint box. It’s an older version of XnView, but you can actually find a version of XnView in the default repositories. It probably(?) won’t update with nearly the same frequency as your manual updates, but Mint users can install XnView with:

Follow the prompts and you can install what I suppose would be a supported version of XnView. I can’t think of any good reason to use an older version, but I wanted to mention that the option is there. Then again, it might just be the same and update with the same frequency. I confess that I’ve never tried it.

Notably, there’s no such option on Lubuntu (Ubuntu) 22.04. So, I guess it’s a Mint thing. Even with Mint, I’d expect that you’ll be just fine by installing XnView MP with the method above. The above method will, of course, work on any system that’s using a package manager that works with .deb files. Easy peasy…

Closure:

And there you have it. You have a new article! This time around, you’ll have learned how to install XnView MP on Ubuntu. It’s not terribly difficult and it’s a great application.

Sure, it’s proprietary – but that doesn’t necessarily mean it’s bad. If you’re philosophically opposed to closed source software, this article isn’t really meant for you. Again, this is really more of a review – a way to make more Linux users aware that XnView exists and is available for Linux.

Thanks for reading! If you want to help, or if the site has helped you, you can donate, register to help, write an article, or buy inexpensive hosting to start your own site. If you scroll down, you can sign up for the newsletter, vote for the article, and comment.

Subscribe To Our Newsletter
Get notified when new articles are published! It's free and I won't send you any spam.
Linux Tips
Creative Commons License
This work is licensed under a Creative Commons Attribution 4.0 International License.