How To: Add Ubuntu’s Default Repositories

The headline is correct that, in today’s article, I’ll explain how to add Ubuntu’s default repositories – in the terminal. Seeing as I’m doing so, I’ll tell you about each repository as we go along. They exist for different reasons, so we might as well know how and why.

This article is probably only interesting to new Ubuntu users who want to learn to do things in the terminal. That’s a lofty goal, though I’ve already explained how to reset Ubuntu’s default repositories – but that’s graphical. It’s also likely quicker to do this in a GUI. Still, we might as well cover this. 

I see no reason to make the intro section very long. The article will be plenty long. So, onto the article!

Add Ubuntu’s Default Repositories:

Yup. You guessed it. You’re going  to need an open terminal. Many of my articles do. If you don’t know how to open the terminal, you can do so with your keyboard – just press CTRL + ALT + T and your default terminal should open.

You’re also going to need Ubuntu, or an official Ubuntu flavor. I can’t recommend trying this will all Ubuntu derivatives, as I have not ever tested this in all Ubuntu derivative. So, only do this if you are using Ubuntu or an official flavor of Ubuntu – or it may mess up your system. You  have been warned.

About Repositories:

If we’re going to be writing about repositories, allow me to explain what those are. They’re central points from which you download software and software upgrades. They are there to provide the software you need, though not all software is included.

There’s generally a lot of software in them and some folks will only install software included in their default repositories. (Some folks will refuse even some software in the available repos, as the repositories may vary based on the licenses used by the software within.)

Ubuntu’s Main Repository:

Inside this repository, you’ll come across all the software the system needs to have a running system and a bunch of applications. All the software in this repository is FOSS (Free Open Source Software).

You already have this repository enabled, but stuff happens. If you’ve somehow disabled it (don’t do that) you can add it back with:

Ubuntu’s Universe Repository:

This repository contains software that is also FOSS – but Ubuntu can’t vouch for the update state or software inside the Universe repository. They are packages managed by the community, not by Ubuntu themselves.

It’s software you can install and doesn’t really come with all that many risks as the above may sound. Stuff tends to get updated pretty well. There are a lot of diligent people who tend to this sort of stuff. Upgrades are usually fairly rapid. To enable Ubuntu’s Universe repository, you’d run this command:

Ubuntu’s Multiverse Repository:

 In Ubuntu’s Multiverse repository, you’ll find software that is not FOSS. Due to licensing reasons, the folks behind Ubuntu can not maintain any of this software.

The software gets updated, but nothing in this archive is going to have Ubuntu doing so. Ubuntu also can’t ship this repository as enabled by default. To enable the Multiverse Repository, use this command:

Ubuntu’s Restricted Repository:

In Ubuntu’s Restricted repository, you’ll also have software that is not FOSS. The Multiverse repository contains things like drivers for hardware that doesn’t have FOSS drivers available. Well, the Restricted repository is where drivers exist.

A number of people are sticklers for FOSS-only operating systems. plus there’s the licenses to worry about, mean that these end up in a repository all there own. If you’re using hardware that doesn’t have FOSS drivers, you might need the Multiverse repository. To enable the Multiverse repository, you’ll want to use this:

Ubuntu’s Partner Repository:

In Ubuntu’s Partner repository, it’s still software that doesn’t have a FOSS license. It’s Ubuntu adding the software for partners of Ubuntu. It’s useless and will be axed at some point. (It has been empty in recent Ubuntu iterations.)

So, you can forget about this one. I will explain how to enable the Partner repository, as it’s both obvious and I’m pretty sure it’s still a thing on older versions of Ubuntu, and the LTS variants are going to be around for a while longer. It’s easy to enable Ubuntu’s Partner repository, the command is simply:

Closure:

Well, there you have it. You have another article and this one tells you to add Ubuntu’s default repositories. There’s a GUI way to do so, but this one takes place in the terminal. Besides, I already showed you how to do it graphically. This article almost got missed. I was at a funeral and that took a bunch of time and energy. But, I just couldn’t resist keeping up the same publication schedule.

Thanks for reading! If you want to help, or if the site has helped you, you can donate, register to help, write an article, or buy inexpensive hosting to start your own site. If you scroll down, you can sign up for the newsletter, vote for the article, and comment.

How To: Change The Timezone

In today’s article, I’m going to show you how to change the timezone. This isn’t a task you’ll need to do often, but it’ll be nice to know how to do it when you do need to change the timezone.

Personally, I find myself mostly needing to change the timezone when I lease a VPS and want the system timezone to match my own timezone. All in all, the  computer doesn’t actually care what timezone it is in, so you can set it to your local timezone and not have any issues. Normally, I’d configure the timezone during the installation process.

I suppose this is probably only going to work in systems that make use of systemd. It makes use of timedatectl and I’m pretty sure that’s a systemd thing. If this was a good site, the author would actually go verify this. You get what you pay for! Still, you may need another tool if you don’t use systemd.

It’s also going to be a fairly easy article. If you want to change the timezone, it’s not all that difficult. There really isn’t a whole lot to it. So, without further ado, let’s get into the article…

Change The Timezone:

This article requires an open terminal, like many other articles on this site. If you don’t know how to open the terminal, you can do so with your keyboard – just press CTRL + ALT + T and your default terminal should open.

I suppose you should first know what timezone you’re currently using. To learn that information, you can use this command:

Your output might look something like this:

timedatectl output
Your timedatectl output may look different, obviously. You might not be in my timezone!

Anyhow, to change it, the format of the command is:

I suppose you might not know your timezone options. You can generate a giant list of ’em with this command:

If you don’t know your timezone options, you can use ‘grep’ to narrow it down. For example, if you’re pretty sure you’re in America, your command might look a little like:

That’ll narrow it down. By the way, the  “America” in this case actually more like ‘the Americas’ and far more than just the United States – or even  more than North America. That information might come in handy for some of you.

Closure:

Whelp, there you have it… You have another article. This one will show you how to change the timezone, which might be something you need to know from time to time. It’s probably not something you need to remember, but now you can easily search for it.

Thanks for reading! If you want to help, or if the site has helped you, you can donate, register to help, write an article, or buy inexpensive hosting to start your own site. If you scroll down, you can sign up for the newsletter, vote for the article, and comment.

Search For Command History By Date

Today’s article is going to show you how to search for the command history by date. This isn’t hard, but might seem a little advanced for some of the newer users. We’ll be doing this through the terminal, of course. That seems like a good idea to me!

Unless you’ve made some fairly drastic changes, Linux terminals keep a log of previously entered commands. This is on a per-user basis and considered relatively secure, or at least as secure as your user account is. It’s helpful to be able to look at your command history, especially if you’ve forgotten what you did and you really need to undo it!

Previous history articles include:

Delete An Entry In Your bash_history

Dealing With Duplicates In Your Bash History

So, I haven’t really covered the .bash_history (proper name, I suppose) all that much. There really isn’t all that much to cover, but today we’ll learn how to search your command history by date. It’s most useful when you remember when you made changes but you can’t remember the precise commands used when you made those changes.

Find Command History By Date:

Like oh so many articles, this one too requires an open terminal. You can open one easily enough. Just press CTRL + ALT + T and your default terminal should open.

With  your terminal open, we first have to tell Bash to store and show dates along with the history. That’s an easy command that you need only run once:

When you next type ‘history‘, it’ll look like a hot mess until you figure out what the command has done.

Now, to find command history by date. To do that, you just enter:

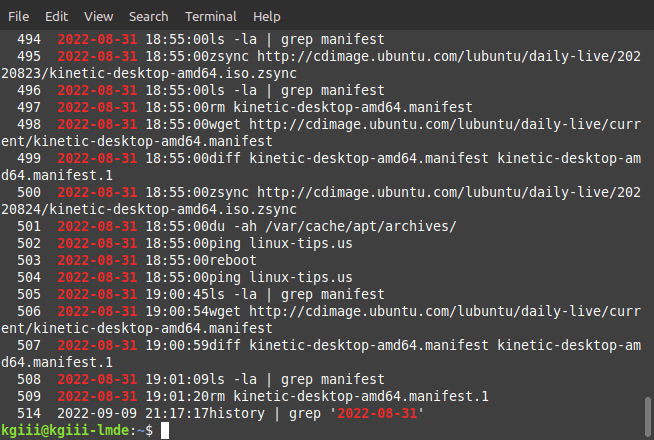
The format for me is YYYY-MM-DD, though I suppose it could be different for others who have an alternative date format set up. I don’t really know, but it’s easy to figure out by just running the history command and deducing the format from those results. If you’ve done it properly, it might look a little something like this:

searching command history by date
See? It works! It does show the command used to show these results, of course.

So, if you want to see what commands were run on a certain date, you can do that. You can also find what you entered when you remember the day but not the commands you entered. It can be pretty handy so search the command history by date. Keep it as a handy tool, as you never know when you’re going to need it.

Closure:

And there you have it. You have another article in a very long list of articles. This one is  handy if you need to know your command history by  date. I know I’ve been known to use this myself, largely because I sometimes need to narrow down my history quite a bit, as I do a great deal in the terminal and my history is a hot mess.

Thanks for reading! If you want to help, or if the site has helped you, you can donate, register to help, write an article, or buy inexpensive hosting to start your own site. If you scroll down, you can sign up for the newsletter, vote for the article, and comment.

Let’s Find The Size Of A Directory

Today’s article is one where we’re going to find the size of a directory. Why? Because that sounds like something fun to do. The site has more than 250 articles, most of which are reasonably productive and authored by me. (I do love me some guest articles – so long as they’re from the community. No more paid stuff! That lesson was learned.) They can’t all be winners!

So, why would you want to know the size of a directory? How should I know? Maybe you need to make space? You could want to upload the directories and want to know if you have space at the destination? Perhaps you are going to transfer the files and you want to estimate how long that will take? You do you. I don’t care why you want to find the size of a directory. That sort of thing is between you and your directories!

Anyhow, we’ll be using ‘du’ in this article. If you want a GUI way to find the size of your directories, you can visualize disk usage easily enough. You can also easily find large files. You shouldn’t need to install ‘du’, it should be installed as a part of the standard toolkit (GNU coreutils). To find out if you have ‘du’ installed, you can just try du --v in the terminal, which will spit out some version information.

So this should be a fairly short article – nice and easy. Let’s get on with it!

Find The Size Of A Directory:

This article requires an open terminal, like many other articles on this site. If you don’t know how to open the terminal, you can do so with your keyboard – just press CTRL + ALT + T and your default terminal should open.

We’re going to us ‘du -h‘ for everything, because that -h stands for ‘human readable’ and it’s just easier than seeing byte sizes. You don’t actually have to use the -h, it just makes good sense to do so.

The format for this is largely ‘du -h /directory‘, like so (using the Documents directory as an example):

You can just add more directories as needed (we’ll add downloads):

That will output the size of both directories. If you are unaware, the ~ (tilde) is a shortcut meaning your home folder. For example, if you’ve navigated away from your desktop, you can cd ~ and get back home. It’s faster than clicking your heels together three times!

By the way, if you’re stringing directories together, you can get the total size of the directories with the following:

That’s about it. That’s all you really need to know for this exercise. I told you that it’d be quick and easy! Most of my articles involve opening the terminal, and yet so many of them are really quite simple to learn and remember. I strongly urge new Linux users learn a bit about the terminal, not because it’s hard but because it’s often easier and faster than using a graphical tool.

Closure:

I wasn’t kidding about there being more than 250 articles. There are 256 of them at this time, and this will make 257. So far, I haven’t run out of ideas and I’ve been able to get one out to you every other day. I hope you find these articles as useful as I’d like them to be. It does take me longer to come up with ideas, so it might have to slow down at some point. I mean, I can’t keep writing these kind of articles forever,  can I? No… No, I don’t think I can.

Thanks for reading! If you want to help, or if the site has helped you, you can donate, register to help, write an article, or buy inexpensive hosting to start your own site. If you scroll down, you can sign up for the newsletter, vote for the article, and comment.

How To: Convert JPG to PNG

In today’s article, we’re going to learn how to convert JPG to PNG image files. It’s a pretty easy process. In fact, the second part of the article should be fairly brief. Read on to learn more!

I should also mention that we’ll be learning how to convert JPG to PNG in the terminal. There are all sorts of GUI ways to do so, from individually converting files to batch conversions. Well, you can do all that in the terminal and this article will show you how.

Why PNG? Well, it supports lossless compression. PNG also supports transparency. PNG also looks better at higher resolutions, as it is able to display more details. Additionally, PNG not only supports lossless compression, it supports compression better – so you needn’t transfer larger files if you have no reason to do so. Plus, PNG is one of the better formats if  you’re going to do things like share the images online.

So, there are a number of reasons why you’d want to convert JPG to PNG. Fortunately, as I mentioned above, it’s really not all that difficult. You have tools to do this right in your default repositories, assuming you’re using a mainstream distro.

Without further ado…

Convert JPG to PNG:

As we’ll be converting in the terminal, you will have to have an open terminal. To do that, just press CTRL + ALT + T and your default terminal should open. See? We’re off to a good start.

Now, the tool we’ll be using is ‘ImageMagick’ and it’s available to install via  your normal channels. If you were using a distro that uses apt (Debian/Ubuntu/Mint/etc) then it’s trivial to install with:

Otherwise, install it with your default package manager tools. (You just might have installed when we covered how to resize images with ImageMagick. If not, now’s a good time to install it and then read that article!)

So, next you’ll either want to use the /path/to/directory where your JPG files are,  or just navigate to the directory where you’ve stored them (the easiest path), and you can convert them all with just one command:

Congratulations, in just that one command you’ll have converted all the JPG to PNG files. Feel the power of Linux! You’ll retain the originals, just in case something goes awry. If you’re happy with the results, you can always delete the originals with any one of a number of commands.

So, what if you just want to convert one JPG to PNG? Well, that’s easy:

See? I told you it was easy. While there’s a whole lot of complexity with ImageMagick, it can be quite simple to use for some very generic day-to-day tasks. Of couse, man imagemagick is always an option to learn more.

Closure:

Yup… It’s really not all that hard to convert JPG to PNG files with ImageMagick. If it’s a large number of files, it could be a bit for you to convert them all, but let it do its thing and it won’t take too long on a modern computer. If you only need to convert one image, that’s fine too.

Thanks for reading! If you want to help, or if the site has helped you, you can donate, register to help, write an article, or buy inexpensive hosting to start your own site. If you scroll down, you can sign up for the newsletter, vote for the article, and comment.

Linux Tips
Creative Commons License
This work is licensed under a Creative Commons Attribution 4.0 International License.