Turn Your Man Pages Into HTML

Today’s article is going to teach you how to turn your man pages into HTML. It’s a relatively straightforward process and handy if you want your man pages to be more easily read. It should be a quick article, as I have preexisting work to help along the way. 

Again, making your man pages easier to read is really the only reason why I can think of for doing this – other than preparing them for uploading to share on a web site. I’m not entirely sure why you’d want to upload them, when there are already uploaded and maintained versions of man pages.

If you recall, the last article was about showing you how to find your man page’s location on disk. In that article, you learned about the whereis command. The reason that article was done first was so that I can save some time and just refer you to the first article. 

So, yeah, click that last link and learn about the whereis command, saving me a bunch of time and typing! After all, I planned ahead! I swear, half these articles are so that I can refer to ’em later, I just forget that I wrote ’em. Wine might just be a factor.

Anyhow, with you having refreshed your memory by reading the previous article, let’s just jump right into it. Let’s learn how to…

Turn Your Man Pages Into HTML:

Like many other articles on this site, you’re gonna need an open terminal. If you don’t know how to open the terminal, you can do so with your keyboard – just press CTRL + ALT + T and your default terminal should open.

Once you have a terminal open, you’ll want to install man2html. That should be in your default repositories, so I’ll save some time and just share how to install it in Debian/Ubuntu/derivatives. It’s just:

Once installed, we can check the man page and see that it defines itself as:

man2html – format a manual page in html

Which is, well, a pretty good description. That’s what it does. That’s what we’ll be using it for. Imagine that?!?

Now, the first step in the operation is finding the location of your man pages. To do that, we’ll use the whereis command – like so:

The 3rd field is what we’re actually after, so you can use awk to help you out. That’d look more like this:

That’s the actual path to the man page for ls.  You’ll need it for the next command. That’d look like:

Now, as you can see, the command first needs to know the path of the man page and then needs to know the path where you wish to save the output HTML file. You can adjust each according to your needs, using the > operand to determine where the resulting file is saved. 

If you need a refresher on how to output the terminal to a file, click and read:

How To: Write Text To A File From The Terminal with “>” and “

(See, more foreshadowing!)

The output from your command should end up looking something like this:
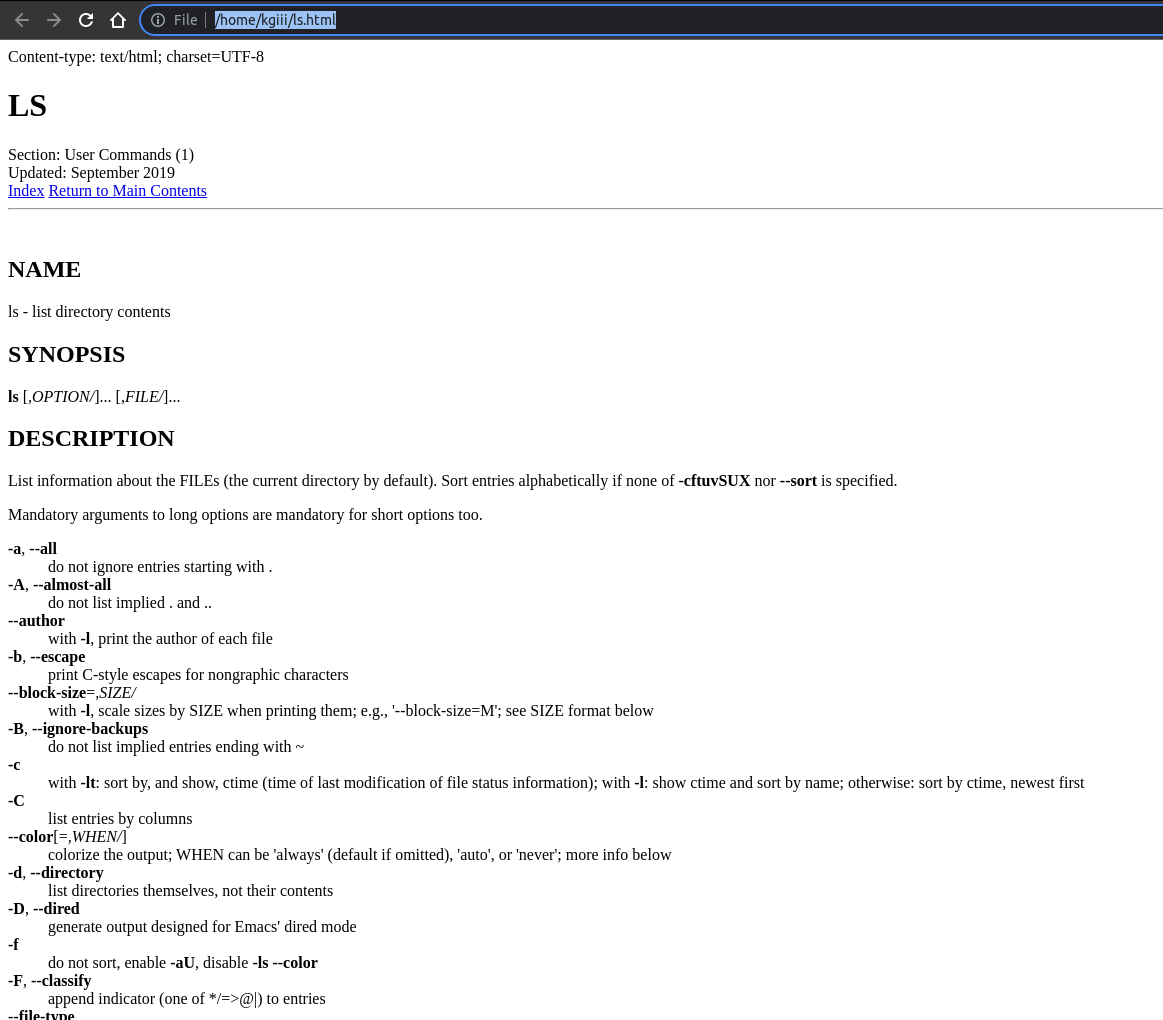
man2html does its magic with the ls command
See? You get HTML as your output when you turn your man pages into HTmL! Tada!

Anyhow, that’s actually all there is to it. Use the whereis to find the location of the man page. With that information you use man2html to write the HTML to a directory of your choosing. ‘Snot all that difficult, now is it? And to think, there are people afraid of the terminal!

Closure:

Well, there you have it. It’s a pretty simple article, mostly thanks to having written a lot of the information ahead of time – in other articles. Sometimes I plan on another article to follow an article, but I forget or it just gets lost in the shuffle. The good news is that the search function works well enough and I now have a whole lot of articles to reference! If nothing else, you now know how to turn your man pages into HTML – should you want to do so.

Until next time…

Thanks for reading! If you want to help, or if the site has helped you, you can donate, register to help, write an article, or buy inexpensive hosting to start your own site. If you scroll down, you can sign up for the newsletter, vote for the article, and comment.
How To: Install PIP In Linux

Today’s article is going to teach you how to install PIP in Linux. PIP is a reverse acronym meaning ‘PIP Installs Packages” and it’s a handy tool for the installation and management of Python applications. This article should be pretty short and easy for anyone to understand. 

This article is going to be pretty basic, merely telling you how to install PIP and not a whole lot more. The reason I write this article is because it needs to be written. I should also point out that Python is a programming language, though I’d expect most visitors to know that already. But, yes, this article needed to be written.

See, I wanted to tell you about a lovely piece of software (or three), but they all need to be installed with PIP. So, rather than write out the long installation instructions for various distros and package managers each time, I figured I’d make a single article that told you how to install PIP.

That’ll save some time and effort. I can refer back to this when those articles are written. There are many Python applications that can be installed with relative ease – just like you’re installing from your regular Linux repositories. PIP’s Python applications can be installed and uninstalled in the terminal while using PIP, so it’s quite easy.

So then, let’s learn how to…

Install PIP In Linux:

Installing PIP requires a terminal. If you don’t know how to open the terminal, you can do so with your keyboard – just press CTRL + ALT + T and your default terminal should open.

Once you have the terminal open, you can install the appropriate PIP. Most folks will be using Python 3, but a smattering of people will still be using Python 2. I will list the installation instructions, where applicable, with Python 2’s instructions first.

Debian/Ubuntu/derivatives:

SUSE/openSUSE/derivatives:

Fedora/derivatives:

RHEL/CentOS/derivatives:

Arch/Manjaro/derivatives:

Slackware:

Read Install PIP For Slackwaare Instructions.

The basic usage of PIP is pip install <package>, pip uninstall <package>, and pip search <package>. My readers are smart enough to understand that without further instructions. You can also learn a lot by using man pip. Now you know how to install PIP in Linux.

Closure:

And there you have it. You have an article telling you how to install PIP in Linux, enabling you to install Python packages/programs quickly and easily inside the Linux terminal. It’s also one more article in my series of articles. I’m now well within a month of when the project is allowed to end and I still have a lot of articles left in me, so I’d expect it to keep going for long into the future. Or at least until someone steps up and takes the site over for me.

Thanks for reading! If you want to help, or if the site has helped you, you can donate, register to help, write an article, or buy inexpensive hosting to start your own site. If you scroll down, you can sign up for the newsletter, vote for the article, and comment.

Remove Default Music Player In Elementary OS

It can be a little confusing if you want to remove the default music player in Elementary OS. It isn’t really all that clear immediately, so here’s an article explaining how to remove the default music player in Elementary OS.

The default music player in Elementary OS (eOS from here out) is kinda lame. There are many better choices out there. Once you’ve chosen a replacement music player, this is how you remove the default music player in eOS.

This was first asked on a forum that I frequent and I took the time to find the answer. I figured that I’d not been able to easily find the answer with a search engine, so I might as well turn it into an article. It’s actually pretty simple.

eOS lacks any handy GUI system monitor that I could find, so I installed one. You might as well do the same. With eOS, you’re eventually going to want it – though top or htop or even atop do the job just as well.

Anyhow, I installed one and found that closing the “io.elementary.music” process closed the music player. Obviously, you can’t uninstall that. It’s part of some bigger package and eOS does things in unusual ways.

With further digging, I finally noticed an application called ‘noise’ in the list of running processes. Killing it would kill the music player, just like killing the io.elementary.music process would. Finding this out pleased me, as that was the answer.

Remove Default Music Player:

With that information in hand and properly tested, I was able to give the answer. The answer began with telling them to open their terminal, which you can do easily enough. Just press CTRL + ALT + T and your default terminal should open.

With the terminal open, it’s just one single command:

It’s so intertwined with eOS that you might want to reboot after you’re done. You can do that with the following command:

And there you have it. That’s all you need to do. I’m not sure why eOS makes it so difficult to find this. I’m also not sure why it wasn’t widely published, but it’s online now. Technically, it was online before now -at my old site. This is actually an old article that was redone to suit this site.

Closure:

We are getting closer to the one year mark. It’s less than a month away. I’m probably going to take a day or two off and then get back to the regular schedule – though with maybe a little less pressure to get it done every other day. It’s great when I have a half dozen articles done and ready to publish, but not so much when I’ve run out of ideas and I need an article for tomorrow. Ah well…

Thanks for reading! If you want to help, or if the site has helped you, you can donate, register to help, write an article, or buy inexpensive hosting to start your own site. If you scroll down, you can sign up for the newsletter, vote for the article, and comment.

FTP From The Linux Terminal

Why would you want to use FTP from the Linux terminal? It’s quick, easy, consistent, and works well enough as an FTP client. If it’s not already installed, it’s just a quick installation command away. In my experience, it’s usually already there.

If I’m going to be transferring a bunch of files or editing files, I’ll just use a GUI FTP client. My choice FTP client has been Filezilla for quite a long time now. It does the trick and I just keep moving my profile/config to new computers as I get them. Being easy to migrate is a definite selling point for me.

So, what is FTP? It stands for File Transfer Protocol. It’s not encrypted, so many folks have moved to SFTP – which is actually not related to FTP at all. It just shares similar functionality. Even though FTP traffic isn’t secure, it’s still fairly widely used. 

An FTP server is probably not installed by default on your desktop Linux system. However, I’ve written how to Install An FTP Server With VSFTPD which should get you sorted if you need one.

The application will be using is “FTP” which describes itself like:

ftp — Internet file transfer program

And you may find that your version of terminal-based FTP is maintained by your distro maintainers. The FTP command and flagsr should still be pretty universal throughout. Still, be sure to check the man page – especially if things seem weird.

FTP From The Linux Terminal:

Obviously, this requires an open terminal.

Press CTRL + ALT + T and your terminal should pop right open.

Once you have the terminal open the command is basically this:

You can connect via domain name, hostname, or even IP address. It’ll look like this, or pretty close:

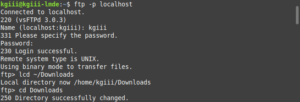
ftp from the terminal
See: You can use FTP from the Linux terminal.

There are many commands available, so you should probably check man ftp to see what’s on offer. We’re just going to cover a few of the more useful commands.

You’ll find that ‘ls’ works to list files, just like you’re used to, as does ‘cd’. If you want to change your local directory, that is your working directory on your machine and not the working directory on the server, you need to use the ‘lcd’ command – like so:

Note: Read More About Paths

After you’ve logged in and learned to navigate, it’s time to do something. If you want to download something, you use the ‘get’ command:

That will download the file from the server to the local directory. To do the opposite, that is upload something from your current local directory, you would use the ‘put’ command, like so:

If you want to get or put more than one file, the commands are ‘mget’ and ‘mput’ respectively. They look like this:

Note: It may give a warning about using passive mode. If that’s the case, add the -p flag to your connection command – like ftp -p hostname.

Just like with your regular terminal file management, you can ‘mkdir’, ‘rmdir’, and even use ‘pwd’ to be reminded of your present working directory. Files can also be deleted with the delete <file_name> command.

Closure:

And there you have it, an article that explains how to use FTP from the Linux terminal. It is important to note that the FTP command transmits data without encryption. If security is a concern, use SCP or SFTP.

Thanks for reading! If you want to help, or if the site has helped you, you can donate, register to help, write an article, or buy inexpensive hosting to start your own site. If you scroll down, you can sign up for the newsletter, vote for the article, and comment.

How To: Change Ubuntu Into Lubuntu

Today’s article is going to teach you how to change Ubuntu into Lubuntu. Why? Because you can! Because you might want to try a different desktop environment, or because you’d like to have them both on one computer. It’s remarkably easy to change Ubuntu into Lubuntu – and, of course, would work with other official Ubuntu flavors with just slight modifications

As you know, Ubuntu is a distro. Lubuntu is also Ubuntu, but it is an official flavor of Ubuntu. They are not actually different distros. Lubuntu is Ubuntu, with different Ubuntu software installed to provide a different experience.

Ubuntu is Canonical’s flagship operating system. It ships with a suite of useful software and uses the GNOME desktop environment. If you say Ubuntu, that’s the distro you’re talking about. Lubuntu is a separate project under the same umbrella, based on Ubuntu. Lubuntu, once known for being lightweight, is now using the LXQt desktop environment where it once used LXDE. The latter dropped for the former for a whole host of reasons, including maintenance improvements. Comparatively speaking, it’s still fairly lightweight.

Full Disclosure: I’m an “Official Lubuntu Member” and, by extension, also an Official Ubuntu Member. I’m quite biased with regards to Lubuntu, but my biases are open and I still strive to be objective (or at least not objectionable!).

So, if you have Ubuntu installed and you’d like to experience Lubuntu, then this is the article for you, as it will teach you how to …

Change Ubuntu Into Lubuntu:

Like oh so many articles, if you want to change Ubuntu into Lubuntu, you’re going to want to start off with an open terminal. You can use your menu to open a terminal, or you can just press CTRL + ALT + T and your default terminal should open.

Once you have your terminal open, you need to enter just one command, really. The command you’ll enter is:

That will run its course and then pause on a screen where you can read about your display manager. There are no real options on that page, so you can just press the enter button after reading it.

This won’t actually take all that long. When you’re done, you can logout and then login to Lubuntu or, more effectively, just reboot and you’ll boot into the Lubuntu environment. 

When you reach your new login menu, you can pick which desktop session you want to login with by using the dropdown menu in the upper left, with Lubuntu being the new default. Of course, you can login to the regular Ubuntu session still (as well as Ubuntu on Wayland). Most things will still work in when you’re logged into an Ubuntu session, except for blanking the screen. That fails because you’re no longer using GNOME-display-manager (GDM3). (You’re now using SDDM.)

That was it. That’s all you have to do. However, if you don’t like it and want to change it back, it’s slightly more complicated – but not terribly so – to reverse this change. To reverse it, you need to …

Change Lubuntu Into Ubuntu:

Once again, open your terminal. It’s not hard, as described in the 2nd section of this article. Heck, it’s described in almost every article.

You can start with just this command:

And that’ll get you almost all the way back to normal. You’ll still have the splash screen and boot logos that belong to Lubuntu. You could leave those and learn to accept them, or you can fully restore the original setup.

Assuming you want things back the way they were, we need to get your display manager reconfigured – restored to what it was. That’s a very easy command. It looks like:

You’ll get another one of those warning screens and, once again, there are no options. The only thing you can do is press the enter button. Fortunately, that’s exactly the button you want to press!

Finally, you need to change the boot screens. It’s a pretty easy command, but it is interactive. Just run this to get it started:

That will ask you which theme you want to use. In this case, you’ll pick 1 and press the enter key. Basically, you want the option that isn’t “Lubuntu” and this will fix the final visual issue.

When you next reboot, you’ll have the default Ubuntu logo and theme during the whole boot process (assuming everything went as expected). Your login theme will have been restored to Ubuntu’s default, as will have the Ubuntu splash screen while the system boots.

Of course, you could always opt to keep Lubuntu installed alongside Ubuntu, that is LXQt alongside Gnome, if you’d prefer. Then again, if you like your Lubuntu installation, maybe you’ll just want to use it. It’s easy enough to remove GNOME or to even just clean install Lubuntu.

Closure:

And there it is! It’s an article that teaches you how to change Ubuntu into Lubuntu. It’s not a very complicated affair and you can restore it easily enough, should you not like it. You can more or less do this with any other official flavor. Swapping back to just the old Ubuntu will potentially use different commands, but it’ll otherwise be quite similar.

Thanks for reading! If you want to help, or if the site has helped you, you can donate, register to help, write an article, or buy inexpensive hosting to start your own site. If you scroll down, you can sign up for the newsletter, vote for the article, and comment.

Linux Tips
Creative Commons License
This work is licensed under a Creative Commons Attribution 4.0 International License.