How To: Test Your Bandwidth From The Terminal

There are all sorts of ways that you can test your bandwidth rate from the terminal. This article is going to cover just one of them. As far as articles go, this one should be pretty easy for anyone to follow and understand. It should also be relatively quick.

So, there’s that…

Which is nice…

The tool we’ll be using is known as ‘speedtest-cli’. You may be more familiar with their website, speedtest.net. If you, like most, visit the site, you can have your bandwidth tested in a number of ways and from a variety of servers. You can do that from the terminal, if you want.

Speedtest.org is pretty handy, though I’d probably recommend librespeed.org to folks who are testing via the web. The latter has no Java, websockets, nor Flash. It is also open source. On the other hand, it lacks a way to easily test it in the terminal.

So, what is speedtest-cli? It’s a way to access the speedtest.net tests via the terminal. There are a number of options and I’ll cover the most important of those options below. For now, speedtest-cli defines itself as:

speedtest-cli – Command line interface for testing internet bandwidth using speedtest.net

That’s a pretty accurate description of what it does. It’s also the tool we’ll be using. It’s just easier and fancier than other ways. Sure, you can download a large file in the terminal and get a good idea of what your download rate is, but it’s not much of a test and doesn’t include things like your upload speed.

Test Your Bandwidth:

As stated above, you will test your bandwidth rate in the terminal. To do this, you’ll obviously need an open terminal. To open your terminal with a keyboard shortcut, just press CTRL + ALT + T and your default terminal should open.

Install speedtest-cli:

So, speedtest-cli is unlikely to be installed by default, you’re going to have to install it. If you go to their official download page, you’ll get to download a script form of the application for pretty much every architecture out there. Those will work just fine and have directions about how to use them.

But, you can probably properly install speedtest-cli. For example, if you want to install it on Ubuntu, your installation command would look like this:

I didn’t check every other distro, but it sure looks like it’s available in the default repositories for a bunch of them. Even in Manjaro, I was able to install speedtest-cli with this command:

And all was good with it installing without any need to mess around with scripts or installing it manually. As near as I can tell, it works the same for Fedora and even CentOS. Just use your package manager to do the installation and it’s probably in there.

Test Your Bandwidth With speedtest-cli:

Next, you’re going to want to run speedtest-cli. If you’re familiar with the web interface, the terminal interface won’t seem too terribly foreign. By default, the bandwidth test will be done with the closest servers to you (based on IP address geolocation). You can also pick the server you want it to test your bandwidth with, overriding the default choice.

If you want to run the command that’d give you the results you’d get by using the defaults on the web page, you just run the command without any flags at all. It looks like:

If you want to list servers based on distance from your location, then you first need to run this command:

That will show you servers and their associated server number. Using that number, you can pick which server you want to use with this command:

Those commands will happily give you the test results right there in the terminal, but you can also opt to generate an image. To do that, you use the --share flag. So, a basic command would look like this:

After it spits out the results, it will give you a URL to an image generated based on your individual results. I suppose this is good for bragging rights or for demonstration purposes when complaining about your throughput to your ISP. An image generated from a VPS of mine looks like:
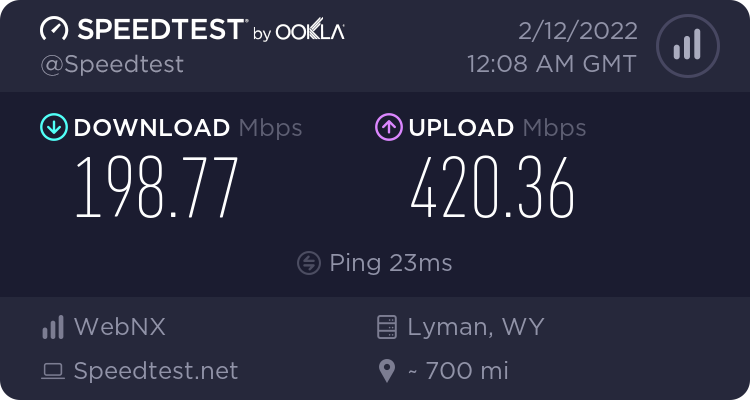
speedtest-cli results from a VPS
That’s obviously from a VPS. My bandwidth isn’t that good! It’d be pretty sweet if it was!

You can use that image to show off to your friends or, as mentioned, a demonstration for how poorly our ISP is serving you. This is one of a few ways you can tell if your provider is actually providing you with the services you purchased.

Those are pretty much the only ways you’re going to use speedtest-cli in the real world. There are a few more options, so be sure to check the man page. As a general rule, most folks are going to just want those options and those results.

Closure: 

And there you have it. You now have a new article. This one is telling you how to test your bandwidth with speedtest-cli, a test you may find useful from time to time.

The bandwidth from my house? Well, I have a lot of stuff using the ‘net on this line right now – but it’s still enough bandwidth for my needs. It’s not nearly as impressive and the results look like this:
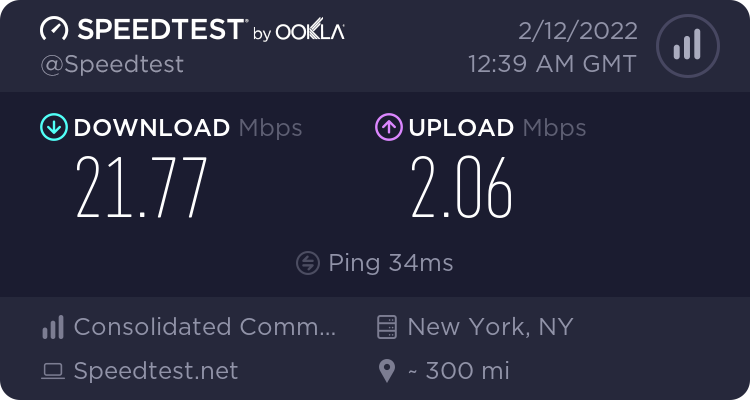
speedteest-cli results from my home
As you can see, it’s not that high. That’s actually a bonded DSL line and twice what it used to be!

It’s useful testing to see if you’re actually getting the bandwidth you paid for. Sadly, ISPs are aware of the IP addresses speedtest.net uses and folks tell me that they’re prioritizing traffic from that service (meaning giving you better results than reality would give you) but I have no idea if that’s true or not. To be fair, it does sound sleazy enough for an ISP to do it, though I’ve had pretty good luck with the service providers I currently use.

Thanks for reading! If you want to help, or if the site has helped you, you can donate, register to help, write an article, or buy inexpensive hosting to start your own site. If you scroll down, you can sign up for the newsletter, vote for the article, and comment.

How Do I Install Linux (A General Guide)

Today, I will try to answer one of the most common questions asked by the newcomer to Linux; “How do I install Linux” To answer this I have prepared a step-by-step guide of how to install Linux with the minimum of technobabble. So, I hope you will find it simple enough to follow.

This is a guest article by one Brickwizard, who describes himself as thus:

I am Brian the Brickwizard. My interest in modern computers goes back to the days of the 8-bit IBM compatible. As a hobby, I have been repairing, upgrading, and building from-scratch computers for friends and family. I have done so since the late 80s/ early 90s. I have been a Linux user for over 20 years! Brickwizard is an upstanding member of Linux.org. This is my first contribution to Linux Tips.

This is a guide to most distros, a generic guide that’s useful for the most popular distros that have handy GUI installers. This isn’t a guide to things like Arch, Slackware, or Gentoo! It will work for Ubuntu, Debian, Mint, MX-Linux, and many more!

This also serves as a place people can link to, rather than clutter the forum up with long posts that really don’t get much formatting options. This is meant to be a time-saver, among other things. As a living document, it is also subject to change.

How Do I Install Linux:

Depending on the age of your machine you will need an installation medium, this is usually a clean pen-drive of 4 GB minimum (try not to exceed 16 GB), make sure it is of good quality and formatted to FAT32 or exFAT.

On older machines that are not USB boot-able, you will need a clean new DVD-R. You will also need courage, patience, and time. This is just the start of your journey, the step where you learn how to install Linux.

Make your ISO installation medium [pen-drive or DVD-r]

  • Choose your distribution and go to the official download page.


  • On the download page you will find an SHA sum, make a note of it.


  • Download your chosen distribution.


  • Burn a bootable installation medium.

For a USB pen-drive to do this, we recommend Balena Etcher.
Or for optical disc, select “burn as ISO image” in your burning software.

  • Whichever you use, now is the time to check the SHA sum (if you are unsure how, then see this article). 

To Install:

For best results, ensure your computer is either hard-wired to your router, or has a Wi-Fi card installed.

  • Connect the computer to mains power.


  • Insert USB into drive (or optical disc into drive).


  • Switch the device on and open the temporary boot menu (method will depend on the make and model of your computer).

Look down the list and find USB (or Optical Drive) click on it and enter, after a few seconds (depending on your choice of distribution) it will load a “live” session to RAM.

NOTE: You actually do not need a hard-drive installed at this stage if you only wish to check to see if Linux will work on your machine

NOTE: If you are making a dual boot system with Windows 8, 10 or 11, disable the windows quick-start (in the BIOS) and re-boot before continuing.

For best results, ensure your computer is either hard-wired to your router, or has a Wi-Fi card installed.​

  • Connect the computer to mains power.

  • Insert USB into drive (or optical disc into drive).
  • When the live instance of your chosen distro has loaded, your desktop will appear. Now is the time to ensure everything works okay, such as Wi-Fi, sound, and graphics. The easiest way to do this is click on the wireless icon find your router and enter the password. When you’re connected, go to your favorite music video site and pick something you are familiar with. If the video plays okay, the picture looks good, and the sound works, you can then decide if you wish to continue the installation.


  • To start full installation, double-click the installation button on the desktop (this may vary based on the distribution). The installer will then check the components of your machine. This may take several seconds or a couple of minutes, depending on how fast your computer is. If all goes well, the installation will begin shortly, asking you to input certain information – such as your username and password. Watch it install. When it asks about partitioning, this is your final chance to decide if you want to dual boot with your existing system (select installation alongside) or wipe the system and just install Linux.


  • During install, most distributions will ask if you wish to install non-free/proprietary drivers, tick the box for yes and enter. Non-free does not mean it will cost money to use. It just means that it’s supplied by the manufacturer and not FOSS (Free Open-Source Software). You can choose to not install proprietary drivers, but that will make your life more difficult and is beyond the scope of this article.


  • You may need to continually enter information as it installs, so keep an eye on it. A typical Linux installation can take from 10 to 20 minutes.


  • When it has installed you will get a message do you wish to re-start now, accept and enter. When prompted, be sure to remove the installation media.

Sit back whilst it reboots, then it will take a couple more minutes to clean up the installation and get rid of the installation files. Then if all goes well we will have a working Linux box

When your system has rebooted to your new Linux system, open the update manager and run a full update.

NOTE: When you have successfully installed your Linux distribution, we strongly recommend you install and activate some backup software, such as Timeshift

Being new to Linux, there will be learning curve. As I often say, “Relax, kick off your shoes, grab a beer, and enjoy the ride.”

Closure:

There you have it, it’s another article – and this time it’s a great article from Brickwizard. This one will tell you how to install Linux. It’s a basic guide, which is fine, because it can always be more complex and this is just to get you started. If you have any questions, you can ask below or head over to the Linux.org forum and ask questions there. Even better, it stands as a static page that can be linked to, saving time, effort, and space.

Thanks for reading! If you want to help, or if the site has helped you, you can donate, register to help, write an article, or buy inexpensive hosting to start your own site. If you scroll down, you can sign up for the newsletter, vote for the article, and comment.

How To: String Commands Together In The Terminal

Today’s article is about how you can string commands together in the terminal. You can do so in a few different ways, for a few different reasons. This article will explain some of those to you, hopefully making your life easier.

There are a number of reasons why you’d want to string commands together. I find it easier to just run certain commands together. I also find it easier for some aliases. (Speaking of which, I really need to do an article about aliases!)

For example, you might want to run change to the Foo directory and then list the files inside it. Well, one way to write that command would be cd Foo && ls -la. In that case, you’d change the directory to Foo and then you’d list all the files within that directory. As I said, there are a number of ways to do this and a number of reasons why.

This article won’t be all that long – or even all that difficult. But, this is a pretty basic skill you’d want to have if you’re working in the terminal. It’s one of those tools you’ll (maybe) find yourself using more often once you’re used to it. I, for one, use it with some frequency. You can string commands together and then go make coffee!

String Commands Together:

Obviously, you’re going to need an open terminal. If you don’t know how to open the terminal, you can do so with your keyboard – just press CTRL + ALT + T and your default terminal should open.

With your terminal open, you’ll want one of the following operators:

; run the next command no matter what.
&& run the next command only if the first one succeeds.
|| run the next command only if the first one failed to run.

The ; operator can be used something like this:

Them the && operator can be used something like this:

Finally, the || operator can be used something like this:

You could string them along something like:

See? It’s not all that complicated. You can also swap the ; operator for a single ampersand. It’ll do the same thing, run the following command regardless of the results of the first. So, cd Downloads ; touch foo and cd Downloads & touch foo are functionally the same.

Closure:

Yup, another article – said and done. This one is, as promised, not all that difficult or even all that long. Still, I hope you’ve learned something and know now how to string commands together in the terminal. It’s a pretty useful skill to have. Feel free to leave a comment explaining how you already use these operators to string commands together.

Thanks for reading! If you want to help, or if the site has helped you, you can donate, register to help, write an article, or buy inexpensive hosting to start your own site. If you scroll down, you can sign up for the newsletter, vote for the article, and comment.

How To: Find The File Type In The Linux Terminal

There are many file types in Linux, and we’ll learn to find the file type in the Linux terminal in this article. It’s not terribly difficult and is a good basic article, with a command not that widely discussed. It’s a good time to learn.

Let’s start at the beginning… As many of my readers are new, there’s some stuff you ought to know.

First things first, everything in Linux is a file. I realize that that may confuse some folks new to Unix/Linux, but it’s true. If you don’t know how this works, click this link. That should explain it well enough.

Linux also uses the whole Magic Bytes thing. You can click here and learn about Magic Bytes. To explain it a bit differently than Wikipedia – it’s why you can make a text file without an extension and still have it open with a text editor when you click on it. The system sets Magic Bytes that mark the file as being of a certain type.

Well, there’s a tool that you can use in the terminal to find a file type. Amazingly enough, that tool is called ‘file’. The man page for which is clear:

file — determine file type

Yup, that’s the tool and that’s what it does. It’s pretty accurate and works with a number of file types. It checks things like whether the file is an empty file, what response it sends when queried, if it has Magic Bytes, and the language used in the file. It’s pretty comprehensive.

Find The File Type:

Obviously, this requires an open terminal. After all, we’re finding the file type in the terminal. That kinda needs an open terminal! Just press CTRL + ALT + T and your default terminal should open. Tada!

Now, with your terminal open, and enter the following command. I’m pretty sure this will work on any desktop Linux!

It’ll happily spit out that you have a data file on your hands.

But, here, let’s see if we can fool it. Grab an image and call it image.png (or whatever extension) and run file <filename.extension> to see the output. Now, rename the file to just plain ‘image’ and run the command again (sans extension). What does it tell you? It should look something like this:

file command in action
See? It still knows that it’s an image file. Images use the Magic Bytes.

Go ahead and try to fool it. Rename it image.txt and try it again. Pretty neat, huh?

I don’t need to patronize, by now you get the idea. You see what it can do. Well, there’s a bit more. You can create a text file with a list of files in it (with their path if in different directory) and the run file on that file you created – just make sure it’s a plain text file that you created. It’ll happily output the types of all the files listed inside.

You can also use the whole wildcard thing. You can get all the file types in a directory with this command:

If you want all the files starting with the letter I, you’d do this:

If you want, you can even use it on compressed files. For that, there’s the -z flag. It looks something like this:

It’ll spit out some information, perhaps letting you know the minimum version of your archive manager needed to open it. It doesn’t give you information about the compressed files, however. To do that, you’d have to extract the files first.

Closure:

And there you have it. You have yet another article! This one shows you how to find the file type in the terminal, and is a handy tool indeed. I normally take the entirety of January off, but I can’t do that this year. This year, I must ensure there are articles. Maybe next year! The good news is I can author these things with a wee bit o’ the wine in me. So, there’s that!

Thanks for reading! If you want to help, or if the site has helped you, you can donate, register to help, write an article, or buy inexpensive hosting to start your own site. If you scroll down, you can sign up for the newsletter, vote for the article, and comment.

How To: Make A Directory In Linux

Today’s article will teach you how to make a directory in Linux. Making a directory in Linux is pretty basic, straightforward, and easy. There are some options when making directories which we’ll be covering, but we’ll just be using ‘mkdir‘ for this exercise.

You’ll find the man page describes mkdir eloquently enough:

mkdir – make directories

And that’s exactly what it does. It’s a tool for making directories. Again, it’s pretty straightforward.

If you want a decently useful directory structure, you’re going to want more than the default directories. You’re going to want to make a consistent and meaningful directory structure, which will save you quite a bit of time and effort. Life is easier when you have a useful directory structure that makes sense to you – making things easier to find.

In case one doesn’t know, you can use ‘folder’ as a synonym for ‘directory’. It’s a hierarchical marker to which files can be designated – meaning you can stick stuff in your folder if you want to. They’re one of the best ways to organize your files in a meaningful fashion.

Like files, there are permissions for folders. Often, those permissions are inherited by the files within, though that’s not strictly necessary. We’ll lightly cover that as well.

For such a simple subject, there’s a bit of meat to it. We’ll cover that too in this article about how to make a directory in Linux. It’s mostly a beginner oriented article, but there may be some options that are unfamiliar more advanced users.

On to the article!

Make A Directory In Linux:

This article requires an open terminal, just like many other articles on this site. You can do so with your keyboard – just press CTRL + ALT + T and your default terminal should open.

Once you have your terminal open, you can change directories or make these practice directories in your home folder (which would lead to clutter). So, if you want you can run mkdir tmp && cd tmp to get a fairly clean workspace going. (See? We’re using mkdir already!)

Anyhow, a nice basic use is to make a directory. To make a directory called ‘foo’ then you’d simply use:

If you want to make parent and child directories, you can also do that with just one command:

You can even make multiple directories in the same directory. That’s just a simple use of brackets and looks like this:

If you want to set permissions at the same time, that’s also an option:

You can also add the -v flag (meaning ‘verbose’) to any of these commands. That will output the results of your command so that you can verify that the command actually created the appropriate directories. After all, you never know when you’ll fat-finger something.

Closure:

There you have it! It’s another article, this one teaching you how to use the mkdir command to make a directory in Linux. This article is not terribly difficult, but there are a few advanced options that can make your file management even better. It’s a handy set of flags to know if you’re keen on keeping your system free of clutter.

Thanks for reading! If you want to help, or if the site has helped you, you can donate, register to help, write an article, or buy inexpensive hosting to start your own site. If you scroll down, you can sign up for the newsletter, vote for the article, and comment.

Linux Tips
Creative Commons License
This work is licensed under a Creative Commons Attribution 4.0 International License.