How To: Find Your Timezone In The Terminal

This article is about your system time, specifically how to find your timezone in the terminal. It shouldn’t be a very long article and it should be relatively easy and suitable for new Linux users.

Why would you want to find your timezone in the terminal? Well, for starters you may not have the proper time set and need to verify it. You may also be working with servers scattered across the globe and knowing the timezone may be important.

As you may need things synchronized, knowing the timezone could be important. Seeing as you’re not always able to access a GUI desktop, you might want to find your timezone in the terminal. So, to those end, this article will share a few ways to do so.

Find Your Timezone In The Terminal:

Obviously, this article requires an open terminal. If you don’t know how to open the terminal, you can do so with your keyboard – just press CTRL + ALT + T and your default terminal should open. If you’re operating remotely, you probably already have a terminal open.

Anyhow, there are multiple ways to do this. For starters, you can just use the date command. It looks like this:

The output will have your timezone in it. For example, the output of that command on one of my boxes looks like:

As you can see, the timezone is at the end. In my case, it’s “EDT” and that’s probably the easiest way to get the timezone information.

You can also use ‘timedatectl’ which looks like this:

That’ll give you the timezone and even tell you the adjustment from GMT. If you want, you can use grep with it.

That will, of course, just output the line containing your timezone. Also, I have no idea why it’s two words. I know it as one word, but here we are and I suppose it’s just not that important.

I have one more way to find your timezone in the terminal and it’ll output your timezone in text. It’s just:

The output from that would look a little like this:

So, there are a few ways. There are surely other ways, so feel free to leave a comment sharing them.

Closure:

And there you have it, another article. This one shares how to find your timezone in the terminal. It’s a relatively easy article to follow and not really a tool I expect most users to need. Still, it’s there if you need it and this article stands as a reference to it.

Thanks for reading! If you want to help, or if the site has helped you, you can donate, register to help, write an article, or buy inexpensive hosting to start your own site. If you scroll down, you can sign up for the newsletter, vote for the article, and comment.

A Little About The ‘tail’ Command

Today’s article is about the ‘tail’ command, seeing as the last article was about the ‘head‘ command. The tail command is the head companion’s counterpart. It only makes sense to cover one after covering the other, so today’s article will do just that.

Like the head command, the tail command has been with us for a long time, since pretty much the earliest days of Unix. Where head shows you the first lines in a file, the tail command shows you the lines from the end of the file. The man page describes tail as:

tail – output the last part of files

The tail command is pretty handy, often used by sysadmins to monitor log files. It can also be used like the head command to quickly check the contents of a text file, but it shows the material at the end of the file and not at the start of the file. That’s useful for remembering where you left off, for example. Anyhow, there are all sorts of ways to use it and this article will explain some of them.

Getting Started With The ‘tail’ Command:

I don’t think it’s all that important for this article (I’m not sure, I haven’t written it yet!), but we can start on the same page like we did with the head command. 

We’ll need to get started with the terminal open. You can do open your terminal with your keyboard – just press CTRL + ALT + T and your default terminal should open.

Once you get the terminal open, you can run the following two commands. Be sure to press the enter button after each of them and it will download a handy text file (just some random numbers) so that we’re all working on the same file.

With that complete, we can head on into the main article! It shouldn’t be all that long or difficult.

The ‘tail’ command:

Seeing as you’ve already got the rnd-num.txt file downloaded and your terminal is already open, I think we can just jump into using the tail command. If you just want to view last 10 lines of a file, you can use this command:

On the other hand, you can use the -n flag to show a specific number of lines. If you only wanted to see the bottom 5 lines, you’d use this command:

Assuming you’re all playing the home game, and just to show a good example, the output from the final command would look similar to this:

tail with the -n flag
As you can see, it only shows the last five lines of text. Pretty neat, huh?

Along the same lines, but not necessarily as useful, is the -c command. It works the same way it does in the head command, namely showing the specified number of bytes. If you wanted to see the final 5 bytes, the command would look like:

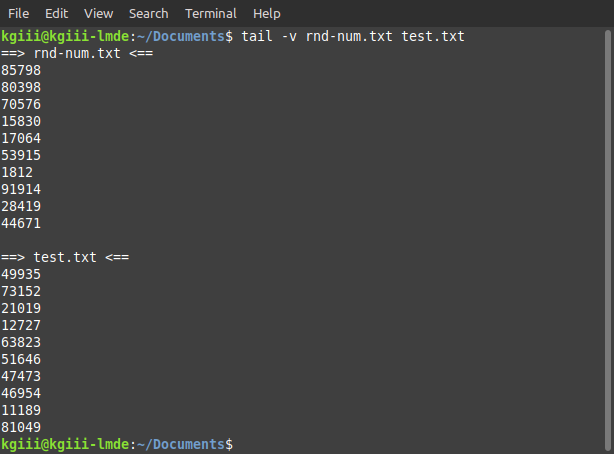
You can also use tail on more than one file at a time. If you do so, you can also use the -v flag and it will helpfully show the names of the files. The command would look a little like this:

The output would look similar to this:

tail being used on multiple files
It helpfully shows you the file names, which can be handy if you’re using multiple files.

One of the command options available with tail isn’t available with head. That flag is the -f mostly used for logs. What happens is you use the -f flag and then tail keeps running, outputting new lines to your terminal as the occur. In that case, it’d be something like:

That should show the last 10 lines of the log file and then update when new lines are added to the log file you’ve opened. Use man tail for more usage information.

Closure:

And that’s it! There’s another article for the site and another article closer to reaching the project’s goals. This article covers the tail command, seeing as the head command was covered in the last article. Feel free to leave a comment sharing how you use the tail command, or maybe even just a comment or question to motivate me.

Thanks for reading! If you want to help, or if the site has helped you, you can donate, register to help, write an article, or buy inexpensive hosting to start your own site. If you scroll down, you can sign up for the newsletter, vote for the article, and comment.

Linux Installation USB Media Using Windows

This is a guest article by @captain-sensible, about Linux installation – specifically creating USB media using Windows. I trust him on this, and don’t feel qualified to do much in the way of editing as I know next to nothing about Windows. So, without further ado:

Preamble:

If you already have Linux as your OS, then an article about how to get a Linux .iso onto a USB stick is probably redundant. The other thing I can deduce is that if you want to have a go at trying to install Linux, that would mean you probably don’t have Linux OS nor access to programs that run on Linux.

You might think an article involving Windows is not a good fit for Linux tips? Well I disagree the tip to put it succinctly is this – “Linux and how to get it” I.e. you want Linux but you don’t have it, and so the article is about getting it using the only tool you probably have at your disposal, which is Windows. (That’s assuming you don’t have any avisée friends using Linux)

Therefore, I am going to go through how to use Windows and software tools to get a Linux OS iso file onto a USB from which you can boot. Maybe in part 2 I could mention use of ventoy on a Linux box and persistence for a live Linux OS on a usb .

Now there are a couple of tools you can try including:

https://www.balena.io/etcher/
https://rufus.ie/

But here we will have a look at Ventoy. Ventoy has a couple of useful features – you can put several Linux ISOs onto the same stick and boot from any of them via the Ventoy boot splash menu. Also via one of the Ventoy tools called CreatePersistentImg a file is created, inside the same directory that the script is run and can be configured to be used on the formatted stick with the ISOs so that the live OS can install software.

Our Agenda will be:

  • Download a Linux .iso file
  • Download Ventoy
  • use Ventoy to format a USB stick we have
  • Drag .iso file onto ventoy formated stick
  • Boot from USB stick

Create USB Media Using Windows:

Normally I use Linux with ventoy; for this exercise using Windows10, I downloaded linuxmint-20.2-cinnamon-64bit.iso from University of Kent Mirror.

See Linix Mint Cinnamon Mirrors

Now with a download you need to check the integrity of the download. You can get the sha256 sum from:

https://ftp.heanet.ie/mirrors/linuxmint.com/stable/20.2/sha256sum.txt

And the gpg from:

https://ftp.heanet.ie/mirrors/linuxmint.com/stable/20.2/sha256sum.txt.gpg

Instructions for verifying your download can be found at:

https://linuxmint-installation-guide.readthedocs.io/en/latest/verify.html

Next we need to download Ventoy:

Go to this URL:

https://sourceforge.net/projects/ventoy.mirror/files/v1.0.52/

Shimmy down to ventoy-1.0.52-windows.zip and mouse left click to download it to your PC. Right click and choose “extract”. You will probably get something like select a destination – go for Desktop if you can; at least you can find it easily.

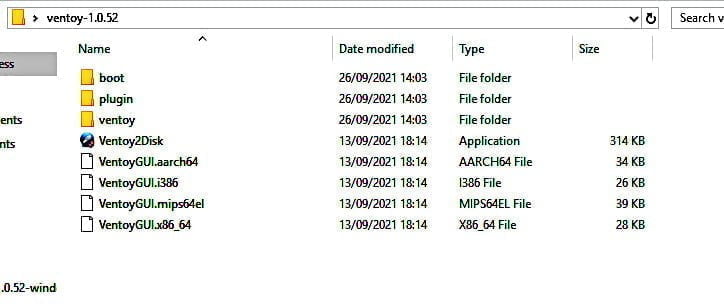
Anyway that will unzip the zip file. I found once unzipped that the directory I wanted was inside another directory called ventoy-1.0.52-windows, the directory and its contents you want is the one labelled ventoy-1.0.52.

See image below:

That’s the one that contains the tools you need including Ventoy2Disk, an executable Windows file. Drag that directory from inside the outer directory to your desktop.

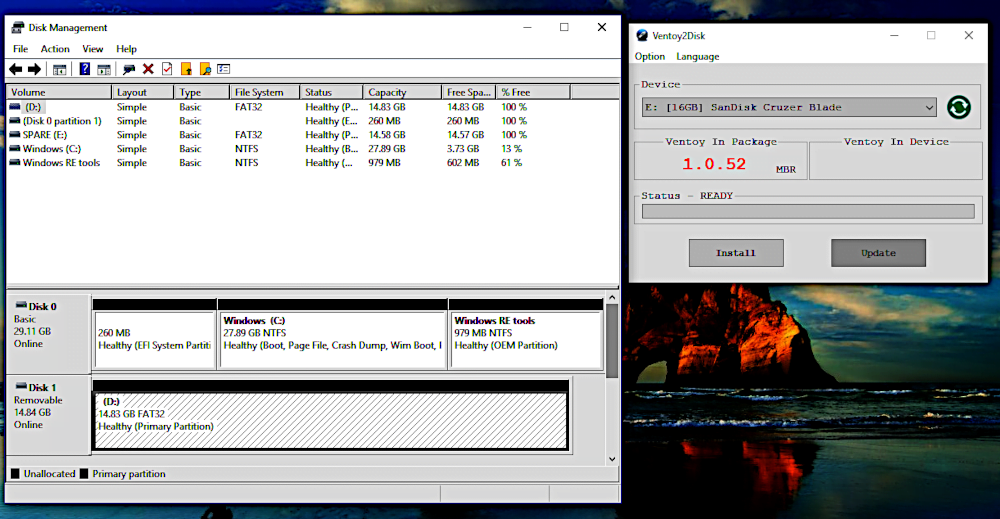
To fire up Ventoy, go inside the ventoy-1.0.52 directory and mouse left click twice on Ventoy2Disk. You should then see a dialogue box (see image below). Now from the image it tells you that it thinks Device E: SanDisk is the USB stick to be formatted. The main point being you need to insert a preferably virgin USB stick, a USB thumbdrive with nothing on it, into your PC before Ventoy2Disk can work on anything.

Now its always best to double check things. One way of doing that is to fire up a disk utility and see what’s listed. You will use common sense as well – A 16GB storage device is unlikely to be your PC internal hard drive. Lets have a look anyway.

One way of confirming is to use Disk management. To fire that up hit the key with Windows Icon on it and R, that should bring a dialogue box up with a text box . Into the text box type Diskmgmt.msc; you should then see Disk Management and entries – see image left.

Disk management and venoy dialogue

I think I can conclude with Ventoy that Spare E is the USB I want to use. One reason is that I formatted it and labelled it using GParted. So next with USB attached to PC, left click on the install button of the Ventoy dialogue box. Now when its finished, pull the USB out and re-insert it , that’s to make sure the PC is correctly recognizing, the USB which will now have a label – ventoy.

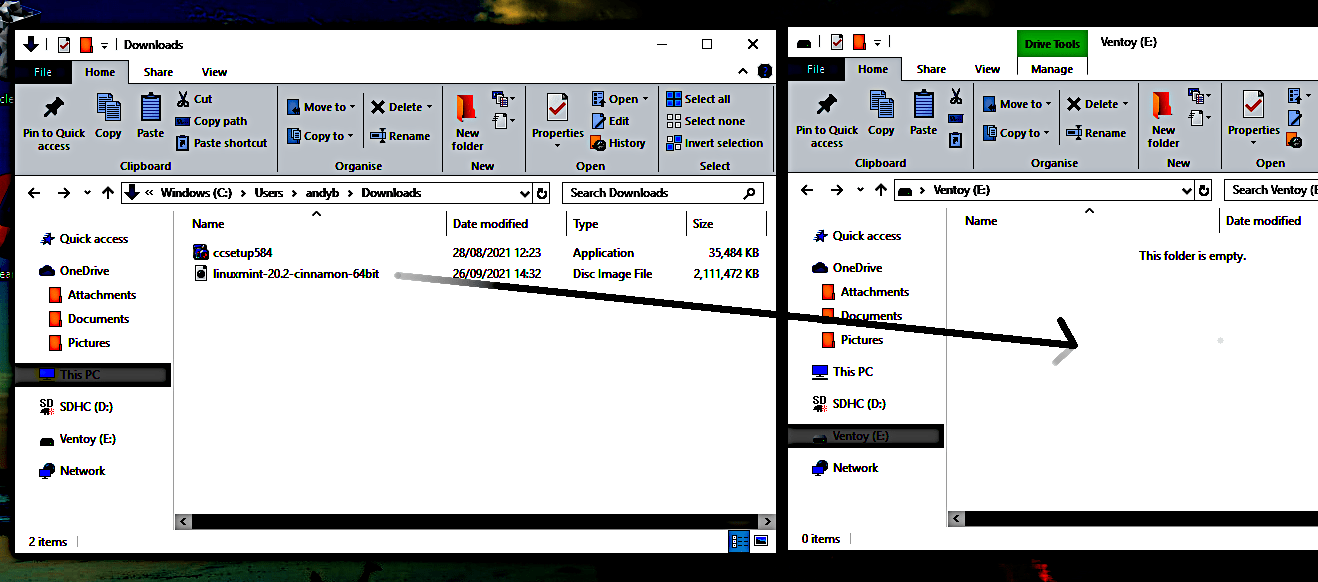
Drag iso from download location onto ventoy usb

If you look at the above image, a window is open with location of the ISO file and the other Window on the right is the newly labelled USB stick called ventoy opened. All you have to do is use your mouse and literally drag holding down left, on the mouse from the left window onto the right window. You might have to fiddle with Windows, I know I did with Windows 10 on the laptop I was using.

Once that’s been done its a case of now shutting down Windows and from a cold boot hit the key which will give you boot options. The laptop I was doing the operation was a H.P stream so for that laptop F9 is the boot option key and F10 is the bios. You have to hit the keys almost immediately after powering up.

I had a couple of glitches on powering up, getting the boot option and booting from the USB I got “image not authenticated “now what came to mind was checking the integrity of the download. No that wasn’t it.

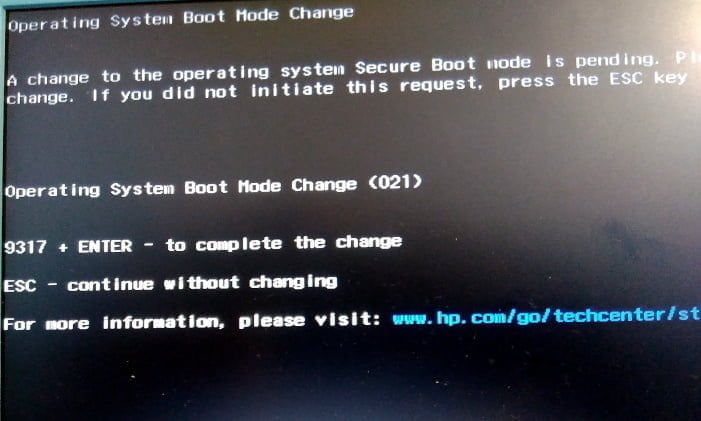
boot glitch

One issue was expected in disabling secure boot and enabling legacy boot; the other one wasn’t. What is was is that although I had edited the BIOS, there was a “Operating System Boot Mode Change” notification.

I did as requested entered the number quoted, hit Enter (return key) and after that I was Ok. I then got Mint booted live! Finally – Windows doesn’t like to let go easily.

Moving On:

Now when you get to the stage of getting a Linux OS up live from a USB here are a view bits of advice:

On the Desktop of your live Linux OS you will see an icon saying install Linux, don’t rush in and do that. Play around for a week with the live OS, get to know it and try of launching a shell (terminal window). Learn to use, at least launch and have a look at tools such as GParted and screenshot. You can use apt-get or apt from a terminal to search for that.

Those sort of tools and your ability to use them will come in extremely handy if you have any issues and need help from a Linux forum. Users will want to see your partitions (use gParted) and see what some things look like (use screenshot) they will probably also want to see some output of commands on the shell (your ability to use basic commands needed).

The live Linux OS you have doesn’t have persistence, you can play with installing software and it should install but only in RAM. You can achieve persistence with the Ventoy approach, but thats perhaps for another time.

Closure:

There you have it, an article about creating Linux installation USB media using Windows. This one was written by a guest, now a registered user and author. So, kudos to them for stepping up and contributing!

Thanks for reading! If you want to help, or if the site has helped you, you can donate, register to help, write an article, or buy inexpensive hosting to start your own site. If you scroll down, you can sign up for the newsletter, vote for the article, and comment.

Strip Password From A Password-Protected PDF

One company likes to send me a password-protected PDF every month, and it can be a pain typing in the password every time. Fortunately, we don’t have to! To completely remove the password from password-protected PDFs, keep reading!

Now, there are times when removing the password from a password-protected PDF is against corporate policy or may be a violation of regulations. I suppose a good rule might be, “Don’t tamper with the password protection unless the PDF belongs to you.”

That said, it’s actually pretty easy to remove the passwords from password-protected PDFs. It’s easy and I’ll show you how! This won’t even have to be a very long article!

Remove Password From A Password-Protected PDF:

Like oh so many of my articles, this one starts with the terminal open. If you don’t know how to do that, it’s easy. Just use your keyboard and press CTRL + ALT + T and your default terminal emulator will open.

The tool we’ll be using is called ‘qpdf‘ and it describes itself as:

PDF transformation software

Once you have that open, one of the following should help you install qpfd:

Debian/Ubuntu:

Arch/Manjaro:

RHEL/Fedora:

Any of those should get you to the point where qpdf is installed, and there shouldn’t be (m)any dependencies. Using it is just as easy as installing it.

Obviously, you change “PASSWORD” to the password that’s used in the password-protected PDF to the actual password. You also use the name (and path) of the PDF and a new name for the new PDF that has no password. That will, of course, remove the password and you can delete the original after verifying that it worked.

BONUS:

You can actually use qpdf to make a password-protected PDF. It’s also easy and the command would look like this:

In this case, the PASSWORD is your new password and it must be typed twice. The 256 is the key-length used to encrypt the PDF. To get more information like that, just run:

In there, you’ll see that qpdf is really quite a potent application. It can do so much more than just stripping the password from a password-protected PDF. So, give that help file a scan and see what other features it has!

CLOSURE:

See? I told you that this article wouldn’t take all that long. Best part? It’s another in what’s a growing list of articles and it’s something you can actually use when you get a password-protected PDF. Again, if you’re gainfully employed or in a regulated occupation you may not want to remove the password protection.

Thanks for reading! If you want to help, or if the site has helped you, you can donate, register to help, write an article, or buy inexpensive hosting to start your own site. If you scroll down, you can sign up for the newsletter, vote for the article, and comment.
Let’s Have Some Fun With Cowsay And Fortune

Today, we’ll be having fun with ‘cowsay’ and doing so while getting your fortune in your terminal. Why not? Linux doesn’t always have to be about work. Today’s article will be not even remotely useful for work and none of what you learn will greatly increase your Linux skills. We are doing this for fun, mostly.

Sometimes, it’s okay to be a little silly and to have some fun.

Besides, you’ll get to use the | (pipe) and that’s always fun! Seriously, the pipe is one of the best tools Linux has. It lets you take the output from one command and use it in another one. The man page helpfully describes it like this:

pipe – Postfix delivery to external command

We’ll just be scratching the surface with pipe, so be sure to run man pipe if you’re unfamiliar with it. Pipe hails from Unix and has been with us, in one form or another, since 1973. I dare say that the longevity is good evidence of the value.

I’m just going to give the directions for Debian/Ubuntu/derivatives. I haven’t checked across all the systems, so I’m not sure what distros this will work on. Probably all of the major distros, but it should work on anything with Debian in its lineage. If you’re not doing so, you should still be able to follow along and just adapt it to your package management systems. 

So, that being said and done, let’s look into this matter of a mad world with cows and fortunes.

Fun With Cowsay:

The first thing we have to do is open a terminal. Press CTRL + ALT + T on your keyboard and the default terminal emulator should open up. Once open, run the following command:

That should install both ‘cowsay‘ and ‘fortune‘, along with any dependencies that need to be satisfied. Those are the only two tools you need to install for this exercise, or at least they should be.

Fortune:

Fortune is a tool that outputs fortunes from a database. A normal use would be:

That should happily output a fortune for you.

Cowsay:

The cowsay application prints a graphic that looks vaguely cow-like and any text you tell it to print. The command would look a bit like this:

All of which is all well and good – but the magic is when you put them together. So, let’s try that. Let’s pipe fortune output to the cowsay application:

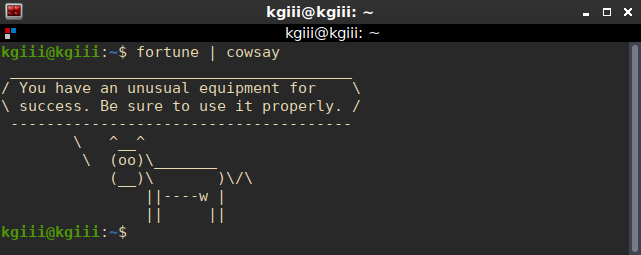
Which will have an output similar to this:

cowsay in action
See? You’ve got a cow spouting wisdom in the terminal! Just what you always wanted!

That’s not it! No, dear reader, that is not it! That’s not all you can do! See, you can change the cow to Tux, the Linux penguin mascot.

What the penguin has to do with a cow, I know not. But, I do know that you can use the command and output a penguin. 

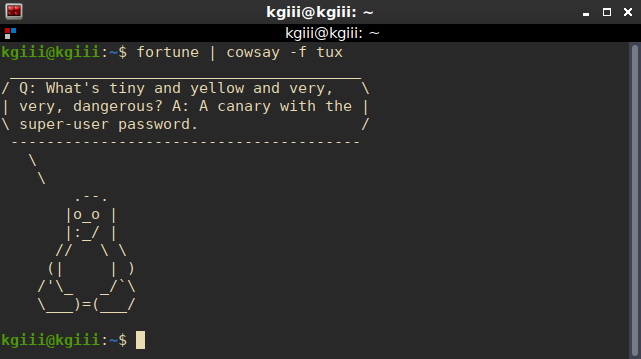
The output from that command should look pretty similar to this:

cowsay goes tux
See? It’s Tux! I wouldn’t make this sort of stuff up. It’s too important!

And there you have it. You’ve successfully piped the output from fortune to cowsay and, as a bonus, morphed the cow into tux. Another productive day at the office, while having fun with cowsay!

Closure:

I’ve got a couple of articles ahead, which is nice. This one tells you how to have fun with cowsay, which is also nice. It’s pretty important business!

Now to write some that are scheduled years in the future (so that I don’t mistakenly post them and they’re out of the way) and not fret too much when Mother Nature comes to claim my internet… I’m not giving up on my publishing schedule yet!

Thanks for reading! If you want to help, or if the site has helped you, you can donate, register to help, write an article, or buy inexpensive hosting to start your own site. If you scroll down, you can sign up for the newsletter, vote for the article, and comment.
Linux Tips
Creative Commons License
This work is licensed under a Creative Commons Attribution 4.0 International License.