Today’s article is just for fun, as there’s usually a handy graphical way because we’ll be discussing how to disable a PPA the hard way. This is mostly an exercise in fun and education. It’s something you can do, but you do not need to do. We’ll be learning how to disable a PPA the hard way, specifically through the terminal.
If you’re interested in doing things the hard way, read on! We’ll have fun with this one, and having fun is essential.
There’s an easy way to manage your PPAs, and this is not that. In your application menu, look for ‘Software Sources’ and do that. Do not do this – unless you have no graphical environment.
A PPA is something used by Ubuntu, but is also used in Mint and is possible to use in others – like Debian which strongly suggests against it. PPA stands for Personal Package Archive and is meant to be exactly that. It’s us that abuse the idea, which is kind of how we ended up with Ubuntu Snaps and other similar package formats.
We use PPAs for all sorts of things, like adding entire other repositories to install custom software. It’s meant to be your personal package archive – meaning personal. We’ve decided it’s a fine way to add repositories to install software not included by default. Oops!
So, we’re going to disable a PPA, and we’re going to do it the hard way. We have no reason to do it this way, at least on desktop Linux, but we can. And so, just because we can, we have this article.
Disable A PPA The Hard Way:
Yeah, we’re doing this the hard way. So, that means we’re going to need an open terminal. If you don’t know how to open a terminal, you probably shouldn’t be doing this. But, just in case, you can normally press
With your terminal open, you need to first know what repositories you have available to you. You need to know the added PPAs. That’s easy enough, just enter the following commands:
1 | cd /etc/apt/sources.list.d |
That will change you to the correct directory. We’ll now list the files like this:
1 | ls |
That will show you an output similar to this:
1 2 3 4 | kgiii@kgiii:/etc/apt/sources.list.d$ ls brave-browser-release.list official-package-repositories.list google-chrome.list opera-stable.list home:stevenpusser.list~ teamviewer.list |
Find the PPA you want to remove. In our case, we’ll use teamviewer.list as the PPA (or ‘regular’ repository) we wish to remove. This works for both PPAs from LaunchPad or other repositories you may have added.
So, you’ll want to use Nano for this. Odds are that Nano is installed by default these days, but this is not always true. So, read the following page before moving on.
Let’s Install Nano (With Some Bonus Information)
So, we want to edit the teamviewer.list to disable the TeamViewer repository. That’s done with Nano and the command looks like this:
1 | nano teamviewer.list |
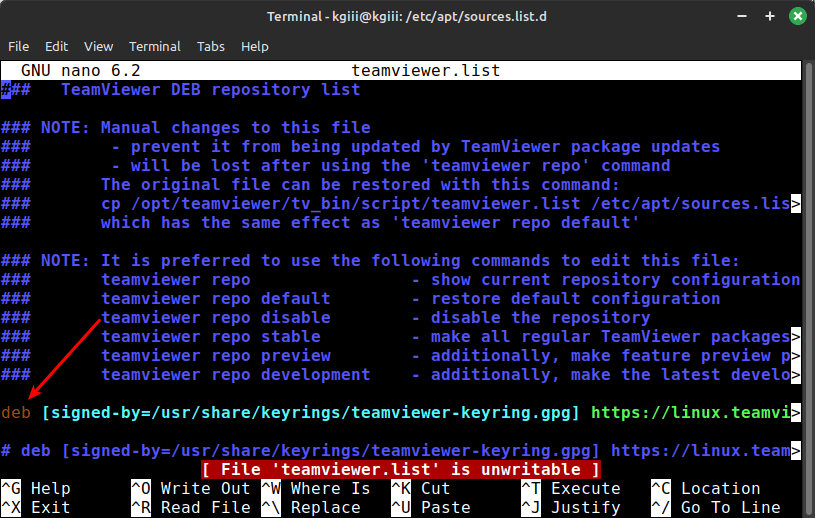
You’ll then be faced with a text file. Look for the line that starts with deb and is not commented out, that is not starting with a # symbol. For example:

So, in my case, I’d take the line that looks like this:
1 | deb [signed-by=/usr/share/keyrings/teamviewer-keyring.gpg] https://linux.teamviewer.com/deb stable main |
And I’d comment out that line. More specifically, I’d add a # sign at the front of that line. So, it’d look like this:
1 | # deb [signed-by=/usr/share/keyrings/teamviewer-keyring.gpg] https://linux.teamviewer.com/deb stable main |
You’ll then need to tell Nano to save the file. That’s easily done. You can just press
Next, you do this for any repositories (not just PPAs) that you wish to remove. Be aware that the software installed from those repositories will no longer update (which can be a bad thing). If you remove a PPA and still have the software installed, it should be temporary so that you can troubleshoot something.
Otherwise, you can now verify this. You simply need to update the available software again. You do that with this command:
1 | sudo apt update |
When you do that, you should find that you no longer have that PPA (or just regular ol’ repository) enabled. It will no longer update, thus no longer offer you new versions of that software.
The latter part of that previous paragraph should be considered essential.
So, choose carefully. If the repository has software that you plan on using, you should probably keep updating it. Many of the updates aren’t just bug fixes. Oftentimes, they’re legitimate security fixes. Software is software, regardless of the operating system. It has bugs and sometimes those bugs are security issues. It’s best to keep your system updated and doing so makes you a good Netizen.
Closure:
So, yeah… We’ve discussed how to disable a PPA the hard way. You can disable any repository this way, I suppose. I’m not sure that I’d suggest doing it this way – unless you need to do it this way. If that’s the case, you should do it this way. Most of the time, there are nice handy graphical tools to manage that sort of stuff.
Thanks for reading! If you want to help, or if the site has helped you, you can donate, register to help, write an article, or buy inexpensive hosting to start your site. If you scroll down, you can sign up for the newsletter, vote for the article, and comment.