Disable A PPA The Hard Way

Today’s article is just for fun, as there’s usually a handy graphical way because we’ll be discussing how to disable a PPA the hard way. This is mostly an exercise in fun and education. It’s something you can do, but you do not need to do. We’ll be learning how to disable a PPA the hard way, specifically through the terminal.

If you’re interested in doing things the hard way, read on! We’ll have fun with this one, and having fun is essential.

There’s an easy way to manage your PPAs, and this is not that. In your application menu, look for ‘Software Sources’ and do that. Do not do this – unless you have no graphical environment.

A PPA is something used by Ubuntu, but is also used in Mint and is possible to use in others – like Debian which strongly suggests against it. PPA stands for Personal Package Archive and is meant to be exactly that. It’s us that abuse the idea, which is kind of how we ended up with Ubuntu Snaps and other similar package formats.

We use PPAs for all sorts of things, like adding entire other repositories to install custom software. It’s meant to be your personal package archive – meaning personal. We’ve decided it’s a fine way to add repositories to install software not included by default. Oops!

So, we’re going to disable a PPA, and we’re going to do it the hard way. We have no reason to do it this way, at least on desktop Linux, but we can. And so, just because we can, we have this article.

Disable A PPA The Hard Way:

Yeah, we’re doing this the hard way. So, that means we’re going to need an open terminal. If you don’t know how to open a terminal, you probably shouldn’t be doing this. But, just in case, you can normally press CTRL + ALT + T and your default terminal will open. Otherwise, you can open the terminal from your application menu.

With your terminal open, you need to first know what repositories you have available to you. You need to know the added PPAs. That’s easy enough, just enter the following commands:

That will change you to the correct directory. We’ll now list the files like this:

That will show you an output similar to this:

Find the PPA you want to remove. In our case, we’ll use teamviewer.list as the PPA (or ‘regular’ repository) we wish to remove. This works for both PPAs from LaunchPad or other repositories you may have added.

So, you’ll want to use Nano for this. Odds are that Nano is installed by default these days, but this is not always true. So, read the following page before moving on.

Let’s Install Nano (With Some Bonus Information)

So, we want to edit the teamviewer.list to disable the TeamViewer repository. That’s done with Nano and the command looks like this:

You’ll then be faced with a text file. Look for the line that starts with deb and is not commented out, that is not starting with a #  symbol. For example:

Find the correct line to edit when trying to remove a PPA.
This should be fairly easy for anyone to follow. It’ll be the line without the pound sign.

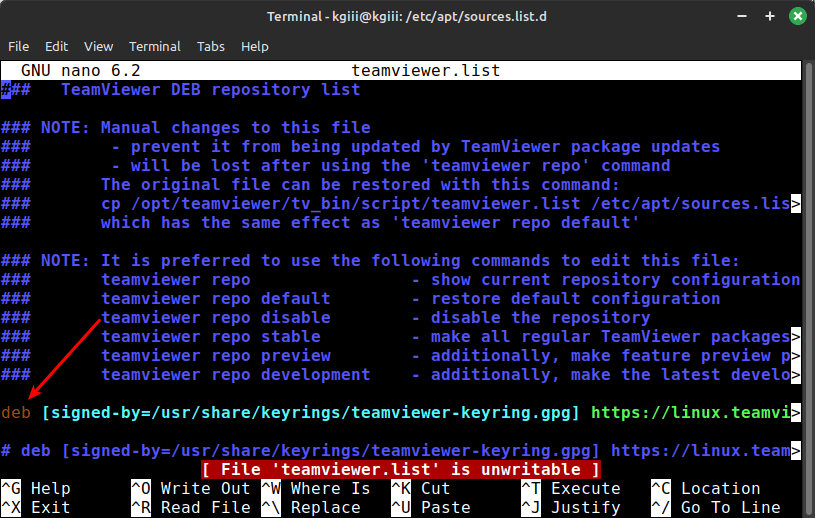
So, in my case, I’d take the line that looks like this:

And I’d comment out that line. More specifically, I’d add a # sign at the front of that line. So, it’d look like this:

You’ll then need to tell Nano to save the file. That’s easily done. You can just press CTRL + X, then Y, and then ENTER to save a file with Nano.

Next, you do this for any repositories (not just PPAs) that you wish to remove. Be aware that the software installed from those repositories will no longer update (which can be a bad thing). If you remove a PPA and still have the software installed, it should be temporary so that you can troubleshoot something.

Otherwise, you can now verify this. You simply need to update the available software again. You do that with this command:

When you do that, you should find that you no longer have that PPA (or just regular ol’ repository) enabled. It will no longer update, thus no longer offer you new versions of that software.

The latter part of that previous paragraph should be considered essential.

So, choose carefully. If the repository has software that you plan on using, you should probably keep updating it. Many of the updates aren’t just bug fixes. Oftentimes, they’re legitimate security fixes. Software is software, regardless of the operating system. It has bugs and sometimes those bugs are security issues. It’s best to keep your system updated and doing so makes you a good Netizen.

Closure:

So, yeah… We’ve discussed how to disable a PPA the hard way. You can disable any repository this way, I suppose. I’m not sure that I’d suggest doing it this way – unless you need to do it this way. If that’s the case, you should do it this way. Most of the time, there are nice handy graphical tools to manage that sort of stuff.

Thanks for reading! If you want to help, or if the site has helped you, you can donate, register to help, write an article, or buy inexpensive hosting to start your site. If you scroll down, you can sign up for the newsletter, vote for the article, and comment.

How To: Add A PPA To Ubuntu

In this article, we’re going to discuss how to add a PPA to Ubuntu. A PPA is a Personal Package Archive, but we’ve come to use them much differently than they were ever intended. So, you might as well learn how to do this. You might as well learn how to add a PPA to Ubuntu.

Yes, we use PPAs in ways never intended. They are meant to be your own personal archive of packages. not a way of disseminating software to the masses. We’ve turned PPAs into a tool to widely distribute software more easily. If you want a piece of software that’s not in the official repositories, you do a quick search, add a PPA, update, and install your software! It’s how we’ve always done things! (Hint: No, it’s not how we’ve always done things.)

This is one of the main reasons Snap apps were created and why they are being pushed. During this time, people could also have used AppImages and Flatpaks, and some of us did.

Me? I’m among the worst of offenders. As it is, I still only use Snaps that came installed by default. I still reach for a PPA (when available) and install things in the ‘traditional’ manner. Well, it’s hardly traditional and it’s generally a bad idea.

In fact. let me sum up why it’s a bad idea with just one sentence…

When you add a PPA, you’re giving the PPA maintainer root-level access to your computer.

All they gotta do is push an update and you’ll have installed it with your next upgrade. No, don’t pretend you’re going to read the source and verify the integrity. You’re going to do it, just like you wanted to …

Add A PPA To Ubuntu:

Alright, let’s paint a simple picture:

There’s some software you want, but you can’t find it in your repositories and the GitHub page doesn’t release packaged binaries. You don’t want to have to deal with building it every time there’s a new version, so you take to the ‘nets in search of a fix.

Your first stop is at Launchpad.net to search for the application. You got lucky and found a PPA. In fact, you found a few of them. In this case, you want to look for the one who has most consistently published upgrades. First, you have to enable Ubuntu’s ‘universe’ PPA, which may already be enabled. If it isn’t, the command to run is:

When you find the proper repository’s name, you can add it with this command:

An example of that could be sudo add-apt-repository ppa:mozillateam/ppa. You could use that to use the more traditional Firefox. 

No matter… Once you’ve done all this,  you might still need to update your own local software database with this command:

There you have it. You can now add a PPA to Ubuntu. You can now use the software included in the newly added PPA. Modern/current Ubuntu flavors will run the apt update automatically, but older versions will still need to trigger the update manually.

BONUS: You can more easily remove the PPA through the GUI, but you can also do so in the terminal, it’s just the –remove flag, like this;

See? You can now do both. You can add a PPA to Ubuntu or you can remove a PPA from Ubuntu.

Closure:

Ah well… You can now add a PPA to Ubuntu. Removing a PPA is also now something you can do, assuming you didn’t already do so. On top of that, adding PPAs willy-nilly as  you’re essentially giving that PPA’s owner a key to your entire computer.

Thanks for reading! If you want to help, or if the site has helped you, you can donate, register to help, write an article, or buy inexpensive hosting to start your own site. If you scroll down, you can sign up for the newsletter, vote for the article, and comment.

Enable PPAs In Elementary OS

Today’s article will tell you how to enable PPAs in Elementary OS. This is generally considered a bad idea, but it’s your computer and you can do anything you want with it. So, well, this one will have you enabling PPAs in Elementary OS.

I suppose that some folks will have no idea what I’m talking about. So, I’ll point out that Elementary OS is a Linux distro. Also known as eOS, it seems  targeted at looking good, having cohesive apps, and charging you money for this. That’s fine. You can use it for free.

Elementary OS is based on Ubuntu, which is based on Debian. Ubuntu has PPAs, a way to install software that’s not in the default repositories, but Debian does not. Some Ubuntu derivatives also do not allow PPAs (by default) and Elementary OS is among those that do not.

Elementary OS developers would prefer you use AppImages or Flatpaks, instead of accepting the security burden that is allowing PPAs. After all, any PPA you add is pretty much like giving someone root access to your computer.

Well, today’s article is about just that. It’s a quick article that’ll teach you how to use PPAs in Elementary OS. Heck, the command to enable this is shorter than this intro, where I show you how to…

Enable PPAs In Elementary OS:

To get started, we’re going to have to have one of those open terminals. You can root through your menu (or use the search feature) or you can just press CTRL + ALT + T and your default terminal should open.

Next, to enable PPAs in Elementary OS, you really only need one command. But, we’ll make sure you’re updated fully before trying this. Thus, you get two commends!

Now that you’ve done that, you can now add PPAs to eOS. If you wanted to keep up with the more recent versions of LibreOffice, you’d run the following commands:

That should install LibreOffice and then keep it updated as the PPA maintainers update the repository. Either way, congratulations! If you’ve done everything correctly, you can now enable PPAs in Elementary OS.

Closure:

There you have it, another article. This article tells you how to enable PPAs in Elementary OS. Their preferences for different packages isn’t too dissimilar than Ubuntu themselves recommending Snap applications. Plus, any PPA you add will the be able to install software by its very nature, Maybe it is time to start doing away with the old ways and moving towards modernity?

Thanks for reading! If you want to help, or if the site has helped you, you can donate, register to help, write an article, or buy inexpensive hosting to start your own site. If you scroll down, you can sign up for the newsletter, vote for the article, and comment.

Subscribe To Our Newsletter
Get notified when new articles are published! It's free and I won't send you any spam.
Linux Tips
Creative Commons License
This work is licensed under a Creative Commons Attribution 4.0 International License.