How To: Graphically Check Your Logs For Errors With ‘KSystemLog’

Today’s article is going to be about one of my favorite tools for checking the various system logs, KSystemLog. Checking your logs for errors has never been easier, and this is one of the first tools I reach for when I have a problem that I don’t know how to solve.

When you first notice a problem with your Linux box, you might only be noticing the symptoms and not actually seeing the reason. Those reasons can often be found by rooting through the various logs to see what’s actually causing the error.

Back in the early computing days it required the terminal to work with your system’s logs. You’d ask for help on a forum and they’d request that you run a command that looked something like this:

It that actually worked and it worked well enough for a long time. It worked even better when you knew what you were looking for and looking at. If you didn’t, you’d scroll through tons of text in the terminal with no real visual cues to sort through the data. Today, there are better tools for this.

Enter KSystemLog:

Thankfully, there’s KSystemLog. KSystemLog’s man page describes it thusly:

Description: system log viewer
KSystemLog show all logs of your system, grouped by General (Default system log, Authentication, Kernel, X.org…), and optional Services (Apache, Cups,etc, …).
It includes many features to read nicely your log files:
* Colorize log lines depending on their severities

* Tabbed view to allow displaying several logs at the same time
* Auto display new lines logged
* Detailed information for each log lines

Which looks like this:

ksystemlog
KSystemlog UI – The images are old and can’t be expanded due to a sudden bout of laziness.

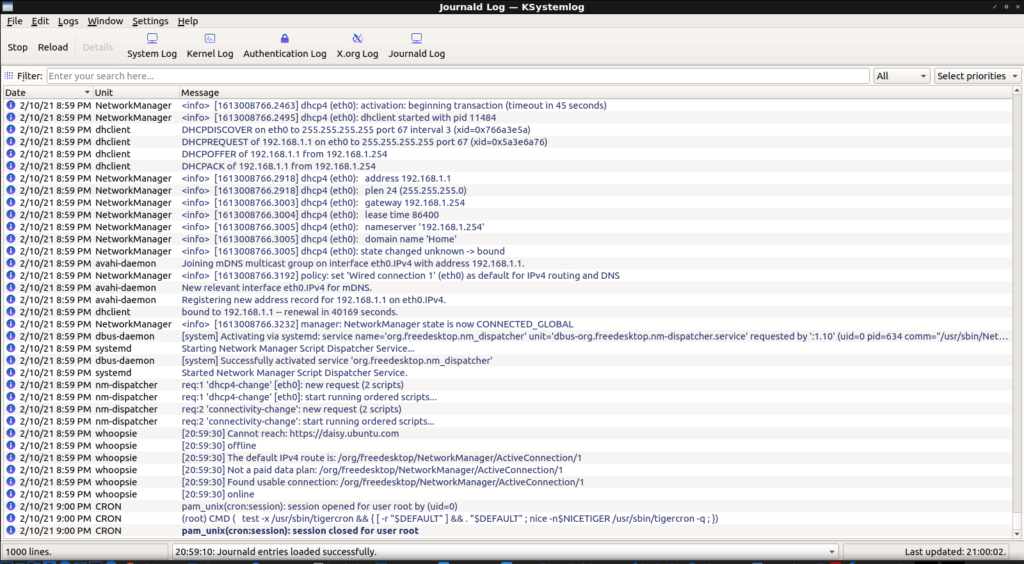
As you see in the image, KSystemLog is a handy GUI that lets view your various system logs. When you look at the image above, you’ll be able see that one of the lines is a darker blue than the previous lines. This is because it’s a new entry, an event that happened after the application had been opened.

That means you can open KSystemLog and then open the application that’s giving you trouble. Doing it this way will let you see what log entries are made and what errors are thrown as the application is opened and used. Of course, you can always examine the entire log of errors and events. 

Even better, the events in the logs can be color-coded, providing easy visual cues. The events range in color, indicating severity, of from a light gray (normal) to a bright red for emergency-level events. You can even filter and search for events.

error messages in kystemlog
Note the color change for errors.

KSystemLog is a KDE application but pulls in very, very few dependencies. It starts rapidly and will show the installed log files by default. In a pretty default configuration, it finds these:

ksystemlog logs available
Currently available logs on this system. More are available.

Getting KSystemLog:

Assuming you are using a major distro, it’s almost certain to be your default repositories. For example, if you’re using a Debian derivative (Ubuntu, Mint, etc.) then it can be installed by opening the terminal and entering:

Just adjust the above installation command for your distro’s package manager and you should be good to go. If KDE is an option for your distro, then KSystemLog can’t be far behind.

By the way, you don’t have to know what the errors mean. You can just take the logged errors and use them as search terms to help. Just copy and paste, using the errors verbatim, and search! It’s absolutely amazing how many errors can be resolved by doing just that. I’ve personally used this method to troubleshoot so many times that I’ve decided that it’s a tool we all need in our Linux toolbox.

Closure:

And there you have it, another article. This one is about KSystemLog, a tool that lets you graphically examine your system’s logs. It’s a great tool for wading through long logs and searching for the root cause of various problems. In an ideal world you’d not need such a tool, but this is not an ideal world. It’s a world with bugs and errors, and KSystemLog is a tool for just that.

Thanks for reading! If you want to help, or if the site has helped you, you can donate, register to help, write an article, or buy inexpensive hosting to start your own site. If you scroll down, you can sign up for the newsletter, vote for the article, and comment.

Dooble Browser: A Review

Today, I’m going to review the Dooble browser, so that you don’t have to. The Dooble browser is a browser that has no dependencies as long as your system has fits ‘latest Qt is supported’ requirement. It bills itself as:

Dooble is the scientific browser.

Many folks are aware that I’m a sucker for a new browser. I install browsers that interest me, even though I have no plans to use them as my regular browser. I install browsers just to see what’s going on in the browser world. Changing my browser isn’t actually something I plan on doing!

So, I first read about Dooble browser when I was browsing Reddit. It was some video that I didn’t watch, ’cause I don’t tend click many video links. Seeing a browser name that I didn’t recognize sent me immediately to a search engine, where I found what was once their home page. That, sadly, wasn’t the project’s page anymore. It sent me here.

Technically, the link I clicked sent me straight to the release page where I found it packaged as a .deb file. Being who I am, I immediately downloaded it – with some glee, as it had been a little while since I played with a new browser. It said it was a scientific browser and I’m a mathematician, so I was pretty sure that the browser and I would get along famously.

I was wrong. Oh, was I wrong.

Installing Dooble Browser:

As mentioned, from the releases page, I found the .deb packaged for my Lubuntu system. It downloaded well enough, but the first thing I noticed was this:

Yes, yes that’s verbatim. I just copied and pasted the output. No, I have no idea why it started off with the selection process like that. I also have no idea why it’d go on to ‘getting’ files. The files were already there. The good news is that it did install and that it was immediately available in the application menu under the Internet heading.

Using Dooble Browser:

So, I opened up Dooble browser and was greeted with what looked like a fairly regular browser. I typed in the address for this site and the site opened, complete with ads.

Curious, I looked for a way to add extensions and found none – more on this later. So, I typed ‘Dooble browser ad block’ into the address bar and pressed the enter button.

Nothing happened.

At this point, I opened a few more sites and decided to open the settings menu. There are like 4 first-level tier buttons that will take you to your browser history… In the settings menu, I found search engines. None of them worked for searching from the address bar. Right clicking on text? Nope… There’s no active ‘search’ feature there.

I found an option to enable ‘web plugins’. This did not enable anything noticable.

I decided to check out the ‘science’ aspect – which is just some sort of mystery graph. To do this, I clicked on ‘Charts’. It helpfully looks like this:

helpful charts from dooble browser
Yes, I pushed the buttons. No, it didn’t help. It wasn’t even remotely helpful.

I have no idea what they’re plotting on the chart. Pressing the buttons didn’t make it clear. I thought about investing some more time, but I don’t like throwing good time after bad.

In my effort to block ads, or at least to see if you could, I played with a feature that let me accept and block domains. I told it to only accept linux-tips.us, and refreshed. It still happily showed me ads from Google. Speaking of which, it’d be pretty sweet if you’d unblock ads on linux-tips.us!

Reviewing Dooble Browser:

Well, it does have an option for a floating clock and floating history. Oh, wait, there’s a 5th way to access history as a top-level option. They sure want you to be able to view your history.

I have no idea why it has ‘search engines’, because there’s no right click search menu and searching from the browser’s address bar does this:

Searching is not Dooble's strong point...
You can just keep clicking and waiting. Nothing happens… You can keep waiting…

Whatever it’s charting, I can’t tell. Usually an X and Y axis actually have labels. Without those, I can’t really tell what is going on. Is it me that’s making the mistakes? Once more, I can’t even tell!

Does it function as a browser? Well… You can technically browse sites. I browsed a number of them before giving up and noticed not one single rendering problem – which is a plus. I was able to login – but my username and password wasn’t remembered, meaning I couldn’t automatically log back in. 

One of the things I noticed was that the ‘cache size’ never increased – regardless of how much browsing was done. On the plus side, I told it to not allow Reddit to send push notifications and it appears to have remembered that.

So, on a scale of 1 to 10, I’m gonna give Dooble browser a solid 3.5. It stayed up and running, with no crashes. It didn’t require any dependencies, and installed cleanly. Technically, it does browse websites. The Gopher support amused me, though I didn’t bother testing it.

I find it laughable in its lack of functionality. That it has search features and then doesn’t let you search is amusing. I just can’t give it less than 3.5. I’m sure tons of hours are going into it, and I’ll assume that it’s going to improve. I’ll keep checking in on it. If you’re a developer and would like to offer some sort of rebuttal, I’m all ears. 

Closure:

Well… That’s a review. I don’t think I can recommend the Dooble browser to anyone at this time. They have lofty goals but are failing to meet them. When it becomes a usable browser, I’ll try to let people know. I’ll check in on it from time to time, even if just to get a chuckle from how laughably bad it is.

Thanks for reading! If you want to help, or if the site has helped you, you can donate, register to help, write an article, or buy inexpensive hosting to start your own site. If you scroll down, you can sign up for the newsletter, vote for the article, and comment.

How To: Use sudo Without A Password

It is possible to use sudo without a password. Doing so is probably a pretty bad idea for most people, but it can be done. Password-less sudo is an option that you have, but it’s one heck of a security risk.

I have pretty good physical security and the risks of someone physically accessing my devices are pretty minimal. There’s no neighbors that can access my WiFi, or anything like that. Because of this, I can, and sometimes do, set up my computers so that I don’t need to use a password when I use sudo.

I feel like I need to make this clear:

If you set it up to use sudo without a password, you’re removing a key security element. If you can use sudo without a password, so can’t someone who’d be doing so with malice aforethought. It’d be even more risky if you did this on a laptop that might get misplaced or stolen.

In short: DO NOT DO THIS (without considering the security implications).

By the way, if you don’t know what sudo is, it stands for “superuser do”. It’s what you use to temporarily elevate your permissions, to read, write, or execute administrative (or otherwise restricted) files. Basically, it turns you into an omnipotent administrator. 

Again, be careful before doing this. If it makes you an omnipotent user, it makes anyone that can access the device an omnipotent user. You have been warned. If you’re comfortable with your physical security, this is an option. It’s an option you should consider only with care and diligence. 

SUDO Without A Password:

     See Also: Generate Complex Passwords

Like so many things, this too starts in the terminal. As always, you can open your terminal with your keyboard, just press CTRL + ALT + T and your default terminal should open. Once it is open, enter the following to open the file with nano:

Arrow button yourself down to the bottom and add the following line:

Where it says “<your_username>” you change it to your username – without the brackets. So, if your username were the same as mine, you’d make a line that looks like:

The ‘kgiii’ is lowercase, and your username will be lowercase. If, for some reason, you don’t actually know your username, you can find it with:

Anyhow, after you’ve added that line, you can save the file. As we’re using nano, you save it by pressing CTRL + X, then Y, and then ENTER

That should get you sorted and you should now be able to use sudo without a password. If you are aware of the security implications, this may just be something you want to do. On the other hand, it’s not exactly taxing to type your password.

Closure:

And, once again, you have another article! I’ve reached the point where I have a small buffer. I could be offline for a few days and articles will still publish themselves. I’m hoping to get even further ahead, so we shall see how it goes.

Thanks for reading! If you want to help, or if the site has helped you, you can donate, register to help, write an article, or buy inexpensive hosting to start your own site. If you scroll down, you can sign up for the newsletter, vote for the article, and comment.

Let’s Have Some Fun With Cowsay And Fortune

Today, we’ll be having fun with ‘cowsay’ and doing so while getting your fortune in your terminal. Why not? Linux doesn’t always have to be about work. Today’s article will be not even remotely useful for work and none of what you learn will greatly increase your Linux skills. We are doing this for fun, mostly.

Sometimes, it’s okay to be a little silly and to have some fun.

Besides, you’ll get to use the | (pipe) and that’s always fun! Seriously, the pipe is one of the best tools Linux has. It lets you take the output from one command and use it in another one. The man page helpfully describes it like this:

pipe – Postfix delivery to external command

We’ll just be scratching the surface with pipe, so be sure to run man pipe if you’re unfamiliar with it. Pipe hails from Unix and has been with us, in one form or another, since 1973. I dare say that the longevity is good evidence of the value.

I’m just going to give the directions for Debian/Ubuntu/derivatives. I haven’t checked across all the systems, so I’m not sure what distros this will work on. Probably all of the major distros, but it should work on anything with Debian in its lineage. If you’re not doing so, you should still be able to follow along and just adapt it to your package management systems. 

So, that being said and done, let’s look into this matter of a mad world with cows and fortunes.

Fun With Cowsay:

The first thing we have to do is open a terminal. Press CTRL + ALT + T on your keyboard and the default terminal emulator should open up. Once open, run the following command:

That should install both ‘cowsay‘ and ‘fortune‘, along with any dependencies that need to be satisfied. Those are the only two tools you need to install for this exercise, or at least they should be.

Fortune:

Fortune is a tool that outputs fortunes from a database. A normal use would be:

That should happily output a fortune for you.

Cowsay:

The cowsay application prints a graphic that looks vaguely cow-like and any text you tell it to print. The command would look a bit like this:

All of which is all well and good – but the magic is when you put them together. So, let’s try that. Let’s pipe fortune output to the cowsay application:

Which will have an output similar to this:

cowsay in action
See? You’ve got a cow spouting wisdom in the terminal! Just what you always wanted!

That’s not it! No, dear reader, that is not it! That’s not all you can do! See, you can change the cow to Tux, the Linux penguin mascot.

What the penguin has to do with a cow, I know not. But, I do know that you can use the command and output a penguin. 

The output from that command should look pretty similar to this:

cowsay goes tux
See? It’s Tux! I wouldn’t make this sort of stuff up. It’s too important!

And there you have it. You’ve successfully piped the output from fortune to cowsay and, as a bonus, morphed the cow into tux. Another productive day at the office, while having fun with cowsay!

Closure:

I’ve got a couple of articles ahead, which is nice. This one tells you how to have fun with cowsay, which is also nice. It’s pretty important business!

Now to write some that are scheduled years in the future (so that I don’t mistakenly post them and they’re out of the way) and not fret too much when Mother Nature comes to claim my internet… I’m not giving up on my publishing schedule yet!

Thanks for reading! If you want to help, or if the site has helped you, you can donate, register to help, write an article, or buy inexpensive hosting to start your own site. If you scroll down, you can sign up for the newsletter, vote for the article, and comment.

How To: List All Users In Linux

If you want to list all users in Linux, this is the article for you. It should be a fairly short article, but it should tell you how to list all users. So, there’s that. By that, I mean it’ll probably do what it says on the tin, namely telling you how to list all your users.

You may want to check the list of users from time to time. Applications may add users, you may have added users, malicious software or people may have added users, etc… There are other reasons to list all users, but you get the idea.

This is a beginner-level exercise, so you shouldn’t have any difficulty with it. It should also be reasonably short, which is nice! If you find any mistakes or have any questions, scroll down and leave a comment. You can also ask on the lovely Linux.org forums.

Without further ado…

List All Users:

Once again, we start with opening the terminal. To do this, you just press CTRL + ALT + T and the terminal should open. That’s true on most distros that I’ve encountered. If not, you will still need an open terminal.

Got it open? Good, ’cause it’s a pretty easy operation. The file you’re looking for is ‘/etc/passwd’, which is a plain text file that’s in conjunction with the /etc/shadow file. Like most text files, it’s easy enough to work with them in the terminal.

You probably shouldn’t edit /etc/passwd by hand, but we’re just going to be viewing it.

So, to show the content of the file (and see the list of users):

If you want to show fewer results at a time, you can just use:

If you want, you can ‘grep’ a specific user. Just pipe the output to grep and you’re good to go. It looks like this:

If you want to use that format AND have numbered lines, one way of finding out how many users there are, then just use:

Though you could just as easily have used this to get the number:

If you want to list just the users, you can use ‘awk’ and pick the first column like this:

And that’s about it, really. You’ve now listed all the users – and counted ’em!

Closure:

That’s it! That’s all there is to it, and you’ve learned a little bit more – this time how to list users in Linux. I told you that it’d be pretty painless and easy. Plus, this is another article for the books – and this one authored early enough to give me some time to keep scheduling them ahead of time.

Thanks for reading! If you want to help, or if the site has helped you, you can donate, register to help, write an article, or buy inexpensive hosting to start your own site. If you scroll down, you can sign up for the newsletter, vote for the article, and comment.

Linux Tips
Creative Commons License
This work is licensed under a Creative Commons Attribution 4.0 International License.