The State of Linux-Tips.us, a Meta Post

Wait a minute… There was an article yesterday! There shouldn’t be an article today! Indeed, there shouldn’t. This is a meta post, letting folks know the state of the site.

Linux-Tips is a personal project, though one I encourage folks to join. The goal has been, and will continue to be, to write an article every other day. I figure that I’ll do this for a year and see where things are at before deciding if I should keep it up.

The feedback has been awesome. The participation is not much but it’s actually better than I’d expected – especially considering how new the site is and how little promotion I do. Most of the feedback seems to be at the sites where I link this site, and not here on this site. It is what it is…

Speaking of which, if you want to help you could help by sharing the articles on social media. It’s just a few minutes every other day! I should also point out that each article is published with a permissive license. You can use ’em for anything you want, with attribution.

I think things are coming along just nicely. I increased the available bandwidth due to some hammering on the server, but that didn’t happen last month. I’m okay with that. I’d prefer a steady growth. It’s less pressure, I think. I figure I’ll share the meta information with you now and again. I’m not sure how often I’ll do this.

So, how about some meta?

By the time you read this, there should be 39 articles published. That’s keeping with my schedule. I still have tons of notes, old articles on the old site, and ideas for articles. Don’t let that stop you from making suggestions or writing the article yourself!

The stats are all over the place. Every analytics software does it differently. There’s Google’s Analytics that doesn’t count anyone blocking ads, and Awstats that counts everything under the sun. We only used about 4 GB of traffic this month but we did average ~140 unique visitors per day.

Most of June’s referred traffic came from Reddit. This was followed by Linux.org. Only a small amount of traffic comes from search engines (so far), and most of that was from Google. Perhaps due to some SEO efforts, some of the articles rank fairly well at Google.

Not a whole lot of people are signed up for the newsletter. You should sign up for that! I promise, there won’t be any spam. There may also come a time when I stop sharing the links at the various sites, and this will be your way to keep up with when new articles are published.

In June, 688 people visited my article about will your hardware work with Linux. Most of those visitors came from r/linux on Reddit. The page counter is horrible and I should probably disable it. I have more accurate stats from the server itself.

More Info!

Site-wise, I’ve invested about 250 hours according to a plugin that monitors this stuff. Sadly, I didn’t install the plugin at first, so that doesn’t include most of the time I spent building the site’s architecture.

I did remove the adblock nag. I figured that was just annoying people. Alas, nobody clicks on the ads and Google prohibits asking people to do so. They’re pretty strict about the rules. So far, there has been a single donation. To them, I say thanks! The site will (almost certainly) stay up and running even without donations. You can help cover the server expenses if you want. If not, I’ll just cover the costs. I ain’t scared!

I dare say the site is feature-complete. Everything is running as it should. The site updates itself. It backs itself up both locally and remotely, each with duplication for a truly robust backup strategy. It does this daily, so the odds of losing much data are pretty low. If you can think of a feature you want, let me know.

The site’s security is quite robust. There have been no breaches as far as I know. Then again, I don’t ask for much in the way of personal information. I figure if I don’t collect your information then I’m not obligated to protect it. Still, everything is reasonably secure, using multiple layers of defense that I’ll avoid detailing here.

Closure:

And, I guess that’s it. That’s the state of things at Linux-Tips.us. That’s about all the meta I can come up with. Things are going fine and I look forward to saying the same thing a month from now, though some more activity would be nice. I guess I’ll include my standard closure text…

Thanks for reading! If you want to help, or if the site has helped you, you can donate, register to help, write an article, or buy inexpensive hosting to start your own site. If you scroll down, you can sign up for the newsletter, vote for the article, and comment.

How To: Change The Port SSH Uses

There are a number of things you can do to help secure SSH, and changing the port that SSH uses is one of those things that many people change. That can help, but I feel it’s important to also mention that security by obscurity isn’t really good security.

By the way, I’ve already written a couple of articles about SSH. Feel free to check ’em out, as they may get you up to speed if you’re not already there. The first link should be the link you click if you need to learn how to get started.

If you don’t know what ports are, there’s a great Wikipedia page here. We’re talking about software ports and not hardware ports. They’re well-described as this:

At the software level, within an operating system, a port is a logical construct that identifies a specific process or a type of network service.

By default, SSH uses port 22, and everybody knows it. Well, everybody that’s interested in networking knows this. And, because of this, malicious actors will scan for online computers and then check port 22 to see if SSH is running. If they find the port open, they’ll possibly try to guess the password and keep trying until they get through. 

NOTE: There are a number of ways to secure SSH, including disabling password logins entirely and using things like fail2ban to limit login attempts. I’d expect articles on those subjects in the future, but they have not yet been written by me. I’m sure other sites will have information, so use a search engine if you’re wanting to learn about those things today. (I am never gonna remember to come back and remove this.)

So, one step you can take is to make SSH listen on a different port. You can do that in isolation or along with other security methods. It’s not the greatest security fix, because people can (and do) just scan entire port ranges. While moving the port to something other than the default will help, it’s (by itself) just security by obscurity.

Knowing all that, let’s take a look at how we can change from the default port to one of your choosing. It’s actually pretty easy.

Change Your SSH Port:

To get started, we’re gonna need to open a terminal. You can do this with your keyboard, simply press CTRL + ALT + T and your default terminal should open up. By the way, you can change your default terminal.

Once that’s open, we’re going to want to edit a file using nano. You’ll do that with this command:

That will open ‘sshd_config’ (the SSH configuration file) with the nano text editor. Once that’s open, you’re going to scroll down while looking for “#Port 22”. It will look a little something like this:

changing the port SSH uses
For many of you, the next step will be obvious!

What you need to do is remove the # and then change the 22 to whatever port you want to use. So, if you wanted to change the port to 4441, you’d change the line to read:

Note the removal of the #, as the # tells the computer to ignore that line. A line starting with # (in this case) means that line is ‘commented out’, meant to be ignored.

Anyhow, once you’ve changed it to the new port you need to save it. Seeing as you’re using nano, that’s pretty easy. Just use your keyboard and press CTRL + X, then Y, and then ENTER.

Just because you’ve changed it doesn’t mean it has taken effect. You have to restart the service. To do that, you need this command:

That should restart the service, where it will now listen on the new port. From now on, you’ll connect with something like this:

Basically you’re just adding the ‘-p 4441’, except whatever port you picked, to the command. If you’re using aliases or something like Putty, be sure to change those settings as well.

NOTE: This isn’t the final step for many people. Some of you will have to change your firewall’s settings to allow TCP on the changed port. In some cases you may also have to enable it with semanage utility. In those cases, consult your documentation. If you can’t get it figured out, leave a comment and we’ll see if we can get it figured out together.

Closure:

And there you have it, another article in the books. This time, you’ve learned how to change the port that SSH uses. Hopefully that’ll come in handy for some of you. In isolation, it’s not the greatest security method – but it’s better than nothing. There’s still an article every other day!

Thanks for reading! If you want to help, or if the site has helped you, you can donate, register to help, write an article, or buy inexpensive hosting to start your own site. If you scroll down, you can sign up for the newsletter, vote for the article, and comment.

How To: Create a New User Without a /home Directory

There are legit reasons to create a new user without a /home directory. Maybe you want a new user to have limited access to just a few things, or a dedicated user that runs a single application. This article will show you how.

See, I was reading a forum post on Linux.org about a member that had set up a bunch of Linux computers for some learning children. One of the things that came up was that the kids were already trying to guess the password so that they could install games. 

That got me thinking about some security implications. What if they guessed the password and wanted to hide it? What if they used that password to create a new user, but one without a /home directory so that it wouldn’t be easily spotted by just using a file manager? It wouldn’t be impossible to find, but it’d not stand out immediately with a quick inspection. Besides, the new account’s password would remain the same even if the admin changed the password to the root account.

Well, if they get that advanced and guess that password, I kinda hope they read this article! Why? Because the world needs a little chaos and creativity! So, my fellow Linux.org forum user, this article is for you! Well, no… It’s for when the kids use a search engine to learn how to make a user account a little less obvious! 

Create a New User Without /home:

This one will be short and easy, perfect for budding Linux users! There are two easy ways to create a user without automatically making a /home folder. 

Both ways are done in the terminal, so you need to open it. To open the default terminal, use your keyboard and press CTRL + ALT + T.

Now, the first method is:

The second method is:

Those commands will both make a new user without a /home directory of their own. (Be sure to check ‘man useradd’ for more awesome things you can do.)

There are a couple more steps you can take, if you want. First, there’s no password assigned to the user you just created. So, let’s assign a password to them.

Follow the prompts to type in the password twice and you’re done with that step.

Next, the newly created user isn’t a member of sudoers – meaning it has no administrative rights. That’s easily fixed with the following command:

That command will make the new user a member of the sudoers group. Meaning they have administrative rights over the system. They can install software, remove software, delete files, create files, or even update the entire system.

The admin can still discover the new user by listing the users or poking around in the logs. However, the user won’t stand out immediately. There won’t be any new user folder in /home, so one may not have any reason to look. Additionally, changing the root password won’t matter. You’ll have to do something about the user they created.

And that, kids, is how you get started hiding stuff after you’ve discovered the root password! Use that account for your nefarious activities! You’re welcome!

Closure:

Nah, there are legit reasons why you’d want a user without a home folder. You may want that user to only access a limited set of applications or whatever. A keen admin would likely notice this fairly rapidly, so it’s not a great long-term strategy for hiding your game installing.

Thanks for reading! If you want to help, or if the site has helped you, you can donate, register to help, write an article, or buy inexpensive hosting to start your own site. If you scroll down, you can sign up for the newsletter, vote for the article, and comment.

How To: Stop, Pause, and Resume Processes Running in Your Terminal

As you learn Linux, you’ll possibly find yourself using the terminal more often. You’ll run processes in the terminal because you need to or because you prefer to. This is how you stop, pause, and resume those processes running in your terminal.

There are any number of reasons why you’d need to do this. I’ll give you an example in the main part of the article, but there are all sorts of reasons to know and use this information. There are a few generic reasons to do so, of course.

First, you’d want to stop processes because you don’t just want them to keep running forever. That’s the easy one, though they’re all easy. Speaking of which, this article should be pretty short and easy.

Second, you’d possibly want to not stop but rather pause a running process because you expect to return to it. This is different than stopping the process. It’s very much like pausing a movie.

Third, obviously, will be resuming the above mentioned process. If you’ve paused a running process then it only makes sense to know how to resume said process. If you don’t intend to resume it, it doesn’t make much sense to pause it.

This article will explain how to do all three of these operations!

Stop, Pause & Resume Terminal Processes:

So, we’re going to need both a practice exercise and an open terminal. Let’s start by getting the terminal open by using your keyboard and pressing CTRL + ALT + T.

That should open your default terminal. Assuming it does open your terminal, I want you to run the following command:

Once started that command will keep running over and over again. I assume you don’t need to keep pinging forever, so you can stop it with CTRL + C. That’s it. Once you issue that command, the process will stop.

What if you don’t want to stop it – you just want to pause it for a little while? Well, run the ping command again and this time use CTRL + Z. When you issue that key combination, the running process will pause and be pushed into the background.

If you want to resume running that process in the terminal, in that same terminal, you just use the following command:

Unlike the first two, it’s text that you enter into the terminal before you press enter. There’s no CTRL + anything that you use. You just literally type ‘fg’ (think foreground) and press enter. That brings the paused process back into the foreground and resumes running it.

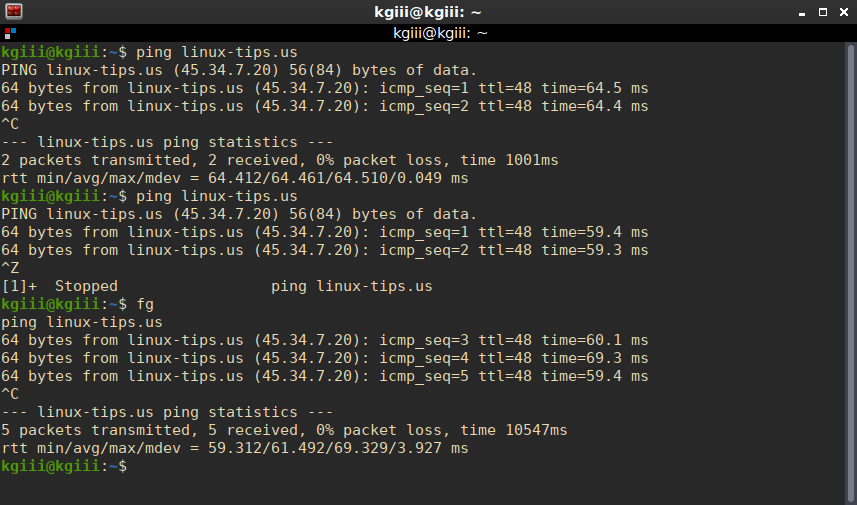
The above commands, when run in succession, should look a little something like this:

terminal
It should look a little something like that. Those are the commands from above.

You can do this with all sorts of applications that run in the terminal. You can stop, pause, or resume, as needed by moving the running process into the background and then bringing it back into the foreground.

If you look carefully at the above image, you’ll see that it counted five packets as being transferred. This indicates that the process doesn’t keep running in the background. It’s truly paused. Typing ‘fg’ and pressing return brought the process back to the foreground, where it continued pinging this site.

Closure:

There you have it. It’s another article in the books! This one tells you how to start, pause, and resume processes running in a terminal. Hopefully, you can find some use for it. If you have any ideas for articles, feel free to leave a comment. My publication schedule seems to be working, so you can expect another article every other day.

Thanks for reading! Your readership and feedback helps keep me motivated! If you want to help, or if the site has helped you, you can donate, register to help, write an article, or buy inexpensive hosting to start your own site. If you scroll down, you can sign up for the newsletter, vote for the article, and comment.

Let’s Learn How To Change The Default Terminal

There are many reasons why you may want to change your default terminal emulator. It’s actually nice easy to change the default terminal. This article explains how and anyone should be able to do it, even a beginner!

First, it’s often called a terminal emulator because it allows you to emulate the terminal in a graphical environment. There are other ways to refer to it, but just calling it the terminal is usually enough for all but the most pedantic. We’ll mostly just call it the terminal from here on out.

The people who put your distro together also picked the default terminal. It’s usually a basic terminal, and often just a terminal that has been around for a long time. That’s not a bad thing, but there may be better terminals than the default. There are terminals with all sorts of features, from multi-window terminals to terminals that support drag-and-drop!

Perhaps you might like XFCE-terminal, or you may prefer Terminator? Maybe you’d like Guake or TildeThe choices for new terminals are vast, and Wikipedia has a ton of them listed.

You can find even more by using your favorite search engine and searching for Linux terminals. Someone is always writing a new terminal and you can pick a new one to be your default terminal any time you want. There’s bound to be one out there ticks all your boxes.

If you want to open your default terminal, you can usually use your keyboard. Just press CTRL + ALT + T and it should open your terminal. If you don’t like the default, you can make any other terminal your default.

Change the Default Terminal:

For the purpose of this exercise, we’ll start with assuming you’re using Ubuntu and that you want to install Terminator and then set Terminator as the new default. However, aside from the initial installation command, it should work for other distros just fine. In fact, the installation command will work for most any distro that uses the apt package manager.

So, seeing as you opened the terminal up above, we’ll just skip right ahead to installing our example, Terminator:

Go ahead and let it finish the installation after you enter your password and agree to install it. Terminator should be in your default repositories and easily installed. This is true even if you’re not using Ubuntu or an Ubuntu derivative.

Once you’ve done that, you will need to set Terminator as the new default. To do that, run this command:

That should bring up some information that looks a little like this:

change default terminal emulator

From there you just pick the number of the terminal emulator you’d like to be the new default and press enter. That’s it. That’s all you should need to do.

You can test this by simply using your keyboard to open the default terminal like you did in the first section of this article. Once you’ve made the change, it should take effect immediately and the new default terminal should open up when you next open the terminal with the keyboard. You’ll still have the old links to the original default, but you can move those around at your leisure.

Closure:

And there you have it. That’s how you change your default terminal emulator. It’s not terribly difficult but it’s a quick and easy step you can take to make your Linux a little more customized, a little more something of your own. If you have any ideas for articles, feel free to leave a comment suggesting them. We’ll see what we can do!

Thanks for reading! It’s truly appreciated and there have been a lot of readers lately. If you want to help, or if the site has helped you, you can donate, register to help, write an article, or buy inexpensive hosting to start your own site. If you scroll down, you can sign up for the newsletter, vote for the article, and comment.

Linux Tips
Creative Commons License
This work is licensed under a Creative Commons Attribution 4.0 International License.