The magic SysRq key can help you deal with a frozen and unresponsive system. It avoids doing a hard reboot along with, hopefully, avoiding potential loss of data. The SysRq key is actually a handy bit of knowledge to keep handy.
NOTE: The information in this article is for those who use the QWERTY keyboard. If you use Dvorak, AZERTY, etc., be sure to click the link in the opening paragraph because it will be different for you.
There are times when your system appears frozen but it actually isn’t. You can test this situation with the Shift Lock key. If the light (assuming you have one) comes on, the system isn’t technically frozen – it’s probably just not accepting inputs. But, if it’s so far gone that the light doesn’t change then it’s possible that this will not work.
There are all sorts of reasons why your system may appear to have halted. This article has nothing to do with that, nor is it about preventing a frozen session. It’s about using the magic SysRq key to get out of a situation where your system has stopped responding.
The purpose, at least as far as this article is concerned, is to reboot without corrupting your data. This gives you a tidier reboot that reduces the risk of data loss. It’s quick and easy to learn and memorize.
The SysRq Key:
Look at your keyboard. Look carefully. The key we’re looking for is the ‘SysRq‘ key. You may not know why it is there, and may think it has no purpose, but it’s there and there for a reason.
The key is often doubled with the PrtScr (print screen) and doesn’t get used often. It’s used in combination with the Alt. If you’re using a keyboard with an Fn, you don’t normally need to use it to perform this keyboard function. Look around your keyboard and you should find the SysRq key. It’s bound to be there somewhere!
What you’re going to learn and is ‘REISUB’. This is easy to remember, because it’s ‘BUSIER’ backwards. When your computer is no longer responding, press (and hold) Alt, while holding SysRq, and then press R E I S U B in order shut everything down properly and reboot without (or with less chance of) data loss.
You can try it right now. However, you’re going to reboot if you do so. Leave about a second between each keypress.
You don’t actually need to use all the letters. If you give zero poops about data loss, you can go straight to Alt + SysRq + B. But, that’s not giving the system the chance to perform all the shutdown processes.
If you want to (hopefully) not lose data, use REISUB. This is what those letters do:
R puts keyboard in raw mode. E sends SIGTERM (except init). I sends SIGKILL (except init). S syncs mounted filesystems. U (read-only) remount of mounted filesystems. B reboots the system immediately.
Those should reboot the system for you, after sending all the other commands. Again, it’s easily remembered as being ‘BUSIER’ backwards and you should press them immediately after one another, allowing a second between each.
Closure:
This makes yet another article in the books, and now you know how to reboot your system when it is frozen. The magic SysRq key works well enough, even though there are some situations where it won’t work. A computer can be so frozen that it’s no longer accepting any input at all. It works well up until you’ve reached that point.
Thanks for reading! If you want to help, or if the site has helped you, you can donate, register to help, write an article, or buy inexpensive hosting to start your own site. If you scroll down, you can sign up for the newsletter, vote for the article, and comment.
Should you use screenFetch or Neofetch? That’s up to you to decide. This article will share some info about both of them. This should be a pretty short article.
I also confess that there’s not much of a “vs.” here. The screenFetch app hasn’t been updated in a long time and Neofetch is the clear winner for most folks. But, well, it seems like people have forgotten that screenfetch exists and that it existed well before neofetch was conceived. That’s why I’ve picked ‘History’ as one of the categories.
See, the thing is, screenfetch (I’m tired of capitalizing the F, and the N, just to be right!) still exists and still works just fine. In some cases, you might get the wrong information from it, especially with newer distros, so why use it? Well, you use it because it shouldn’t be forgotten – and ’cause it still works most of the time.
So, you decide… Screenfetch or neofetch? Or maybe both?
Screenfetch:
The screenfetch application was was created to gather system information so that it could be presented in a screenshot format. In fact, their GitHub page clearly states the purpose as:
Fetches system/theme information in terminal for Linux desktop screenshots.
Though it’s old, it’ll almost certainly be available in your default repositories. Just because it’s old doesn’t mean it isn’t still useful! (Perhaps I’m having some sort of crisis, ’cause I too am old and part of the purpose of this site is to be useful!)
Assuming you’re using a distro with apt, it’s a mere install command away:
1
sudo apt install screenfetch
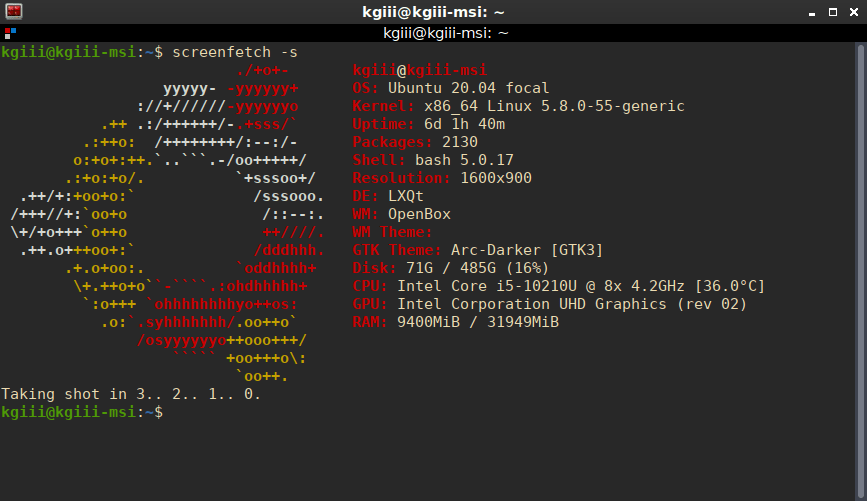
Then, well, you use it. You could just run it with ‘screenfetch’, but you can also actually use the -s switch and create a screenshot of your full screen, making it easy to take and share a picture of your desktop to show others in forums and social media sites.
This is an edited down screenshot, ’cause the rest of my desktop isn’t all that interesting right now.
See? Screenfetch in action. I like the ASCII art better, actually. That’s a matter of taste.
As you can see, that was with the -s switch. It happily generates a screenshot of the entire screen, but I edited it down to just the terminal. There’s nothing interesting on my screen right now. Just a bunch of open windows, largely with text in them.
Screenfetch still works, and I like the ASCII art better. I suppose I could probably customize neofetch to make it do the same thing, but I’m way too lazy for that. Either way, it works – and it works just fine. It still does the task it was designed to do, even without any recent updates.
Neofetch:
Neofetch is newer and probably better in every single way. (Though I do have some issues with it on some systems, as it won’t create its own screenshot! That’s a ‘me’ thing, I suspect.) It’s also familiar to many people, and indeed has been mentioned on this site multipletimes.
It gets regular updates and has a ton of options. It’s also able to be highly customized. In pretty much every single way, it’s the superior solution. It’s described by the authors like so:
The overall purpose of Neofetch is to be used in screen-shots of your system. Neofetch shows the information other people want to see. There are other tools available for proper system statistic/diagnostics.
It’s a much newer application. Screenfetch last had a release in 2019, while neofetch had a release just last August (at the time of writing). It should be noted that there have been some commits at the screenfetch repository, but they’ve not yet been released. The project isn’t dead. It just isn’t as active as neofetch.
Again, it’s easy to install. It’s in the default repositories for most any distro out there, at least the major ones. There are some distros that include it by default, including Lubuntu! Again, assuming you’re using a distro with the apt package manager, it’s installed just like screenfetch:
1
sudo apt install neofetch
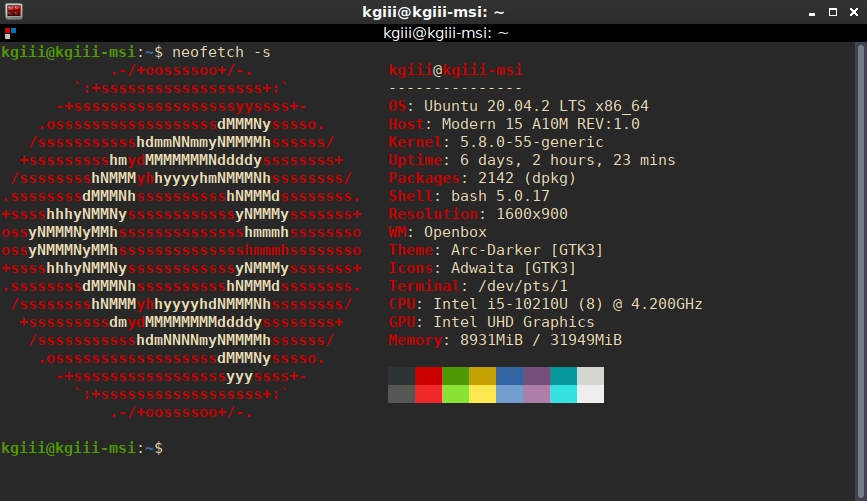
And, like screenfetch, you can just run it as ‘neofetch’. However, check the man page for it and you’ll see there are a ton of other options. It’s seriously highly configurable. It looks like this:
This looks a lot like screenfetch, doesn’t it? The art is different. The output is also different!
For whatever reason, on that system the neofetch doesn’t seem to want to take a screenshot. I’m probably missing scrot or something like that. I’m too lazy to figure it out, but it’ll likely work just fine on your system. It’s a great way to gather a bunch of presentable information about your system, with the end goal being to show it to other people.
So, is neofetch the one for you? Is it really any better?
Screenfetch or Neofetch:
Sure, there hasn’t been a screenfetch release in a long time – but there’s sure to be one eventually. There’s activity in the repository at GitHub. That’s usually an indicator that there’s still more to come. I wouldn’t count it out and it’s pretty much feature complete.
Neofetch? Well, it’s much newer and has more consistent releases lately. It’s also highly configurable. You’ll be able to customize it all you want. You’re encouraged to edit ~/.config/neofetch/config all you want, making neofetch your own. It’s also a mature application, with a large install base and likely also feature complete.
Either one works. They do spit out different information. If you examine both screenshots above, you’ll see the data output is different. Not gonna lie, I ain’t gotta clue why they’re different. The areas where they’re different are trivial and I’ve made no effort to find out which is correct.
What? It’s a blog. I have finite time for these things, you know! 😊
You can decide between screenfetch or neofetch – or you can use both. They’re both very similar and neither should be used for anything all that serious. They spit out some system information in a form that’s convenient for screenshots so that you can show off your system to your forum friends.
Closure:
Here’s another article in the books. It’s not really about a ‘vs’ anything, but the title seemed appropriate. It’s a good time to expose some of the newer Linux users to the venerable screenfetch tool, as choice is always a good thing.
Thanks for reading! If you want to help, or if the site has helped you, you can donate, register to help, write an article, or buy inexpensive hosting to start your own site. If you scroll down, you can sign up for the newsletter, vote for the article, and comment.
Finally, an attempt to answer to the age old question: Which Linux distro is the best?
This question has been asked time and time again and debated from the moment more than one distro existed – so, pretty much since day one. It has been so hotly debated that it has caused true animosity and people rage-quitting entire sites. Some people have high conviction that their distro of choice is the best distro!
Hint: It’s not.
I’ve been using Linux exclusively for more than a decade. Many years ago, I used Unix extensively. I have dozens of virtual machines of current distros. My Linux ISO folder is 250 GB in size. If you can name it, I’ve probably installed it and used it.
I think that makes me pretty darned qualified to finally put this question to bed.
So, what is the best Linux distro?
There isn’t one.
There is No Best Linux Distro:
The best Linux distro is the one that is best one for you. It’s the distro (perhaps even plural, ‘distros’) that suits your individual needs best. The best Linux distro the one where you’re most able to get your work done, because that’s what an operating system is for. An operating system is a tool to help you accomplish a computational goal.
The best distro the one that’s suited to your personal workflow. It’s the one that makes you the most happy, and the one that best lets you use the applications you need to use. Basically, it’s the one that works for you.
You can look up Linux distro benchmarks. And can check their popularity. Or you can test them out virtually online.
You can download the images and use VirtualBox to test them for longer periods. You can download the various .iso images and test them on bare metal by using them live – without making any changes to your currently installed operating system.
But, at the end of the day, nothing beats experience.
It May Take a While:
The reality is, it may take you some time to find the right distro for you. Maybe you’ll start with something easy to install and maintain, and maybe your final destination ends with Gentoo. Who knows? Only you. Only you know.
When someone attempts to tell you the best Linux distro, what they really mean is what is best for them. That may not be the best for you. It could very well be, but you won’t know until you try. You still might not know until you’ve tried many distros.
There are many things to consider. Do you want a stable release? Maybe you want a rolling release with the most up-to-date software? Or, perhaps you want to use Aptitude or Zypper, or maybe no package manager at all? Which desktop environment do you want? What default software do you want? Which window manager is right for you? Do you want a fancy desktop or just the bare minimum? How about something in between?
TIP: You can do some really refined searches at DistroSea.
Do you want a distro that comes with just the basics so that you can add your own software? How about a distro that comes with the software you’re most likely to use? Maybe you want a specialist distro that comes with the tools you need, like Springdale Linux? Do you want to work with multimedia as a creator with Ubuntu Studio?
Then, what computer architecture are you using? Are you trying to keep your old 32 bit computer running? You can do that!
There are unique Linux distros to do all of those things!
So Many Choices:
There are many, many choices. Odds are great that there’s a distro that’s just right for you. And, if you can’t find one that’s just right, you can make your own. On top of that, you can make pretty much any distro do the same thing that another distro does. So, you can start with one distro and turn it into whatever you want.
The choices are so many and so broad that you have practically limitless choices. That’s one of the things that makes Linux so great. You have a say in what your operating system does (and what it doesn’t) do. It’s your computer, you get to decide.
And that, that’s the answer to this age-old question. There is no right distro, there’s only the right distro for you.
Me? I’m old. I want stability and an environment that gets out of my way to let me get my work done with the smoothest possible workflow. The distro that does that is the distro that’s right for me. You do you and you decide what the best distro is for you.
Most of all, enjoy the wondrous journey of discovery, as you too find the right Linux distro for you.
Closure:
This article has been pulled over from the old site. It may look familiar to some of my readers. I cleaned it up and moved it, formatting it to match the current site.
Thanks for reading! If you want to help, or if the site has helped you, you can donate, register to help, write an article, or buy inexpensive hosting to start your own site. If you scroll down, you can sign up for the newsletter, vote for the article, and comment.
NOTE: This article was updated on 06/19/2021. NOTE: This article was updated on 05/13/2022.
For whimsy, or for whatever reasons you dream up, you may want to rename your network adapters in Linux. Well, you can. This article will explain how to rename your network adapters, from perhaps eth0 to whatever you want.
I can only be certain that this works in current Ubuntu LTS – 20.04, I didn’t test with any other distros. It’s pretty safe to assume that it will work with most distros out there.
Notably, I am just pulling this from my notes. I forgot why this is in my notes and I really can’t think of too many reasons why you’d need to rename your network adapters. Still, there’s at least one person who needed to know this information, else it’d probably have not been in my notes. It’ll almost certainly work with Debian, Mint, Pop!_OS, and others in that family of operating systems.
This article should be fairly short and will suggest the use of ‘inxi‘. As this article is based around Ubuntu, you can go ahead and install it with:
1
sudo apt install inxi
It’s a lightweight application that spits out a ton of information. I think it should be installed by default, but not all distros do. If you’re trying this with a non-Ubuntu distro, and one without apt, just adjust the installation method for your package management system. It’s almost certainly in your default repositories.
Rename Your Network Adapters:
The first thing you’re going to need to do is open your terminal. If you just installed inxi, you may well have your terminal already open. If not, you can open it with your keyboard. Just press CTRL + ALT + T and it should pop right open.
Once you have the terminal open, we’re going to use ‘inxi’ to get some information. The command you’re looking for is:
1
inxi -v 4
Specifically, you’re looking for the networking section. It should look a little something like this picture:
Note the arrows. You need those two pieces of information.
You’re looking for the name of the adapter and the MAC address. You’ll want both of those bits of information, so you might as well keep that terminal open and open up another one. That’ll be easiest, as you can then just copy and paste the data in the next step.
Now, you need to create and edit a file. We can more or less do this with a single step. In the 2nd terminal, use this command:
Now, to use that template, you insert the MAC address that you got from the inxi command where you see <mac_address>.
The <device_name> is a bit more tricky. It’s usually the first three letters – and don’t forget to leave the asterisk there. So, if you use my image above, you’ll see it’s wlo1. To change it, you’d just use ‘wlo*’. If it’s ‘eth0’ for your network adapter then you’d change it to ‘eth*’ being careful in all instances to keep the asterisk.
The last field to change is the name. You can stick anything you want in that field. So, for me, the command will look like this:
Yes, yes I really did name it booger. I’m pretty much a giant five year old.
When you’re done, save it. Just press CTRL + X, then Y, and then ENTER to save it with nano. As it’s creating a new file, it may ask if you want to create said file and you should (of course) say yes.
That’s it! Just reboot and you should see that you managed to successfully rename your network adapter. If it doesn’t work, double-check to make sure you got the device name and MAC address correct and reboot again. Done successfully, it looks like this:
Yes, yes I really did name it ‘booger’ – but only in a virtual machine.
See? It works!
Closure:
Again, I’ve only tested it in Ubuntu – so it’ll likely work with any Ubuntu derivative, should work for Debian, and will probably work with any other mainstream distro. I forget why it was in my notes, but I’m sure it was useful for someone. Maybe they just needed a name they could recall a bit easier, perhaps for their wireless connection and they wanted to connect to it in the terminal instead of keeping it always connected? I dunno… It was in my notes, it’s now online.
Either way, there’s another article. Thanks for reading! If you want to help, you can donate, register, write an article, or buy cheap hosting. When you scroll down, you can comment, vote for the article, or sign up for the newsletter. Should you sign up for the newsletter, I won’t share your information with anyone else and I won’t send you any spam.
Let’s try something new! Let’s take a look at a different file manager for a change. Specifically, let’s look at SpaceFM, a multi-panel file manager for Linux. It’s worth looking at and has a ton of useful features.
I figured that it’d be fun to sometimes review stuff and added the category when I was building the site. I haven’t used it until now, mostly because I had more pressing things to write. Alas, I’ve committed to write articles every other day for a year (or as close to it as I can get), so I might as well try out this review thing.
On with the article!
Wikipedia has an article about file managers, because of course they do. Simply put, it’s an application that lets you more easily manage files and directories. It’s usually a graphical application these days, but that wasn’t always true. If you’re coming from a Windows background, the Windows Explorer application was a file manager.
File managers often add other features, as does SpaceFM. Not only does it have multi-panels, it also has tabs, and more! So, let’s see how this ‘review’ thing is actually going to work. It’ll probably be a little rough, as this is the first one I’ve written for the site.
Getting SpaceFM:
SpaceFM is actually the default file manager in a few (seven, it seems) distros. It’s also almost certainly possible to find SpaceFM in your default repositories. It’s literally packaged for pretty much everything. Literally! Click the link and you’ll see that your distro is probably supported and it’s already available in your package management tools. Unless you’re using a pretty obscure distro, it’s readily available.
Given that it’s so readily available, I’m surprised that so few people use it. It’s so well documented, that I really don’t need to tell you how to install it. But, for example, you’d install it like this with Ubuntu:
1
sudo apt install spacefm
It’s as simple as that! Well, it should be. Just adjust that command for your distro’s package management tools and be sure to use ‘spacefm’ – and it’ll likely be there and installed without a hitch. If you don’t have it available in your default repositories, you can actually use a ‘net installer’ found here. It’s truly one of the most accessible programs I’ve ever seen.
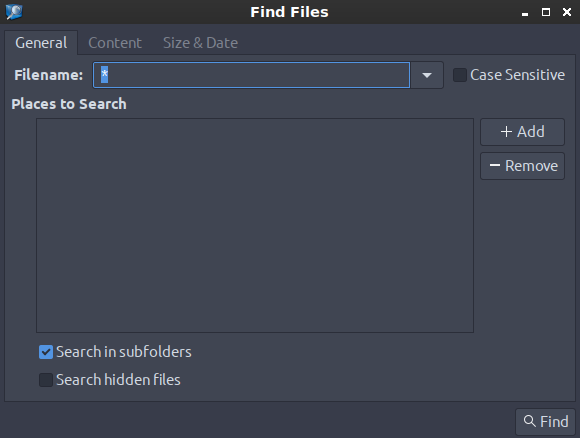
One of the great things about installing SpaceFM is that you’ll also get a nice GUI SpaceFM File Search application. It’s pretty self-explanatory and it looks like this:
See? You can find files with it, as well! Alas, it doesn’t search *in* files.
I use that with some regularity, as I have a whole lot of files and am not the greatest at organizing them. I find it processes the search pretty quickly, though I am not sure how well it will perform on older hardware.
Why SpaceFM:
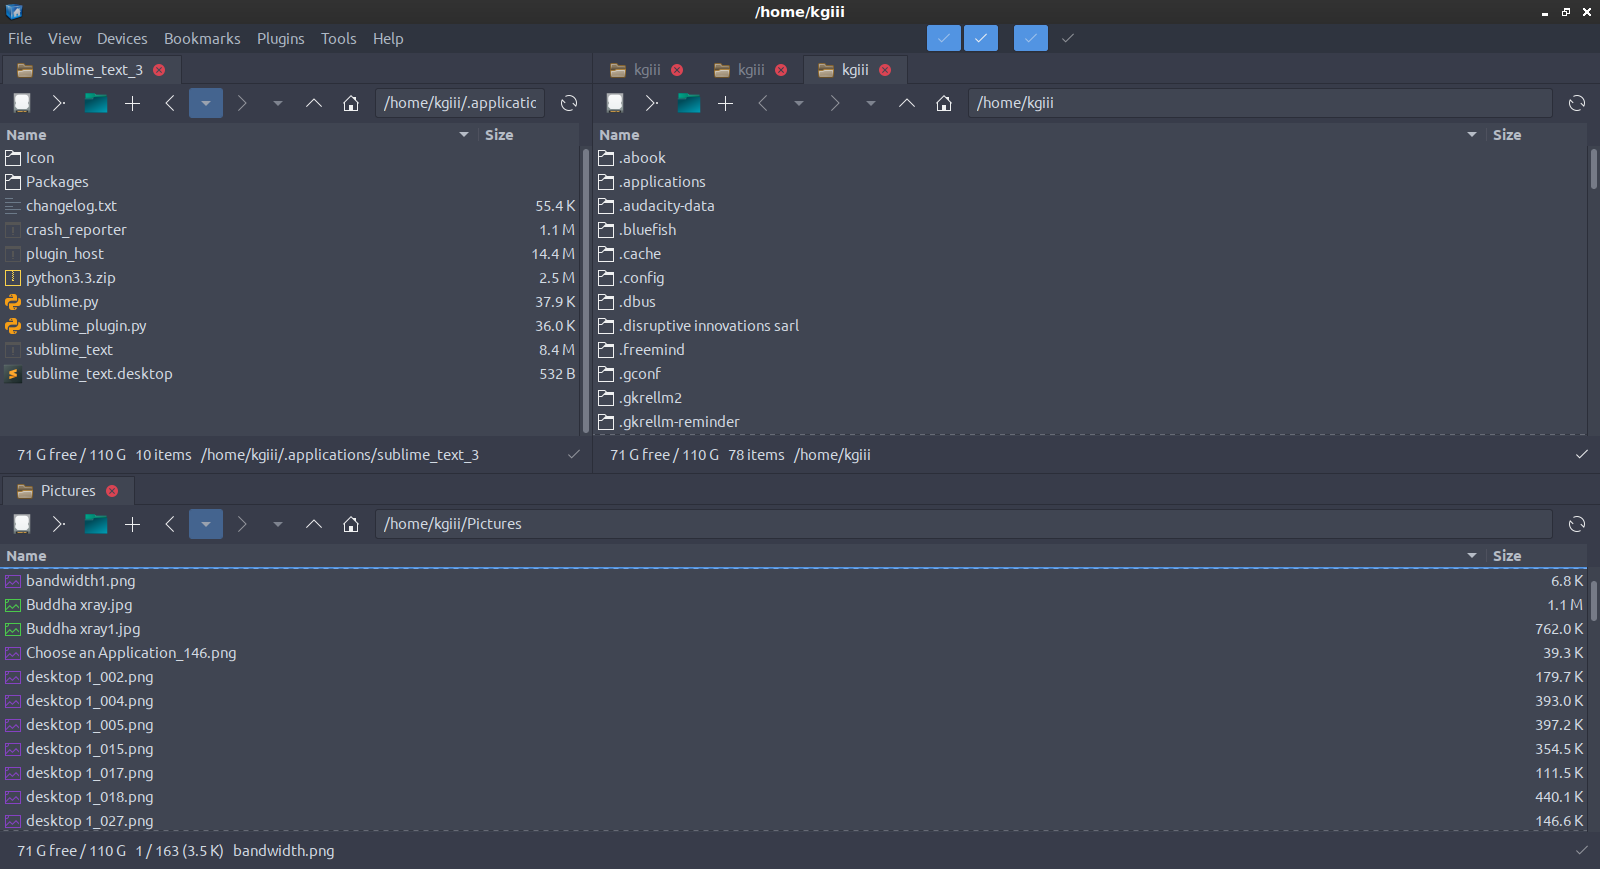
I think a picture is worth 1000 words, or that it can be. So, let me just share a picture with you and we’ll see where we are after that. Be sure to click on the picture, as it will expand to a larger image that’ll let you see more clearly.
I realize that’s a pretty busy picture and that there’s much to digest.
As you can see, I have three different panels open. It’s possible to have up to four panels. In each of those panels, you can also have tabs. If you’re looking to manage your files in a complex fashion, this is definitely one of the best tools to do it.
Helpfully, SpaceFM describes itself as this:
SpaceFM is a multi-panel tabbed file and desktop manager for Linux with built-in VFS, udev- or HAL-based device manager, customisable menu system, and bash-GTK integration. SpaceFM aims to provide a stable, capable file manager with significant customisation capabilities.
The above reasons are all pretty good reasons to at least try SpaceFM, but there’s more! See, there are also a bunch of plugins for those people that want to extend SpaceFM even further. There are plugins for GPG, bulk-renaming, auto-mount, image tools, and more! Take a look, there are quite a few!
So, what you end up with is a complete package. I realize that many folks will prefer to keep some of those things separate (the ‘Unix philosophy’), but it really does make for a light, responsive, intuitive, and effective file management package. I’m really surprised that so few people take advantage of this.
Closure:
There’s not much more to say. It’s there. Give it a try. As this is a review, I’ll rate it a solid 9 out of 10, with one point being taken off for not having an easier way to install plugins. I’ve used it extensively and never had so much as a crash and the plugins have always worked as advertised.
As mentioned above, this is my first review for the site. I made the category at the start, without really putting any thought into what it’d look like when I wrote stuff to fit that category. I’m not terribly pleased with how this one came out, but I know that I’ll try a few more things in future reviews and they’ll improve over time.
I’ve said before that the goal is an article every other day for a year, which means I’ve got plenty of time to get better! Please leave any feedback below, as I’d like to make this a regular feature. It’d be great to expose people to some alternatives – and to learn of some alternatives along the way. There’s some great software out there that’s still relatively unknown.
As always, thanks for reading. If you want to help, you know how to do so! I’ve told you this before! You can donate, register, write an article, buy hosting, rate the article, share the article on social media, leave a comment, or sign up for the newsletter! Bandwidth is again creeping up, but it’s below my new level. Again, thanks!