For some reason, Ubuntu Server comes with ‘power management’ enabled. This is an article that tells you how to disable sleep and hibernation in Ubuntu Server. It’ll work just fine for non-server installs, but this is aimed specifically at the Ubuntu Server release.
I recently was working on my own router. For this, I used Ubuntu Server as the base operating system. For some reason, it was shutting itself down after periods of inactivity. This isn’t acceptable behavior for a device that’s meant to be running all the time.
I checked in my logs and I found entries like this one:
Apr 3 12:18:27 server systemd[1]: Reached target Sleep.
That was entirely unacceptable. I do not know why power management was installed, nor do I know why it was active by default. I merely know that it was and that I couldn’t have that behavior with a server, a device meant to be always powered on.
So, I did what anyone would do in my shoes. I disabled sleep and hibernation entirely. It’s quick and easy – and effective! I’ll show you how!
Disable Sleep/Hiberation:
Like most articles, you’re gonna need a terminal. If it’s actually a server, you’re likely already able to connect with SSH. So, add the step of connecting to the server if you’re doing this remotely. If not, just proceed.
Once you have your terminal open, you’re to kill everything that has to do with suspend, sleep, or hybrid-sleep. It’s actually pretty easy. Start by opening said terminal, by pressing CTRL + ALT + T and then enter the following commands:
First, you mask ‘sleep.target‘:
1
sudo systemctl mask sleep.target
Then mask ‘suspend.target‘:
1
sudo systemctl mask suspend.target
And mask ‘hibernate.target‘:
1
sudo systemctl mask hibernate.target
Finally, mask ‘hybrid-sleep.target‘:
1
sudo systemctl mask hybrid-sleep.target
Later, should you change your mind, you can unmask them and that’ll enable them again. Just change ‘mask’ to ‘unmask’ and run the commands again. See? Pretty easy!
If you want, you can verify the efficacy. Simply use the following:
1
systemctl status sleep.target
(You can change ‘sleep.target’ to one of the above services and check them individually.)
Closure:
That’s it! I told you that it’d be pretty easy. It’s not only easy, it’s easy to undo this should you change your mind. Again, I do not know why power management is enabled by default in a server release. Nobody asked me! So, that’s how you disable sleep and hibernation with Ubuntu. (It’ll surely work with other distros.)
Thanks for reading! If you want to help, you can donate, write an article, vote for articles you like, share this article on social media, buy cheap hosting, register to help, etc… Nobody ever reads the last paragraph anyhow. Still, you can help if you want!
‘vnStat’ is a wonderful tool for monitoring your bandwidth usage. This article will show you how to use vnStat effectively. For bonus points, we’ll also look at ‘vnstati’ so you can make pretty graphs to visualize your bandwidth usage. This article shouldn’t take too long!
‘vnStat‘ stands for ‘view network statistics’ and has been around for like 18 years at the time of this writing. It’s so common that it has its own Wikipedia page. Of course you know that already, you can see the handy link I already provided!
Anyhow, ‘vnStat’ is a tool that runs in the terminal, a console tool as it helpfully describes itself:
vnstat – a console-based network traffic monitor
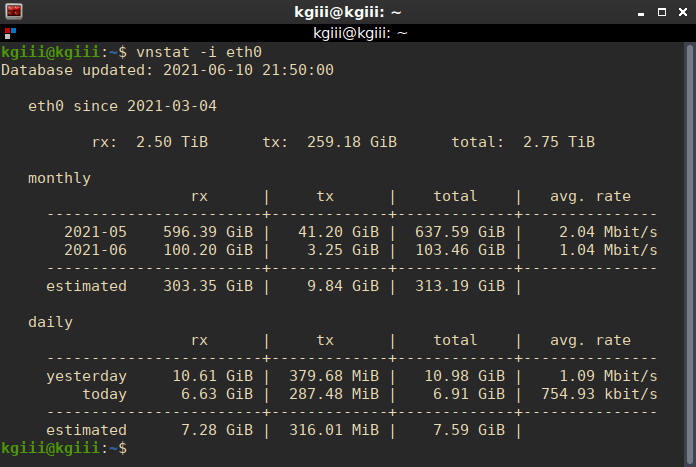
It’s a pretty great tool that generates some neat information and displays it in the terminal. It looks a little something like this:
See? I’ve stopped taking screenshots with a semi-transparent terminal! I’m pretty much a pro!
That image should save me a whole bunch of time! I trust that my readers are smart enough to figure out the gist of it with just a handy screenshot. For those not fluent in the ways of vnStat, ‘rx’ means received and ‘tx’ means sent. The rest should be pretty easy to figure out.
Install vnStat:
In order to get vnStat, you have to actually have to install it. It’s available in the default repositories in the popular distros (and even the BSD family). If it isn’t, you can always build it from source. But, you can probably install it much like you’d install anything else. For example, in a distro that uses apt you’d install it with:
1
sudo apt install vnstat vnstati
(We might just as well install vnstati at the same time. Also, adjust that command for your own package management system.)
You can next go ahead and enable the service and start it next. That will be:
1
2
systemctl enable vnstat
systemctl start vnstat
Once it is installed, you should set up database(s) for vnStat. This is done with:
1
vnstat -u -i <device_name>
Where you have “<device_name>” you replace it with the name of your internet adapter. For example, lots of Ethernet adapters are ‘eth0’. You can find the name of your adapter(s) by using either ‘ifconfig -a’ or ‘ip addr’. You can repeat this with all the names of the internet adapters you use, if you do in fact use more than one.
Then you can verify your vnStat installation with:
1
vnstat -v
Assuming that spits out a version number you should be good to go.
Using vnStat (& vnstati):
So, by now you should have vnStat installed, and its sister app vnstati should also be installed. Let’s examine how you use them.
First, you can just call the application in the terminal. There’s nothing complicated about it and it may be your choice if you have more than one network interface. To do so, it’s just:
1
vnstat
You can also be more specific, getting the data for just a single device:
1
vnstat -i eth0
Where ‘eth0’ is, change it to the name of your device. So, for a wireless device, it may look something like:
1
vnstat -i wlxe4beed0e5f5c
There are a ton of other options, so be sure to check the man page. Those are the options that I use most often, so those are the only ones we’ll be concentrating on.
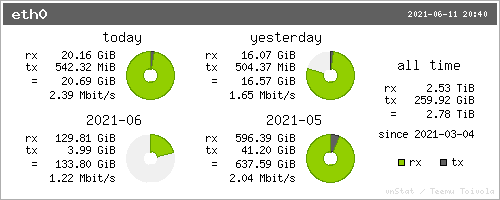
Now, you can also use vnstati to make a nifty graphic that will show you your bandwidth usage. It looks a little something like this:
That’s the graphical outcome I prefer.
That’s the output of this command:
1
vnstati -s -i eth0 -o ~/Pictures/bandwidth.png
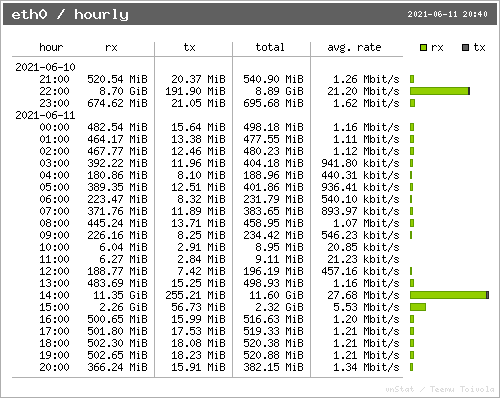
As you can guess, you can change the output path to anything you want (and have permissions for). I prefer that particular graphic, but there are a ton of options and you can gather all sorts of information. For example, there’s also this to show the hourly rate from the past 24 hours:
This is an hourly output, which may be of value if you have limited bandwidth.
That is the output from this command:
1
vnstati -h -i eth0 -o ~/Pictures/bandwidth1.png
And, again, you can modify the outputted .png to place it where you want. There are a whole lot more options and this article isn’t going to cover them all. That’s not the kind of article I write. There are tons more options in the man page, if you want to explore them.
1
man vnstati
Find what works for you and run with it. You should be able to find a format you like that has the information you’re looking for. I’m just introducing you, you decide how you use it.
Closure:
And there’s another article in the books! This one explains vnStat and vnstati. Both are pretty great tools that go well together, and they help you monitor your bandwidth usage. If you have any questions or comments, feel free to scroll down and leave a message.
Thanks for reading! If you want to contribute, you can donate, you can write an article, you can register to help, you can buy inexpensive hosting, you can rate the articles, you can scroll down to sign up for the newsletter, or you can share this site on social media. If you can think of anything else to help, jump right in and start doing it!
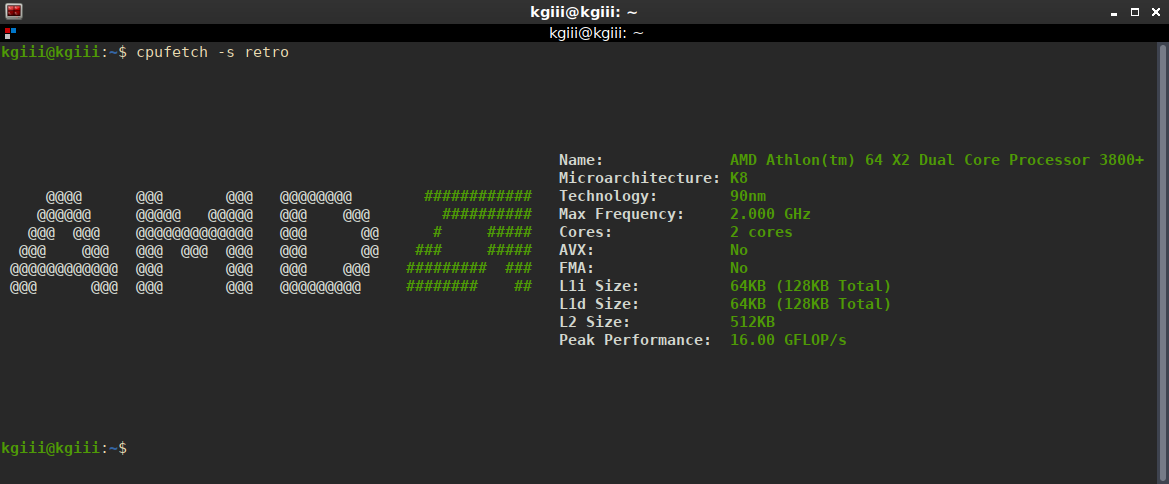
This brief article will help you get ‘cpufetch‘ installed and running. cpufetch is like neofetch, except it’s for your CPU. It’s probably not the greatest information-gathering tool, but it is kind of neat and worth playing with for a little while.
Basically, it’s like neofetch but for your CPU. All-in-all, it’s not the most useful tool. What it is, is interesting – or at least I think so. I saw it on a Reddit post a few days ago and decided to play around with it. I liked it well enough to write this article.
When I check the cpufetch man page, cpufetch describes itself as this:
Simple yet fancy CPU architecture fetching tool
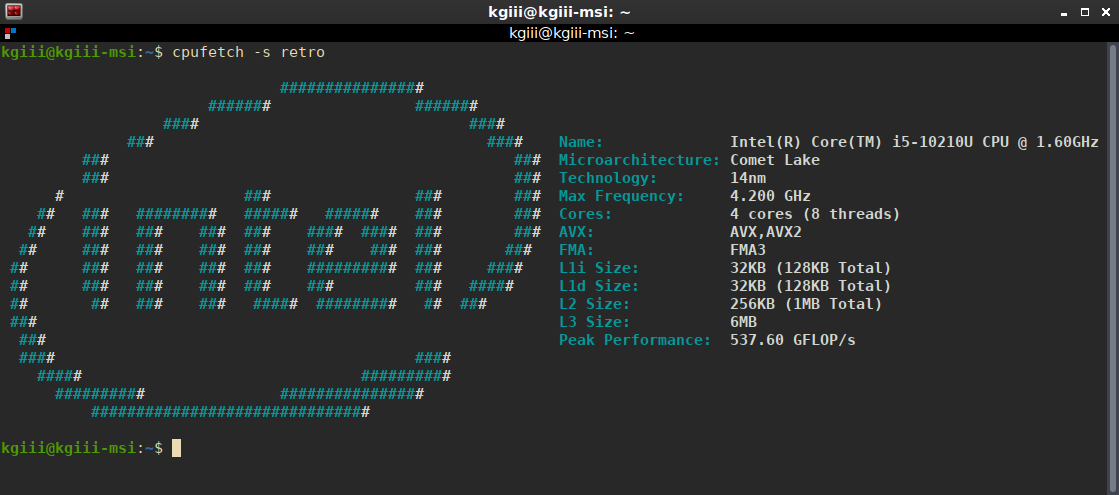
That seems to be an accurate description and that’s good enough for me! You’re not going to be doing a whole lot with it, but it is fun to play with. It simply outputs CPU data formatted to look a lot like neofetch and that’s all it does. In fact, it outputs data that looks like this:
And, yeah, that’s all it does. Neat, huh? No? Well, I think it’s neat! Sheesh!
So, yeah, that’s all it does. As you can see, I used the -s switch with retro to change the styling. You probably won’t be too interested in anything beyond that, which is fine. After all, this article is really about just having fun.
Using cpufetch:
Well, first you’re gonna need cpufetch if you want to use it. So, you should probably do that first! There’s a chance that it’s already packaged for you, and you can check that at this link. If there’s a package for you, go ahead and install it like you normally would. Otherwise, you’re going to need to build it.
Building it isn’t too hard and I had no issues doing so a couple of times on different systems. The directions are right there on the GitHub page, but I’ll recreate them here:
1
2
3
4
git clone https://github.com/Dr-Noob/cpufetch
cd cpufetch
make
./cpufetch
You can, of course, copy the built ‘cpufetch’ file anywhere you want. You can use the following command to make it so that you can use the program from anywhere you want.
1
sudo mv ./cpufetch /usr/bin
Having crammed it into /usr/bin means it’s accessible even when you’re in a different directory. You can just run ‘cpufetch’ and it’ll work.
Speaking of which, that’s all you need to do to run it. You just use:
1
cpufetch
However, you can go one step further and install it. This isn’t listed on the GitHub page, but you can actually install it to have a man page entry for it and the likes. To do that, instead of moving the cpufetch binary like above, you just tell make to install it. It looks like this:
1
sudo make install
With that command, it’ll be fully installed and run just like any other application that runs in the terminal. And, as mentioned, it even adds the man page so you can use that. That’s probably a better option than just stopping at the ‘make’ directions from GitHub.
The way the output is formatted takes up quite a bit of space, so it’s prettier if you make your terminal large enough to fit the formatted output. You can also check the man page to learn the few other options. From the few other options, I’ve decided that I prefer the retro style. To do that, it’s simply:
1
cpufetch -s retro
I found the formatting much nicer with the retro logo applied. You do you and decide which one you like best as you play with your new toy. It’s merely a matter of taste.
Closure:
And that’s it for today. You’re probably not going to need cpufetch in your day-to-day operations. In fact, there are better tools than cpufetch – and they’ll give you far more information about your CPU. In this case, I don’t think that matters. It’s just a fun way to see some of the information about your CPU in the terminal. It’s perfectly okay to just have fun!
As always, thanks for reading! Thanks for the feedback! The traffic has slowed down, which is fine by me. If you’re interested in helping, you can donate, write an article, buy cheap hosting, register to help, scroll down and vote or sign up for the newsletter down there, or you can leave feedback in the comments! Any/all of those are truly appreciated and either help keep me motivated, show me what you like, or help the site stay up and running. Until next time…
EDIT:
I found an ancient AMD box to try it on, just so I could generate the AMD graphics. It took a bit to remember I had that old computer, but it looks like this:
You can click on these to make them larger and easier to read.
The answer to the question, “What is my IP address?” can have different answers. In practice, you likely have more than one IP address. This article will explain how and will tell you how to use your terminal to find your IP address(es).
An IP address is a numerical designation given to computers on a network. This number is used to identify the computer. You can also identify a computer by their hostname, but the hostname is resolving to an IP address. Computers that are connected to a network will have an IP address.
There are two types of IP addresses to be curious about these days. There’s IPv4 and IPv6. IPv4 predates IPv6 and is still in use, but has run out of numbers. IPv6 solves that by enabling a whole lot more combinations. IPv6 has a potential of 340,282,366,920,938,463,463,374,607,431,768,211,456 addresses – which is a whole lot of ’em, especially when compared to IPv4’s paltry ~4.3 billion addresses.
IPv4 addresses have technically already been exhausted, and have been since early 2011. The addresses still exist, but they’re all assigned to various entities. The IPv6 roll-out has been slow. Odds are good that you’re using IPv4 right now, in fact I know you are – as this site has an IPv4 address. Still, your router is likely handing out IPv4 addresses and your ISP is likely still using IPv4 addresses.
Additionally, in most cases, you would be concerned with two IP addresses. You’re likely connected to a router/modem that’s connected to the internet. As such, you will have a private IP address and you’ll have a public IP address. The first is (usually) assigned to your computer by your router and the second is assigned to your router by your ISP. This article will explain a little about each and how to find both of them.
Find Your Private IP Address:
Your private IP address will be in a reserved section of the IP address space. It will probably be handed down by DHCP (Dynamic Host Configuration Protocol), but many routers will both let you pick your IP address (from the reserved space) or will just assign the same IP address to the same device based on the MAC address (Media Access Control).
The reasons you’d want to know it are your own, but it’s handy if you want to connect to a specific computer. As I know my laptop is 192.168.1.5, I can just SSH into it using that address. I know my media server is a different address, and I can connect to it with the IP address as well.
There are a number of ways to find your private IP address. I’ll share two of them that are quick and easy. For this, you’re going to want to open your terminal, which you can do by pressing CTRL + ALT + T and it should open right up.
First try:
1
ip addr
You can also try:
1
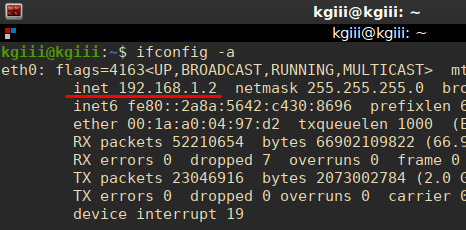
ifconfig -a
In both cases, you look for ‘inet’ AND your device. You’re not looking for ‘loopback’, as that will likely list your IP address as 127.0.0.1 – which isn’t the address you’re after for reasons beyond the scope of this article.
You’re looking for your device, maybe named ‘eth0’ or ‘wlo1’ or similar, and then you’re looking for ‘inet’. Your IP address is the next four sets of digits (or alphanumeric combinations in the case of IPv6). For example:
I’m not so sure the underlining matters.
One or both of those methods should work for you with any major distribution. There are surely many other ways to find your IP address, so feel free to leave a comment indicating how you do it.
Find Your Public IP Address:
The next kind of address is your public IP address. This is the IP address your ISP assigns you. If you wanted to connect to your computer over the world-wide-web, you’d be able to do so (with obvious caveats and proper configuration) with your public IP address.
It’s also the address I see (unless you’re using a VPN) in my server logs when you visit my site. That’s perfectly normal – as my site needs to know where to send the return packets. If my site didn’t know an address to send data to, it simply wouldn’t work.
You can think of this as the IP address assigned to the public side of your router, and your router then passes that information along via the private IP address that originated the request. This lets you have multiple devices using the same public IP address. (Read about NAT here.)
My understanding is that some ISPs are NATing public IPv4 addresses so that multiple routers can actually have the same IP address (not necessarily a good thing). However, that too goes beyond the scope of this article and isn’t want this site is actually about.
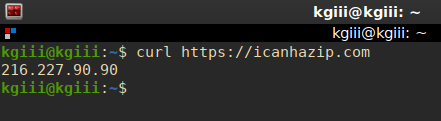
Anyhow, there are numerous public servers out there that you can ‘cURL‘ and those will give you your public IP address right there in the terminal. Just like above, you can open your terminal by using your keyboard and pressing CTRL + ALT + T. Once open, you can try:
1
curl https://icanhazip.com
Or you can try:
1
curl ifconfig.me
It should look a little something like this:
Yes, that’s my public IP address. No, I don’t care.
There are numerous other sites that’ll spit out the same info. The top-most example was recently handed over to Cloudflare, just so folks are aware.
Closure:
And, there you have it. You now know how to find your public IP address and how to find your private IP address from within the terminal. There are also many dozens of websites that will tell you your public IP address, but we might as well stick to the terminal for this one. Why not? You can do a lot in the terminal.
Once again, thanks for reading. Your comments and feedback help make the site better. As always, you can donate, write an article, sign up for the newsletter below, register, and vote to let me know which articles you prefer. If you sign up for the newsletter, you’ll get notifications when new articles are published. No spam, I promise!
In the last article, I explained how to enable SSH. In today’s article, we’re going to learn how to forward GUI application windows with SSH. x11 forwarding is easy and beneficial. Once you learn how, you may decide to stop using VNC or TeamViewer.
Just to quickly clear up a misconception, x11 forwarding works just fine with Wayland. Way back in the earliest days of Wayland development, it was agreed that it should retain backwards compatibility with x11 forwarding.
What is this strange thing, this x11 forwarding?
Well, when you’re connected to another computer via SSH you can use the terminal to control the computer. That’s great, but what if you want to use a GUI application? Sure, you could set up some sort of remote desktop application, such as VNC. Or, alternatively, and often more simply, you can just forward graphic applications over SSH. It’s remarkably easy!
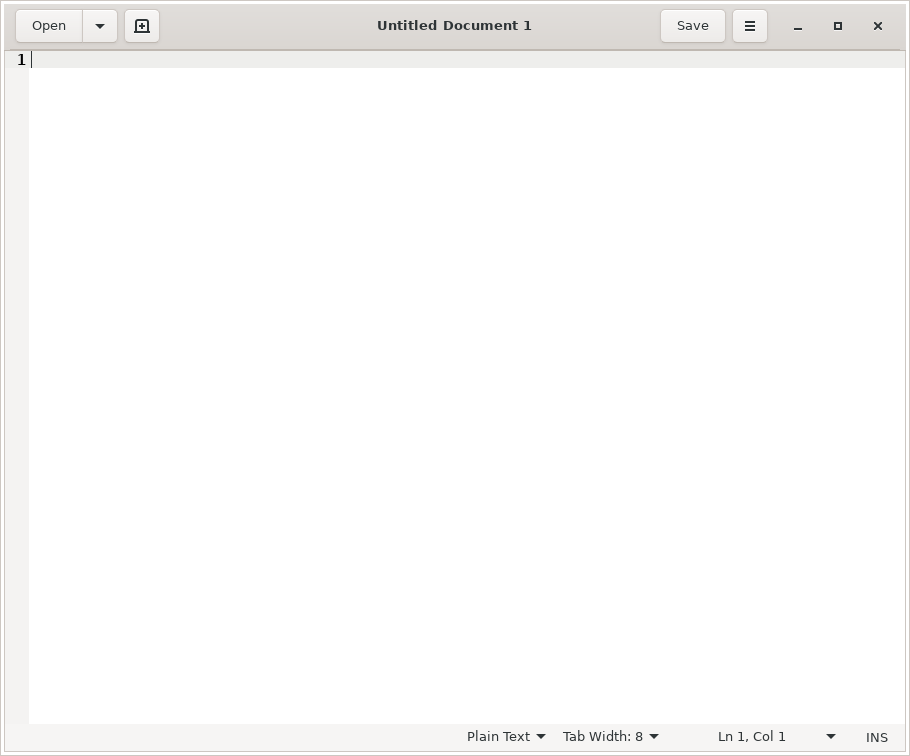
Perhaps a picture is in order. Check this:
That’s GEdit running on a different computer, but forwarded to this one. Pretty neat, huh?
That’s right. That’s GEdit running on my laptop. I’ve just forwarded the GUI application to this computer. If I write something and save it, it’d be saved on the computer that I’m connected to and not the computer that I’m using.
Amusingly, I used this exact process just recently. I had to move a complex password to my laptop and I was being lazy. So, I opened GEdit remotely and pasted in my password, transferring my new password to the other device. See? It comes in handier than you might think.
Let’s Enable x11 Forwarding:
How do you do this? Well, first you need to crack open your terminal. To do that, you just press CTRL + ALT + T on your keyboard and your default terminal emulator should open.
Now, in said terminal, you need to run the following command:
1
sudo nano /etc/ssh/sshd_config
Once you have that file opened with nano, you just need to remove the appropriate pound sign (“uncomment” it out) for the right line. Look for the line that says:
1
#X11Forwarding yes
And change it to:
1
X11Forwarding yes
Then save the file with nano by pressing CTRL + X, then Y, and then ENTER. (You may want to learn that, as that’s how you save files in nano.)
Next up, you’ll restart the SSH service and be done with it:
1
systemctl restart sshd
And that’s it! You can now use x11 forwarding over SSH. To do so, you just need to add the -X switch. That’s not as complicated as you might think. Nothing in this article is all that difficult.
1
ssh user@host_name.local -X
To try to make sense of that above command, if I were to remotely connect to the MSI laptop, then my command would look just like:
1
ssh kgiii@kgiii-msi.local -X
You can also use the IP address, instead of the hostname, just like we discussed in the previous article about SSH. To do that, it looks like this:
1
ssh user@ip_address -X
x11 Forwarding in Action:
Once you’re there, just go ahead and start an application. For example, open gedit by typing just that into the terminal. You may find some applications won’t work, often due to ownership and permissions issues, but you’ll find many that work just fine. If you find one that doesn’t work, you can always check any errors thrown and go from there.
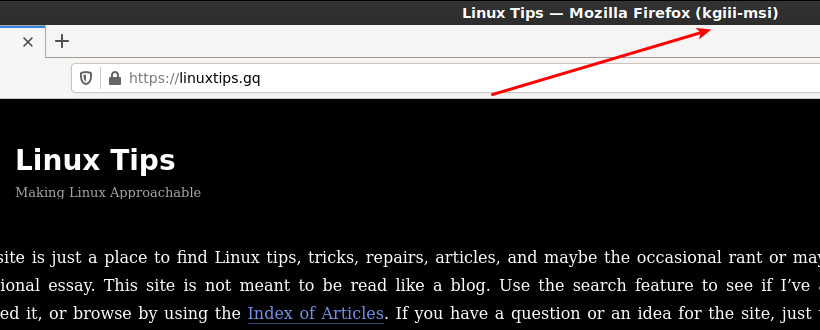
See? Note the carefully drawn arrow that shows where it was forwarded from. Tada!
That’s an example of Firefox forwarded over SSH using x11 forwarding and you may notice the washed out look. I haven’t really dug into it, but I am reasonably confident that washed out look is because of compression. I’ve never needed to dig into that and, amazingly enough, I don’t know everything.
Conclusion:
Anyhow, there you have it. One more article in the books and one more bit of knowledge plastered across the internet. Thanks for reading! If you want to help, you can donate, you can share the site on social media, you can vote to show what type of articles you enjoy, and sign up for the newsletter. You can even buy inexpensive hosting and start your own site while supporting this site or write your own article!