Another Way To Find The Binary For A Specific Command

In today’s article, we’re going to learn another way to find the binary for a specific command. This won’t be a very difficult article. It’s an article that will be easy enough for even new Linux users to follow. So, if you want to find the binary for a specific command, read on!

You’ll find some similarities between today’s command and the ‘which’ command, which we used in this article:

Find A Command’s Binary

Well, we’ll use the ‘whereis’ command in this article. The man pages for the ‘whereis’ command describe it ‘whereis’ thusly:

whereis – locate the binary, source, and manual page files for a command

You may recognize the command, as we’ve used it to find the man pages for a specific command. In that article, we discussed the possibility of using the ‘whereis’ command to do just this, but I feel it deserves its own article. The first article merely mentions the possibility, so an article specifically discussing this command’s use like this makes perfectly good sense to me.

So, let’s learn another way to…

find the binary For A Specific Command:

As you might have guessed, the ‘whereis’ command is a command used in the terminal. As such, you’ll need an open terminal. Just press CTRL + ALT + T and your default terminal should open.

Now, with your terminal now open, you can try to find the binary for a specific command. Let’s say you want to find the binary for ‘grep’. Then the command would look like this:

The output of which would look a whole lot like this:

whereis command finding the binary for grep
Where is grep? There it is! This will probably not work for Waldo. Or Carmen Sandiego. 

The extra fields are where the man page and info pages are located, and the first field is the path to the binary in question. So, if you want to find the binary file for Firefox, the pattern is:

So, for Firefox specifically, you’d run:

However, if you just want to find the binary for the specific command, you’d use the -b flag. That’s all you need to do in this case. It looks like this:

And that will output just the binary file’s location without the additional fields of man pages and info pages. See? It’s pretty easy after all.

Closure:

Well, there’s another article. This time around, we’ve learned another way to find the binary for a specific command. It’s another article in a long list of articles, indeed a growing list of articles. So, well, there’s that… Which is nice…

Thanks for reading! If you want to help, or if the site has helped you, you can donate, register to help, write an article, or buy inexpensive hosting to start your own site. If you scroll down, you can sign up for the newsletter, vote for the article, and comment.
Review: Ubuntu Cleaner

In today’s article, we’re going to review a piece of software known as ‘Ubuntu Cleaner’. It won’t be a very long article, as there’s not much to cover – as it’s fairly self-explanatory. If you’re interested in learning about ‘Ubuntu Cleaner’ then this is the article for you.

As the name implies, this software is designed to work with Ubuntu. You may find that it works fine with Ubuntu derivatives. It may also work with the various official Ubuntu flavors – in part or in whole. But, the key here is ‘Ubuntu’. It’s software designed for Ubuntu. If you don’t use Ubuntu, this may not be the software for you.

I guess this isn’t a review so much as it is making folks aware of Ubuntu Cleaner. It’s reasonably easy and safe, so it seemed like a good idea to share this with Linux-Tip’s Ubuntu users.

About ‘Ubuntu Cleaner’:

You’ll find that ‘Ubuntu Cleaner‘ does more or less what you’d expect it to do. In many ways, it’s similar to BleachBit. Though, you’ll sometimes read stories of people using BleachBit and hosing their systems. That’s extremely unlikely to happen with ‘Ubuntu Cleaner’.

In short, you’ll see that this application cleans your system. It deletes files you don’t need, reducing the amount of disk space used. It cleans the following things at the push of a button:

  • Clear browser cache
  • Clear APT cache
  • Clear thumbnail cache
  • Remove unneeded packages
  • Remove old kernels
  • Remove old installers

So, ‘Ubuntu Cleaner’ is a system cleaner. If you’re curious about the browser cache, it appears to work with Firefox and the major Chrome/Chromium-based browsers. It did not seem to recognize the Snap version of Firefox, but that could be a problem at my end or something they’re working on.

You can see that it clears other things, like running the APT commands you’d consider running manually. If you have extra kernels installed, it’ll remove them – leaving one kernel version as a backup. 

But, it does what it says it does on the label, it cleans Ubuntu.

Installing/Using ‘Ubuntu Cleaner’:

It’s easy enough to install ‘Ubuntu Cleaner’ in Ubuntu. You will need an open terminal. If you don’t know how to open the terminal, you can do so with your keyboard – just press CTRL + ALT + T and your default terminal should open.

With your terminal now open, simply follow the directions to install ‘Ubuntu Cleaner’ on their project page. I’ll copy them here, but be aware that things change and these installation directions may change:

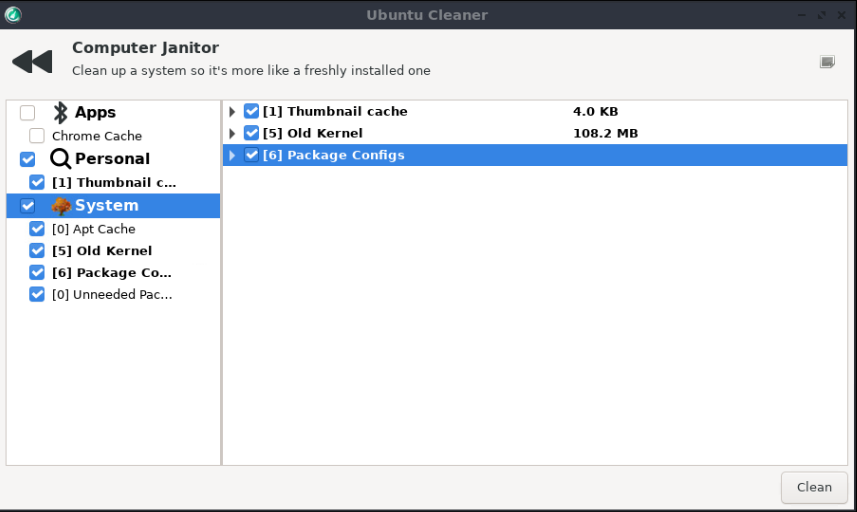
Then, open ‘Ubuntu Cleaner’ from your applications list and the rest is pretty obvious. On the left side of the screen, select the category of items you want to clean. On the right side, select the specifics you wish to have cleaned with ‘Ubuntu Cleaner’. When you’re done picking, push the button to clean your Ubuntu system. It’s not complicated, and looks like this:

Ubuntu Cleaner in action.
It’s pretty easy to understand how to use Ubuntu Cleaner.

See? It’s not all that complicated and it does what you’d expect it to do. It cleans Ubuntu’s system files – including your browser cache.

Thoughts and Closure:

These are all things you could manually clean yourself, including being able to run commands to remove your APT cache and the likes. But, if you’re one of those people who likes to stay on top of removing unused system files, this might be an application you’d like to use – assuming you’re an Ubuntu user.

On a scale of 1 to 10, I suppose I can rate it a 9. The application could do more, but it doesn’t need to. It does what it says on the tin and there’s little risk of it harming your system. Ubuntu Cleaner is a safe and effective way for Ubuntu users to remove system files.

If you’re an Ubuntu user, go ahead and install it. If you use an official Ubuntu flavor or a derivative, you can also try installing it – but it may not do things like remove the thumbnail cache. You can give it a shot. It’s unlikely to break anything.

Thanks for reading! If you want to help, or if the site has helped you, you can donate, register to help, write an article, or buy inexpensive hosting to start your own site. If you scroll down, you can sign up for the newsletter, vote for the article, and comment.

Rename A File Downloaded With ‘wget’

In today’s article, we’re going to learn how to rename a file downloaded with ‘wget’. This will not be a complicated article. It will also be a pretty short article. If you want to learn how to rename a file downloaded with ‘wget’, read on and you’ll see how!

Often, you’ll use ‘wget’ to download a file and it will have some sort of convoluted file name. You can download a file with ‘wget’ and rename it automatically. If this is something you’re interested in doing, we’ll learn how to do it in this article.

We’ve used ‘wget before. See:

How To: Hide The Output From wget
Make wget Use IPv4 or IPv6
How To: Make ‘wget’ Ignore Certificate Errors

We’ve used ‘wget’ in other articles, so feel free to use the search function to see the other articles about ‘wget’.

If you’re curious, you can check the man page. You’ll see ‘wget’ defines itself as:

Wget – The non-interactive network downloader.

That’s a good enough description, I suppose. Basically, you use ‘wget’ in the terminal to download files. It’s a pretty handy application and, importantly, a pretty universal application. If you’re using a GNU/Linux desktop (or server), you’ve almost certainly got ‘wget’ as an available tool.

So then…

Rename A File Downloaded With ‘wget’:

This article requires an open terminal, like many other articles on this site. If you don’t know how to open the terminal, you can do so with your keyboard – just press CTRL + ALT + T and your default terminal should open.

Let’s ensure you have ‘wget’ installed with:

If ‘wget’ is not installed, install it from your package manager. Once installed, you can take it on a test run:

Now, we’re going to make ‘wget’ keep trying in case the download has issues. We’ll use the -c (continue) flag:

You probably don’t need the -c flag for this file, but it’s a good habit to get into. If we add the -O flag (for output-document) to the command, it’d look like this:

Or, to try to make it more clear:

In the latter example, you’ll have downloaded the file and renamed it to numbers.txt instead of saving it as the original filename. See? Pretty simple!

Closure:

There you have it. You have a new article. This time, we’ve learned how to rename a file downloaded with wget. It’s a handy trick to keep in mind, as people tend to want to give their files names with things like version information and all that. If you want a simpler file name, this is a nice easy way to do it.

Thanks for reading! If you want to help, or if the site has helped you, you can donate, register to help, write an article, or buy inexpensive hosting to start your own site. If you scroll down, you can sign up for the newsletter, vote for the article, and comment.

Disallow Directory Listing (in the terminal)

In today’s article, and for no apparent reason, we’re going to learn how to disallow directory listing in the terminal. This seems like a good article for beginners to learn, and it seems like something most folks might like to know. So, if you want to disallow directory listing read on!

You never know when you might want some additional privacy, though I’d definitely not confuse this for strong privacy measures like encryption, amongst your files. Perhaps you’re planning on releasing a memo and you don’t want anyone to read it until you’re done?

I dunno? It’s up to you as to why you’d want the potential privacy from making it so that the files in a directory can’t be listed. Your reasons are your own. I just share tidbits of knowledge.

We will be using ‘chmod’ in this exercise. The man page for ‘chmod’ describes itself like:

chmod – change file mode bits

But, for our purposes and generally speaking, it’s used to adjust the file permissions. As you should know, files have various permissions in Linux – and everything in Linux is a file. There are read, write, and executable bits that can be set (with said chmod, for example) and there’s also file ownership (for another day). We’ll be using those permissions to prevent listing the files in a directory.

Ready? It really won’t take long – and it should be easy enough for anyone…

Disallow Directory Listing:

As the title suggests, this is another ‘in the terminal’ application. So, of course, you’ll need an open terminal. You should open a terminal now. If you don’t know how to open the terminal, you can do so with your keyboard – just press CTRL + ALT + T and your default terminal should open.

With your terminal now open, let’s first start by making a directory – just so that we can then use that to disallow directory listing. We’ll just do this in your /home directory. Start with:

Now, let’s move to the new ‘sample’ directory and make a couple of files.

Now, what we’re going to do is change the permissions of the ‘sample’ directory, like so:

You don’t need ‘sudo’ or anything, because these files belong to you. But, you can now test it. While still in the folder, try any of the following:

Or (from outside the directory, if you’d like):

In all cases, it should give you a ‘permission denied’ error, because you no longer have permission to list files from within that directory.

If you wish to reverse this, you can simply try changing the permissions again. You can just:

With that command, you can resume directory listing. So, it’s pretty easy to reverse the process. It’s also not the greatest security measure you can take, because of that. So, do what you will with it, as you now know how to disallow directory listing in the terminal.

Closure:

There you have it, it’s yet another article. This one seemed like an interesting one to write, so I figured I’d write it. You never know when you want to disallow directory listing, but now you know how to do so. If you have any questions, feel free to ask…

Thanks for reading! If you want to help, or if the site has helped you, you can donate, register to help, write an article, or buy inexpensive hosting to start your own site. If you scroll down, you can sign up for the newsletter, vote for the article, and comment.

How To: Find Files Over A Certain Size

Today’s article is going to be a quick article, one where we learn how to find files over a certain size. We’ll be using the ‘find’ command, which we’ve used previously, even though it can be fairly complicated to use. If you want to play around with the ‘find’ command, read on!

Also, and this wasn’t the first article I wrote tonight. I wrote another article. It was a good article. No, it was a great article! Then, as I’m wrapping that article up and hit the preview button, I scrolled down and saw the automatic article recommendation thing at the bottom…

Yup… It was such a good article, I wrote it twice! Well, I couldn’t let that pass – as I’d just done so recently, so I’m writing a new one and this one should be entirely new!

Making the find command approachable to new users means doing it in small bits. Fortunately, the command tells you what it does by its very name. It does exactly what you’d expect – it helps you find files. In fact, it defines itself as:

find – search for files in a directory hierarchy

So, it does what you’d expect it to do – though it can seem fairly complicated to a new user. Let’s do our best to make it approachable, shall we?

Lets Find Files Over A Certain Size:

If you’re a regular reader, you’ll know what’s coming next…

This article requires an open terminal, like many other articles on this site. If you don’t know how to open the terminal, you can do so with your keyboard – just press CTRL + ALT + T and your default terminal should open.

So, if you just want to run this ‘find’ command in the directory (and recursive into sub-directories) you’re in, it’s nice and easy. Try this:

As you can guess, that finds files bigger than 100 MB in your current directory (and recursively). If you want to find files of a different size, you just change 100M to whatever you need – like 1000M (you can use G for gigabytes, for example).

If you want, you can specify a directory. Let’s say you want to do the entire system from the root directory (not to be confused with the root user). You just specify that – but you’ll want to use ‘sudo’ because you don’t have permission to read all those files.

Like this, you can specify the starting directory. If you want to find all files larger than 2 GB in your home directory (and sub-directories) then you just run this command:

There’s so much that you can do with the ‘find’ command. It’s really quite useful and I find myself using it with some regularity. Don’t forget to run the man find command to learn more about it. You can do a lot more than just find files over a certain size.

Closure:

So, I’ve tried to make the find command approachable by even novice users. It can be a bit complex looking, but it really is useful. If you think I’ve made it approachable, go ahead and comment. Of course, comment if you think the opposite is true. It’s all good, we’ve just tried to learn how to find files over a certain size.

Thanks for reading! If you want to help, or if the site has helped you, you can donate, register to help, write an article, or buy inexpensive hosting to start your own site. If you scroll down, you can sign up for the newsletter, vote for the article, and comment.

Linux Tips
Creative Commons License
This work is licensed under a Creative Commons Attribution 4.0 International License.