How To: Go To A Specific Line In Nano

In today’s article, we’re going to learn how you can go to a specific line in Nano. It’ll be an easy article, perhaps even a fairly brief article. There are a just a couple of ways to cover, so it won’t take all that much time or space.

Often, when things like scripts throw an error, they’ll tell you on which line number the error happened. There are often hundreds or thousands of lines in complicated files and navigating to the correct line number is tedious, prone to error.

You can be pressing the down arrow for quite a while! So, why not note the line number where the error occurred and open the file at that specific line? It’s perfectly good sense! It’s such good sense that I figured I’d write an article about it.

You all know that I’m a Nano fan. You can read the ‘big’ Nano article here. If that’s not enough, this link is to a search for Nano across the entire site. There are nearly 30 articles that use Nano in them. I really am quite a fan.

Why am I a fan? Well, the first link will probably tell you that, but I like it because it’s simple. Nano’s starting to be fairly universal. It’s light and that’s why I like it – it’s only meant for quick text file edits.

Nano’s not really the right tool for writing a book, nor would I want to use it to write large scripts or for programming. For what it is, it’s great. If it’s not great, odds are good that you’re not using it as the tool it is. Sure, it’ll work for other things, but it excels at being what it is – a quick text editor in the terminal.

Go To A Specific Line In Nano:

Nano is a terminal-based tool. So, you obviously need to have an open terminal. If you don’t know how to open the terminal, you can do so with your keyboard – just press CTRL + ALT + T and your default terminal should open. Tada! (That’s mostly copy/paste from previous articles, but I do sometimes mix it up a little!)

With  your terminal open, let’s show you how to go to a specific line in Nano. It’s pretty easy, and we’re going to use a file most users will have. If you don’t have a ~/.bash_history file, you can use any plain text file you want.

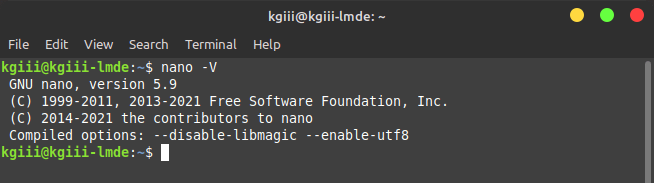
I suppose we should first make sure that you have Nano installed. To check, you can just look for the version. That’s done with:

Your output should look something like:

checking the nano version
As you can see, Nano is happily installed and ready for use.

If Nano isn’t installed, and you’re using any mainstream distro, it’s certainly in your default repositories. You can install it like you would any other piece of software in the repositories. 

Now, there are two ways to open and go to a specific line in Nano. The first is probably the easiest. Using our ~/.bash_history as an example, the command looks like this:

Where you see the +25 flag, that’s the place where you specify the line number to start with when  you open Nano. You can use any number you want, provided there are that many lines in the file you’re intending to edit.

The next way is also easy. Using your keyboard, press CTRL + Shift + . Nano will then present you with the chance to enter in a specific line. It looks like a lot like this:

open a specific line in nano
See? Follow the arrow and that’s where it prompts you to enter a line number. ‘Snot hard at all!

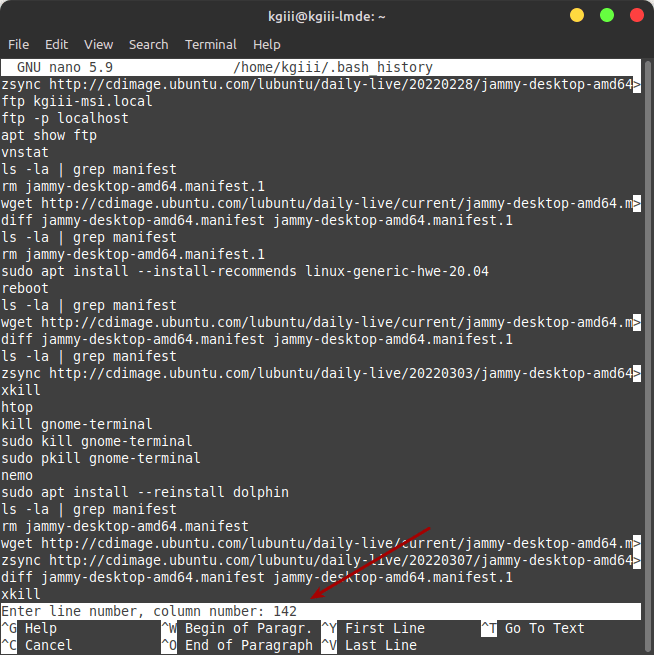
So, now you have two ways to go to a specific line in Nano. I told you that it was going to be easy! Nano is awesome.

Closure:

There’s another article! It’s on one of my favorite subjects – Nano. Now you’ve learned how to go to a specific line in Nano, which is a pretty handy trick to have in your toolbox. It can save you all sorts of time, and not just time scrolling. It means you aren’t paying attention to the rest of the fluff and you can concentrate better, or so it seems to me. For what it is, Nano is my favorite plain text editor and it’s remarkably useful at times.

Thanks for reading! If you want to help, or if the site has helped you, you can donate, register to help, write an article, or buy inexpensive hosting to start your own site. If you scroll down, you can sign up for the newsletter, vote for the article, and comment.

My Three Favorite Text Editors, a Meaningless List

One of the things I hope to avoid on this site is lists and rankings. I hope to be creative enough to avoid what other sites do. You shouldn’t expect this site to have articles like, “The Top 10 Distros for Low-end Computers!” It’d be great if I were creative enough to not end up with articles like that. Though they do appear popular, I think we can do better than that!

Ah, yes… I see that paragraph coming back and biting me in the arse after I’ve run out of article ideas and am just publishing fluff content. Anyhow…

People have heard me say this before, and it’s just like how I do it with browsers, I use different text editors for different reasons. I do different things in each, using each for specific tasks. This article shares my three favorite text editors, along with the why and how I use them.

This isn’t a list of the best text editors, because I don’t know what needs you have and I don’t feel qualified to say what is best. (That’s another sentence that’s going to come back and bite me in the arse.) Instead, it’s a list of my favorite text editors – so you could say that they’re the best for me.

The order that I list these text editors in might as well be in the order that I use them. I can’t think of a better way to organize them. So, here they are from most-used to least-used.

Favorite Text Editor #1: FeatherPad

Link: FeatherPad

That’s right, FeatherPad comes in first. Why? Because I always have it open. It, along with a host of other software, gets opened immediately after booting and never gets closed. 

Maybe a picture will explain it:

FeatherPad with many files open.
As you can see, it’s a pretty busy application with many text files open.

See? I do a lot of things in plain text files. I keep track of many things, including ideas for articles for this site. When it comes to keeping many text files open and available, FeatherPad does great. FeatherPad doesn’t use a lot of resources, never crashes, and has adequate preferences for me to set it up how I like.

I use all those text files (fuzzed section on the left) on a regular basis. Not only can I save them as a session, FeatherPad can helpfully open all previously opened text files when it is started. I don’t use a clipboard manager, I use plain text files that can be easily managed and FeatherPad is one of my favorite text editors. The session feature is a great benefit.

Favorite Text Editor #2: gedit

Link: gedit

gedit, no caps, is a rather pompous application. When you install it, it boldly refers to itself as “Text Editor”, as though it is the only text editor out there. It’s also meant to be used in the Gnome desktop environment, and is actually the default Gnome DE text editor. You can trivially install it on other desktops and it doesn’t pull in a ton of dependencies.

The gedit text editor is one of my favorite text editors because of the plethora, yes an overabundance, of plugins available. It’s easily themed with colors that don’t burn my eyeballs, and the syntax highlighting works well enough. I even wrote an article about installing gedit with all the bells and whistles. (I know, it needs to be transferred to this site.)

gedit in action
See? It doesn’t scald my eyeballs and it highlights text just fine.

I use gedit when I’m editing files with my FTP client. I use gedit when I right click on a file and want to open it. The gedit text editor is good for that sort of stuff. It’s basically my default editor for plain-text files that I don’t already have opened in FeatherPad. 

It’s not the lightest editor out there, but it’s not all that heavy. gedit opens responsively even with reasonably large text files. It does what it says it does on the tin and, as such, is one of my favorite (or at least most frequently used) text editors.

Favorite Text Editor #3: nano

Link: nano

At the time of writing, nano is going on 22 years of age. Yeah, it has been around that long. While I have a passable familiarity with Vim, I don’t really need any advanced features when I’m editing files in the terminal.

nano is a GNU project, just like Emacs, but doesn’t have nearly as many features and runs in the terminal. You also don’t get to use the macros that you get to use in Emacs. It’s a much more simple application than Emacs.

While you can surely use nano for a lot of text editing, it’s not ideal for doing so. If you’re going to do a lot of text editing from the terminal, learn to use Vim. If you’re going to just do quick edits (like me), nano works just fine.

nano text editor in action
There aren’t many features. This is a very bare-bones editor. That”s intentional.

As I said, it’s really basic, and that’s by design. It’s meant to be basic and to just be used for editing text. Unlike some of the other editors that run in the terminal, this one probably came installed on your distro by default.

You’ll need to learn some keyboard shortcuts to make use of nano, but they’re easily learned and you’ll soon have a familiarity with the application. It’s great for quick edits, especially if you need elevated permissions – which is when you just open it with ‘sudo’ and it functions like normal but with the ability to edit things like system files.

Closure:

There are a ton of editors out there. Feel free to leave comments telling us about your favorite text editors. You too many find that it’s easier to use different editors for different tasks, and I’d encourage folks to try it. I’ve been doing it this way for years. It seems to actually save time, because each application is used for the tasks it is most suited for.

I also use other text editors, such as Sublime, Bluefish, and Notepadqq. Those get used with less frequency and only for more specific tasks. They aren’t included here, because I use them far less often. 

As always, thank you my wonderful readers. Traffic is starting to pick up on this site. That’s a good thing! Don’t forget that you unblock ads. If you want to support this project, you can also sign up for the newsletter, donate, or even write articles.

Subscribe To Our Newsletter
Get notified when new articles are published! It's free and I won't send you any spam.
Linux Tips
Creative Commons License
This work is licensed under a Creative Commons Attribution 4.0 International License.