How To: Login To SSH To Run One Command

In today’s article, we’re going to learn how to login to SSH to run one command. Yes, it’s another SSH article! However, this one should be relatively short. I’ve covered SSH a great deal already. This is just one more SSH trick.

SSH stands for Secure Shell and is a way to remotely control other computers. As I said in the opening paragraph, I’ve already covered a lot of SSH articles, because SSH is a tool I use regularly and it’s a tool I really like.

SSH lets me manage computers on the other side of the country without even leaving my chair. I also use SSH to manage various computers around my house. If I need to do something on a computer in another room, I can just SSH into it and do what I needed to do. It’s great!

Well, today’s SSH article is a bit different. We’re going to login to SSH to run one command. That’s all we’re going to do. We’ll login, automatically run the command, and then automatically exit the SSH connection. This is useful if you want to run a script, update, etc…

There are some previous SSH articles that you might want to read:

Install SSH to Remotely Control Your Linux Computers
Prevent SSH Root Login
Show Failed SSH Login Attempts

Alternatively, you can click to search for SSH articles. I’ve covered quite a bit of SSH material, so you can learn quite a bit from those links – even if you’re already familiar with SSH.

Well then, let’s just jump into the article… It really shouldn’t take long.

Login To SSH To Run One Command:

Like oh so many articles, and this one involving SSH, you’re going to need to start off with a terminal. You’ll also need a device that has SSH properly setup and ready to run. You can actually set SSH up on the computer you’re using and just SSH into localhost to practice this.

And, of course, if you don’t know how to open your terminal, just press CTRL + ALT + T and your default terminal should open.

With your terminal now open, the format of the command is something like this:

For example, if I wanted to connect via SSH to run one command, and that command was to list the files in the home directory, the command would look like this:

Note: That device doesn’t face the public internet, so I don’t have SSH keys enabled on the device. So, that means I have to enter my password in the image below. With that in mind, the output of that command would look like this:

login to ssh to run one command
See? It logs into the remote device, runs one command, and exits! Pretty neat, huh?

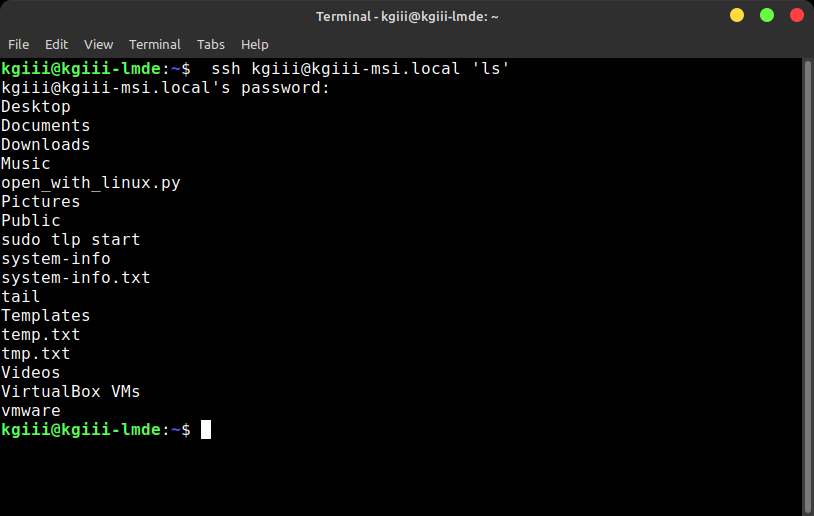
Of course, you can make it your own and there would be one less step if you had set up SSH keys. You can also make it more complicated if you want. You could try any one of the following commands, adjusting it for your needs:

Go ahead and play around with this. If you want to login to SSH to run one command, that’s how you do it. You can make the command as simple or as complicated as you want. So long as you string it together properly, the sky’s the limit!

Like I said above, you can just install SSH on your single device and practice what you read in these SSH articles. It’s not particularly taxing. There are plenty of articles to help you along the way.

Closure:

See? It’s really not all that hard to login to SSH to run one command and then exit automatically after that command has been run. It’s another handy SSH trick that you can add to your SSH toolbox. Also, the article is longer than I anticipated. Ah well…

What comes next? I have no idea. I try to not write too many consecutive articles on the same subject. Mixing them up seems the best way to go about it, as the site’s meant to be searched and not read like a blog. I do have a bunch of SSH content, but I’ve also covered a whole lot of it already.

Thanks for reading! If you want to help, or if the site has helped you, you can donate, register to help, write an article, or buy inexpensive hosting to start your own site. If you scroll down, you can sign up for the newsletter, vote for the article, and comment.

Add A Message Of the Day (MOTD) To SSH

In today’s article, we’re going to learn how to add a message of the day (MOTD)  to SSH. It won’t be a very long article, ’cause I can refer to some earlier articles. But, I’m sure someone will find it handy.

So, yeah… There have been a lot of SSH articles. I love SSH and it has a ton of features, so they get written about. Here’s a link to a list of previous SSH articles. If you have any SSH questions, you’re free to read those articles. They answer all sorts of SSH questions.

SSH stands for ‘secure shell’ and is a way to remotely manage computers. It’s a handy tool, one I think most users should learn. You can sometimes SSH into a broken computer and repair it. It’s pretty handy that way.

The astute among you might notice that this article is a little late. So, I lost internet connectivity and wrote and scheduled an article – or thought I did…

Normally, WordPress would hold that article in cache – but I wasn’t connected. I seem to recall noticing an error when I did hit the scheduling buttons, but it looked normal so I assumed it’d work. That means I’m writing this article right now, ’cause I don’t really want to break my streak of an article every other day. 

Which also explains why this one is just a short article.

Recently, I covered how to show an SSH banner. Well, this is pretty much the same thing. When someone logs into SSH, they’ll see the banner. When someone logs into SSH, they can also see the MOTD. I figure I’ll give you the option to pick which ever one you want.

Add A Message Of The Day (MOTD) To SSH:

This article requires an open terminal, like many other articles on this site. If you don’t know how to open the terminal, you can do so with your keyboard – just press CTRL + ALT + T and your default terminal should open.

With your terminal now open, we’re going to use nano to do some file editing. It’s really simple. First:

Add whatever text you want. You can generate a fancy ASCII logo and some text about who’s allowed to access the server and remind hackers (’cause they’ll surely listen) that unauthorized access is illegal. To save your MOTD with nano, just press CTRL + X, then Y, and then ENTER.

That’s actually mostly it. You shouldn’t have to edit the SSH configuration for this, it should just work when you restart the SSH service with:

SSH should pick it up automatically and now display your brand new SSH MOTD. It’s a ‘message of the day’ so you can change it regularly and SSH should pick up those changes automatically.

Depending, you might not even have to restart the SSH service. I’ve had it use the MOTD automatically, and I’ve had to restart the service to get it to show. You can have some fun and use things like this to generate some ASCII text. It’s your MOTD, do whatever you want with it!

Closure:

See? This was a nice and easy article. If you want to add an MOTD to SSH, you now know how to do so. Also, for the record, I’m getting pretty darned fast at writing articles. Well, some of them are pretty speedy to write. It helps if I don’t have to consult my notes that often. If I do, I often just put them on a different screen and that makes it easier to read them.

Thanks for reading! If you want to help, or if the site has helped you, you can donate, register to help, write an article, or buy inexpensive hosting to start your own site. If you scroll down, you can sign up for the newsletter, vote for the article, and comment.

How To: Show An SSH Banner

Today’s article is another SSH article, and it will show you how to show an SSH banner. What’s an SSH banner? It’s a message shown when someone logs into the computer via SSH. This can include warning messages, reminders that they’re being logged, etc…

Why would you want to do this? Well, you can include specific directions in there. You can also do so for regulatory compliance, should you be obligated to warn people that you’re storing their information. Some of the messages are quite formal, but you can write your own.

Once again, SSH stands for ‘Secure Shell’. It’s a way to remotely login and use a remote device. It’s usually done in pure text, terminal mode. You can actually forward x11 and control some graphical applications. That’s easy enough and quite a load of fun.

I’ve actually written many SSH articles. Feel free to peruse them at your leisure. If you have questions about SSH, odds are good that I’ve covered them already. I think SSH is a brilliant tool and so quite a few articles cover the many things you can do with SSH.

I find SSH to be a useful, brilliant tool even when it’s just me in my house. As I also manage some remote stuff and SSH beats flying across the world just to update a computer. The good news is that I’ll eventually run out of SSH article ideas!

With the above in mind, let’s just jump into the article…

Show An SSH Banner:

This article requires an open terminal, like many other articles on this site. If you don’t know how to open the terminal, you can do so with your keyboard – just press CTRL + ALT + T and your default terminal should open.

Note: We’ll be using ‘nano‘ in this article. Click that link to learn more.

With your terminal now open, it’s time to set up an SSH banner. To start with, we’ll create the banner. You’ll need to start with creating a file like so:

With your banner file open (and you can name it anything, or you can even place it anywhere), just enter the text you want people to see when they login via SSH. You can make it anything you want, but I tend to keep it brief. Some folks go for the giant ASCII banner types, but I like to keep it simple.

When you’re done writing your banner, you need to save it. To save it in nano, you just press CTRL + X, then Y, and then ENTER.

Now, you need to edit your SSH configuration. To do that you use:

Scroll down until you see the following:

Edit that line to read:

If you stored your banner in a different location or a different file name, you must also change the path to suit. Then, save your SSH configuration by pressing CTRL + X, then Y, and then ENTER.

Your next step will be to restart SSH. That command is nice and simple:

Next, login again with SSH and you should see your new SSH banner! It’s really that simple. If you don’t see it, make sure to double check because all those steps are necessary.

Closure:

And there you have it. You have another article! This one has shown you how to show an SSH banner. It’s not terribly difficult. It’s also potentially useful. Users are effectively agreeing to the terms you set in them, which may be legally binding. Enjoy your new SSH banner and, if it’s not in a professional setting, feel free to be creative with it!

Thanks for reading! If you want to help, or if the site has helped you, you can donate, register to help, write an article, or buy inexpensive hosting to start your own site. If you scroll down, you can sign up for the newsletter, vote for the article, and comment.

Use Your Hostname With SSH Instead Of Your IP Address – In Ubuntu

Today’s article will show you how to use your hostname with SSH instead of your IP address. This should actually be a very short article, like really short. We’re only using Ubuntu for this example, because it consistently uses the .local for your hostname. This will work with any distro that does that.

If you don’t know what SSH is, it’s ‘Secure Shell’ and is a way of connecting to remote computers. I’ve written many articles about SSH. Go ahead. Click that link and have a browse around. This will be a short article because I’ve already written a good amount of material. I’m trusting you to search for things you don’t already know.

You’re also going to need to know your hostname. To do that, read this article:

What is my Hostname in Linux?

You’ll need that hostname information because that’s how you’ll be using your hostname with SSH. I’m going to assume you already know the IP address, because that’s what you’d have been using for SSH instead of using your host name this entire time.

With all that in mind, let’s just get to it…

Use Your Hostname With SSH:

This article requires an open terminal, like many other articles on this site. If you don’t know how to open the terminal, you can do so with your keyboard – just press CTRL + ALT + T and your default terminal should open.

Now, again, I’m going to assume you know the IP address and that’s how you’ve been connecting to the device with SSH. I’m going to assume that you read the above link, learning how to find your hostname.

So, with that in mind, login to your remote Ubuntu (or official Ubuntu flavors) computer using your IP address. Next, find your hostname. You can just use the hostname command, to make it easier.

Now that you have your hostname, add .local to it. This works because it’s on your local network. If you had a VPS somewhere, you’d just use the FQDN (like example.com) to connect. Then, with that hostname information in hand, exit your SSH session with exit and try logging in with the hostname.

So, if your computer was called ‘mydevice’ you would connect to it with:

That’s it. Just put your hostname in front of .local and you should be able to use your hostname with SSH. This will work for other distros, of course. However, I’ve only verified it with official Ubuntu flavors. So, that’s the caveat should you try this with other distros.

Closure:

See? I told you that this would be a short article. It really doesn’t need to be longer and I’ve padded it more than enough. Seriously, this one could have been so much shorter!

This site could really use a better author and an editor! Alas, you get what you get and that’s just me at the moment. Do feel free to offer to help. I have thought about doing more of these fairly short articles, as there are some great subjects that really don’t need an 800+ word article.

Thanks for reading! If you want to help, or if the site has helped you, you can donate, register to help, write an article, or buy inexpensive hosting to start your own site. If you scroll down, you can sign up for the newsletter, vote for the article, and comment.

Subscribe To Our Newsletter
Get notified when new articles are published! It's free and I won't send you any spam.
Linux Tips
Creative Commons License
This work is licensed under a Creative Commons Attribution 4.0 International License.