Easily Monitor Your Wireless Connection

Have you ever wanted to easily monitor your wireless connection? Well, now you can learn how to do that while using tools you have already installed. This won’t even be all that complicated.

If you use a wireless connection to connect to the internet, you may notice that it changes over time. It can fluctuate quite a bit, depending on the quality of your hardware. The reasons to monitor your wireless connection are thus pretty obvious.

The good news is that you won’t have to install any new software for this. If you’re using a desktop Linux, you’ll already have the tools available. You won’t even need to know the name of your wireless connection. All you’ll need to do is run a couple of simple commands.

The commands we will use are the cat command and the watch command. I’ve covered the cat command before, so regular readers will be familiar with the cat command already. Those of you who are not familiar should click the link.

The watch command is a bit different, but you won’t need to install anything to use it…

The watch command will run a command (like a cat command) periodically. Are you seeing where we’re going with this? It’s a pretty simple concept.

Monitor Your Wireless Connection:

Using the cat command means using the terminal. Just press CTRL + ALT + T and your default terminal should open. Otherwise, you should know how to do that already. (I have faith in you!)

With your terminal open, you can simply check on the state of your wireless connection with a trivial command. That command is just:

Next, you can use the watch command to run that command over and over again. That’s simple enough. The syntax is as follows:

If you want to run the command every five seconds, it looks like this:

That will run the command as expected, refreshing every five seconds. 

When you’re done monitoring your wireless connection, you can close the watch process by pressing CTRL + C. That closes all sorts of stuff in the terminal, so it’s a good idea to memorize it no matter what.

Closure:

It doesn’t take much to monitor your wireless connection. You have the tools already installed and you’re simply checking the text in a file every so often. There’s nothing to install. The tools are already there, you just need to know how to use them. 

Which is, I suppose, why I wrote this article… It’s a nice and easy article, fit for the weekend, and one where you don’t have to work all that hard to learn something interesting.

Thanks for reading! If you want to help, or if the site has helped you, you can donate, register to help, write an article, or buy inexpensive hosting to start your site. If you scroll down, you can sign up for the newsletter, vote for the article, and comment.

Control Your WiFi With ‘rfkill’ And More

In today’s article, we’re going to learn how to control your WiFi with ‘rfkill’ and we’ll be learning a bit more than that. I think you’ll find ‘rfkill’ to be a nifty and useful terminal-based command to learn. Is this article appropriate for a beginner? Maybe? Maybe not? I’ll do my best to make it approachable for anyone at any level.

By the way, I’ve decided to intersperse the articles about simple commands like ‘lsusb’. I don’t want to bore my more advanced readers – and I don’t want to bore myself. I’ve decided to make the time necessary, even though I’m pretty busy. I’ll be busy for a little more than a week. (Ask me in private, if you want.)

Anyhow, you should learn about ‘rfkill’, as it’s a pretty handy tool for controlling your wireless. If you look at the name, there should be some indication that it’s actually more than just WiFi. You can use ‘rfkill’ to manage Bluetooth, for example. Bluetooth is also wireless communication. As such, you can use ‘rfkill’ to manage that as well.

So, what is ‘rfkill’? Let’s see how the man page defines it:

rfkill – tool for enabling and disabling wireless devices

See? It says what you’d expect, assuming you read the previous paragraph. The title only mentions WiFi, but that’s really due to space and convenience. You can use ‘rfkill’ to manage both WiFi and Bluetooth. Pretty handy, huh?

Well then, let’s just get the party started…

Control Your WiFi with ‘rfkill’:

Sure enough, you use ‘rfkill’ in the terminal. On Linux-Tips.us, we do a whole lot of stuff in the terminal. So, open your terminal now. If you don’t know how to open your terminal, just press CTRL + ALT + T and your terminal should just pop open.

With your terminal now open, let’s first gather some information:

The output should look a little bit like this, or a lot like this:

gathering information with rfkill
The output should be fairly easy to understand for my delightful readers! I have faith in you!

The information you’re after “ID,TYPE-DESC,SOFT,HARD” is easy to understand. 

The first column is the ID number and the second column is a description of the device. The third column is if there’s a ‘soft block’ on the device, and the fourth column is if there’s a ‘hard block’ on the device.

If you see a ‘soft block’, that’s when there’s some software that disabled the device. A ‘hard block’ is when there’s a hardware block on the device. If it is soft blocked, you’ll need a software solution to turn it on – like ‘rfkill’.

Additionally, when you see a ‘hard block’, it means there’s probably a physical switch (often an Fn + F* key combination, perhaps labeled something like ‘Airplane Mode’) that is keeping the device powered off. You need to physically enable the device to make it work.

Importantly, the ‘rfkill’ application can do nothing about a hard block. But, it can do something about a soft block. If you want to unblock WiFi, try this:

Using my computer’s output, to unblock the WiFi the command would be:

You can also unblock with the description. To unblock the WiFi with the description looks like:

Of course,  you can also do the opposite. Instead of ‘unblock’ you would use ‘block’. That means the opposite of the above command would be:

If you want, you can also just ‘toggle’ the devices. When you toggle it, it turns off if it was on – and it turns on if it was off. You do that with the ID. If I wanted to toggle the wireless, the command would look like:

That will turn my WiFi off (if it was on) or it will turn my WiFi on (if it was currently turned off). See? It’s pretty simple!

Well, I hope I’ve made it simple. If it’s not simple, I hope it’s at least approachable. Like always, feel free to drop a question as a comment. If I don’t have an answer, I’ll try to direct you to someone who does.

Also, don’t be afraid of the man page. There’s a lot more to ‘rfkill’ than I’ve covered in this article. We’ve mostly just scratched the surface. To check the man page:

That’ll give you all the information you want. Plus, I’m sure others have authored pages that will go into more depth. We tend to not do too much of that here. I just want you to be up and running, not Linux gurus. If you want to be a Linux guru, you’ll need a whole lot more than just this site!

Closure:

Well, I’m glad you made it through today’s article. I tried to keep it nice and simple, simply showing you a way to control your WiFi with ‘rfkill’. But, there’s more to it, including Bluetooth. I like to think I’ve made this approachable for even a new user, but maybe not…

Again, feel free to comment about this. Is it easy enough for a new person? How about a new person coming from a Google search? Is it easy enough for a novice, someone completely new to computers? (Probably not, but let me know what you think. Thanks!)

Thanks for reading! If you want to help, or if the site has helped you, you can donate, register to help, write an article, or buy inexpensive hosting to start your own site. If you scroll down, you can sign up for the newsletter, vote for the article, and comment.

Disable WiFi From The Terminal

In today’s article, we’re going to learn how to disable WiFi from the terminal. It’s going to be a simple enough article, with just a few commands to learn. Read on, my dear readers! There’s information to share!

This is certainly a tool that new Linux users could use, you just need to remember to turn WiFi back on when/if you need wireless access again. So, read on, my dear readers, as we venture into a bit of controlling networking with the Linux terminal.

This will will show you how to completely disable WiFi, rendering you unable to connect to any wireless network. There are those folks who will see this as a security measure, as they distrust wireless connections. There are others who may view this as a battery saving measure, as you no longer will have the wireless radio polling for connections or anything like that.

The tool we’ll be using for this is ‘nmcli’. You can do a lot with this command, but the man page describes ‘nmcli’ as this:

nmcli – command-line tool for controlling NetworkManager

And, if you dig a bit deeper, you’ll see that there’s a man page for ‘NetworkManager’. This is described as:

NetworkManager – network management daemon

So, as you can see, we’re gonna be dealing with the network. That’s what I told you in the title and the introductory paragraph! See? We take this seriously! So very, very seriously!

Disable WiFi From The Terminal:

Yup. You read that right. It’s another article that requires an open terminal, so you should open a terminal now. If you don’t know how to open the terminal, you can do so with your keyboard – just press CTRL + ALT + T and your default terminal should open.

With your terminal now open, let’s learn how to disable WiFi from the terminal itself. So, to disable WiFi, your command would look like:

Next, of course, we’ll learn to turn it back on again. That command looks like:

If you have other radios, such as a mobile/cellular network, you can actually enable and disable all the radios with just one command:

And to turn all the radios back on again:

And there you have it.. You can disable WiFi from the terminal. If you want to know more about ‘nmcli’ (and it’s a bit of a robust command), it’s just:

You can also check the ‘NetworkManager’ man page with:

Closure:

There it is! It’s another article! This one does what the title says it’s going to do – it shows you how to disable WiFi from the terminal. There’s more to ‘nmcli’ and ‘networkmanager’ so maybe we’ll have another article covering some other options? It could happen!

Thanks for reading! If you want to help, or if the site has helped you, you can donate, register to help, write an article, or buy inexpensive hosting to start your own site. If you scroll down, you can sign up for the newsletter, vote for the article, and comment.

Turn Your Ubuntu Into A Wireless Hotspot

Have you ever wanted to use your Linux computer as a wireless hotspot? It’s actually pretty easy. Today’s article will get you started and it really isn’t all that difficult. We will actually be cribbing a bit of this article from the software’s homepage, but while some more, rather important, information added.

For many years, I used my own router that I had configured on my own hardware. It was built on Linux. The preceding version actually ran on BSD, but that’s not important for a site called Linux-Tips. Today, you can get a NUC or Pi for dirt cheap and so making a new router is back on my list of things to do. In other words, it’s a fun project that won’t take a lot of money to get into.

All of the varied software and hardware components are already there to make your own router, but I want to enable wireless connectivity. a wireless hotspot, and that’s what we’re going to look at today. The tool we’re going to use is called ‘linux-wifi-hotspot‘ That’s is a great tool, complete with GUI if wanted, written by lakinduakash. It has only been around for a few years, but it’s spoken of very highly – and it just works and works well.

At least it worked the last time I used it. This article is from the old site and I’m just moving it to this site. I actually haven’t bothered much with my own router for the past year or so. So, this information is a bit dated.

Turn Your Ubuntu Into A Wireless Hotspot:

This article requires an open terminal, like many other articles on this site. If you don’t know how to open the terminal, you can do so with your keyboard – just press CTRL + ALT + T and your default terminal should open.

The software is easy enough to install. If you’re using Debian/Ubuntu, just add the PPA and install the software. To add the PPA, you just run:

On a modern Ubuntu, you shouldn’t need to do this, but you might want to go ahead and run a quick update with:

Then you can install the software, starting to get your system into a workable wireless hotspot. To do that, it’s just:

If you want, you can visit the link above (in the preamble), click on releases, and download the .deb file for the current release and just install it with gdebi. In this case, I’d suggest installing with the PPA – just to make sure

Then, you can go ahead and start it. You can also go ahead and make it start at boot, which would be prudent if you intended to use this to make your own router. It’s really self-explanatory and without specific questions for using it, I’m just going to refer you to the man page and the information at the project page.

Caveats:

But, before you can even do all of this, you need to know that your wireless adapter actually supports doing this. To find out, you need to know if your wireless adapter supports “AP” mode. AP obviously meaning ‘Access Point’.

To check this, you need to run the following command:

The project page is noticeably silent with this, but it’s a necessary step. See, you need to know if your hardware actually supports it before you even bother trying. Come to think of it, I probably should have put this closer to the top of the page! Ah well…

Anyhow, the output should contain one or both of the following lines:

Device supports AP scan.

And/Or:

Driver supports full state transitions for AP/GO clients.

So long as you see one or both of those, you should be all set to proceed. If you don’t see either of them, there’s no software solution and you’ll need to get hardware that supports AP mode. In many cases, that’ll mean doing a bunch of research and may even mean contacting the vendor or OEM.

Nobody appears to have compiled a list of hardware that supports AP mode and I don’t think I’ve ever bought wireless adapters that explicitly stated they do on the box. As near as I can tell, more modern adapters support it just fine, so you’ll probably be alright. Online specs are more thorough than what’s printed on the outside of the box, so maybe searching is okay.

Closure:

Alright, there’s your article for the day. I have no idea if you want to make a wireless hotspot for your Linux box, but now you know how. It’s pretty self-explanatory, and you shouldn’t have any questions. If you do, you know where to find me – or to find others who can help you – at Linux.org.

Thanks for reading! If you want to help, or if the site has helped you, you can donate, register to help, write an article, or buy inexpensive hosting to start your own site. If you scroll down, you can sign up for the newsletter, vote for the article, and comment.

Want To See The WiFi Password In The Terminal?

It’s remarkably easy (assuming one can gain access to a privileged account) to get the WiFi password from the terminal. It does generally require sudo or root. It’s literally three commands. It’s the kind of attack you’d possibly worry about in an office where you don’t regularly log out of your device when you leave it. It might be an akin to attack from the ‘evil maid‘, as well, but not just quite. 

It really requires only two pieces of knowledge. The first is how to gain elevated permissions on the device and the other is the name of the network device – usually easy enough to surmise. It’s pretty easy information to get under those circumstances – circumstances we may all have been guilty of. Perhaps we typed a sudo command and then walked off to get coffsssee while it updated itself? Who knows – but it’s really just that easy.

Is it a security issue? Not if your security is any good, it isn’t. But, if anyone has physical access to the device, they pretty much own the device. If your security is any good, nobody should get this far and internal practices would prevent fellow employees from doing much harm. I could speak for hours about security, I just can not seem to do it coherently. 

Anyhow, here’s how you view the wifi password in the terminal.

WiFi Password From The Terminal:

Obviously, you need an open terminal. Just press CTRL + ALT + T and your default terminal should open.

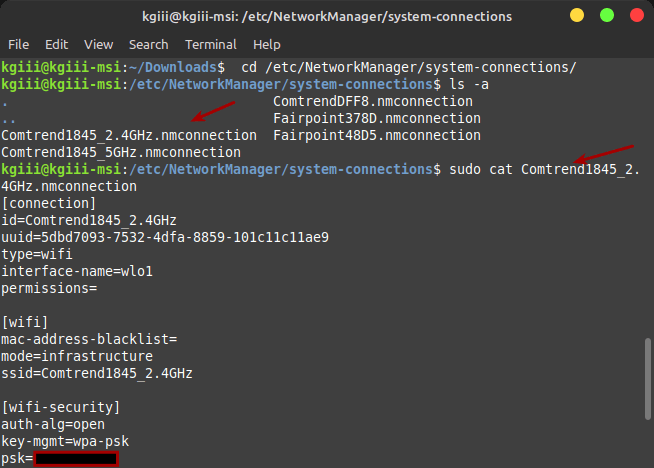
First, you must change to the directory where this sort of information is stored. 

Find the network name (SSID)… You can usually guess that, or narrow it down rapidly on sight, but you can also just find the SSID by typing iwgetid Either way, just enter this:

The password will be happily shown to you in plain text. I’m not even kidding. This is what the whole process looks like and shows you how easy it is:

I am elite hackor!
Tada! There it is in plain ol’ text, easily captured and saved away.

Obviously, I knew the sudo password – I’d have easily figured out the rest. Even if I didn’t, there really weren’t all that many choices and a little tab completion goes a long ways. It’s a good example of why you should lock your screen and logout of your computer if you’re going to be away from it. (Of course, there’s always a risk vs reward thing and it probably doesn’t really matter to most of us.)

Closure:

There you have it! You can now find the WiFi password from the terminal. This shouldn’t ever be a risk, because you already practice good security. But, it’s a fun little trick to know. It doesn’t take a whole lot of effort and it makes for another article. Another one is written and done!

Thanks for reading! If you want to help, or if the site has helped you, you can donate, register to help, write an article, or buy inexpensive hosting to start your own site. If you scroll down, you can sign up for the newsletter, vote for the article, and comment.

Linux Tips
Creative Commons License
This work is licensed under a Creative Commons Attribution 4.0 International License.