Send A Message To Logged In Users

Today’s article will have limited use for my regular readers, as we talk about how you can send a message to logged-in users. The thing is, this is only valid for those users who are logged into the terminal. It doesn’t pop up a handy GUI window (like the old messenger service from Windows, though I’m sure there’s a way to do so). This is only valid for users who have logged into the terminal.

Got it?

Good!

So, who is this useful for? Well, those of you who have shell users. This is useful for system admins who want to send mass messages to the people who are currently logged in. For example, maybe you want to message folks to let them know that you’ll be doing routine maintenance and rebooting the system at a specific time.

While this is a bit archaic, it’s still useful under some circumstances.

Why do I include it if it’s so archaic and has limited use?

Well, because I can. You never know when someone doesn’t know something and will hit up their favorite search engine to learn something. I care that each article teaches you something, even if that something isn’t all that grandiose. 

Plus, it’s nice to have an easy article now and then. This is going to be a pretty easy article! There are just a couple of tips that I have for folks and that’s the end of it.

Send A Message To Logged In Users:

You’ll need an open terminal if the opening wasn’t descriptive enough. After all, we’re sending messages to users who are logged in with the terminal. So, open said terminal. Most often, you can press CTRL + ALT + T and your default terminal should open.

With your terminal open, you can be reasonably sure that the wall command is available. Run this command to be certain that the wall command is available:

You can then check the man page to ensure that this is the correct tool for the job. As you’ll see, if you run man wall, this is the tool for the job:

wall – write a message to all users

See? It is the right tool for the job. The syntax is even remarkably simple:

Or, if you do this often and want consistency:

So, you can try something like:

Or, if you do this often, you can make a .txt file with your message and just reference that file in the wall command. That’d look like the above example.

See? That’s it. That’s all you need to know to send a message to logged in users. If you’re new to your admin job or maybe have started running a public-access shell, you’re now able to send those messages to your users.

Closure:

I figured it was a good day for a nice easy article. They can’t all be complicated, because not everything is complicated. Sometimes, it doesn’t take 1000+ words to describe a task. I could probably bloviate and digress, but that’d just make the article longer with no real value.

As much as it might seem otherwise, I value your time. I try to remain on topic and I try to include no more than the information you need – with just a bit of digression in the intro. I figure most of you skip the intro anyhow!

Thanks for reading! If you want to help, or if the site has helped you, you can donate, register to help, write an article, or buy inexpensive hosting to start your site. If you scroll down, you can sign up for the newsletter, vote for the article, and comment.

Compare Two Text Files Side By Side

Today’s article has a theme that may seem familiar, as I recently wrote an article about how to compare two text files side by side. That article was well received and I figured I’d share another way to compare two text files side by side. After all, this is Linux and there are usually many paths to the same destination.

You can use a variety of tools to compare files. It’s not hard to check two files to see the differences between them. However, you can visually compare them quite easily. All you need to do is to show those two files in a side-by-side manner.

The previous article can be read here:

Show Two Text Files Side By Side

So, that’s one way to show two text files side by side. This article is going to show you another way. Why? Because I can! Also, I’d like to write this article while it’s still fresh in my memory. If I don’t write it soon, I’ll have forgotten to write it at all. Age will do that to a person. It is what it is.

Preparation:

In the previous article, I had you download two files. I’m going to suggest that you do so again. That way, we’re on the same page. 

Download these two files to your ~/Documents directory:

File One
File Two

Those two files should be the same in every way. Byte for byte, they should be the same (with maybe a slight difference in metadata like last accessed time).

The tool we’ll be using is sdiff and you almost certainly have this installed by default. It’s part of the diff tools, so it is likely installed by default. You can verify that sdiff is previously installed with the following command:

 The output should show you that sdiff is just a part of the diff utilities. It should say something similar to this:

sdiff (GNU diffutils) 3.8

Those are the only tools you’ll need. Well, that and a terminal emulator of your choosing. It’ll be easy enough for anyone to follow along with this article.

Compare Two Text Files Side By Side:

As I mentioned above, you’ll need an open terminal. For most distros, you can just press CTRL + ALT + T and your default terminal emulator should open. If not, open a terminal from your application menu.

If you followed the above directions and downloaded the two files, you will first need to change your directory to your ~/Documents directory. That’s easily done with this command:

Then, you can simply compare the two files. The syntax is like this:

So, in this case, the command would look like this:

As you can see the files are the same.

using sdiff to compare two text files side by side
See? The files are the same. You can use sdiff to compare two text files side by side.

Let’s mix things up…

Change One File:

We already have the terminal open, so let’s see this sdiff in action with a changed file. Let’s edit the sort1.txt file with Nano. Run this command:

Now, scroll to the bottom and add the following line:

Then, you need to save the updated sort1.txt file. As we’re using Nano, you can do that by pressing CTRL + X, then Y, and then ENTER. It’s not hard to save a file in Nano.

Now, let’s run the sdiff command a second time so that we can compare two different text files side by side. 

You’ll see a different output. It should look like this:

comparing two different files with sdiff
You can see that one line is different when you compare the two text files.

The > character indicates that there’s a difference. Specifically, it indicates that there’s a new line that isn’t in the first text file. 

On the other hand…

comparing two files with sdiff and one has a different line
This time, the sdiff command is showing two different text files side by side.

The | character shows that the lines are different. This is a different character that shows that there’s a new line. Instead, this one is indicating that the text on that line is different than the file it is being compared with.

See? Pretty simple stuff!

Closure:

Well, this is another way to compare two text files side by side in the Linux terminal. There are so many ways to accomplish a goal in Linux and this is just another way that you can do this operation on text files. This sort of stuff would be handy in dealing with revisions or easily spotting differences in readme files. You can apply this skill to all sorts of situations. Feel free to comment telling me how you use the sdiff command.

Thanks for reading! If you want to help, or if the site has helped you, you can donate, register to help, write an article, or buy inexpensive hosting to start your site. If you scroll down, you can sign up for the newsletter, vote for the article, and comment.

Disable A PPA The Hard Way

Today’s article is just for fun, as there’s usually a handy graphical way because we’ll be discussing how to disable a PPA the hard way. This is mostly an exercise in fun and education. It’s something you can do, but you do not need to do. We’ll be learning how to disable a PPA the hard way, specifically through the terminal.

If you’re interested in doing things the hard way, read on! We’ll have fun with this one, and having fun is essential.

There’s an easy way to manage your PPAs, and this is not that. In your application menu, look for ‘Software Sources’ and do that. Do not do this – unless you have no graphical environment.

A PPA is something used by Ubuntu, but is also used in Mint and is possible to use in others – like Debian which strongly suggests against it. PPA stands for Personal Package Archive and is meant to be exactly that. It’s us that abuse the idea, which is kind of how we ended up with Ubuntu Snaps and other similar package formats.

We use PPAs for all sorts of things, like adding entire other repositories to install custom software. It’s meant to be your personal package archive – meaning personal. We’ve decided it’s a fine way to add repositories to install software not included by default. Oops!

So, we’re going to disable a PPA, and we’re going to do it the hard way. We have no reason to do it this way, at least on desktop Linux, but we can. And so, just because we can, we have this article.

Disable A PPA The Hard Way:

Yeah, we’re doing this the hard way. So, that means we’re going to need an open terminal. If you don’t know how to open a terminal, you probably shouldn’t be doing this. But, just in case, you can normally press CTRL + ALT + T and your default terminal will open. Otherwise, you can open the terminal from your application menu.

With your terminal open, you need to first know what repositories you have available to you. You need to know the added PPAs. That’s easy enough, just enter the following commands:

That will change you to the correct directory. We’ll now list the files like this:

That will show you an output similar to this:

Find the PPA you want to remove. In our case, we’ll use teamviewer.list as the PPA (or ‘regular’ repository) we wish to remove. This works for both PPAs from LaunchPad or other repositories you may have added.

So, you’ll want to use Nano for this. Odds are that Nano is installed by default these days, but this is not always true. So, read the following page before moving on.

Let’s Install Nano (With Some Bonus Information)

So, we want to edit the teamviewer.list to disable the TeamViewer repository. That’s done with Nano and the command looks like this:

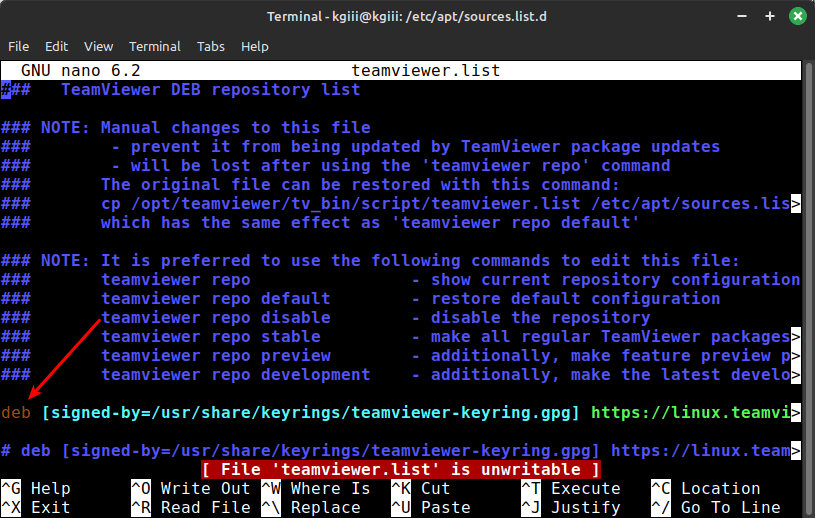
You’ll then be faced with a text file. Look for the line that starts with deb and is not commented out, that is not starting with a #  symbol. For example:

Find the correct line to edit when trying to remove a PPA.
This should be fairly easy for anyone to follow. It’ll be the line without the pound sign.

So, in my case, I’d take the line that looks like this:

And I’d comment out that line. More specifically, I’d add a # sign at the front of that line. So, it’d look like this:

You’ll then need to tell Nano to save the file. That’s easily done. You can just press CTRL + X, then Y, and then ENTER to save a file with Nano.

Next, you do this for any repositories (not just PPAs) that you wish to remove. Be aware that the software installed from those repositories will no longer update (which can be a bad thing). If you remove a PPA and still have the software installed, it should be temporary so that you can troubleshoot something.

Otherwise, you can now verify this. You simply need to update the available software again. You do that with this command:

When you do that, you should find that you no longer have that PPA (or just regular ol’ repository) enabled. It will no longer update, thus no longer offer you new versions of that software.

The latter part of that previous paragraph should be considered essential.

So, choose carefully. If the repository has software that you plan on using, you should probably keep updating it. Many of the updates aren’t just bug fixes. Oftentimes, they’re legitimate security fixes. Software is software, regardless of the operating system. It has bugs and sometimes those bugs are security issues. It’s best to keep your system updated and doing so makes you a good Netizen.

Closure:

So, yeah… We’ve discussed how to disable a PPA the hard way. You can disable any repository this way, I suppose. I’m not sure that I’d suggest doing it this way – unless you need to do it this way. If that’s the case, you should do it this way. Most of the time, there are nice handy graphical tools to manage that sort of stuff.

Thanks for reading! If you want to help, or if the site has helped you, you can donate, register to help, write an article, or buy inexpensive hosting to start your site. If you scroll down, you can sign up for the newsletter, vote for the article, and comment.
Show Two Text Files Side By Side

Today’s article will be fairly simple, and easy enough for anyone to follow, as we talk about how to show two text files side by side. This is an immensely useful tool for editing text files. It’s a simple enough process and you probably won’t even have to install anything.

We all know what a text file is. I want to assume we can all see the value in comparing two text files side by side. If you want to compare and contrast text files, comparing them side by side is a pretty good way to do so visually. (Some tools will let you check the differences between files and I’ll likely do an article on some of those tools.)

We really don’t need anything special for this, but you can download the following file to your ~/Documents directory and we’ll all be on the same page – hopefully.

First, download this file:

sort.txt

Next, download this file:

sort1.txt

Don’t worry. Those are identical files with the original created for another exercise. We’ll use them both this time around, just as the example, so download them both to your ~/Documents directory.

The tool we’ll be using is the pr command.

The pr Command:

This pr application is part of the core utilities, so pr should be installed by default. You can ensure that pr is installed by running the following command:

The output of that will also let you know that it’s a part of the core utilities, specifically with this text (the version number may vary):

pr (GNU coreutils) 8.32

Like always, you should probably check the man page to learn more about the application we’ll be using. To do so, it’s simply:

If you check the man page, you’ll see that pr is described as this:

pr – convert text files for printing

You’ll also see that there are a whole lot of options. For a new user, this will seem confusing and complex. Don’t worry, we’ll only be worried about a couple of the options (flags in the command) and it’ll be quite simple.

Now, the following is going to assume you’ve downloaded the sort files from above. I’ll include generic commands as well. I just want to keep this article relatively short.

Show Two Text Files Side By Side:

You will of course need an open terminal for this. That’s easily done and on most distros you can just press CTRL + ALT + T and your default terminal will open. If that’s not the case, you can find and open the terminal from your application menu.

With your terminal open, and assuming you downloaded the files to your ~/Documents directory, you’ll want to first change to that directory. So, that command would be this:

You should probably run the ls command to ensure that you see both sort.txt and sort1.txt. Assuming you see both files, the command you’re going to want to use would be something like this:

So, in our case, the command you want to run would be this:

A quick examination will show that the two files are indeed open and that they’re identical in every way. You’ve now been able to show two text files side by side – and you didn’t even need to install any applications to do so.

Of course, the pr command has a lot more to it. You can do a great deal with this command besides using it to show two text files side by side. If you want to manipulate text, it’s one of many tools. This particular tool is usually used for preparing text for print, but it can be used in this way easily enough.

Closure:

I figured I’d keep this article nice and short. There’s no need to make it more wordy than required to get the point across. After all, it should be a simple task for people who do want to show two text files side by side. If it’s not simple, many folks won’t bother doing it. That’s one of the reasons why I try to keep some articles (including this one) simple enough to follow along. It’s great to expose people, especially new people, to new tools.

Thanks for reading! If you want to help, or if the site has helped you, you can donate, register to help, write an article, or buy inexpensive hosting to start your site. If you scroll down, you can sign up for the newsletter, vote for the article, and comment.

Linux Tips
Creative Commons License
This work is licensed under a Creative Commons Attribution 4.0 International License.