How To: Decompress tar.bz2 Files

Today’s article will be simple enough, though it will have limited application, as we discuss how to decompress tar.bz2 files. While this is certainly suitable for a newbie and easy enough to learn, many folks will just choose the GUI route.

Of course, you’re not always able to use a GUI. Sometimes there’s no way to do this graphically and you’ll have to do this in the terminal – perhaps over SSH. In fact, with my crappy bandwidth, I like to upload compressed files and then extract them on the server itself. This sort of thing works for me.

We have already talked about how you go about compressing and decompressing .bz2 files. You can read that article here:

How To: Compress And Decompress .bz2 Files

This time we’re going to be working with ‘tar.bz2’ files – and decompressing these files is different than what you’ll have learned from the previous article.

What is ‘tar’?

A tar file stands for ‘Tape Archiver’ and is a compression method as old as time itself. Well, probably not that long – but a very long time. It’s sometimes referred to as a ‘tarball’ and Wikipedia tells me that it has been around since early 1979.

Here’s a good quote from Wikipedia:

The archive data sets created by tar contain various file system parameters, such as name, timestamps, ownership, file-access permissions, and directory organization.

The blurb goes on to mention that POSIX has supplanted tar in favor of pax, but when was the last time you saw a .pax file? So, tar is still widely in use.

The man page describes tar as:

tar – an archiving utility

Which is exactly the kind of thing we’re looking for. Imagine that?

What is .bz2?

If you read the link above, you’d know the answer to this question. I assume my readers are creatures of habit, so they’ve done no such thing. They’re probably skipping this section entirely and reading just the middle of the article.

Anyhow, in the previous .bz2 article, I mentioned this:

If you don’t already know, .bz2 files are bzip2 files. You’ll find that bzip2 is an opensource compression program that gets some regular usage, and you’ll sometimes find downloaded files that are compressed with this format. You may also, for compatibility reasons, want to compress files with bzip2 to share with other users who are already set on using the .bz2 format.

That sums it up nicely, though you don’t have to worry about that. See, with this particular command and these particular tar.bz2 files, you can decompress (extract) the files in one fell swoop. 

Just for the record, you should also know that the bzip2 man page defines itself like so:

bzip2, bunzip2 – a block-sorting file compressor, v1.0.8

Your man page might be different, saying that it’s a different version. Either way, that’s what bzip2 is and that’s what it’s used for. 

So, with all that in mind, we can get to the important bits of the article…

Decompress tar.bz2 Files:

As I mentioned in the intro, you can likely do this with your built-in GUI file extraction tool (often file-roller) easily enough. However, again as suggested in the intro, we’ll be doing this in the terminal. In most cases, you can press CTRL + ALT + T to open the terminal.

With your terminal open in the correct directory, you can start by listing the files in the archive without actually decompressing them. That command would look like this:

That will happily spit out a list of all the files included. If you want, you can make the output more verbose by adding the -v flag, so that it’d be tar -tvf for example.

Next, I assume you want to decompress the tar.bz2 files, that is to extract the files within. To do that, you’d want this command:

Finally, I’ll give you a fun command. Let’s say you only want to extract files of a certain type, that is with a certain extension, from your tar.bz2 file. Well, you can do that and it’s easily done. Just use this command:

That command would decompress and extract all the files with .jpg as their extension. You can use any extension there, being sure to use the * to indicate a wildcard even though you already specified it with the –wildcard flag. It is what it is.

There’s more that you can do, but those are the ways I figure most folks are going to decompress tar.bz2 files. Just be sure to check the man page (man tar) to learn more about the command.

Closure:

Well, for better or worse, my articles have been pretty verbose lately. Yes, yes it does tell me how many words are in each article. I’m not sure why I ended up being more verbose lately, but I think it’s a good trend.

Anyhow, today we learn how to decompress tar.bz2 files in the Linux terminal. It’s a useful skill to have and a good tool to toss into your Linux toolkit. You never know when you’re going to need to use these commands, but there may come a time when you do – and you can refer back to this article to learn how.

Thanks for reading! If you want to help, or if the site has helped you, you can donate, register to help, write an article, or buy inexpensive hosting to start your site. If you scroll down, you can sign up for the newsletter, vote for the article, and comment.

How To: List Mounted Partitions

Today we’ll have a nice and simple article, simply because we can, about how to list mounted partitions in Linux. Like so many of these articles, we’re going to need an open terminal. On the other hand, we’ll just be exploring a couple of tools to help us along the way.

Your disk drives, be they solid state or hard disk drives, will be separated into partitions. It can get confusing until you realize that the outputs from these commands won’t always just represent what I’ll call physical partitions. Sometimes, there are virtual partitions – sometimes with their fun file systems.

You may have everything from mounted temporary partitions to software designed to run in its own mounted partition space. When you run these bellow commands, you’ll learn that there are all sorts of mounted partitions. This is completely normal. It’s also pretty easy to weed out the physical partitions.

Why would you want to do this? Well, I’m having a goofy error when I boot one of my computers and I need to narrow it down to which disk it is that’s giving me the error. Once I take the time to do that, I can move on to troubleshooting the problem and finding a solution for the problem.

The tools we’ll be using are ‘findmnt’ and ‘df’. They’re described as the following:

finding:

findmnt – find a filesystem

df:

df – report file system disk space usage

As you can see from the description, both of those have something to do with getting information about a file system. That makes them good tools for the job.

NOTE: There are multiple ways to list mounted partitions. You have GUI and CLI-based tools available to you. One of the goals surrounding this whole project is not just to make people more familiar with Linux but also to help them get comfortable working within the terminal. You’ll be just fine!

List Mounted Partitions:

As I mentioned above, we’ll be using a terminal for this. I do not mind which terminal you’re using but you can usually open the default terminal by pressing CTRL + ALT + T. That works most of the time.

With your terminal now open, you can try the following command:

The output from that command will list your mounted partitions. It’s a lot of text, but most folks are probably only interested in the start of the line. The output of the findmnt command may look a little something like this:

The next command you’re going to want to try will be the ‘df’ command. We’ll be using a few flags. It’s not very complicated, though it may look like it. The command is a simple ‘df’ command and looks like this:

We use the -a flag for ‘all’. Then we use the -T flag because that means type. Finally, we use the -h flag because that means the output will be “human readable” (or more easily read by us mortals.) The output of which looks something like this:

No matter which of those commands you use, it will make your terminal list mounted partitions. If you need to know which partitions are mounted, these are the tools you can start with. They’re easy enough to work with.

Closure:

Well, it’s a bit late in the evening. I almost forgot that there was an article due tomorrow. This happens when I get a lot of responses (elsewhere) on the wrong day. My brain just doesn’t click. I should probably set an automated notification to let me know which days require articles, but I haven’t failed yet. In fact, you get an interesting article about how you can list mounted partitions.

Thanks for reading! If you want to help, or if the site has helped you, you can donate, register to help, write an article, or buy inexpensive hosting to start your site. If you scroll down, you can sign up for the newsletter, vote for the article, and comment.

Send A Message To Another Logged In User

Today’s article might be useful for system administrators or just for fun, as we learn to send a message to another logged-in user (in the terminal, of course). This shouldn’t be a complicated or lengthy article, though many of my recent articles have been significantly longer than usual.

If you’re just a regular desktop user, this might not be all that interesting, but you can still test it if you want. Besides, you never know when you will want to send a message to another logged-in user! It could happen.

Let’s say you have a server with people logged in via SSH. This could also be a single computer with multiple people logged in, should you wish to test this and play around with sending a message to another logged-in user. Let’s also say that you want to send them a message in the terminal.

Perhaps you’re going to log them off? Maybe you’re going to reboot the server? Who knows, maybe you want to give them some sort of directions and the easiest way to do so is to send them a message that pops up in their terminal. You can do that!

We’ll be using a few tools for this. None of them are all that complicated and these little tools (do one thing and do it well) are tools that make the Linux world go around. 

For starters, we’ll be using the ‘who’ command.

who – show who is logged on

We will also be making use of the ‘awk’ command.

gawk – pattern scanning and processing language

Next, we’ll be using the ‘echo’ command.

echo – display a line of text

There will also be the ‘write’ command.

write — send a message to another user

We will also be using a pipe. We will pipe the output from one command to another command. We’ve done that lots of times on this site, so regular readers will already be familiar with a pipe and how it works.

Briefly speaking, a pipe is just one way to take the output from one command for use in another command. It’s a pretty handy tool to add to your Linux toolbox if you haven’t already done so. It’s a simple tool, which is a good thing.

If all of the above looks complicated, don’t be alarmed. It’s not all that complicated and the commands I share will be simple enough for most anyone to follow. You’ll be able to adjust them to your needs quite easily.

Send A Message To Another Logged In User:

As mentioned in the intro, you’ll want an open terminal for this. So, open your default terminal emulator. You can usually just press CTRL + ALT + T and your default terminal will open. This isn’t always true, but it’s true in many cases. You will otherwise need to open the terminal on your own.

With your terminal now open, let’s find out who is logged in. To do that, we only need the following command:

However, we only care about the first two fields, so let’s narrow that output with the following command:

The output from that command is all we need for the next part. You use the first column to identify the username. That makes them easy to identify, or at least easier for most folks.

The other column is the 2nd one. That identifies their login method, basically which terminal they’re using, and is also what we will use to specify the recipient of our message. Next, to send a message to another logged-in user, you use a command similar to this:

Or, take a look at this:

identify and send a message to a logged in user.
See? It’s not complicated. It’s harder to describe than it is to do.

So, in that case, the syntax of the command is easy, it’s just like this:

You’ll notice that the output of the command isn’t on that screen. It was sent to the other screen, the screen where that user was logged in (specifically over SSH). It quite happily sends the message to the user logged in at that location.

You can’t use usernames alone, as it’s possible for more than one person to use the same username. This method identifies the user and the method/location they’ve used to log in. It’s a pretty handy command like that. It might look a bit complex, but it isn’t.

Closure:

So, if you’ve ever wanted to send a message to another logged-in user, you can now do that. It’s easier done than explained, but hopefully, you get the gist of it and can apply it to your personal computer usage.  

It’s not always that easy to come up with ideas for articles. I often pull them from my notes, but my notes are a mess, and not all of them would make good articles. If there’s something you’d like covered, and I know the subject, feel free to contact me and let me know. Of course, don’t forget that I take guest articles when they’re about Linux.

Thanks for reading! If you want to help, or if the site has helped you, you can donate, register to help, write an article, or buy inexpensive hosting to start your site. If you scroll down, you can sign up for the newsletter, vote for the article, and comment.

Ping With IPv4 Or IPv6

Today we’re going to have a fun article, one easy enough for everyone, where we talk about how to ping with IPv4 or IPv6. You have an option and you get to decide if you want to use IPv4 or IPv6. It’s just a matter of a couple of different flags, so a new user can manage this one.

An IP address is a numerical address assigned to computers, it’s a way to address those computers – meaning to send and receive data. While you normally don’t do much with individual IP addresses, they’re what runs in the background and make this whole networking thing happen.

We had IPv4 and we’re slowly moving to IPv6. We’ve long since run out of IPv4 addresses (though they’re still widely used, often for legacy reasons), but they’re 32-bit addresses while IPv6 is a 128-bit address.

If you’re not good at math:

IPv4 supports 4,294,967,296 addresses.
IPv6 supports 340,282,366,920,938,463,463,374,607,431,768,211,456 addresses.

See the difference?

There was an IPv5 but IPv6 was created before IPv5 was made a standard and so there’s no IPv5 standard. The reasons for this are fairly obvious. After all, IPv6 supports a metric buttload of devices. That’s a seriously big number that we write as 128-bit (2128).

Every human on the planet can have all the addresses they could use, which is important when you consider stuff like IoT (internet of Things) where your home may contain many connected devices in the ‘smart home’ sense of things. We decidedly do not have enough IPv4 addresses for that.

Well, the truth is that we kind of suck at migrating to IPv6. Wh you ping localhost, you’re probably going to see 127.0.0.1. If you’re using IPv6 then you’d see ::1. If there’s any place where we might want to use IPv6, it’s in the home – with all these connected devices.

Even if you don’t have a smart home, smart cameras, a doorbell camera, various routers, a connected refrigerator, or the like, odds are that you’ve got more than one connected device. Fortunately, you still have IPv4 going on and they have some reserved IP addresses to work with. So, you’re good with that – as a general rule.

So, we still use IPv4. Should we? Probably not. But, there are legacy reasons for IPv4 to exist. That shouldn’t include the public web (I don’t believe) but it does. The adoption rate for IPv6 is really slow. After all, IPv6 launched on June 6, 2012. We’ve had more than a decade to move to IPv6!

I am no help… I am just as guilty as anyone else. When I order a VPS, I ensure that I have a dedicated IPv4 IP address. Why? Legacy reasons! Well, more out of habit. I’m quite sure I could migrate to IPv6 by just changing a few things in my process.

Anyhow… This is a long intro!

What is this ‘ping’ thing? Well, ping is you sending a packet to an address and then waiting for the response. You ping a server and the server effectively sends a pong back! It’s ping pong! Ha! I crack me up. 

You send a ping and wait for an acknowledgment from the server when it sends a packet back to your computer. Ping doesn’t always work because you can decide to ignore them (perhaps a future article) and not send a response. Fortunately, the easy-to-remember domain names (remember, they respond on an IP address, they are resolved to an IP address) respond to pings. I use ‘google.com’ as a general rule.

If you check the man page, ping describes itself like this:

ping – send ICMP ECHO_REQUEST to network hosts

We’ll be using ‘localhost’ (your computer) for this article, for the record. I think that’s a better choice than having a bunch of my readers ping any specific website. It should be effective on every modern computer with a modern operating system.

Man, this is a long intro. I’m sure I’ve forgotten something…

Ping With IPv4 or IPv6:

By now you know the routine. You’ll be using a terminal for this exercise. If you don’t know how to open your terminal, try pressing CTRL + ALT + T and (in most cases) and your terminal should pop right up! It’s magic!

Believe it or not, this may also work for other operating systems. I have it on good authority that this works with Windows, where they’ll be using ‘cmd.exe’ as memory serves. From what I can tell, this is also true for MacOS users. It’s a fair assumption to say this also works with the operating systems in the BSD family. Huh… Imagine that?!?

Anyhow, you can try the following command:

That will resolve to an IP address, be it IPv4 or IPv6. You can ping a specific IP address easily enough. To ping an IP address, the syntax is:

The results of those commands will be either an IPv4 or IPv6 address. If you’re new and don’t know the difference, an IPv4 address uses periods. It’d look like 127.0.0.1. An IPv6 address uses colons. It’d look like 2607:f8b0:4006:817::200e. It’s easy to tell the difference.

Now, if you want to use IPv4, the command would be like this:

If you want to use IPv6, the command would be like this:

NOTE: This is likely to work in many instances but, due to the lack of participation, you might find that some sites don’t support IPv6. On the other hand, you might find some sites don’t support IPv4. If one doesn’t work, then you have the other as an option.

Closure:

Well, if you ever wanted to know how to ping with IPv4 or IPv6, you now know. Are there good reasons? Well, there’s still some legacy stuff out there and we’ve poorly adopted IPv6. For all intents and purposes (intensive porpoises) we have limitless IP addresses available with IPv6.

We will move in that direction, just like we’ve currently moved in that direction. Adoption will continue and adoption rates may speed up. After all, we’ve had more than a decade to adopt. The specification is well-supported and it’s almost certainly the future of networking. Or so I’d like to believe…

Thanks for reading! If you want to help, or if the site has helped you, you can donate, register to help, write an article, or buy inexpensive hosting to start your site. If you scroll down, you can sign up for the newsletter, vote for the article, and comment.

How To: Add A New Line With CURL

Today’s article isn’t going to be all that long and it’s definitely not going to be complicated, as we just discuss how to add a new line with curl. It’s just an annoyance factor and something I was reminded of today. Lacking a better idea, I decided I’d use this annoyance and recollection as a reason to write an article about how to add a new line with curl.

First, this obviously requires a terminal.

Second, this obviously requires curl. You almost certainly have curl installed, so you won’t have to install anything. 

If you’re curious, you’ll find that the curl man page defines the application as:

curl – transfer a URL

You’ll understand why I’d use that in a second, but you can imagine that it’s a pretty handy tool to have in your Linux toolbox. We’ve previously used curl in many articles. Here’s a sampling of those articles:

Let’s Have a Limited Look at Linux’s cURL Application
Weather In The Terminal? We can do that!
How To: Find Your IP Address Through Your Terminal

… and more!

So, in this case, I show ads on the site. To do this, Google relies on a file known as ‘ads.txt’ being in your web’s root folder (often called ‘public_html’). If the file is not there, there’s an ad inventory issue and Google won’t show ads.

Well, if you read the previous article you’d know that there was an outage. During this outage, it appeared that the site was still reachable – except it wasn’t. It was during this time that AdSense decided to check and see if the ‘ads.txt’ file is there. (This is nothing private. Everyone using AdSense has an ads.txt file.)

Because of this, I decided to verify that the ads.txt file existed and contained the appropriate information. To do this, I simply used the following command:

It gave me the answer I wanted, but I disliked the formatting of the output. But, it was enough for me to determine that the file existed and that I just had to wait for Google to confirm this.

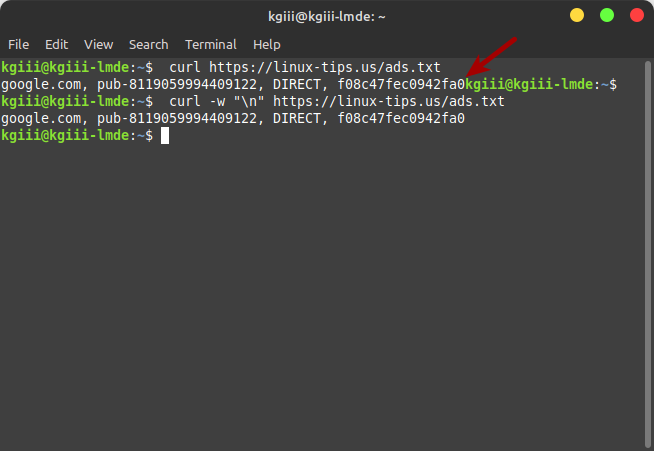
The formatting was horrible. I’ll show you an image in the next section and you’ll see…

Add A New Line With curl:

So, when I saw the output from the above command (feel free to run it on your computer), it just ran the line into the next prompt. I had to dig through my ~/bash_history file because I couldn’t remember how to fix the formatting.

A picture is probably going to describe this best. In the picture, you’ll see the ugly formatting and you’ll see the solution.

adding a new line to the curl output
As you can see, the second command has a much nicer output.

So, to make sure you have a new line, you use the -w (write-out) flag and add the character for a new line in quotes – which is "\n". It’d look like this:

As you can see (and I hit the enter button between commands to start on a fresh new line) the output is much nicer. So, instead of curl starting a new line, a command entry line as it were, you’re starting with a nice fresh new line.

I messed with this way too long before I started digging into my bash history to find other curl commands used over time. Eventually, I found it, but I’d already verified that the file existed and that Google would notice the next time they checked.

Closure:

Well, it’s not the greatest of articles – but it’s useful if you want to know how to add a new line with curl. It’s a much tidier output this way. I just need to remember to do it without having to dig through my bash history each time I want to have a clear curl output.

Meh… I’m sure it’ll eventually be handy for someone…

Thanks for reading! If you want to help, or if the site has helped you, you can donate, register to help, write an article, or buy inexpensive hosting to start your site. If you scroll down, you can sign up for the newsletter, vote for the article, and comment.

Linux Tips
Creative Commons License
This work is licensed under a Creative Commons Attribution 4.0 International License.