Get Some System Information With Archey

Today’s article will be a fun one, where we figure out how to get some system information with Archey. It’s a mostly unnecessary article and Archey is definitely replicating work done elsewhere, but it’ll be fun!

Well, I think it’ll be fun…

I suppose you can decide that for yourself as you read the article. If you want to get some system information with Archey, read on (and maybe have fun)!

As regular readers might know, I’ve covered a variety of *fetch articles.

How To: Display System Information With screenFetch
Screenfetch vs. Neofetch, You Decide!
Show RAM Information With Ramfetch
Get Some Prettified CPU Information in Your Terminal With ‘CPUFETCH’

In fact, the ‘Screenfetch vs. Neofetch’ article is oddly one of the most searched articles on the site, at least from Google’s traffic.

Anyhow, Archey is like those (but written in Python, if that matters). If I understand correctly, it was Archey4 – a maintained fork of Archey. The original Archey project ceased development and now this project is just called Archey as it is no longer a fork but is the actual project.

I think I’m understanding that properly. If I’m not, hopefully, someone chimes in and lets me know the full story. Often my articles are visited by project leaders, so maybe that’ll happen in this instance and someone will set the story straight.

Either way, it doesn’t matter much – but it does explain why I’m simply referring to the project as ‘Archey’. If you check the man page, you’ll learn that Archey describes itself like:

A simple system information tool written in Python

Got it? Good! Let’s get started getting some system information with Archey!

Let’s Get System Information With Archey:

So, the first thing you’re going to need is a copy of Archey. That’s easily accomplished if you want .deb or .rpm. There are some odds that you’ll find it’s already in your repositories (like Arch or BSD). You can also use “pip” (Python packages from PyPI) to install Archey. There’s even a ‘homebrew’ version for Mac users.

Otherwise, if none of those will work for you, you might find you need the source code to build and install Archey.

This link should take you to the current release:

https://github.com/HorlogeSkynet/archey4/releases/latest

From there you can install Archey. Due to the huge variety of installation methods, I’m just going to tell you to follow the directions to install Archey. If you can’t get it installed, you can always ask for help and someone will hopefully get you sorted.

Once you have Archy installed, you can start getting system information with Archey. You just run the archey command and it’ll spit out something like this:
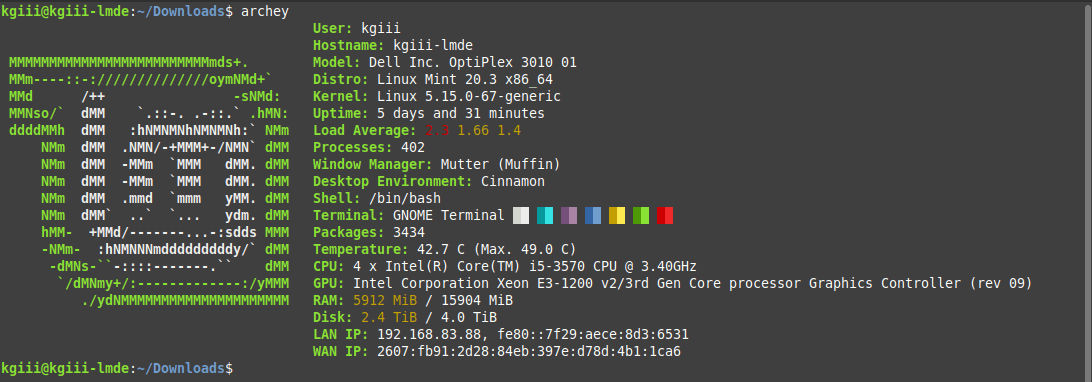
Achey displays system information.
I don’t think you’ll need me to explain. The screenshot should be adequate.

As you can see, Archey’s output is fairly normal. It likely reminds you of things we’ve already covered in earlier articles. That’s okay – it should remind you of things like Screenfetch and Neofetch.

Just like some of the other previously covered *fetch applications, you can take a screenshot automatically. After all, the goal of these applications is to give you some information that si easily captured as a screenshot so that you can show it off to your forum buddies.

However, possibly because I have Flameshot installed (which seems to have taken over the ‘screenshot’ command that Archey uses), I am unable to actually verify the screenshot bit. I dutifully took the screenshot with Shutter. But, the -s flag should work for other people. I tried a few times with Archey but got conflicting errors. Someone smarter than I probably have this sorted out.

I’m not going to go uninstalling stuff just to demonstrate it. If it doesn’t work for you, file a bug at the above-linked GitHub site. Also, you have some additional options with Archey. There’s nothing too fancy, but be sure to check the man page (by using man archey) to learn more about the application.

Closure:

There you have it, you have another article. This article covers how to get system information with Archey. It’s an easy and, likely, familiar task. If you’ve followed along, you’ve learned all sorts of ways to get system information.

Do you really need Archey? No, probably not… I figured I’d cover it because my site shows up in some Archey queries. If people are looking for it, it might as well be here. That’s my line of thinking, at any rate.

Thanks for reading! If you want to help, or if the site has helped you, you can donate, register to help, write an article, or buy inexpensive hosting to start your own site. If you scroll down, you can sign up for the newsletter, vote for the article, and comment.

Let’s Find A Site’s MX Records

Today’s article is going to be rather specific and brief, as we learn how to find a site’s MX records. This isn’t something everyone is going to need to know, but it’s useful for debugging an email issue when you’re hosting websites. So, some folks are going to find it useful – and will then know how to find a site’s MX records. Read on!

I suppose most of my readers will not know what an MX record is…

In short, an MX (Mail Exchange) record is another DNS (Domain Name System) record. In this case, it is used to route emails to the correct server (via the IP address, basically). From there, your server will route the emails to individual email inboxes.

Basically, you want to know this information when things go pear-shaped with your emails or maybe when you’re using a 3rd party email service provider. There are reasons why people will want this information, they will want to find a site’s MX records.

Additionally, I figured I’d do this article now while ‘dig’ is still fresh in our memory. After all, I’ve used dig in the previous two articles and this is the final dig-related topic that I can think of. Here are the previous two articles, if you’re not reading these articles in order and are unfamiliar with the dig command:

How To: Find A Website’s IP Address
How To: Find A Site’s Nameservers

So, with all that in mind, let’s learn how to find a site’s MX records!

How To Find A Site’s MX Records:

Yes, dig is run in the terminal. Yes, you’ll need an open terminal to follow along. If you don’t know how to open the terminal, you can do so with your keyboard – just press CTRL + ALT + T and your default terminal should open.

With your terminal now open, the syntax for this specific dig command is:

For example, you’d find this site’s MX records with:

If you want, as the other dig commands used recently, you can use the +short flag with this, like so:

The output should look like this:

using the dig command to find a site's MX records
There, you can see this site’s MX records. This is public information. So, gawk away!

You can have more than one MX record, should you want failover but the mail protocol already includes some efforts to resend mail when there’s an outage. That’s irrelevant here, but information that I might as well share.

Also, like the other dig commands covered, you can put the flags at the end, like so:

So, that’s an option. I’m not sure why it’s an option. If anyone has a clue as to why it’s an option, do feel free to share. Heck, even if it’s a wild guess, I’ll take it. But, if you want more information about the dig command, run man dig in your terminal.

Closure:

There you have it, it’s another article. I think this is the last dig article, but who knows? This time around, we’ve learned how to find a domain’s MX records. For those that need to know, this will be handy.

For everyone else, you’ll likely forget this by tomorrow – and that’s okay. You don’t have to carry all the tools in your toolbox. If you tried, you’d need a very big toolbox and it’d be hard to carry it!

Thanks for reading! If you want to help, or if the site has helped you, you can donate, register to help, write an article, or buy inexpensive hosting to start your site. If you scroll down, you can sign up for the newsletter, vote for the article, and comment.

How To: Search For Files By Name

Today’s article isn’t going to be all that complicated, as we’re just going to cover one way to search for files by name. It is a pretty useful skill to have, and a skill that one should probably learn early on. If you want to learn how to search for files by name, read on!

So many of us will parse the output of the ‘ls’ command, but you really shouldn’t parse the output from ‘ls’. Sure, it’s nice and easy to use something like ls -la | grep <filename>, but that’s a bad idea for reasons better explained by clicking the above link.

One of the options you can use instead of ‘ls’ would be the ‘find’ command. We’ve used it a few times before, but this time we’ll be using it to search for files by name. It’s relatively easy and I’m sure you can figure it out. The find command’s man page defines itself as:

search for files in a directory hierarchy

Which is a good description, because that’s what it does. Which is also good, because that’s what we want it to do! So, let’s get this article started rather than wasting time in the intro…

Search For Files By Name:

This article requires an open terminal, like many other articles on this site. If you don’t know how to open the terminal, you can do so with your keyboard – just press CTRL + ALT + T and your default terminal should open.

With your terminal now open, the command you’re looking for would look a little like this example:

As you can see, you must declare a directory and a file name. If you want some level of leeway, you use ‘-iname‘ which indicates that it isn’t case-sensitive. As a matter of habit, I use ‘-iname‘ instead of ‘-name‘. This works for me and we’ll use ‘-iname‘ from here on out.

Let me give you an example…

Say you wanted to find the ‘firefox.desktop’ file and ensure it’s there. You could use this command:

Of course, if you aren’t sure it’s a desktop file, you can use:

The asterisk means anything, so you’ll get results for firefox.desktop as well as anything else.

If for some reason, you wanted to search your entire system for anything containing firefox, it’d look like this:

That’ll likely throw a whole lot of errors, as you don’t have permission to look in those areas, so you just add sudo to the command:

Which should show you every instance of a file starting with firefox on the entire computer. The ‘find’ command can seem pretty difficult to tackle for a new person, but if you take it in small bites you’ll start to learn that it’s not all that complicated. Be sure to check man find for more details.

Closure:

There you go… It’s yet another article. This time, we’ve covered how to search for files by name, a task that you may do with some frequency. If you know what you’re doing, it’s possibly faster than rooting around in a GUI hoping you find the right directory.

You don’t even need to know the entire file name to at least narrow it down a great deal. So, it’s a great tool to add to your toolbox and is more reliable than parsing the output of the ‘ls’ command.

Thanks for reading! If you want to help, or if the site has helped you, you can donate, register to help, write an article, or buy inexpensive hosting to start your site. If you scroll down, you can sign up for the newsletter, vote for the article, and comment.

Make ‘wget’ Resume From An Interrupted Download

Today’s just going to be a quick article, an article where we learn how to make ‘wget’ resume from an interrupted download. This is a darned useful function you can add to a wget command, especially if you’re in an area with sketchy connectivity. To learn to make wget resume from an interrupted download, read on!

So many of my articles are written because of something I did recently. Many are still based on my copious notes (we’re well over 300 articles here on Linux Tips), but those will run out eventually. I’m often thinking of new ideas for articles and sometimes my day-to-day computing gives me an article idea that’s not from my notes. This is one of those…

Today, we’re going to cover yet another wget feature! We’ve had many wget articles. Here are a few of them:

Limit The Download Speed For ‘wget’
Rename A File Downloaded With ‘wget’
How To: Hide The Output From wget

And we’ve used wget in many articles. Go search for “wget”.

By now, many of my regular readers will be more than familiar with wget. So, what is wget? It’s a terminal-based tool that you use to download files. I use it often. You’re encouraged to check man wget for more information.

I use it outside of the browser, even if I found the download link via a browser. It’s just that handy and the throughput rate seems to be greater with wget (oftentimes). If you check the man page, wget describes itself as:

The non-interactive network downloader.

Which is exactly what it does. Which is nice…

How To: Make ‘wget’ Resume From An Interrupted Download:

You’ll kinda sorta maybe need an open terminal for this article. If you don’t know how to open the terminal, you can do so with your keyboard. Press CTRL + ALT + T and your default terminal should pop open.

With your terminal open, you just need a file to download… I’ll let you pick that. You also need to interrupt your download, so that you can practice this…

Wait, no… That’s just silly. Instead of practicing this, just learn from my usage and call it good. There’s no need to replicate this until you need it. Yeah, that’s the ticket!

So, imagine my surprise when I learned that Gentoo now has a live USB edition. (I was pretty surprised.) I immediately decided to download the file, though I’ve still not tried it. To download the .iso, I used the fantastic wget tool.

My terminal was already open. My present working directory was already the ‘Downloads’ directory. I had nothing to do except enter the wget command. The command I entered was this:

As you may know, my DSL provider made me angry and I’m now using a combination of a mobile hot spot and satellite. My mobile provider likes to disconnect me for 30 minutes at a time and does so at varied intervals.

I normally just switch to the satellite connection for 30 minutes but wget didn’t like that. I’d already downloaded half of the file while tethered to my phone and didn’t want to download it again. Downloading data I’d previously downloaded is just a pain in the butt and slows things down. So, I added the -c flag. The command I then used, once connectivity was restored, was this:

Sure enough, wget resumed from where it left off when the connection dropped out. I didn’t have to download that all over again. Sure, wget will automatically retry a few times (which you can modify) but it’s not going to keep trying for 30 minutes (by default) or longer. So, this is how you make wget resume from an interrupted download.

Closure:

See, it’s easy to make wget resume from an interrupted download. Was it worth writing an entire article for a single flag? I’d say yes. Well, of course, I would say yes. If I didn’t think it was worth an entire article, I wouldn’t have written an entire article about it!

Ah well…

And now you know…

You’re welcome…

Thanks for reading! If you want to help, or if the site has helped you, you can donate, register to help, write an article, or buy inexpensive hosting to start your site. If you scroll down, you can sign up for the newsletter, vote for the article, and comment.

A Couple More Ways To Find Your Network Interfaces

Today’s article is mostly just for fun, as we examine a couple more ways to find your network interfaces! I’ve shown you a variety of ways at this point, but this is Linux. If you just want to have some fun finding your network interfaces, read on – ’cause this article is meant for those who like to travel a different path!

One of the things that make Linux so awesome is the myriad choices we have. There are so many different ways to accomplish the same goal. In fact, we sometimes get defensive about ‘our way’ of accomplishing things. It can make for some amusing (and sometimes a bit heated) discussions. 

Anyhow, I’ve covered this before. I’ve even covered it recently, which is why this is still fresh in my memory. You can start with this article if you want:

How To: Show Your Network Interfaces

Just to touch on it, a network interface is a device that your computer uses to communicate over the network. In most folks’ cases, you’ll locally use your network interface to connect to the Internet, perhaps first to your router or modem. These networking devices have names.

It’s important to be able to point to a specific networking interface, which is why they have names. If you want to issue commands, you want to send them to the right networking interface. If you want to monitor a connection, you need to know the correct name for the network interface.

So, these network interfaces have names. These names should be unique in your system, meaning you shouldn’t have more than one device per name. The names should not be shared among the devices and each working networking interface should have a name of its own.

If you want to know the network interface names, this article’s for you…

Find Your Network Interfaces Continued:

This article requires an open terminal, like many other articles on this site. If you don’t know how to open the terminal, you can do so with your keyboard – just press CTRL + ALT + T and your default terminal should open.

With your terminal now open, we’re going to show you a couple of new ways to find your network interfaces. It’ll be fun!

For starters, and probably one I should have already covered, we’ll use a command we’ve covered here and here. We’ll use the ‘netstat’ command, and the ‘netstat’ command you need to find your network interfaces is simply:

(If you don’t have ‘netstat’ available, install the ‘net-tools’ package from your distro’s repositories. It’s almost certainly available.) The output is nice and clear and will show you the names of your network interfaces.

The next command we’ll use is one we’ve used many times before. It’s just a two-letter command, so trying to search for it (on this site) is neigh on impossible – but you can be certain that we’ve used it before. (We’ve at least covered sorting and formatting the output from the ‘ls’ command.)

Anyhow, the command we’ll use to list the network interfaces is pretty simple, it’s just this simple command:

That ‘ls’ command should spit out a list of your network interfaces all nice and easy. If there’s going to be one command that’ll work on any system, it might be this one.

Speaking of which, as this is Linux, there are all sorts of ways to accomplish goals. Because of this, that also means they’ll not always work on every system. You may need to try multiple commands to get the output you’re after – but both of today’s commands should result in you getting the names of your network interfaces (even if you have to install ‘net-tools’ to do so).

Closure:

There you have it, another easy article. Ugh… I do wish I was feeling a bit more up to snuff. Meh… At least I’m writing and writing this sort of stuff. In this case, it’s another article that’ll show you how to find your network interfaces. It’s information worth having. They’re tools that will go well in your growing toolkit of Linux tools.

Thanks for reading! If you want to help, or if the site has helped you, you can donate, register to help, write an article, or buy inexpensive hosting to start your own site. If you scroll down, you can sign up for the newsletter, vote for the article, and comment.

Linux Tips
Creative Commons License
This work is licensed under a Creative Commons Attribution 4.0 International License.