Limit The Download Speed For ‘wget’

In today’s article, we’re going to learn how to limit the download speed for ‘wget’. It will be a short article because I’m watching a race and didn’t bother writing an article ahead of time. It’ll also be suitable for someone new to ‘wget’. So, to learn how to limit the download speed for ‘wget’, read on!

We’ve had a number of ‘wget’ articles in the past. There’s quite a bit to it. If you don’t know, you use ‘wget’ in the terminal, as a way to transfer files across a network. The ‘wget’ command is often used to download files from the internet. If you’re unfamiliar with the ‘wget’ command, it defines itself as:

Wget – The non-interactive network downloader.

There are a number of existing ‘wget’ articles if you want to gain some familiarity with the command. Here’s some:

Rename A File Downloaded With ‘wget’
How To: Hide The Output From wget
Make wget Use IPv4 or IPv6
How To: Make ‘wget’ Ignore Certificate Errors

Plus, there are numerous articles that used wget to download files.

So, when you’ve taken a look at those articles and feel you have a solid grasp of what ‘wget’ is used for, you might as well take a look at the man page to get a better idea of the possibilities:

With that information properly learned or refreshed, let’s just skip right ahead to the main article…

Limit The Download Speed For ‘wget’:

It’s a bit different lately, as I’ve been using a different ISP. In the past, if I was downloading anything the whole network would bog down. I’d use things like ‘wondershaper‘ to get around that. Else, if I was using ‘wget’ to download a large file, I’d limit the download speed.

This isn’t much of an issue with my current connection, so I don’t worry about it. Still, you might have all sorts of reasons to limit the download speed for ‘wget’. We can do that! You will need an open terminal, however. 

So, open up your default terminal emulator. If you don’t know how to open the terminal, you can do so with your keyboard – just press CTRL + ALT + T and your default terminal should open.

If you don’t know what we’re looking for, we’re looking for the --limit-rate flag. It’s not all that complicated and looks like this:

For example:

Where you see 50k, you can change it to 100k, 500k, or whatever. The k obviously stands for kilobytes. You can also use m, as in --limit-rate=50m and that’s obviously megabytes. If you’ve got enough bandwidth for it to matter, you can even use a g in that space, and it’s obviously for gigabytes.

See? That’s actually all there is to it. I told you it was simple and quick! Tada! It was!

Closure:

And there’s another article. This one was hurried but hopefully is worth reading and sharing with your online friends. You’ll have learned that you can limit the download speed for ‘wget’, a potentially handy way to use the tool. You can combine it with the various other flags, so be sure to read the man page!

Thanks for reading! If you want to help, or if the site has helped you, you can donate, register to help, write an article, or buy inexpensive hosting to start your own site. If you scroll down, you can sign up for the newsletter, vote for the article, and comment.
Bring Your Network Up Or Down (In The Terminal)

In today’s article, we’re going to learn how to bring your network up or down – in the terminal, of course. This will be an article that’s easy enough for a beginner to understand. It’s not very complicated, so it should also be fairly short. If you’re interested in bringing your network up or down in the terminal, read on!

There are times when you may want to bring your network down and then bring it back up. Odds are that you can do this with a GUI, often with a network manager right there in your system tray.

You can also do this in the terminal. This is especially handy if we’re unable to reach a graphical state and need a network connection for things like updating and troubleshooting. We will use the ‘ip’ command for this, which is a pretty robust command. The ‘ip’ command describes itself as:

ip – show / manipulate routing, network devices, interfaces and tunnels

That’s an accurate description and we will indeed be manipulating network interfaces in this article. We will also be showing network interfaces in this article.

If you’d like to get a head start, you can read the man page:

That command will show you all the available options for the ‘ip’ command. We’ll just be using a couple of the commands, so it won’t be all that complicated or stressful.

Bring Your Network Up Or Down:

As the title suggests, we’ll be managing our network interfaces from the terminal. This means you’ll need to open your favorite terminal emulator at this point. If you don’t know how to open the terminal, you can do so with your keyboard – just press CTRL + ALT + T and your default terminal should open.

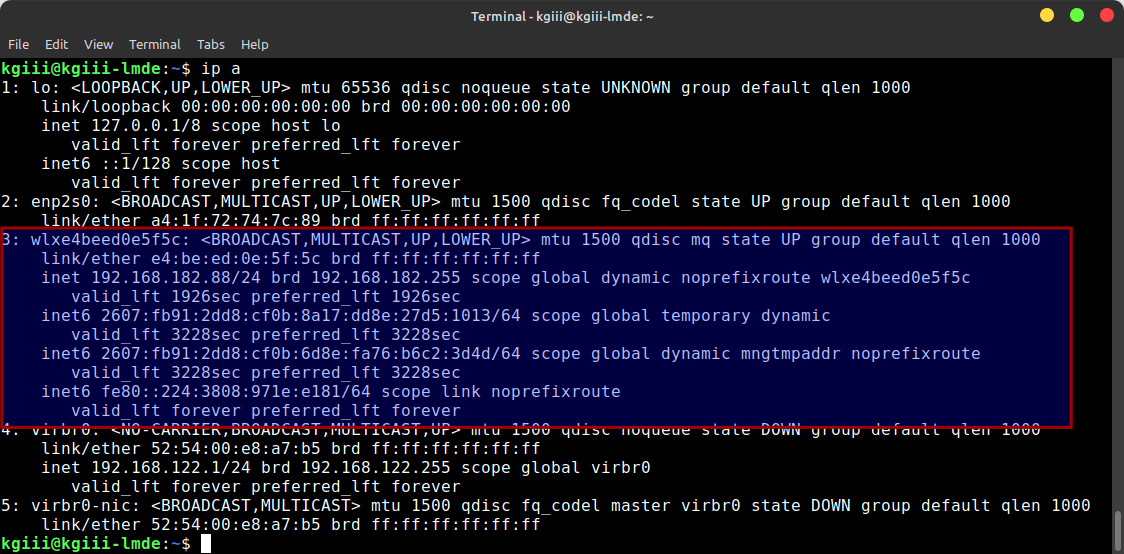
With your terminal now open, you should identify your network interfaces. We can do this with the ‘ip’ command, like so:

Or just:

Hint: The connected device(s) will be those with the most information output. Like the wireless network interface in the following image:

output of the 'ip addr' command
As you can guess, that rectangle is a good indicator that it’s the ‘up’ network interface.

Now, if the network interface is down and you want to bring it up. The command is quite simple, it’s just:

So, in my case, the command would look like this:

If you wanted to bring it down, and mine is already up, the command would look like this:

With that, you can bring your network up or down as desired, and from the terminal. It’s not very difficult at all.

If you’re using an older distro, you might still be using ‘ifconfig’. If you are, the commands are a little different, and I include these only for completeness’ sake and would look like this:

And, of course, to bring the network interface down:

So, that’s not too dissimilar to the more modern ‘ip’ command and is still worth mentioning. For a while, as ‘ifconfig’ was sunsetted, you could use both commands with the Ubuntu flavors. In current versions of Ubuntu, you only have the ‘ip’ command available unless you install ‘net-tools’ for some reason.

Closure:

And there you have it! You can now bring your network up or down in the terminal, and it’s not even all that difficult. It’s yet another article and yet another skill you can add to your growing toolbox of commands. It’s just a subset of the things you can do with the ‘ip’ command, but it’s one of the more useful things you can do with it. So, there’s that…

Thanks for reading! If you want to help, or if the site has helped you, you can donate, register to help, write an article, or buy inexpensive hosting to start your own site. If you scroll down, you can sign up for the newsletter, vote for the article, and comment.

Another Way To Find The Binary For A Specific Command

In today’s article, we’re going to learn another way to find the binary for a specific command. This won’t be a very difficult article. It’s an article that will be easy enough for even new Linux users to follow. So, if you want to find the binary for a specific command, read on!

You’ll find some similarities between today’s command and the ‘which’ command, which we used in this article:

Find A Command’s Binary

Well, we’ll use the ‘whereis’ command in this article. The man pages for the ‘whereis’ command describe it ‘whereis’ thusly:

whereis – locate the binary, source, and manual page files for a command

You may recognize the command, as we’ve used it to find the man pages for a specific command. In that article, we discussed the possibility of using the ‘whereis’ command to do just this, but I feel it deserves its own article. The first article merely mentions the possibility, so an article specifically discussing this command’s use like this makes perfectly good sense to me.

So, let’s learn another way to…

find the binary For A Specific Command:

As you might have guessed, the ‘whereis’ command is a command used in the terminal. As such, you’ll need an open terminal. Just press CTRL + ALT + T and your default terminal should open.

Now, with your terminal now open, you can try to find the binary for a specific command. Let’s say you want to find the binary for ‘grep’. Then the command would look like this:

The output of which would look a whole lot like this:

whereis command finding the binary for grep
Where is grep? There it is! This will probably not work for Waldo. Or Carmen Sandiego. 

The extra fields are where the man page and info pages are located, and the first field is the path to the binary in question. So, if you want to find the binary file for Firefox, the pattern is:

So, for Firefox specifically, you’d run:

However, if you just want to find the binary for the specific command, you’d use the -b flag. That’s all you need to do in this case. It looks like this:

And that will output just the binary file’s location without the additional fields of man pages and info pages. See? It’s pretty easy after all.

Closure:

Well, there’s another article. This time around, we’ve learned another way to find the binary for a specific command. It’s another article in a long list of articles, indeed a growing list of articles. So, well, there’s that… Which is nice…

Thanks for reading! If you want to help, or if the site has helped you, you can donate, register to help, write an article, or buy inexpensive hosting to start your own site. If you scroll down, you can sign up for the newsletter, vote for the article, and comment.

Rename A File Downloaded With ‘wget’

In today’s article, we’re going to learn how to rename a file downloaded with ‘wget’. This will not be a complicated article. It will also be a pretty short article. If you want to learn how to rename a file downloaded with ‘wget’, read on and you’ll see how!

Often, you’ll use ‘wget’ to download a file and it will have some sort of convoluted file name. You can download a file with ‘wget’ and rename it automatically. If this is something you’re interested in doing, we’ll learn how to do it in this article.

We’ve used ‘wget before. See:

How To: Hide The Output From wget
Make wget Use IPv4 or IPv6
How To: Make ‘wget’ Ignore Certificate Errors

We’ve used ‘wget’ in other articles, so feel free to use the search function to see the other articles about ‘wget’.

If you’re curious, you can check the man page. You’ll see ‘wget’ defines itself as:

Wget – The non-interactive network downloader.

That’s a good enough description, I suppose. Basically, you use ‘wget’ in the terminal to download files. It’s a pretty handy application and, importantly, a pretty universal application. If you’re using a GNU/Linux desktop (or server), you’ve almost certainly got ‘wget’ as an available tool.

So then…

Rename A File Downloaded With ‘wget’:

This article requires an open terminal, like many other articles on this site. If you don’t know how to open the terminal, you can do so with your keyboard – just press CTRL + ALT + T and your default terminal should open.

Let’s ensure you have ‘wget’ installed with:

If ‘wget’ is not installed, install it from your package manager. Once installed, you can take it on a test run:

Now, we’re going to make ‘wget’ keep trying in case the download has issues. We’ll use the -c (continue) flag:

You probably don’t need the -c flag for this file, but it’s a good habit to get into. If we add the -O flag (for output-document) to the command, it’d look like this:

Or, to try to make it more clear:

In the latter example, you’ll have downloaded the file and renamed it to numbers.txt instead of saving it as the original filename. See? Pretty simple!

Closure:

There you have it. You have a new article. This time, we’ve learned how to rename a file downloaded with wget. It’s a handy trick to keep in mind, as people tend to want to give their files names with things like version information and all that. If you want a simpler file name, this is a nice easy way to do it.

Thanks for reading! If you want to help, or if the site has helped you, you can donate, register to help, write an article, or buy inexpensive hosting to start your own site. If you scroll down, you can sign up for the newsletter, vote for the article, and comment.

Disallow Directory Listing (in the terminal)

In today’s article, and for no apparent reason, we’re going to learn how to disallow directory listing in the terminal. This seems like a good article for beginners to learn, and it seems like something most folks might like to know. So, if you want to disallow directory listing read on!

You never know when you might want some additional privacy, though I’d definitely not confuse this for strong privacy measures like encryption, amongst your files. Perhaps you’re planning on releasing a memo and you don’t want anyone to read it until you’re done?

I dunno? It’s up to you as to why you’d want the potential privacy from making it so that the files in a directory can’t be listed. Your reasons are your own. I just share tidbits of knowledge.

We will be using ‘chmod’ in this exercise. The man page for ‘chmod’ describes itself like:

chmod – change file mode bits

But, for our purposes and generally speaking, it’s used to adjust the file permissions. As you should know, files have various permissions in Linux – and everything in Linux is a file. There are read, write, and executable bits that can be set (with said chmod, for example) and there’s also file ownership (for another day). We’ll be using those permissions to prevent listing the files in a directory.

Ready? It really won’t take long – and it should be easy enough for anyone…

Disallow Directory Listing:

As the title suggests, this is another ‘in the terminal’ application. So, of course, you’ll need an open terminal. You should open a terminal now. If you don’t know how to open the terminal, you can do so with your keyboard – just press CTRL + ALT + T and your default terminal should open.

With your terminal now open, let’s first start by making a directory – just so that we can then use that to disallow directory listing. We’ll just do this in your /home directory. Start with:

Now, let’s move to the new ‘sample’ directory and make a couple of files.

Now, what we’re going to do is change the permissions of the ‘sample’ directory, like so:

You don’t need ‘sudo’ or anything, because these files belong to you. But, you can now test it. While still in the folder, try any of the following:

Or (from outside the directory, if you’d like):

In all cases, it should give you a ‘permission denied’ error, because you no longer have permission to list files from within that directory.

If you wish to reverse this, you can simply try changing the permissions again. You can just:

With that command, you can resume directory listing. So, it’s pretty easy to reverse the process. It’s also not the greatest security measure you can take, because of that. So, do what you will with it, as you now know how to disallow directory listing in the terminal.

Closure:

There you have it, it’s yet another article. This one seemed like an interesting one to write, so I figured I’d write it. You never know when you want to disallow directory listing, but now you know how to do so. If you have any questions, feel free to ask…

Thanks for reading! If you want to help, or if the site has helped you, you can donate, register to help, write an article, or buy inexpensive hosting to start your own site. If you scroll down, you can sign up for the newsletter, vote for the article, and comment.

Linux Tips
Creative Commons License
This work is licensed under a Creative Commons Attribution 4.0 International License.