How To: Test Your Bandwidth From The Terminal

There are all sorts of ways that you can test your bandwidth rate from the terminal. This article is going to cover just one of them. As far as articles go, this one should be pretty easy for anyone to follow and understand. It should also be relatively quick.

So, there’s that…

Which is nice…

The tool we’ll be using is known as ‘speedtest-cli’. You may be more familiar with their website, speedtest.net. If you, like most, visit the site, you can have your bandwidth tested in a number of ways and from a variety of servers. You can do that from the terminal, if you want.

Speedtest.org is pretty handy, though I’d probably recommend librespeed.org to folks who are testing via the web. The latter has no Java, websockets, nor Flash. It is also open source. On the other hand, it lacks a way to easily test it in the terminal.

So, what is speedtest-cli? It’s a way to access the speedtest.net tests via the terminal. There are a number of options and I’ll cover the most important of those options below. For now, speedtest-cli defines itself as:

speedtest-cli – Command line interface for testing internet bandwidth using speedtest.net

That’s a pretty accurate description of what it does. It’s also the tool we’ll be using. It’s just easier and fancier than other ways. Sure, you can download a large file in the terminal and get a good idea of what your download rate is, but it’s not much of a test and doesn’t include things like your upload speed.

Test Your Bandwidth:

As stated above, you will test your bandwidth rate in the terminal. To do this, you’ll obviously need an open terminal. To open your terminal with a keyboard shortcut, just press CTRL + ALT + T and your default terminal should open.

Install speedtest-cli:

So, speedtest-cli is unlikely to be installed by default, you’re going to have to install it. If you go to their official download page, you’ll get to download a script form of the application for pretty much every architecture out there. Those will work just fine and have directions about how to use them.

But, you can probably properly install speedtest-cli. For example, if you want to install it on Ubuntu, your installation command would look like this:

I didn’t check every other distro, but it sure looks like it’s available in the default repositories for a bunch of them. Even in Manjaro, I was able to install speedtest-cli with this command:

And all was good with it installing without any need to mess around with scripts or installing it manually. As near as I can tell, it works the same for Fedora and even CentOS. Just use your package manager to do the installation and it’s probably in there.

Test Your Bandwidth With speedtest-cli:

Next, you’re going to want to run speedtest-cli. If you’re familiar with the web interface, the terminal interface won’t seem too terribly foreign. By default, the bandwidth test will be done with the closest servers to you (based on IP address geolocation). You can also pick the server you want it to test your bandwidth with, overriding the default choice.

If you want to run the command that’d give you the results you’d get by using the defaults on the web page, you just run the command without any flags at all. It looks like:

If you want to list servers based on distance from your location, then you first need to run this command:

That will show you servers and their associated server number. Using that number, you can pick which server you want to use with this command:

Those commands will happily give you the test results right there in the terminal, but you can also opt to generate an image. To do that, you use the --share flag. So, a basic command would look like this:

After it spits out the results, it will give you a URL to an image generated based on your individual results. I suppose this is good for bragging rights or for demonstration purposes when complaining about your throughput to your ISP. An image generated from a VPS of mine looks like:
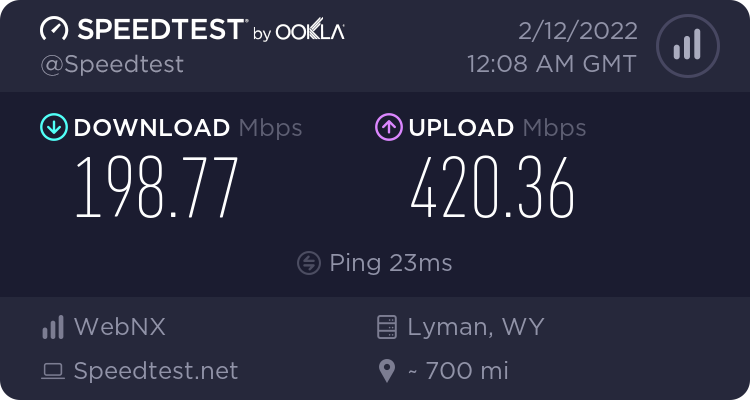
speedtest-cli results from a VPS
That’s obviously from a VPS. My bandwidth isn’t that good! It’d be pretty sweet if it was!

You can use that image to show off to your friends or, as mentioned, a demonstration for how poorly our ISP is serving you. This is one of a few ways you can tell if your provider is actually providing you with the services you purchased.

Those are pretty much the only ways you’re going to use speedtest-cli in the real world. There are a few more options, so be sure to check the man page. As a general rule, most folks are going to just want those options and those results.

Closure: 

And there you have it. You now have a new article. This one is telling you how to test your bandwidth with speedtest-cli, a test you may find useful from time to time.

The bandwidth from my house? Well, I have a lot of stuff using the ‘net on this line right now – but it’s still enough bandwidth for my needs. It’s not nearly as impressive and the results look like this:

speedteest-cli results from my home
As you can see, it’s not that high. That’s actually a bonded DSL line and twice what it used to be!

It’s useful testing to see if you’re actually getting the bandwidth you paid for. Sadly, ISPs are aware of the IP addresses speedtest.net uses and folks tell me that they’re prioritizing traffic from that service (meaning giving you better results than reality would give you) but I have no idea if that’s true or not. To be fair, it does sound sleazy enough for an ISP to do it, though I’ve had pretty good luck with the service providers I currently use.

Thanks for reading! If you want to help, or if the site has helped you, you can donate, register to help, write an article, or buy inexpensive hosting to start your own site. If you scroll down, you can sign up for the newsletter, vote for the article, and comment.
How To: Find Large Files Using ‘ncdu’

In this article, we’ll learn how to find large files by using ‘ncdu’. It’s useful for spotting large files that eat up your disk space. We’ve previously had an article about visualizing disk usage. Those were some great GUI ways to find large file, but this will be done inside your terminal – and using ncdu.

You’ll find that ‘ncdu‘ stands for NCurses Disk Usage. As the link says, it refers to the similarity with ‘du’ and that it uses the [n]curses programming language. As far as tools like this go, this one is relatively new (from 2007). Unsurprisingly, ncdu defines itself as:

ncdu – NCurses Disk Usage

There are a ton of options for ncdu and we’re only going to touch on just one of ’em. The goal isn’t to teach you how to use ncdu, it’s to teach you how to use ncdu to find large files. If you want to learn more about the tool, you can always refer to the man page.

Now that we understand the scope of this article (how to find large files using ncdu) we can move on into it…

Find Large Files Using ncdu:

Chances are good that ncdu isn’t installed by default and you’ll need to install it. It’s also a text-based application. So, obviously, you’re going to need a terminal open. You can easily open a terminal by pressing CTRL + ALT + T. That should open your default terminal.

Now, you’re going to need to install ncdu, and one of the following commands should cover the most popular distros:

Fedora:

Debian/Ubuntu: 

Manjaro/Arch: (Note: Should work, threw PGP error in my testing VM.)

openSUSE/SUSE:

RHEL/CentOS: (Note: Needs epel-release.)

Or whatever… It’s available for any distro I could think of to check, and it’s trivial to install it. If you’ve been following this site long enough, you can figure it out. I have the greatest confidence in your ability to get it installed!

That said and done, all I’m going to teach you is how to use it with no flags or anything of the sort. Yup… I wrote all this just to show you a single use type of ncdu.

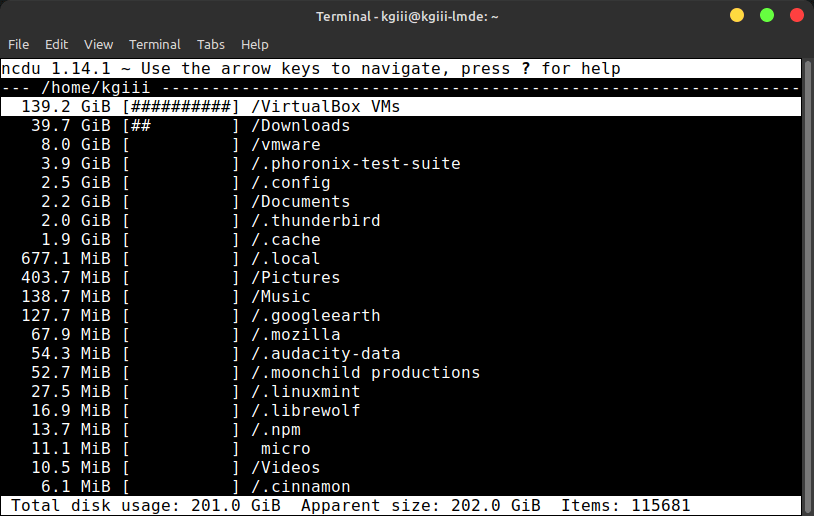
Basically, for the exercise today, all you need to do is change to the directory you’re curious about and then you’ll just run ncdu in that directory. So, as you just opened your terminal and installed ncdu, you can just run it right there in your /home/<user> directory. It looks like this:

If you want to run it on the root of your drive, just navigate to it and run ncdu all over again. Sure, you can specify the directory or you can just be a lazy bum and navigate to the directory and simply run ncdu without any flags at all.

If you run it in your home directory, it’ll just be the files that belong to you. But, you can navigate to any directory and just run the command. In your home folder, it might look a little something like this:

ncdu showing the directories in order of tile size.
See? It should be pretty self explanatory from here on out. Navigation is easy.

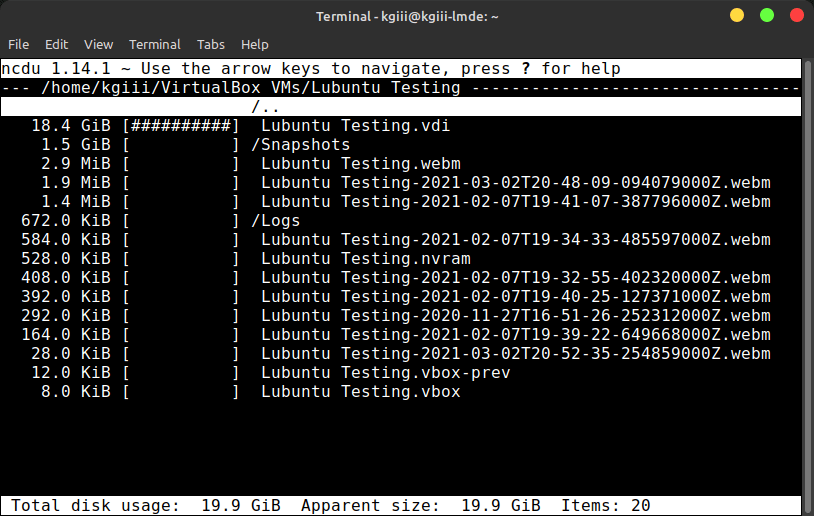
To navigate, you just use your arrow keys. Up and down to pick the directory, forward and backward to enter and exit the directories. For example, when I dig down into my VirtualBox virtual machines directory, I get a screen that’s even more informative. Like this:

ncdu showing the directories in order of tile size.
As you can see, you can dig down quite nicely and find the file sizes.

Anyhow, I’m sure you can figure this out. Use your arrow buttons and explore. Heck, go to the root directory and explore your system until you’re happy and content! Trust me on this one,  you have the capacity to figure this out.

Now, before I go, I’d be remiss in my duties if I didn’t strongly suggest you read the actual man page. There’s a whole lot more to this tool. Using it this way is kinda like using a hammer to bake cookies, or some other horrible analogy. But, it does work. It does give you the information you need. Best of all, it does it without any necessary complexity.

Closure:

And there it is! Yet another article is said and done. This one will show you how to use ncdu in the terminal to find large files. If you’re ever unable to use a GUI, this is an excellent tool to determine file sizes. You never know when you’ll need such a tool.

Thanks for reading! If you want to help, or if the site has helped you, you can donate, register to help, write an article, or buy inexpensive hosting to start your own site. If you scroll down, you can sign up for the newsletter, vote for the article, and comment.
Determine If You’re Using UEFI

Today’s article is going to tell you how to determine if you’re using UEFI or legacy mode. This is particularly useful if you’ve either forgotten. It’s also useful if you’re using a system you don’t know anything about. It’s handy for troubleshooting things like boot issues.

UEFI (Unified Extensible Firmware Interface) is not really a ‘thing’. It’s a set of specifications that determine how the OS interfaces with the operating system. While it does have its advantages, OEMs have been pretty sporadic with the quality of their implementation. UEFI was predated by EFI, which came from a vendor known as IBM. UEFI was predated by BIOS (legacy) and, for now, vendors seem inclined to more or less support both.

Why should you care? Well, it’ll tell you a lot about how you’re booting your system and it says a lot about how your system interacts with the hardware. While tools like boot-repair are able to work with either, you will need to know what type of system you’re working with if you’re doing it manually.

The good news is that it’s easy to figure this out. Even a beginner can figure it out! So, let’s find out if you’re using UEFI.

Are You Using UEFI:

Yup… You need a terminal open. So, let’s do that. All you need to do is press CTRL + ALT + T and your default terminal should open.

Now, the tool we’ll be using is called ‘efibootmgr’. That tool defines itself as:

efibootmgr – manipulate the UEFI Boot Manager

I did some testing and it was installed by default on most of the operating systems I tried it on. If it’s not installed, it’s pretty easy to install. The only time I had to install it manually was with openSUSE Tumbleweed. So, the command for that is:

If it’s not installed on your system, just go ahead and install it. You may need to use apt, dnf, or whatever – but it should be available for your distro. Just install it like you’d install other software from the terminal, suited to your distro’s package manager.

Once it is installed, it’s really, really simple. Just run:

Then, check the output. If you’re not using UEFI, it will say:

If it says anything else, you’re using UEFI. 

See? I told you that it was easy. That’s all you need to know.

Closure:

Yup. Another article said and done. This one is about determining if you’re using UEFI or if you’re not. It’s so simple that even a rank beginner can figure it out. Don’t forget that you can use the comment section to ask questions that’d be suitable for new articles. Sometimes, even with my notes, it’s harder to decide the subject than it is to write the article.

Thanks for reading! If you want to help, or if the site has helped you, you can donate, register to help, write an article, or buy inexpensive hosting to start your own site. If you scroll down, you can sign up for the newsletter, vote for the article, and comment.

Did You Know You Have A Calendar In The Terminal?

You might not know it, but you actually have a calendar in the terminal. It’s surprisingly handy. Though, to be clear, I pretty much only use it when I’m already in the terminal – such as when I’ve used SSH to connect to a remote server.

So, it’s useful (to me) while I’m already in the terminal. The rest of the time, I’m in a GUI desktop environment and there’s a calendar to be had just by mousing over the time. There’s also Thunderbird’s calendar and I use that a great deal. It cal command is of limited value, which is just fine. 

The tool we’ll be using is called ‘cal‘. The cal command is in wide use today and has been with us for, at the time of this writing, more than fifty years. It’s a pretty straightforward command and its longevity speaks towards its usefulness for a subset of Unix/Linux users. It describes itself like:

cal, ncal — displays a calendar and the date of Easter

And it does (sorta) tell you when Easter is – for both western churches and the Orthodox churches. See? It’s already doing what it says on the tin! It only gets better from here!

We won’t really be covering ncal, which is useful if you’re trying to find things like the number for the day of the year. While that might be useful to some, it’s not useful to most and those folks can easily read the man page to learn more about it.

Anyhow, on to the article about the calendar in the terminal!

Calendar In The Terminal:

As you can see, this has to do with the calendar in the terminal, so you’re going to need an open terminal. If you want, you can just press CTRL + ALT + T and your default terminal should open right up. 

With your terminal now open, you can start with the absolute basic command, which will show you a calendar with today’s date highlighted. It’s really easy, it’s just:

If you want to show the last month, this month, and next month, you can do that too. The command to do that is:

If you want to see a month from time past, or in the future, you can do that. The format for that is <mm> <yyyy> and it’s useful for both months past and months future. It looks something like this:

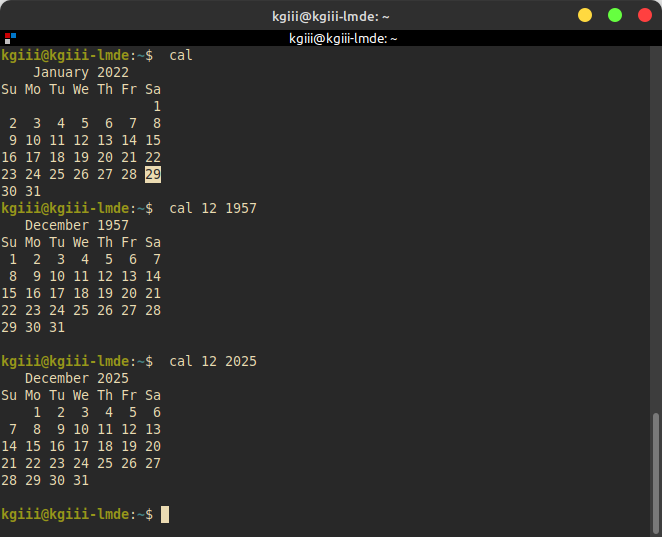
The previous commands (sans cal -3) will give an output similar to this:

cal in action
Well, you don’t need to be a police detective to tell what day it was when I wrote this.

But wait! There’s more! You can show the entire year in the calendar by just using the -y flag. It looks like this:

That command can be modified. To show a different year, it’d look a little something like:

By default, the calendar in your terminal uses the Gregorian calendar. If you want the calendar in your terminal to use the Julian format then you just use the -J flag.

On top of that, it really will tell you when it’s time to celebrate (assuming you do) Easter. For some reason, I can’t get ‘cal’ to show Easter – but you can still make it work. To show it in Gregorian (western churches) format, it’s just ncal -o or for Julian dates you’ll just use ncal -j.

Closure:

See? I told you that you had a calendar in the terminal! It’s not entirely useless and can be useful when you’re full-screening your SSH sessions, or something of that nature. If you regularly work in the terminal, this is a handy tool to add to your toolbox. Most of the time, you’ll probably only need three letters to have a useful calendar appear in your terminal.

Thanks for reading! If you want to help, or if the site has helped you, you can donate, register to help, write an article, or buy inexpensive hosting to start your own site. If you scroll down, you can sign up for the newsletter, vote for the article, and comment.

How To: Create Custom Welcome Message In Your Terminal

In today’s article, we’ll teach you how to create a custom welcome message in your terminal. This could be useful or playful. What you do with this power is entirely up to you. After all, that’s the whole point of ‘custom’!

It’s not terribly difficult and there’s some fun to be had with this exercise. Basically, we’ll be making it so that you get a custom message (including action) that is output whenever you open up a new terminal.

You can make the terminal do all sorts of things by editing your ~/.bashrc file. That’s how we’ll create a custom welcome message in your terminal. It’s not dreadfully difficult but it will help make your system feel like your own and, to some people, that’s one of the greatest things about Linux.

So, how about I show you how I customized my welcome message in the terminal? You can use my example as a brief template to use yourself, when you create your own custom welcome message. It’s something even a new Linux user can do!

Create Custom Welcome Message

The file we’re going to be using for this is .bashrc, located in your home directory. So, the path to that file will be ~/.bashrc. If you don’t know, dot files (those starting with a period) are considered hidden. Unless you’ve opted to do so, these files will not show up in your file manager. We can still access ’em just fine in the terminal, when we use their path.

The tool we’re going to use is ‘nano‘. It’s an acceptable tool for this, and many other things, but you could just as easily substitute a GUI text editor. In this case (so long as you can see the hidden files) you don’t need to edit in the terminal – and you don’t even need to use ‘sudo’ for anything, because the files you’re editing belong to you in the first place!

Let’s get to editing – as it’s easy and I need to show only a couple of commands in order to demonstrate the feature. We’ll do it in nano, of course. That requires an open terminal, so just press CTRL + ALT + T and your default terminal should open.

With your terminal open, enter the following command:

Once that’s open, add the following lines:

Then you’ll save that with nano – which is done by pressing CTRL + X, then Y, and then ENTER. That’ll save the file – but you still need to tell the system how to use it. You need to tell bash to look for the new source and that’s done with:

That reloads the changed file. Close your terminal and open it again to see the new custom welcome message. In this case, it’d look a bit like this:

custom welcome message
See? You now have a custom welcome message in the terminal! Tada!

Obviously, you can customize those two commands, add more commands, and generally craft the custom welcome message you want to see when you open the terminal.

Just remember… You have to save the changes and then you need to reload the changes with source ~/.bashrc in order to make sure they work. You have to save the changes and reload the source with every change. You’ll see the changes when you next open the terminal. The two commands I chose should be self-explanatory, you can use them as an example for the commands you want to use to make your custom welcome message.

Closure:

There you have it, another article said and done! This one shows you how to make a custom welcome message in your terminal. Is this a useful skill? Well, not necessarily – but it is a way to make Linux a little more your own. It’s an easy way to customize Linux. Enjoy!

Thanks for reading! If you want to help, or if the site has helped you, you can donate, register to help, write an article, or buy inexpensive hosting to start your own site. If you scroll down, you can sign up for the newsletter, vote for the article, and comment.

Linux Tips
Creative Commons License
This work is licensed under a Creative Commons Attribution 4.0 International License.