How To: Add A User To A Group

Today’s article is going to teach you how to add a user to a group. It’s not particularly difficult, but it’s something everyone should know. If you don’t know how to add a user to a group, this article is meant for you.

This article is going to make a few assumptions. The first is that you’re familiar with cat /etc/passwd which will tell you what groups a user belongs to. It also assumes that you’re familiar with cat /etc/group – where you can find supplementary information.

Furthermore, you should also be aware of the groups command, which is a handy command, probably worthy of its own article, that lets you know what groups you already belong to. So, there’s a bit you’re expected to know already, or at least be familiar with conceptually, but trust me when I say this is a very simple article and very straightforward.

Anyhow, if you’ve looked at those previous commands, you’ll see there are a lot of groups. Your user may or may not be a member of those groups, as the groups command will let you know. For myriad reasons, you may wish to add yourself or another user to different groups. Well, that’s what this article is actually about. It’s about showing you how to …

Add A User To A Group:

This article requires an open terminal, like many other articles on this site. If you don’t know how to open the terminal, you can do so with your keyboard – just press CTRL + ALT + T and your default terminal should open.

The command we’ll be using for this exercise is ‘usermod‘. You can get a head start by using ‘man usermod‘ but we really won’t be needing most of that information. In reality, we only care about a couple of the flags. Still, usermod is a pretty expansive command, with many options. Still, it defines itself simply as:

usermod – modify a user account

See? Pretty straightforward still. The command we actually want is:

The -a means append (add) the user. The -G means groups – so the -a -G means add a user to a group. You can verify the command worked (though, well, you really don’t need to – ’cause, assuming  you did it properly it’ll work) with the following:

See? That’s it. You’ve learned how to add a user to a group – in under 500 words!

Closure:

Yup, it’s a nice and easy article for a skill you may need as you work with advanced group permissions. If you want to refine the permissions in your system, the sky’s the limit and it’s easy enough to add a user to a group if you need to. So, there’s another tool in your toolbox.

Thanks for reading! If you want to help, or if the site has helped you, you can donate, register to help, write an article, or buy inexpensive hosting to start your own site. If you scroll down, you can sign up for the newsletter, vote for the article, and comment.
Find Your Linux System’s Timezone

This article, telling you how to find your system’s timezone, is more aimed at server users than desktop users. Desktop users probably know this already.

This command is most useful when you’re dealing with servers across the globe. You may want to schedule things (for one small example) to run at local times and knowing the local time will help with that. Knowing the timezone is pretty important, and the timezone itself is important.

The timezone dictates things like when your clocks change to adjust for Daylight Savings Time. While that may not seem like a big deal, having the proper date and time is a big deal. So, this article will tell you a couple of quick and easy ways to find your Linux system’s timezone.

Find Your Linux System’s Timezone:

This is going to need an open terminal. You probably could have guessed that. You can open a terminal with your keyboard – just press CTRL + ALT + T and your default terminal should open.

With your terminal open, you can try one of the following commands (I prefer the first):

The second option is easier to remember, but you don’t get the full name of your timezone. It may require a bit more thinking, just to be sure. Try:

And the timezone will be at the end of that string of characters. If you’re still confused, you can type the abbreviation into your favorite search engine and they’ll get you sorted out.

Thee is a third way, but keeping that way crammed into memory isn’t as easy as the date command. It’s just:

Of course, you can just use ​’timedatectl’ without grep. That’s a viable option, it just spits out more information. So, if you were to remember just one of the commands, the third one is probably the best.

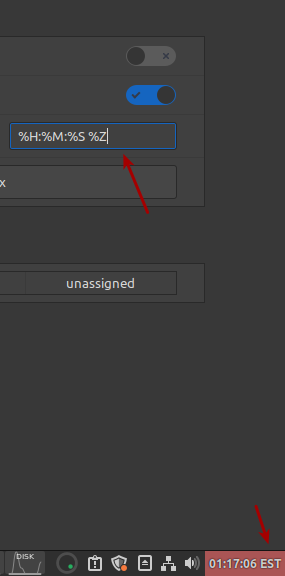
Those are three ways I know of to find the timezone within the Linux terminal. It may show up in the GUI. If you want to add it to your system’s time display, you add %Z to the string (ISO 8601 standardizes this) and it’d look something like this when you changed it and the change took place:

Using the #Z to show the timezone in the system clock.
Tada! That’d be how you’d do that!

So, you can display the timezone in the GUI if you really needed to. But, this article is mainly for those who admin servers across the globe and need to know the timezone the system is in.

Closure:

Woohoo! Another article done and ready to publish. However, I’m going to leave this one unscheduled (scheduled way in the future) so that I have an ’emergency’ article, an article that can be used when Mother Nature has taken out my ‘net or motivation just isn’t there.

Either way, this article covered how to find your timezone in Linux. It’s information you may want, and information you may want to check before rolling out changes. The data is in the system, we just need to pry it out.

Find Out Which Shell You’re Using

Today’s article is going to teach you how to find out which shell you’re using. Knowing which shell you’re using is important if you’re using an unfamiliar system. Most of the time, it’s something you’d already know, but once in a while you might need to find out which shell you’re using.

As you’re visiting this site, it’s fairly safe to assume you’re using Linux (or at least interested in Linux). In that case, you’re quite likely using Bash. Bash is the most common, from my observations.

If you’re curious, Bash is a replacement for Bourne Shell – and is ‘Bourne Again SHell’. It has existed, thanks to the Brian Fox and the GNU Project, since the late eighties. It’s pretty ubiquitous, pretty stable, and pretty feature complete.

While Bash is the most common, it’s certainly not alone in the field of shell options. There are other shells, from ZSH to Fish, or from Dash to Nushell. In some distros, you might find one of them installed by default, but it’s usually going to be Bash.

So, odds are pretty good that you will already know if you’re using something other than Bash. After all, you’d likely have been the person who installed the alternative. Still, there are a couple of commands you can use when you want to figure out which shell you’re using, for when you do need to know.

Find Out Which Shell You’re Using:

This article requires an open terminal, like many other articles on this site. If you don’t know how to open the terminal, you can do so with your keyboard – just press CTRL + ALT + T and your default terminal should open.

On the off-chance that you don’t know what a shell is, Wikipedia describes the shell as:

A Unix shell is a command-line interpreter or shell that provides a command line user interface for Unix-like operating systems. The shell is both an interactive command language and a scripting language, and is used by the operating system to control the execution of the system using shell scripts.

And now, with your terminal emulator open, let’s go about finding out which shell you’re using. 

The first command you can try would be:

You can also use the echo command in a different way. It’s even a bit more clear with this command:

You can also use ‘ps’ which takes snapshots of current processes:

There are certainly other ways to find out which shell you’re using, but those are a few ways that are easy enough. If you have other ways, please feel free to leave them as a comment.

Oh, and here’s a bonus… If you want to see which shells are installed on your system, you can use the following command:

The output of this would look similar to this:

list of installed shells
This is the defaults from Lubuntu 20.04 LTS. Your output may vary, of course.

As I said, that’ll let you know which shells you have installed. In a future article, we might discuss how to change your default shell – but that’s something I seldom bother with these days. Bash works and works well.

Closure:

Yup… There it is! Another article. Now that the year is up, I’m not sure what to look forward to as a goal. I highly doubt I’ll make it a full two years, but it could happen. We shall see…

Thanks for reading! If you want to help, or if the site has helped you, you can donate, register to help, write an article, or buy inexpensive hosting to start your own site. If you scroll down, you can sign up for the newsletter, vote for the article, and comment.
Change Snap Application Privileges In Lubuntu

In today’s article, we’re going to learn how to change Snap application privileges in Lubuntu. With Ubuntu, it’s a bit more straightforward. In Lubuntu, you have to dig around a little bit. Don’t worry, ‘snot hard – it’s just not all that intuitive. 

Snap applications come with their own privileges. This is useful because sometimes you may want to change them, to enable something that was disabled or to disable something that was enabled. I think it’s sorted now, but at one point you even had to change the permissions to let the Firefox browser access removable media.

In Ubuntu it’s pretty straightforward and there are a ton of tutorials already out there that will help you change Snap application privileges. It’s just one of those things that comes with Snaps, so we’ll cover Lubuntu.

I’ve written about Snap applications before, including sharing how to disable Snaps completely. However, the reality is that they’re going to be a part of the Ubuntu ecosystem for the foreseeable future.

Like them or not, they will be a part of Ubuntu and official Ubuntu flavors. I suspect trying to avoid them will get more difficult. With the new Lubuntu, for example, the Firefox browser will come as a Snap application by default.

So, well, even we folks using Lubuntu must come to grips with Snap applications. This can be a pretty painless process, if you’re armed with some information. That’s what this article is meant to do. This article is meant to teach you how to …

Change Snap Application Privileges In Lubuntu:

This is actually pretty easy, but not necessarily intuitive. Unlike many of my articles, you don’t actually have to start with an open terminal. No, you need to start with “Discover”.

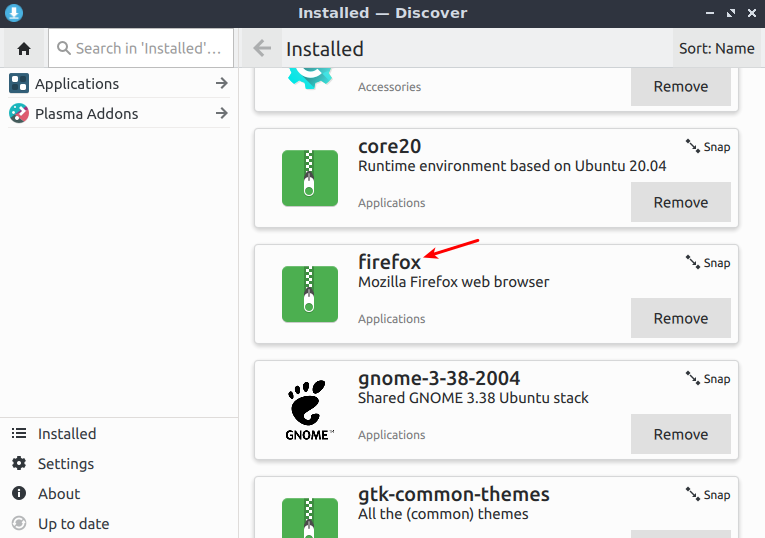
So, crack open your menu, click on System Tools, and then click on Discover. Once you have Discover open, you can use the search or installed option to find the application in question. In this article, I decided to just use Firefox – seeing as we Lubuntu users will be faced with a Snap app Firefox.

When you find the application, you just click on it. It looks like so:

click on Firefox to begin
See? I even started you off with a handy arrow! It’s a recurring theme!

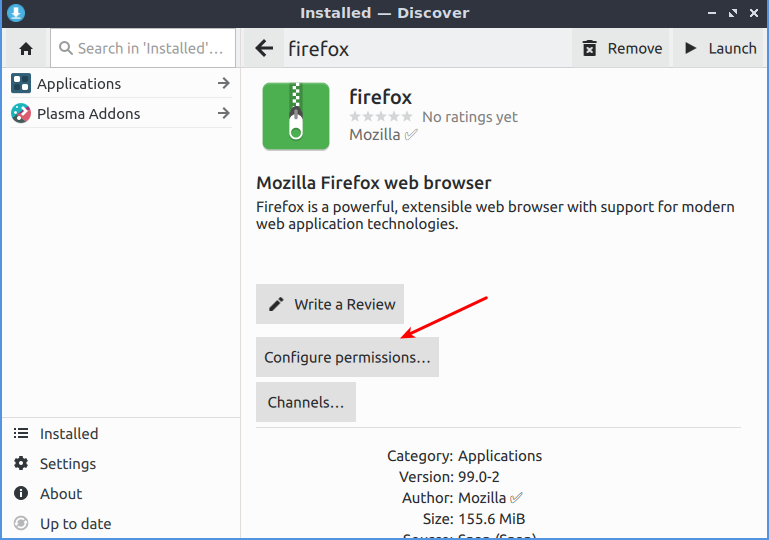
Once you’ve clicked the application, then you just click on the obvious! You just click on “Configure permissions”. That looks like this:

click on permissions to continue
Yup. I gave you another handy arrow – but it should be obvious now.

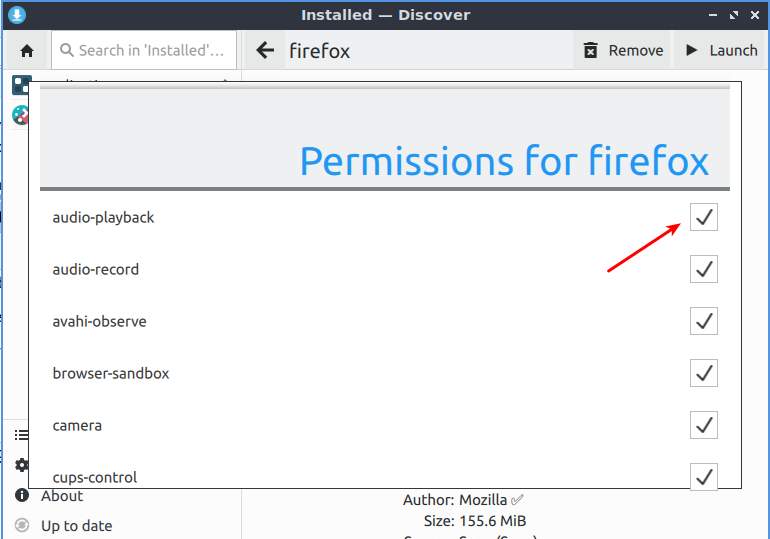
Finally, you can adjust the individual permissions. That looks like this:

finally, adjust your permissions as needed
There are a bunch of settings you can change. Again, you get a handy arrow!

That’s about it, really. The thing is, you have to use Discover. While the Muon application is able to install applications, it doesn’t deal with Snap applications. Only the Discover application has these menus and it’s the only way (at least graphically, by default) for you to adjust the individual Snap application privileges.

So, while it’s not necessarily intuitive – it’s not dreadfully difficult. You just have to know where to look and then it becomes obvious.

Closure:

Guess what? As of tomorrow, a day where no article is scheduled, it will have been a full year that this project has been alive. That’s right! I’ve gone the full year without missing  a single publication date! If I can do it, so can’t you! 

So, am I done? No… No, I don’t think so. I still have articles that need to be written, things that need to be said. I’ve had a great deal of fun, though it has been a lot of work. I’ve learned some, you’ve learned some, and I’d say it’s a net benefit to the Linux community – though I suppose I’m a bit biased. (Feel free to agree with me!)

I may take a few days off. I’m not actually sure. I haven’t decided. I have decided that this can’t be the last article, so there’s that. Which is nice… If nothing else, I’ll see you again in a few days. I might enjoy taking a break. Then again, I kinda suck at taking breaks. I truly suck at retirement.

Thanks for reading! If you want to help, or if the site has helped you, you can donate, register to help, write an article, or buy inexpensive hosting to start your own site. If you scroll down, you can sign up for the newsletter, vote for the article, and comment.
Install The Snap Version of Chromium

Today’s article will teach you how to install the Snap version of Chromium – the opensource browser from Google. It’s akin to Chrome, but without all the proprietary bits and bobs. This isn’t a difficult article to follow, but may have some information that was easy to miss along the way.

Chromium is also the source for many other browsers, from Brave to Opera, they’re all Chromium underneath – including the Edge browser from Microsoft.

You’ll find things like syncing your passwords and history isn’t really possible with Chromium’s default configuration. Those bits are proprietary, and Google doesn’t want third parties using their resources, so those bits have been disabled for some time now.

However, it’s still very much a usable browser – and I’d know that sorta thing. After all, I’ve made it pretty clear that I’ll try any browser at least once! I’m often checking out the browser market and trying new browsers. With that, I can say that Chromium is generally easy to work with, has the features I use, has great support, and has a ton of available extensions.

Snap Version?

Snap? Yes, this article is about installing the Snap version of Chromium. I actually wrote an article about how to install the non-Snap version. (It was a horrible article written while I was very ill – I need to go back and edit it.)

Snaps are Ubuntu’s (will work on most every distro, with a little effort) ‘new’ package management system. It’s meant to be easier for both you and the developer, as the developer needs to only package one version. As for it being easier for you, it’s meant to avoid needing dependencies and does things like run in a secure container. It has some differences to, and some similarities with, both AppImages and Flatpaks

Snaps are happening. If you don’t like them, you’re going to have to put some effort into not using them – if you want to use Ubuntu and official Ubuntu flavors. Mint is an exception – currently. We’ll see how long they hold out and which side of history they end up on. Still, if you want to use Ubuntu, you might as well adjust and start using Snaps.

In fact, in Lubuntu 22.04, you’ll find that Firefox defaults to a Snap version. That’ll likely be mentioned in the release notes that nobody ever reads, so, we’ll have to see how folks deal with that change. I wonder how many won’t even notice the change?

Yes, there are complaints about Snap applications – some of them even valid complaints. It doesn’t matter. This is the direction Ubuntu is going and there’s no stopping them. I will link to this page again, just to show you how easy they are to use. You might as well jump on the train, ’cause the destination is set for Ubuntu’s locomotive. 

On a personal level, I don’t really mind them. They’re a bit wonky when compared with traditional repositories or PPAs. They do things like save the previous version, so that you still have access to the application if the newer version is buggy. They also take up more space, as one would expect if dependencies are included with each Snap. Indeed, they even take longer to load. Much of that is mitigated by having more modern hardware or being just a little patience – they don’t take all that long to load, after all. They also have some pretty great features.

So, yeah… This article is about a Snap application – specifically Chromium. It’s not terribly complicated – but there’s a second step that many don’t realize and I want to bring attention to that step.

Install The Snap Version of Chromium:

This article requires an open terminal, like many other articles on this site. If you don’t know how to open the terminal, you can do so with your keyboard – just press CTRL + ALT + T and your default terminal should open.

Once you have your default terminal emulator open, you can just install Chromium with the following:

That’s all well and good, but it’s actually just a limited version of Chromium. Perhaps for licensing reasons, I’m not actually sure, you’re probably not done at this point. Well, many people will not be done at this point.

If you, like those many people, want to play things like proprietary media (i.e. DRM encumbered media like Netflix) you actually have to install another package. This step isn’t really all that clear and you’re kinda left blind to figure it out for yourself. Hopefully this makes it a bit more clear for those seeking information about installing the Snap version of Chromium.

Again, it’s not hard. This is not a difficult article to follow. It’s just that it’s not all that clear. You next need to install chromium-ffmpeg. Your regularly installed ffmpeg is not adequate, you need a Chromium specific version. The command is pretty logical, once you know that you need it.

And, that’s actually all you should need to do. Having done that, you can restart your browser and you should be able to use DRM-protected music and video. Yes, you should be able to use Netflix – but not Peacock, ’cause they’re just jackasses.

Closure:

See? I told you that it wasn’t that difficult to install the Snap version of Chromium. It shouldn’t take you more than a few minutes before you’re watching videos and listening to the music. We can argue the merits of DRM some other time, but this is not the article for that.

Well, I mean, you can offer opinions in the comments and feedback, but no amount of opinion will stop me from telling folks how to do this. If they want to consume DRM-encumbered media, they are free to do so, and this is one way of doing so. No amount of opinions offered will sway Ubuntu from this course.

Thanks for reading! If you want to help, or if the site has helped you, you can donate, register to help, write an article, or buy inexpensive hosting to start your own site. If you scroll down, you can sign up for the newsletter, vote for the article, and comment.
Linux Tips
Creative Commons License
This work is licensed under a Creative Commons Attribution 4.0 International License.