I have not done a meta article lately. I don’t find them interesting to write even though people seem to show some interest in them. They’re a pain to write and I can write a regular article easier than a meta article.
After all, my normal meta article is just updating you on how much traffic the site gets and how much bandwidth the site uses. I also tend to toss in some stats about where the traffic comes from and what that traffic looks like.
That’s not all that fun and can be a pain to write.
So, let’s get that out of the way…
February wasn’t as great but January was awesome. Last month saw a new level reached – where this site averaged more than 1000 visitors per day.
Yup… There are a lot of you these days…
I guess the next major threshold will be when I get 1000 unique visitors in a month. Quite a few of you visit more than once, those are the ‘visits’ in the chart. The unique visitors are just that, how many unique people visit the site.
Sure enough, my traffic still comes from Google – even though I no longer use AdSense. As far as search traffic, the next two most popular search engines (for this site) are DuckDuckGo and StartPage.
The most popular operating systems are Linux, MacOS, and Windows. I suppose that makes some sense. Some of what’s on this site applies to MacOS as they’re a POSIX-compliant operating system.
The most popular browsers are Chrome (and those that identify as Chrome), Unknown, and Safari. Firefox isn’t well represented here. They’re 4th on the list with about 19% of my traffic.
My legitimate traffic comes from the United States, Germany, and the United Kingdom. China and Russia are in the stats, but they’re mostly bots. Finding accurate stats to pick between them can be difficult. So, the above is about what I can figure out.
Yeah, I regularly consume 50+ GB of traffic per month. Considering the site is pretty much pure text, that’s a lot of writing. There are millions of words on the site now and I’m still not out of ideas.
Anniversary!
This is our third anniversary! Three years!!! Whodathunkit?
I’ve had some guest articles along the way (and at least another one coming when I can schedule it). Most of the articles, 99.999% at least, have been written by me.
We don’t get a lot of donations but we get a couple here and there. That helps cover the costs, plus people can now advertise here on the site. That’s helpful. I do love my CDN though it (and hosting) are expenses.
This has taken a whole lot of my time. I value my time, but I guess I also value the site. Otherwise, I’d have stopped publishing articles. One of these days I’ll quit but I plan on keeping up with the schedule for the time being.
That schedule? Well, you get a new article every other day. Most of those articles don’t contain any major errors, which is nice. I can’t be perfect all of the time, but I do my best. You’re welcome.
I’m working my way towards a million visits. That’s nice.
Once upon a time, I was stoked to see 20 visits in a day. So, I guess I’ve built something here. Pardon me, but I’m a wee bit proud of my accomplishment. It has come a long way.
As such, I’m just going to keep this short.
Thank you. Thank you for your readership and encouragement. Here’s to another year. I think I’ve got another year of this in me. We’ll have to see. I’m bound to miss a day eventually, but this is three years without doing so (technically).
Closure:
That’s all, folks. I appreciate you.
Thanks for reading! If you want to help, or if the site has helped you, you can donate, register to help, write an article, or buy inexpensive hosting to start your site. If you scroll down, you can sign up for the newsletter, vote for the article, and comment.
This is not something everyone is interested in doing but you might as well learn how to disable CPU cores. This is something that’s easily done and easily reversed, so you might as well have an article on the subject.
Why would you do this? Well, maybe you have a low-power project and want to save energy. You may have more CPU horsepower than you need and you prioritize energy use. This might even be something you do to increase the battery life in your mobile devices. Maybe you want to lower the heat output from your CPUs.
There are valid reasons why you might want to disable CPU cores.
It’s just that this isn’t going to apply to most of you. I’d say that 99% of you aren’t going to want to disable your CPU cores.
What are cores? Well, you probably have one single CPU chip in your computer. That computer is then probably broken down into multiple cores. Each core looks like a single CPU to the hardware and operating system.
Of course, each core may also have multiple threads. Threads would also represent themselves as individual cores. If you disable a CPU core, you’ll also disable the threads on that core, if you use a multi-threaded CPU.
NOTE: Moden CPUs may have high-power and low-power CPUs. I have no clue which will be disabled if you follow this article. I don’t have a fancy CPU to test with. You can test and let us know the results! It’s easily reversed. You can add your cores back with no problems.
GRUB:
GRUB is the application we’ll be playing with. I should also mention that GRUB stands for Grand Unified Bootloader and is the default bootloader for most Linux distributions.
GRUB controls how your system boots and GRUB can also give you the option of which operating system to boot if you use a multi-boot system. It’s one of those things that you can modify pretty heavily. You can even modify your boot screen’s appearance when you’re using GRUB.
Trying to access the GRUB man page is interesting. It isn’t your traditional man page and isn’t accessed in the same way. If you want to check the man page, you use this command:
1
info grub
If you run that command you’ll see what looks like an index page. That’s because it is an index page. Use your arrow keys to navigate and use the enter button to open a category page. It’s pretty simple to navigate but there’s a whole lot of information there.
If you’re a newbie, you might just want to look and see that info page. Trying any of that out may result in a system you can’t boot. You have been warned. Tinkering blindly with GRUB will eventually break your system unless you know what you’re doing. Not even I understand everything – but that’s true about a lot of things.
This article assumes that you have GRUB and Nano installed.
So, now that you know what we’ll be using, let’s get into the article!
Disable CPU Cores:
If you didn’t figure it out from the ‘Nano’ mentioned above, this is one of those things you do in the terminal. More often than not, you can open a terminal by pressing CTRL + ALT + T on your keyboard. If that doesn’t work, look in your application menu to find your terminal and open it.
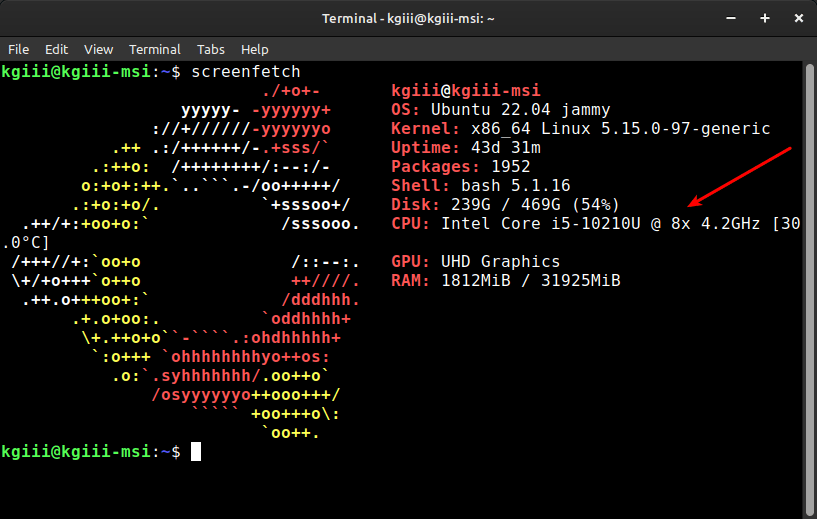
Next, you need to know how many CPUs you have. You should probably already have that information. If you don’t have that information, you can use something like ScreenFetch to find that information. (I used lscpu to find my information, but I’m trying to keep it simple for you.)
Just run this command (once you’ve installed ScreenFetch):
1
screenfetch
The output should tell you how many cores you have available. Like so:
This should be easy enough for anyone to figure out! You can find this information easily.
The Exercise Itself:
Now that you know how many cores you have, you can modify GRUB.
As you saw above, this system has 8 CPUs listed. Let’s say I wanted to cut that in half, perhaps to save battery life while I’m on a trip and not doing any computationally heavy tasks. I’d change that line to match this:
Now that you’ve made the edit, you need to save the file. As you’re using Nano for this, you save files by pressing CTRL + X, then Y, and then ENTER.
The next step is to update GRUB, telling GRUB to reconfigure itself because you’ve changed some of the information. This step is essential but simple.
1
sudo update-grub
Next, you reboot the system for the changes to take effect:
1
sudo reboot
When you next open your system, run
screenfetch again to confirm that you’re using fewer cores and that you’re using the number of cores you specified.
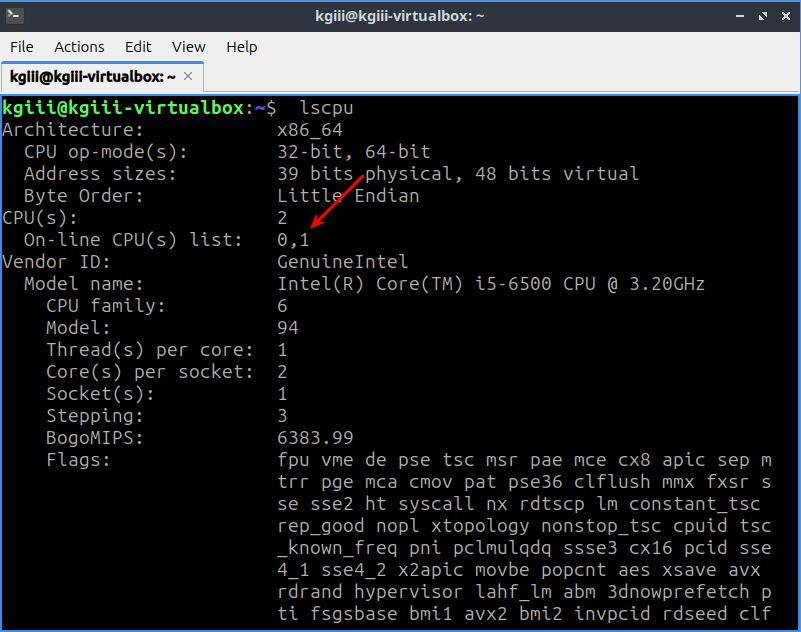
I did this in a virtual machine with 2 CPUs. This was done to confirm that it works and to provide you with some screenshots. When I did so, I did so with lscpu and not ScreenFetch. I hadn’t thought of ScreenFetch and I’d already taken the screenshots. So, that’s what you get.
The Results:
The original configuration:
As you can see, there are two cores in this instance. Core 0 and Core 1.
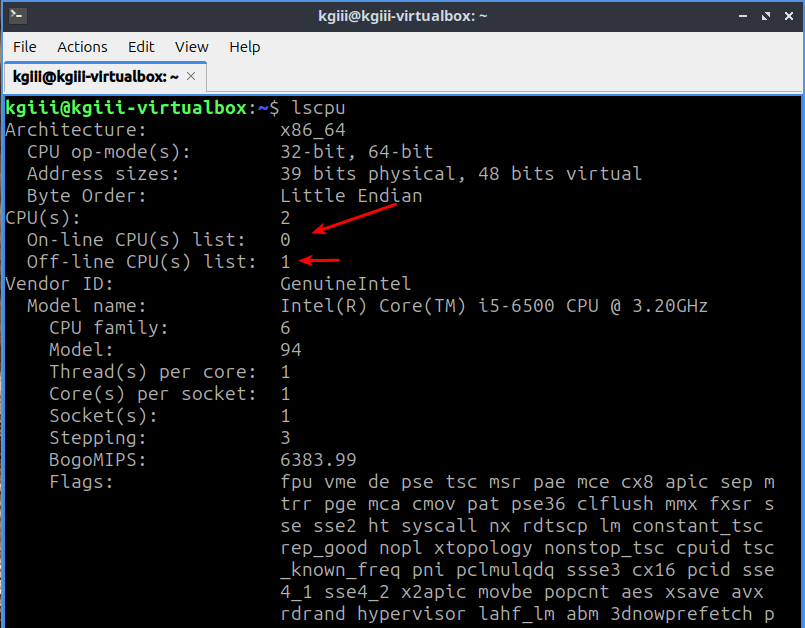
After the change:
Sure enough, there are now fewer cores in use than there were before. It’s just core 0.
As you can see from the screenshots (again, taken in a virtual machine), it’s easy enough to disable CPU cores in Linux. Well, assuming you’re using GRUB… I’m sure it’s possible with other bootloaders but I don’t have any real experience with them in the memorable past. I’ve used GRUB, more or less exclusively, for quite some time.
If you want to undo this change, or if you want to change the CPU cores to some other number, just remove or edit the added text. If you do that, be sure to run
sudo update-grub again to ensure that your changes take effect. If you don’t remember to do that, any changes made will be lost. So, it’s important to update GRUB when you’ve changed any of the information – not just this information.
Closure:
Well, I’m not sure how many Linux users are going to want to change their CPU cores to a lower value. It was in my notes and seemed like a fine article to share with you. I can see doing this in a few instances, such as when you want to save power. Of course, modern operating systems are pretty good at saving power on their own, but it’s still something one might consider.
If you have any other reasons as to why one might want to disable CPU cores, leave a comment. I’m a bit curious. I’d probably do it if I needed longer battery life while on the road or something. I don’t do too many computationally heavy tasks these days. So, I could get away with it on some systems.
Also, this is from my notes. My notes predate the modern CPUs. Quite literally, I have no idea how this will work on systems that have cores that are different, such as high-power and low-power cores. Feel free to test and let me know what you learn. Again, leave a comment. I promise I won’t share your information with anyone and I’ll never send you an email you didn’t ask for.
Thanks for reading! If you want to help, or if the site has helped you, you can donate, register to help, write an article, or buy inexpensive hosting to start your site. If you scroll down, you can sign up for the newsletter, vote for the article, and comment.
Seeing as you’re here, why not visit our friends at Blunix?
“Blunix GmbH offers Debian and Ubuntu focussed Linux Emergency Support 24/7, Project-based Linux Consulting, FOSS-based Managed Hosting on your company IaaS provider account as well as custom Training and Workshops. We prioritize fair business partnerships and employee quality of life over profit. We focus on reasonable security by default and encourage your employees and developers to keep things secure enough to avoid 99% of security issues with automated attack vectors. We focus exclusively on this and do partner with other companies to refer customers that do not fit exactly what we do, or where we require additional help (for example we have a security-focused company that we partner with for higher risk factor hosting setups).”
Today we’ll have a relatively simple set of commands that will show you how to view some system logs in the terminal. We’re only going to cover a few of them that are similar in operation. There are far more things that get logged.
You generate logs as you use your computer. These will vary and there are quite a few logs kept. Logs aren’t just kept by the system. Some third-party applications create logs. We’ll only be covering a few system logs. I just want to keep things simple.
The tool we’re using for this exercise is the cat command. The cat application is one tool that lets you read text files in the terminal. It’s a frequently used tool at my house. Hopefully, you too will get comfortable using this command at your house.
It seems like that should be enough of an intro. If you have any questions, you can always leave a comment. Those get seen and addressed more quickly than when you try to contact me elsewhere. (Comments almost instantly send a notification to whatever computer I’m using. They’ll even ping my phone if I turn the notification sound on.)
Anyhow… Ask away, should you have any questions…
View Some System Logs In The Terminal:
We’ll be viewing a few different types of logs. As mentioned above and in the heading, this is something we do in the terminal. You can usually open a terminal by pressing CTRL + ALT + T. If that doesn’t work, you’ll almost certainly find a terminal in your application menu.
First, we’ll view the kernel log.
The kernel is the actual “Linux” in your Linux. The kernel deals with task scheduling, and running processes as needed. It’s an abstraction between you and the hardware.
If you want to view the current kernel log, use this command:
1
cat /var/auth/kern.log
If you want to view the previous session’s kernel logs, use this command:
1
cat /var/log/kern.log.1
Both of those commands will flood your terminal. That’s okay, you can use the pipe operator and the less command like so:
1
cat /var/log/kern.log | less
Next, we’ll view the boot log.
When you boot your computer, the computer keeps track of what happens during that process. This is known as the boot log. It can be exceptionally handy when you have a problem booting.
If you want to check the current boot log, use this command:
1
cat /var/log/boot.log
If you want to check the previous boot log, check it with this command:
1
cat /var/log/boot.log.1
Again, you can use a pipe and the less command to manage the flow of data.
1
cat /var/log/boot.log | less
Next, we’ll view the system log.
The system logs all sorts of additional information. If you’re not finding the information you want in the previous two logs, checking the system log is prudent. The system logs all sorts of things that are useful for resolving problems.
If you want to check the current system log, use this command:
1
cat /var/log/syslog
If you want to check the previous system log, run this command:
1
cat /var/log/syslog.1
Don’t forget that you can use a pipe and less in this command. This will give you a slower output you can manage with your arrow keys.
1
cat /var/log/syslog | less
And that will show you your system log.
That’s all it takes to view the major system logs. There are other logs and we’ll have to cover them at some point.
Closure:
Well, this didn’t take too many words or too much time… That’s nice. If you want to start troubleshooting your own problems, learn to read the system logs. If you don’t want to ask for help, learn to read the system logs. Well, that and learn to read the man pages, but that last bit is outside the scope of this article.
I do hope you enjoyed this article. They’re fun to write but it does sometimes feel like work. I never wanted this to feel like it was work, but here we are. It probably would have been wiser to not set such a schedule and to allow some vacation time in there. This whole project started when I had far more time due to the pandemic.
We do have a special day coming up… You’ll see!
Thanks for reading! If you want to help, or if the site has helped you, you can donate, register to help, write an article, or buy inexpensive hosting to start your site. If you scroll down, you can sign up for the newsletter, vote for the article, and comment.
Today’s article should be a fairly short article, where I take the chance to show you how to move a file to multiple directories – at the same time. It’s a pretty simple process, albeit a bit weird. If you want to move files to multiple directories, this is the article for you!
I’ve done a lot of articles about file management. This is another one. We usually manage files in the terminal here on Linux Tips. We’ll be doing that again this time around. We’ll be managing files in the terminal!
The tool we’ll be using is the tee command. I covered that recently.
The task we’ll be doing is showing you how to move a file to multiple directories – at the same time and in the Linux terminal. It’s a pretty handy skill to have, though there’s some tee weirdness along the way.
Move A File To Multiple Directories:
You’ll need an open terminal for this, as the intro suggested. You can find a terminal application in your GUI file manager. You can often open your default terminal by pressing CTRL + ALT + T on your keyboard.
With your terminal open, let’s just run through some exercises to ensure we’re all on the same page and ready to move a file.
First, let’s make a directory:
1
mkdir temp
Next, let’s move to that directory:
1
cd temp
Next, let’s make that file that we’ll copy to multiple directories:
1
touch foo
I suppose we’ll need a few folders next, so let’s create them:
1
mkdir one two three
Now, let’s move the file foo to multiple directories:
1
tee ./one/foo ./two/foo ./three/foo &
The syntax is:
1
tee <directory>/<file_name> <directory>/<file_name> <directory>/<file_name> &
We throw the
& in so that the tee command doesn’t hang, awaiting further input. You’ll get an extra message or two, but that’s fine and can be ignored.
Now, we can verify them:
1
cd one
The following command will show you that the file exists:
1
ls
That should show the file, like so:
1
2
$ ls
foo
Now, you can check the other folders.
1
cd ../two && ls
And, of course:
1
cd ../three && ls
Each of those should show you that the foo file exists in each directory.
Now, we can clean up after ourselves with this command:
1
cd ../.. && rm -rf temp
Tada! Now there shouldn’t be any remains left behind and we’ve covered how to move a file to multiple directories at the same time and in the Linux terminal.
Pretty easy and pretty short!
Closure:
You never know when you’ll want to move a file to multiple directories but now you know how to do so. It isn’t a very difficult exercise, warranting only a short article. This seemed like good fodder for a short article and a handy tip to share with my readers.
Thanks for reading! If you want to help, or if the site has helped you, you can donate, register to help, write an article, or buy inexpensive hosting to start your site. If you scroll down, you can sign up for the newsletter, vote for the article, and comment.
Yes, this is another PDF article, but this time it involves a bit of privacy or security because there’s such a thing as PDF Exif data. This shouldn’t take all that long and it shouldn’t be all that complicated.
Files have Exif data. Well, many files do. You’ll find Exif data in your image files, document files, and even PDF files.
Exif data is metadata. It can contain information about when the file was created, how it was created, and when it was modified, among other things. This is useful data but you may still want to know it exists. Additionally, you may want to change it.
I’ve covered Exif data in the past. Exif stands for Exchangeable image file format and is used in many different ways.
So, this isn’t a foreign concept. There are other Exif data articles, but this one is specifically for PDF files. We will need some software for this and that software is ‘ExifTool’…
ExifTool:
The tool we’ll be using in this article is known as ‘ExifTool’ and it’s a widely available application. The ExifTool application is used to view the metadata from a wide variety of file types.
If you check the man page, it should describe ExifTool as such:
exiftool – Read and write meta information in files
You should check the man page once you have ExifTool installed. You do that with the following command:
1
man exiftool
The list of things ExifTool works with is why you should check the man page. It’s rather extensive and it may surprise you how much metadata is kept in a file. It’s a lot and this is the correct tool for the job.
Let’s see if I can fit the man page into this article to show you how many file types contain meta information that you may not be aware of…
1
2
3
4
5
6
7
8
9
10
11
12
13
14
15
16
17
18
19
20
21
22
23
24
25
26
27
28
29
30
31
32
33
34
35
36
37
38
39
40
41
42
43
44
45
46
47
Below is a list of file types and meta information formats currently
supported by ExifTool (r = read, w = write, c = create):
That’s not as well-formatted as I’d like, but it will have to do. It’s a lot of information and I’m not going to invest more effort than I have already invested in this. It’s just a code block, which should work well enough.
So, ExifTool is quite extensive and we only need it for PDF Exif Data!
Seriously, this is quite a tool. It’s something you may want to be familiar with.
PDF Exif Data:
This ExifTool is a terminal-based application. That means you’re going to need an open terminal and a PDF file to work with. You can start by pressing CTRL + ALT + T to open your terminal.
You’ll need to install ExifTool. The command will vary based on your distribution’s package manager. It should be available for the major distros and I’ll cover some of those installation instructions.
Debian/Ubuntu/etc:
1
sudo apt install libimage-exiftool-perl
RHEL/CentOS/etc:
1
sudo dnf install perl-Image-ExifTool
Arch/Manjaro/etc:
1
sudo pacman -S perl-image-exiftool
You can also use your GUI package installation tools to install ExifTool. If the above commands don’t work for you, be sure to leave a comment.
You can download a test PDF: stacer.pdf (which may indicate a future article.)
If you’ve downloaded that file, you need to navigate to the correct directory. Unless you changed something, you likely default to the ~/Downloads directory. You can navigate to that directory with
cd ~/Downloads and then use the
ls command to ensure the
stacer.pdf file exists.
There’s quite a bit of information available and that file doesn’t even have all the information that can be found in your PDF’s metadata.
This PDF isn’t a good one, but you can at least change the title. You can blank the title with this command:
1
exiftool -Title="New Title" stacer.pdf
You can blank the title with this command:
1
exiftool -Title stacer.pdf
Other PDF documents will contain other fields. You can wipe all the fields, resetting the creation and modification times, with this command:
1
exiftool -all <file_name>.pdf
If you’re interested in changing that for privacy reasons, that’s a nice and simple command that will reset all of that metadata. It’s a pretty handy command and ExifTool is a pretty handy tool.
Closure:
So, there’s some ExifTool information and some information about PDF Exif data. That seems like a reasonable article. A new Linux user may be interested in PDF Exif data and this should make it simple enough for anyone to follow along with. You should read the man page because this is an expansive application.
Thanks for reading! If you want to help, or if the site has helped you, you can donate, register to help, write an article, or buy inexpensive hosting to start your site. If you scroll down, you can sign up for the newsletter, vote for the article, and comment.