Set A Timeout Value In cURL

Today we’re going to discuss a topic you probably won’t ever need but is worth knowing, we’re going to set a timeout value in cURL. We’re telling the cURL application to quit trying if it takes too long. I suppose it is something worth knowing, so we might as well learn it.

How often do you need this? Well, that depends on you and your workflow. Me? Well, let’s just say that it’s in my notes. I’m not sure that I’ve ever actually used it productively, but it is in my notes. Now? Well, now it’s in your notes! Or, at least it’s here and searchable should you ever actually need to set a timeout value in cURL.

So, what is cURL? I’ve written about it before (some links to follow) but it’s a tool to transfer a URL. That’s exactly what the man page says. Specifically, it says:

If you want to see what the HTML looks like for this site, you can run this:

(That’s not particularly helpful, but you can do it.)

I mentioned that I’d written about cURL before and it may be of some benefit to read these articles (or at least skim them) if you’re unfamiliar with the cURL application.

Let’s Have a Limited Look at Linux’s cURL Application
How To: Make ‘curl’ Ignore Certificate Errors
How To: Add A New Line With CURL

You can see a couple of useful applications of cURL:

Weather In The Terminal? We can do that!
How To: Find Your IP Address Through Your Terminal

See? So, cURL has some use – even for a regular desktop user. If any of those things take too long, you can set a timeout value for cURL, which is what this article is all about.

Set A Timeout Value In cURL:

cURL is a terminal-based tool. Sure, some GUI applications use it in the background, but it’s a terminal tool. As such, you are going to need a terminal available. You should be able to press CTRL + ALT + T to access a terminal. If not, open one from your application menu.

With your terminal open, the syntax for setting one of the timeout values in cURL is pretty basic and easy to understand. Try this:

The time_limit value is in seconds. If you wanted to load the content of this site’s home page and set a timeout value of 10 seconds, you’d run this command:

(Again, not very useful.)

But, that timeout value is just for time-to-first-byte. So, the server will need to respond within 10 seconds else the cURL process will shut down.

There’s another timeout value for cURL. You can set the overall time limit, that is the entire process (including transferring of data) must be completed within that timeframe. If it isn’t, the cURL process will shut itself down. The syntax for that time of timeout value would be like so:

So, if you wanted to make sure the entire transfer of data was done in under 60 seconds, your command would look like this:

(Again, not very useful – but it should certainly take less than 60 seconds!)

I suppose you might find some of this useful if you’re cURLing files more weighty than a web page. You can cURL actual files and write that data to your terminal’s standard output. That’s what cURL does, after all. So, you might find a use for this command.

Closure:

Well, this wasn’t a very long article. It doesn’t cover a great deal and probably won’t be useful to 99 out of 100 people. That’s okay. Not all of my articles are meant for the 99% and sometimes you just gotta write what you feel like writing. This is what I felt like writing. It probably won’t do well for search engine results and that’s okay. Someday, somebody will want this information, type it into Google, and find this site. Or another one just like it, I suppose…

Thanks for reading! If you want to help, or if the site has helped you, you can donate, register to help, write an article, or buy inexpensive hosting to start your site. If you scroll down, you can sign up for the newsletter, vote for the article, and comment.
Temporarily Set A Static IP Address

Today we’ll have a fairly simple article that may not generate much interest as we’re just learning how to temporarily set a static IP address. This isn’t all that difficult, as I’ll just show you the syntax, but it’s something you might find worth knowing. So, if you’re interested in learning how to temporarily set a static IP address, read on!

What is an IP address?

If you have to ask that question, this article isn’t one that you need to try. You can, it’s just usually something reserved for specific circumstances.

Every networked computer is assigned a numerical IP address. You may have more than one address, including a public and a private IP address. It’s possible to have an IP address on multiple network interfaces, but every connected computer has an IP address. That’s what we use for the web – you just don’t see it as we use domain names that get resolved to IP addresses.

Some links you should read:

How To: Find Your IP Address Through Your Terminal
Find Your Network Interface Name
A Couple More Ways To Find Your Network Interfaces

Those articles aren’t all on the same subject, but they’re articles where I discuss things like IP addresses and DNS. If you’re new to this, you should read the first link, about how to find your IP address. 

The IP address we’re concerned with is our private IP address. This is different than our public IP address and is used on your local network. It’s the address your router sends data, for example. If you remotely control devices on your network, that IP address is what goes on behind the scenes as it denotes the device.

Each private IP address will almost certainly resolve to just one device. This is not true everywhere. One IP address can have many websites and some ISPs are doing IP address subnets for public IP addresses because they’ve run out of IPv4 IP addresses. You needn’t concern yourself with that and that’s just for some random information.

So, the IP address we’ll be setting as a static IP address will be your internal, that is private, IP address. I sometimes do this when I don’t want to have to hunt around for an IP address and device.local isn’t working.

This will only be a temporary change. When you reboot your computer, you may have an entirely different IP address. I don’t want to add complexity, but some routers may already assign a device the same IP address every time it sees it. While this isn’t a static IP address per se, it’s effectively the same.

We’ll be setting that private IP address locally, establishing it on the computer itself. Any modern router should handle the change just fine. However, this may prove problematic for those who have equipment that strays from normal behavior. If that’s the case for you, either reboot or just change your IP address back to what it was originally and everything should be good. However, I can’t see this being a problem, because your original IP address will still work just fine.

Got all that figured out? Well, good! Let’s jump into the article!

Temporarily Set A Static IP Address:

Yes, you’re going to need an open terminal for this. There might be a way to do this with a GUI, but I’ve never tried it. Route around in your network manager and there might be a way. Specifically, check for DHCP and see if there’s a way to change that to a manually configured IP address. It might be the ticket. I’m seeing something similar to that in my network manager, but I haven’t tested it.

Anyhow, as you’re going to need an open terminal, you can probably just press CTRL + ALT + T to open your default terminal. If that doesn’t work, just open it from the application menu. You’ll probably find a terminal application listed under your administration (or system) tools. That’s a good spot to start looking.

With your terminal now open, we need to find the name of your network interface. I shared a link in the opening section, but the command is just this (assuming you’re using a modern distro):

Your network interface names will look something like enp2s0 (for an ethernet/wired connection) or maybe something like wlxe4beed0e5f5c for a wireless network interface. You can assume ‘en’ is ethernet and ‘we’ is wireless. That seems to be fairly consistent. 

Now, while you’re there, you need to determine your IP address, specifically your private IP address. This may look something like this:

That’s the number you’re going to change.

NOTE: Unless otherwise noted, you want to stick to Class C private network addresses. These are addresses reserved for your private networking and are 192.168.0.0 to 192.168.255.255.

So, let’s say your private IP address is indeed 192.168.1.4 and you want to change it to 192.168.1.42 (because 42 is indeed the answer). You can do that. The syntax needed to temporarily set a static IP address is as follows:

So, it’d look like this:

Next, you verify that it worked:

What this does is it adds a static IP address. Your original IP address will still work, but you’ll have designated and set a static IP address that will also work.

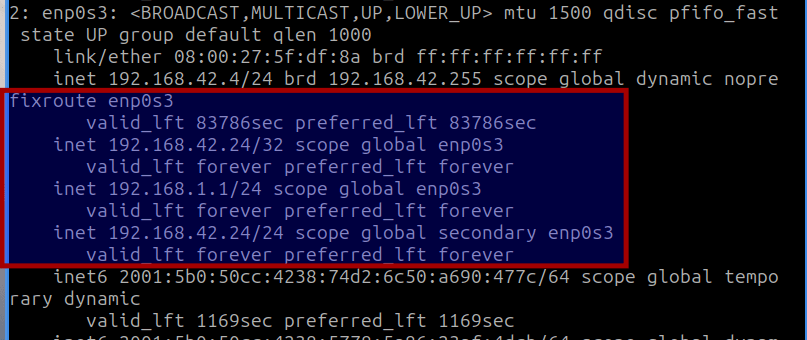
You can add all sorts of static IP addresses by this means. If you run the ip addr command again, you’ll see that the static IP address has been added under the fixroute <network_interface_name> heading.

For example, see this image:

setting a static ip address
Any and all of those private IP addresses will now work and remain static.

You can just reset it to the same original IP address but you shouldn’t need to. This shouldn’t break anything because the original IP address remains the same and remains usable. You can connect to that computer with any one of those private IP addresses, each of them a static IP address.

It’s possible to make this change a permanent thing, which might make an interesting future article. I don’t think anyone will find it complicated. These things are easier to do than they are to explain. I spent more time with the verbiage than anything else. It’s hard to include all that you need to know because I don’t know what you know. 

Closure:

Well, there’s another article. If you’ve ever wondered how to set a static IP address, this is the answer. It’s not complicated. Anyone should be able to figure it out, using the syntax above. I hope that I’ve made it clear. Sometimes it’s not all that easy to explain stuff in plain English without going too deep.

Thanks for reading! If you want to help, or if the site has helped you, you can donate, register to help, write an article, or buy inexpensive hosting to start your site. If you scroll down, you can sign up for the newsletter, vote for the article, and comment.

How To: Boot An SSH User

Today’s article will be pretty simple, though it will have a limited scope, as we discuss how to boot an SSH user. The vast majority of my regular readers are ‘simple’ desktop users. This article shouldn’t apply to them; if it does, something may have gone terribly wrong.

I need to point out that if you’re doing this for security reasons, you’ve done something wrong – or you’re getting ready to fire someone and want to ensure any logged-in accounts have been disconnected.

What is this article about?

Well, let’s say you have a server and people are logged in via SSH. Let’s also say you want to disconnect one of them. That is, you want to boot an SSH user. If you want to boot an SSH user, it’s remarkably similar to sending that SSH user a message. You might want to read that article:

Send A Message To Another Logged In User

We’ll be using similar tools, though we’ll also be using tools from this article:

How To: Kill Processes By Their PID (Process ID)

I strongly suggest that you read both of the two links. That will save you some time and I’m going to gloss over some details because one of the great things about previous articles is that it means I don’t have to duplicate work. The onus is yours to read those articles so that you’re familiar with the subject.

In case you haven’t put two and two together, we’re going to boot an SSH user by killing their process ID (PID). It’s a lovely way to do so, perfectly graceful ideally, and will accomplish the goal of booting said SSH user.

This might be something you do when you take a privileged user down to HR to fire them. When they head to HR (and are then led out of the building by security), you can kill any processes they have ownership of, including any SSH sessions they have open. In this case, we’re just going to learn how to boot an SSH user.

So, put on your steel-toed boots ’cause we’re going to boot an SSH user!

(I do… I crack me up!)

Boot An SSH User:

You’re going to need an open terminal and you’re going to need to be connected to the same SSH server(s) as the user. As this is a bit of an advanced article, I’m going to assume you know what those things mean. If you don’t know what those things mean, you probably shouldn’t be operating a server, and definitely shouldn’t be operating a server that has multiple people connected to it.

If you remember (or clicked to read) the previous article, we are going to start with the ‘who’ command. You can simply try this command:

That has all the information you need and you’re looking for the PID as that’s what we’re going to be using to boot the SSH user. We’ll be killing their PID and logging them out immediately. You only need the first field to identify them by username and the sixth field to know the PID. So, you can just use this command:

This will give you an output similar to this:

Using the first field to identify the user, you can see their PID. You can kill their process with the following command:

Or, for example:

If that doesn’t work, and sometimes a process can’t be killed, you can bring out the hammer and tell the kernel to drop the process. You should try the first way as it’s more graceful and using a hammer may result in a zombie process. But, if you want to bring out the hammer, you would use this command:

If the user is logged in more than once, you can boot the SSH user by adding the rest of their PIDs. You just simply add them to either of the two commands. For example:

And that’s how you boot multiple SSH users in one command.

Again, if you’re relying on this for security you’re doing it wrong. This should just be a part of the security process, such as when you’re letting someone go while they were still at their desk. You bring them to HR while security cleans their desk and IT make sure they’re logged out of any and every system. You then escort them out of the building.

Of course, there are probably other reasons why you might want to boot an SSH user. It’s your system, you can decide what to do. You shouldn’t be using this to boot an adversarial SSH connection because if it has reached that point you’re doing security very, very wrong.

Closure:

So, why not? We might as well have an article about how you boot an SSH user. It does not apply to much of my readership, but it’s certainly something worth knowing. It was also tied into a couple of earlier articles, including one from yesterday, so I figured I’d cover this subject while it was still fresh in my memory.

That memory ain’t what it once was! Welcome to old age!

Thanks for reading! If you want to help, or if the site has helped you, you can donate, register to help, write an article, or buy inexpensive hosting to start your site. If you scroll down, you can sign up for the newsletter, vote for the article, and comment.

Send A Message To Another Logged In User

Today’s article might be useful for system administrators or just for fun, as we learn to send a message to another logged-in user (in the terminal, of course). This shouldn’t be a complicated or lengthy article, though many of my recent articles have been significantly longer than usual.

If you’re just a regular desktop user, this might not be all that interesting, but you can still test it if you want. Besides, you never know when you will want to send a message to another logged-in user! It could happen.

Let’s say you have a server with people logged in via SSH. This could also be a single computer with multiple people logged in, should you wish to test this and play around with sending a message to another logged-in user. Let’s also say that you want to send them a message in the terminal.

Perhaps you’re going to log them off? Maybe you’re going to reboot the server? Who knows, maybe you want to give them some sort of directions and the easiest way to do so is to send them a message that pops up in their terminal. You can do that!

We’ll be using a few tools for this. None of them are all that complicated and these little tools (do one thing and do it well) are tools that make the Linux world go around. 

For starters, we’ll be using the ‘who’ command.

who – show who is logged on

We will also be making use of the ‘awk’ command.

gawk – pattern scanning and processing language

Next, we’ll be using the ‘echo’ command.

echo – display a line of text

There will also be the ‘write’ command.

write — send a message to another user

We will also be using a pipe. We will pipe the output from one command to another command. We’ve done that lots of times on this site, so regular readers will already be familiar with a pipe and how it works.

Briefly speaking, a pipe is just one way to take the output from one command for use in another command. It’s a pretty handy tool to add to your Linux toolbox if you haven’t already done so. It’s a simple tool, which is a good thing.

If all of the above looks complicated, don’t be alarmed. It’s not all that complicated and the commands I share will be simple enough for most anyone to follow. You’ll be able to adjust them to your needs quite easily.

Send A Message To Another Logged In User:

As mentioned in the intro, you’ll want an open terminal for this. So, open your default terminal emulator. You can usually just press CTRL + ALT + T and your default terminal will open. This isn’t always true, but it’s true in many cases. You will otherwise need to open the terminal on your own.

With your terminal now open, let’s find out who is logged in. To do that, we only need the following command:

However, we only care about the first two fields, so let’s narrow that output with the following command:

The output from that command is all we need for the next part. You use the first column to identify the username. That makes them easy to identify, or at least easier for most folks.

The other column is the 2nd one. That identifies their login method, basically which terminal they’re using, and is also what we will use to specify the recipient of our message. Next, to send a message to another logged-in user, you use a command similar to this:

Or, take a look at this:

identify and send a message to a logged in user.
See? It’s not complicated. It’s harder to describe than it is to do.

So, in that case, the syntax of the command is easy, it’s just like this:

You’ll notice that the output of the command isn’t on that screen. It was sent to the other screen, the screen where that user was logged in (specifically over SSH). It quite happily sends the message to the user logged in at that location.

You can’t use usernames alone, as it’s possible for more than one person to use the same username. This method identifies the user and the method/location they’ve used to log in. It’s a pretty handy command like that. It might look a bit complex, but it isn’t.

Closure:

So, if you’ve ever wanted to send a message to another logged-in user, you can now do that. It’s easier done than explained, but hopefully, you get the gist of it and can apply it to your personal computer usage.  

It’s not always that easy to come up with ideas for articles. I often pull them from my notes, but my notes are a mess, and not all of them would make good articles. If there’s something you’d like covered, and I know the subject, feel free to contact me and let me know. Of course, don’t forget that I take guest articles when they’re about Linux.

Thanks for reading! If you want to help, or if the site has helped you, you can donate, register to help, write an article, or buy inexpensive hosting to start your site. If you scroll down, you can sign up for the newsletter, vote for the article, and comment.

Ping With IPv4 Or IPv6

Today we’re going to have a fun article, one easy enough for everyone, where we talk about how to ping with IPv4 or IPv6. You have an option and you get to decide if you want to use IPv4 or IPv6. It’s just a matter of a couple of different flags, so a new user can manage this one.

An IP address is a numerical address assigned to computers, it’s a way to address those computers – meaning to send and receive data. While you normally don’t do much with individual IP addresses, they’re what runs in the background and make this whole networking thing happen.

We had IPv4 and we’re slowly moving to IPv6. We’ve long since run out of IPv4 addresses (though they’re still widely used, often for legacy reasons), but they’re 32-bit addresses while IPv6 is a 128-bit address.

If you’re not good at math:

IPv4 supports 4,294,967,296 addresses.
IPv6 supports 340,282,366,920,938,463,463,374,607,431,768,211,456 addresses.

See the difference?

There was an IPv5 but IPv6 was created before IPv5 was made a standard and so there’s no IPv5 standard. The reasons for this are fairly obvious. After all, IPv6 supports a metric buttload of devices. That’s a seriously big number that we write as 128-bit (2128).

Every human on the planet can have all the addresses they could use, which is important when you consider stuff like IoT (internet of Things) where your home may contain many connected devices in the ‘smart home’ sense of things. We decidedly do not have enough IPv4 addresses for that.

Well, the truth is that we kind of suck at migrating to IPv6. Wh you ping localhost, you’re probably going to see 127.0.0.1. If you’re using IPv6 then you’d see ::1. If there’s any place where we might want to use IPv6, it’s in the home – with all these connected devices.

Even if you don’t have a smart home, smart cameras, a doorbell camera, various routers, a connected refrigerator, or the like, odds are that you’ve got more than one connected device. Fortunately, you still have IPv4 going on and they have some reserved IP addresses to work with. So, you’re good with that – as a general rule.

So, we still use IPv4. Should we? Probably not. But, there are legacy reasons for IPv4 to exist. That shouldn’t include the public web (I don’t believe) but it does. The adoption rate for IPv6 is really slow. After all, IPv6 launched on June 6, 2012. We’ve had more than a decade to move to IPv6!

I am no help… I am just as guilty as anyone else. When I order a VPS, I ensure that I have a dedicated IPv4 IP address. Why? Legacy reasons! Well, more out of habit. I’m quite sure I could migrate to IPv6 by just changing a few things in my process.

Anyhow… This is a long intro!

What is this ‘ping’ thing? Well, ping is you sending a packet to an address and then waiting for the response. You ping a server and the server effectively sends a pong back! It’s ping pong! Ha! I crack me up. 

You send a ping and wait for an acknowledgment from the server when it sends a packet back to your computer. Ping doesn’t always work because you can decide to ignore them (perhaps a future article) and not send a response. Fortunately, the easy-to-remember domain names (remember, they respond on an IP address, they are resolved to an IP address) respond to pings. I use ‘google.com’ as a general rule.

If you check the man page, ping describes itself like this:

ping – send ICMP ECHO_REQUEST to network hosts

We’ll be using ‘localhost’ (your computer) for this article, for the record. I think that’s a better choice than having a bunch of my readers ping any specific website. It should be effective on every modern computer with a modern operating system.

Man, this is a long intro. I’m sure I’ve forgotten something…

Ping With IPv4 or IPv6:

By now you know the routine. You’ll be using a terminal for this exercise. If you don’t know how to open your terminal, try pressing CTRL + ALT + T and (in most cases) and your terminal should pop right up! It’s magic!

Believe it or not, this may also work for other operating systems. I have it on good authority that this works with Windows, where they’ll be using ‘cmd.exe’ as memory serves. From what I can tell, this is also true for MacOS users. It’s a fair assumption to say this also works with the operating systems in the BSD family. Huh… Imagine that?!?

Anyhow, you can try the following command:

That will resolve to an IP address, be it IPv4 or IPv6. You can ping a specific IP address easily enough. To ping an IP address, the syntax is:

The results of those commands will be either an IPv4 or IPv6 address. If you’re new and don’t know the difference, an IPv4 address uses periods. It’d look like 127.0.0.1. An IPv6 address uses colons. It’d look like 2607:f8b0:4006:817::200e. It’s easy to tell the difference.

Now, if you want to use IPv4, the command would be like this:

If you want to use IPv6, the command would be like this:

NOTE: This is likely to work in many instances but, due to the lack of participation, you might find that some sites don’t support IPv6. On the other hand, you might find some sites don’t support IPv4. If one doesn’t work, then you have the other as an option.

Closure:

Well, if you ever wanted to know how to ping with IPv4 or IPv6, you now know. Are there good reasons? Well, there’s still some legacy stuff out there and we’ve poorly adopted IPv6. For all intents and purposes (intensive porpoises) we have limitless IP addresses available with IPv6.

We will move in that direction, just like we’ve currently moved in that direction. Adoption will continue and adoption rates may speed up. After all, we’ve had more than a decade to adopt. The specification is well-supported and it’s almost certainly the future of networking. Or so I’d like to believe…

Thanks for reading! If you want to help, or if the site has helped you, you can donate, register to help, write an article, or buy inexpensive hosting to start your site. If you scroll down, you can sign up for the newsletter, vote for the article, and comment.

Linux Tips
Creative Commons License
This work is licensed under a Creative Commons Attribution 4.0 International License.