Let’s Update Ubuntu In The Terminal

Today’s article will be a nice basic article, where we discuss how to update Ubuntu in the terminal. It seems like a fine article to write and one that not everyone will be versed in. There are lots of folks who don’t use the terminal for much of anything. Then, there are people like me who use the terminal for all sorts of stuff.

If you know how to update Ubuntu in the terminal, this really won’t be a very interesting article. We’ll just be covering the basics and I’ll explain how I do it. You’ll see that I tend to throw caution to the wind and just blindly hope for the best. This strategy is fine for me, ’cause I can fix pretty much anything. (I can fix pretty much anything because I’ve broken pretty much everything.)

Of course, this article applies to Debian. This article applies to Linux Mint. This article should apply to anything that uses apt as the package manager. So, if your distro is related to Debian then this will probably work just fine for you.

Well, there’s no reason to make the intro any longer… I think I’ve covered all that you need to know to get started.

Update Ubuntu In The Terminal:

As you can guess, we need an open terminal if we’re going to update Ubuntu in the terminal. That only stands to reason… Press CTRL + ALT + T and your default terminal should open.

With your terminal now open, let’s update the list of software that’s available. Let’s see what software can be updated. To do that, you just run:

That will tell you the software that’s available to update. You can see what those updates are with the following command:

You can then upgrade those applications one by one if you want to. Some cautious people do this. Some businesses do this – and do this to a staging environment to test – ’cause they need to keep things running. If you want to upgrade just a single package, try this:

Now, most folks are probably going to want to upgrade all the software that has new versions. They get it easy, they just type:

This will give you the chance to see everything that’s going to be upgraded and the chance to decline or agree. Me? I automatically agree. You might want to be more cautious, but I like running the command closer to this:

That automatically says yes that I’d like to upgrade all the things. After all, even if stuff were to break, I’d have had to have upgraded to find it anyhow. 

I go a step further and just tie the two commands together. The command I run would look closer to this:

That will find all the available upgrades and install them automatically, that is without any further input from me. I’ve done this for years and it hasn’t been a problem or any more of a problem any other method would cause me. So, in short, that works for me.

Closure:

I don’t know that you wanted to learn how to update Ubuntu in the terminal, but that’s today’s lesson. It’s not very complicated. I could keep going, as my actually command also includes the ‘clean’ option. I use an alias to tie it all together, rather than typing it out each time. There are also similar commands you can use for other distros with different package managers.

Thanks for reading! If you want to help, or if the site has helped you, you can donate, register to help, write an article, or buy inexpensive hosting to start your site. If you scroll down, you can sign up for the newsletter, vote for the article, and comment.

Make Applications Start Faster in Ubuntu

Today’s article is pretty specific as we discuss one way to make applications start faster in Ubuntu. However, I feel like I need to make you aware that this isn’t some sort of miracle software. The usage and results are pretty limited and I’m mostly covering this because it was in my notes and a question I saw recently on Reddit.

Now, for reasons, I’m not sure what format this article will take. I haven’t written it yet and the information I want to share is kinda mixed. I guess we could have a longer intro than normal.

So, the tool in question is called ‘Preload’. The man page describes Preload like this:

preload – Adaptive readahead daemon

Though I think it’s important to also quote this (also from the man page):

preload is an adaptive readahead daemon that prefetches files mapped by applications from the disk to reduce application startup time.

So, what is this Preload? It’s a daemon that runs in the background and monitors what you do. It pays attention to what applications you open (for example) and loads the various files into memory. Then, when you open the application it will open faster. This is mostly useful if you’ve opened the application, closed it, and wish to open it again. The second time you open the application, the theory is that it’ll open faster.

Does it work? I haven’t lied to you yet and I’m not going to start now. I haven’t tested it enough to claim it has any great benefits. Oh, I’ve installed it before and left it running. I just didn’t do any verification and I’m not going to cite my observations as factual without having data to back that up. I will say that I didn’t notice it slowing anything down. Of course, I have fast hardware, and using a stopwatch to test the results would be full of all sorts of inaccuracies. 

Do I recommend it? Well, it doesn’t seem to hurt anything. It does seem faster when I close Thunderbird and open it back up again. I use an NVMe M.2 SSD, which is already pretty speedy, so I doubt I’d see much. I’ve never tried with a slower SSD nor on an older spinning platter HDD – which is where I’d expect this Preload to work best. If you’re using older disks, it may be worth trying Preload. But, you won’t break anything if you install it on more modern hardware.

Make Applications Start Faster:

So, installing Preload is pretty simple. Once you’ve installed Preload, you are done. There’s no need to tinker with settings. There’s no need to configure it. It should even automatically set itself up as a self-starting daemon.

Crack open your terminal (you know how to do that by now) and enter the following to install Preload in Ubuntu:

Agree to install and enter your password. That’s it. That’s all you need to do. You can check the man page:

See? I told you this would look like a weird article.

Closure:

Have you had good luck with Preload? Have you been using it all along? Did you use it back when you were using a spinning hard drive? Did it help to make applications start faster? Let me know in a comment. I mean, it’s not snake oil, but how much could it help an average user with modern hardware? I’m not sure how much it’ll help those folks.

Thanks for reading! If you want to help, or if the site has helped you, you can donate, register to help, write an article, or buy inexpensive hosting to start your site. If you scroll down, you can sign up for the newsletter, vote for the article, and comment.

Search Your Man Pages With Apropos

Today we will show you how to search your man pages with apropos. If you’ve forgotten a command, apropos might be what you’re after. If you aren’t already aware, it’s possible to search your man pages. This article will show you how to do just that.

I should first point out that most folks would use apropos only as a last resort. If you have access to the internet, and you’re a normal human, you don’t need to rely on the rudimentary search that is apropos.

Apropos is great if you can remember a good description of the application you’re thinking of. But, it’s a basic search. It searches just for matching text. The details in the body of the article will hopefully make that more clear. Even still, it can be a useful reminder. I use apropos sometimes, but I think it’s clear that I’m not a normal user.

In fact, apropos is pretty good if you’ve got the command right there on the proverbial tip of your tongue. It’s good if you can remember some words the man page used to describe the application. It’s reasonably good at giving you a list.

After all, let’s face it, even a bare-bones Linux installation has thousands of applications installed. There are more commands than any one person can reasonably remember. If you try to memorize them all, your dinner will get cold and your head will pop off. (Trust me, I’m a doctor!)

Search Your Man Pages With Apropos:

If we’re going to be searching your man pages, we’re going to be doing it in the terminal. So, you’ll need an open terminal for this article. Just press CTRL + ALT + T and your terminal should pop open.

With your terminal open, you might as well check the man page for apropos:

Now, you have two real choices. You can put quotes around your search term to search specifically for those words in that order, or you can just use search terms without quotes which may net more results.

Let’s test this out… Let’s search for “list files”. That seems reasonable, right? We’ll pretend we’re looking for the ‘ls’ command.

Go ahead and try that. You’ll probably get a cheeky message about finding nothing appropriate. 

But, if you try this command, you’ll get a bunch of results:

If you weed through the output from that command, you should find the ‘ls’ command. If you wanted it narrowed down, you’d have wanted to try something like:

If you couldn’t remember ‘ls’ then you’re probably not going to remember the rest of that. So, you can start with the second search (just “list”) and find it that way.

Now, rather than explain it deeper, I’ll just show you what happens if you don’t use quotes. Try the following command:

Sure enough, you’ll find the ‘ls’ command in the output. It’ll give you a bunch of results but you can see that you don’t need to order the words exactly as they are on the man page. It’ll happily search for any those words, regardless of the order they’re in.

Closure:

See? It’s a new article. This time, we’ve decided to cover how to search your man pages with apropos. It’s not the most useful of commands, but it’s available – and probably useful if you don’t have an internet connection. Or, it’s useful for people like me, people who do all sorts of weird stuff in the terminal, sometimes even if there’s a faster or easier way.

Thanks for reading! If you want to help, or if the site has helped you, you can donate, register to help, write an article, or buy inexpensive hosting to start your site. If you scroll down, you can sign up for the newsletter, vote for the article, and comment.

How To: Install .DEB Files In Ubuntu

Today’s article is only useful for a subset of my readers, that is those who need to know how to install .deb files in Ubuntu. That’s a bit cheeky of a headline, but there’s a character limit to adhere to. So, if you want to install .deb files in Ubuntu, this article is for you…

What are .deb files?

The .deb file extension means that it is a package meant to be installed in Debian. So, this article will be valid for all Debian users – even those downstream, like Ubuntu or Linux Mint.

Quite a few Linux distros use .deb files, not just Ubuntu. I happen to be an Ubuntu member and many of my readers use distros based on Ubuntu (which is, of course, based on Debian). To keep things short, we’re not going to type all that out over and over again.

Many new users start with Ubuntu or Mint, and Debian itself of course. You might be a new user and have reached the point where you’re comfortable installing software from the graphical installer built into your operating system of choice.

Well, this is Linux… There are all sorts of ways to do things! Assuming you’re safe, or unsafe if you want – it’s your choice, you can find software that’s not available in the graphical installer, or newer versions than what you’ll find in the graphical installer. You’ll often find this software available in .deb format and this article will show you a few ways to install those .deb files.

How To: Install .DEB files in Ubuntu:

The first way we’re going to cover will be in your terminal. You’ll likely need an open terminal for the rest of the methods, so you might as well open your terminal now. You can just smash the CTRL + ALT + T and your default terminal application should pop open.

The first method is pretty easy. You’re simply using ‘apt’ in the terminal, much like you’d do if you wanted to update from the terminal. The command would look something like this:

You’ll usually have downloaded the file to your Downloads directory, so you can either navigate to Downloads using the cd command or you can just include the folder in your path to the file, kind of like this:

Of course, you’ll use the actual file name and you’ll be asked for your password (unless you’ve changed that). Enter your password and let apt do its thing. Using apt is great because it will do its best to resolve any dependency issues you might have.

Now onto some GUI ways to install .deb files in Ubuntu!

Install .DEB Files With GDebi:

You followed the directions above and have an open terminal, right? Good, because GDebi doesn’t always come installed by default. I’ve previously written an article about GDebi, but it’s actually on the old site. I won’t bother linking it.

GDebi is a great GUI, that is a graphical, way to install .deb files. In fact, on the man page, it is described as:

gdebi – Simple tool to install deb files

To install .deb files with GDebi you first need to install it. You can do that right there in the terminal. To install GDebi, just run this command:

Once you have GDebi installed, you just use it from the right-click menu. Use your file manager to navigate to the download’s directory. Then you just right-click on the .deb file and choose to install it. The first time around, you might need to do some sort of ‘open with’ exercise, but then it should appear as something like “Open with GDebi package installer” or you will pick it from a list.

I’m positive you can figure it out from there. The great thing about using this GUI method to install software in Ubuntu is that it too will attempt to deal with any dependency issues automatically.

Install .DEB Files With QApt:

Do you still have that terminal open? Good! We have one final graphical method to install .deb files in Ubuntu. This one is a fairly new application and it’s a Qt application. However, it installs with very few dependencies and takes up very little space. Functionally, it’s very similar to GDebi.

So then, let’s start with getting QApt properly installed. The name is quite a bit longer, but it’s still easy to install QApt. To install the software, try this:

It’s a nice and light way to graphically install .deb files. For the life of me, I can’t figure out the correct man page incantation to make it work. No amount of trying the various words results in a man page opening. I do not know why, but I do know that it works. If you search to install QApt, it describes itself as:

qapt-deb-installer – tool for installing deb files

That’s plenty accurate. That’s what it is and that’s what it does. While I can’t find a man page for QApt, that’s an adequate description.

This QApt is a bit different. Like with GDebi, you’ll use your file manager to navigate to the directory that contains your .deb file (usually the Downloads directory) and right-click on the .deb file you wish to install. You’ll then pick “Open With” and click on the “QApt Package Installer”. With QApt now open, you’ll just click the obvious install button and wait patiently for it to do its thing.

Closure:

So, there you have it… You have another article and this one has you learning how to install .deb files in Ubuntu. There are a few ways and you can pick the one that works best for you. Much of the time, I already have a terminal open and already navigated to the ~/Downloads directory. Because of this, I’ll often just do the installation right there in the terminal, using the apt command. But, it’s up to you. You have choices!

Thanks for reading! If you want to help, or if the site has helped you, you can donate, register to help, write an article, or buy inexpensive hosting to start your site. If you scroll down, you can sign up for the newsletter, vote for the article, and comment.

How To: Use An Older Version Of A Google Chrome Extension

Today we’ll cover a not-so-serious topic about how to use an older version of a Google Chrome extension. There’s a subset of my readers who may eventually want to know this information. It might not be today, it might not be tomorrow, but someday you may need this information. 

Fortunately, that information will be right here in an article about how you go about using an older version of a Chrome extension. This is one of those things you don’t need – until you need it. It’s kinda like how I answer kids who ask if I have any good life advice; “But a plunger before you need a plunger.” It’s pretty solid advice.

The gist of the story is that I live in a very remote area. I also live where weather events are (and this is not in jest) sometimes fatal. If you’re unprepared for the cold, it can kill you. Of course, it’s unseasonably warm right now – but that doesn’t change the point.

So, I take the weather a bit seriously. One of the tools I use for cursory weather examination is a browser extension called “Forecastfox.” The extension relies on AccuWeather and folks have determined that it’s an API change that broke the extension. Also, to make it a bit more interesting, the author of the extension is in Ukraine.

It could be a while before it is fixed and operating properly. Fortunately, and for whatever reason, the previous version was known to still work. Unfortunately, it is a bit of a hit-and-miss, but it’s sometimes possible to get an older version of a Chrome extension. It’s then easy enough to install it, which is what this article is all about.

Use An Older Version Of A Google Chrome Extension:

When you find a Google Chrome extension (and this applies to Chromium, Opera, Brave, Edge, and all the other Chromium-based browsers out there) that doesn’t work anymore, you have some options. You can try a previous version, an older version, to see if that still works as expected.

Unless it’s a security extension, or unless the extension had a security-related flaw, it’s reasonable to try an older version of the extension to see if it works. In my case, I did a bit of research before choosing this route – and I’d advise you to do the same. Make sure the update was just bug fixes and feature additions and that you’re not reverting to an extension with known security issues.

Once you’ve looked around and determined that using an older version of the extension is a good idea, you can get to work on using an older extension version. You’ll want your browser open for this. In this instance, we’ll be using Chrome.

Your first real step is to click the three-dot menu in the upper right. Then, open “More Tools” and click on “Extensions”. In the upper right, enable “Developer mode”. It looks like this:

Enable developer mode in Google Chrome.
Have you ever wondered what this switch was for?

With that enabled, your next step is to find and download an older version of the extension. Be sure to remove the existing version before going any further. Additionally, leave that extension page open because you’re going to need it again.

Now to find an older version of your extension. Start by searching here:

https://www.crx4chrome.com/

That site has a whole lot of extension versions backed up. Odds are very good that you’ll find an older version of your extension there. If you don’t find one, you can try going to the extension’s home page or checking code repositories like GitHub. For example, if it’s on GitHub, just look to the right sidebar to find the releases link and look in there.

Once you have that file (it should be a string of letters and numbers that end in .crx) just drag it to your Google extension page. There’s nothing fancy, just left-click on the .crx file and drag it to Chrome’s open extensions page.

That’s it. It’s that simple.

As you manually loaded the extension you shouldn’t need to worry about it updating automatically. It shouldn’t automatically update until you’ve installed the current version from the store again. So, you’re good to wait for a version or two with your working extension. Then, once you’ve determined the current version works, just remove the extension you manually added and install the version from the store.

See? You’re done!

For Our Firefox-Using Friends:

If you use Firefox add-ons, I did look up how to do the same thing with Firefox. It’s much easier to do this with Firefox. I don’t use Firefox all that often anymore, but I figured I’d learn how to load an older add-on and share that information with you. 

If you’re a Firefox user, you’ve got it easier – mostly…

Your first step is to click the three-line menu, where you’ll select “Add-ons and themes”. Open up the add-on’s settings so that you can remove the extension. After you remove the add-on, leave that tab open because you’re going to need it again.

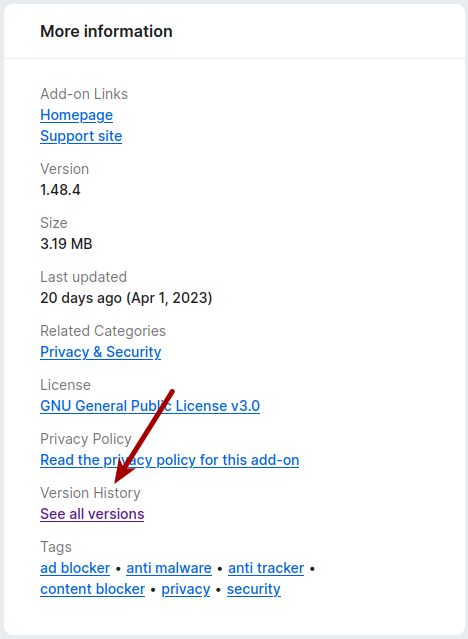
Once you have the add-on removed, find the add-on’s home page on the Mozilla Add-On site. Look on the left and scroll down. You’re looking for “More information” which should have a “See all versions” link. Click on that and download an earlier version. It’d look something like this:

click that link to download older versions of firefox add-ons
It’s not too hard to find. Click it. You’re almost all the way there!

On the next page, scroll down to find the add-on’s older version, the version you believe will still work. It’s a bit uninformative, but just click the older version’s download link on the right and it will download it and ask if you want to install it. Of course, you’ll pick yes to install it.

Now, go back to the tab that you were using to show your add-ons. Find the extension you just added and open up its properties (it’s ‘Manage’ under the three horizontal dot menu). Scroll down to find “Allow automatic updates”. Click on “Off” to disable automatic updates so that it doesn’t automatically update your add-on to the newest version.

When you are reasonably sure that the current version of the add-on will work with your system, you can just enable automatic updates. That should do the trick but will take time as it’ll just update when it next checks. You can simply remove the add-on and add the current one after that, should you be in any sort of hurry.

And, for you Firefox users, that’s it! That’s all you should have to do if you want to use an older version of a Firefox add-on. It’s not too taxing, now is it?

Closure:

Alright, so it’s another long article – and another one that doesn’t require an open terminal. This time around, we’ve talked about how to use an older version of a Google Chrome extension. I also covered how to do so with Firefox. Ordinarily, I’d have considered making these two separate articles, but I figured you could handle another long piece. 

Thanks for reading! If you want to help, or if the site has helped you, you can donate, register to help, write an article, or buy inexpensive hosting to start your site. If you scroll down, you can sign up for the newsletter, vote for the article, and comment.

Linux Tips
Creative Commons License
This work is licensed under a Creative Commons Attribution 4.0 International License.