Customize Your GNOME Desktop With GNOME-Tweak-Tool In Ubuntu

The GNOME-tweak-tool is a valuable tool to modify and manage your GNOME desktop environment. The application is easily installed, easily used, and generally safe to use. This article will help you get the tweak tool installed and explain why you might want to do so.

If you know about it already, you may know it as ‘Tweaks‘, it’s current name. I’ve chosen to use the older name for search reasons. I want to cover the tool not just for new users, but also for older users who may need a reminder. Doing it this way should cover all the bases, though my SEO “skills” are still in the ‘wing it’ phase. Plus, see the installation command below.

I don’t cover GNOME very often. Truth be told, I’m not a huge fan. However, I’d be overlooking a large number of users if it wasn’t mentioned from time to time. GNOME originally stood for GNU Network Object Model Environment, though that was dropped when the focus of the project changed. It’s one of the more popular desktop environment options out there, and is a default for a number of distros – including Ubuntu. 

With GNOME comes a lot of support resources, as it is so widely used, and even has the ability to use extensions. It’s a weighty desktop with a number of great features that are beyond the scope of this article. People sometimes complain about how GNOME does things, and the lack of easy customization, but when you use GNOME you’re buying into the entire GNOME philosophy. “In for a penny, in for a pound.” 

But, we’re Linux users. If there’s one thing we have (just shy of universally) in common across the board, it is that we like to customize our experience. We like to tinker and to make things our own. Well, GNOME-tweak-tool will help you with that. It’ll help you make the GNOME desktop your own.

Install GNOME-tweak-tool:

The GNOME-tweak-tool should be available for any distro that’s using GNOME as its desktop environment. You don’t want to try using the tweak-tool while using a different desktop environment, even if that desktop environment is based on GNOME.

For the sake of this exercise, we’ll assume you’re using Ubuntu. With Ubuntu, you’ll need the Universe repository enabled. You may have that enabled already, but you can check under “Software Sources” easily enough. It’d look like this:
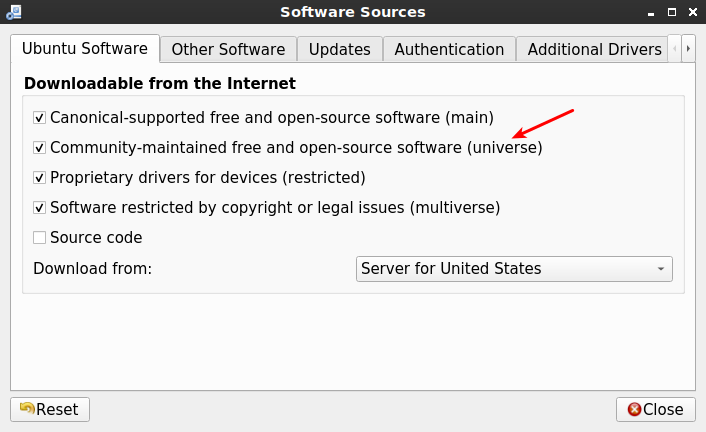
software sources, universe enabled
See? You can just click a button to do this! Nice and easy!

Once you have the correct software source (repository) enabled, you can go ahead and get the GNOME-tweak-tool installed easily enough. Crack open your terminal by pressing CTRL + ALT + T and then enter:

That should install the tool and make it available in your menu. To find it in your application menu, you can search visually or just type “tweak” and it will narrow the results down to show you just the application.

If you’re using a different distro, one not based on Ubuntu, you’ll need to adjust the installation command. If you use dnf or zypper, you’ll need to adjust the command to suit those package managers. While this article specifically covers Ubuntu, it should be easy to do this with other distros as well.

Why The GNOME-tweak-tool:

The GNOME-tweak-tool actually does a bunch of things and is full of options. I’ll go ahead and list some of the options and, seeing as I’m looking at an Ubuntu VM as I write this, I might as well go in order.

  • Change animations and suspend when closing your laptop’s lid.
  • Change application themes, background images, icons, etc.
  • Add/remove desktop items, app indicators, or a dock.
  • Adjust system-wide fonts.
  • Change keyboard and mouse settings, disable touchpad while typing.
  • Add/remove startup applications.
  • Change the top bar, maybe adding/removing battery monitor, etc.
  • Change titlebar actions and buttons.
  • Modify window behavior, including click and focus actions.
  •  Modify workspaces, adding and removing them.

As you can see, there are quite a few tweaks available and they’re all available in a single place. Some of those settings may be in other places, but this puts them all into one place.  The GNOME-tweak-tool is a pretty decent way to customize your GNOME desktop environment, an easy way to make it your own.

If you’re a GNOME user, this may well be just the tool you’re looking for. New users are often exposed to Linux with GNOME as their first desktop. If you’re one of those people, you’ll likely enjoy this chance to customize your experience.

Closure:

There you have it! It’s an article about GNOME-tweak-tools. As y’all know, and as mentioned above, I don’t particularly like GNOME. It’s just not my cup of tea and I don’t fit well in the whole ‘GNOME experience’. And, you know, that’s okay. We don’t all have to agree. If we did, there’d only be a single DE to pick from. We don’t want that.

Thanks for reading! If you want to help, or if the site has helped you, you can donate, register to help, write an article, or buy inexpensive hosting to start your own site. If you scroll down, you can sign up for the newsletter, vote for the article, and comment.
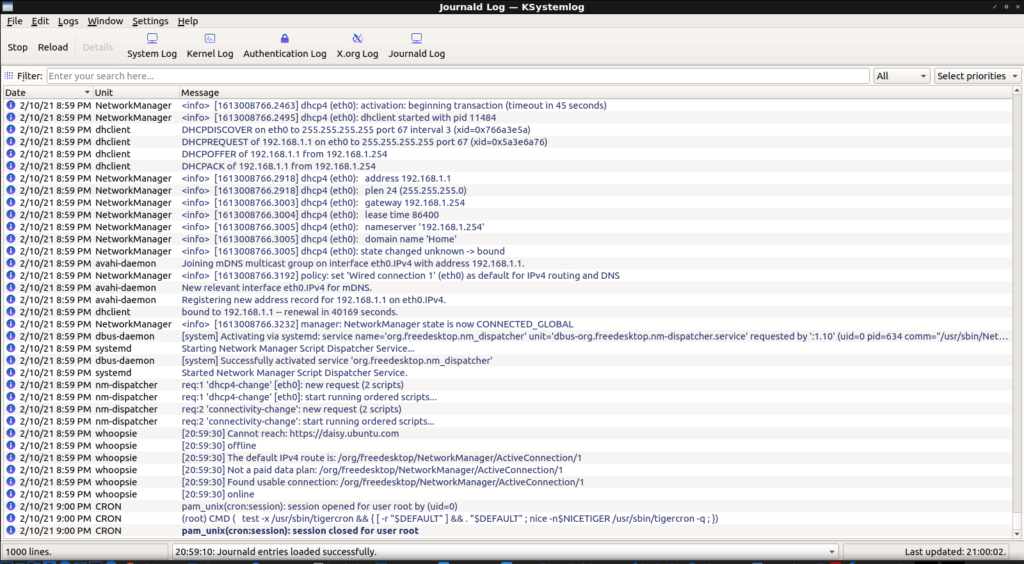
How To: Graphically Check Your Logs For Errors With ‘KSystemLog’

Today’s article is going to be about one of my favorite tools for checking the various system logs, KSystemLog. Checking your logs for errors has never been easier, and this is one of the first tools I reach for when I have a problem that I don’t know how to solve.

When you first notice a problem with your Linux box, you might only be noticing the symptoms and not actually seeing the reason. Those reasons can often be found by rooting through the various logs to see what’s actually causing the error.

Back in the early computing days it required the terminal to work with your system’s logs. You’d ask for help on a forum and they’d request that you run a command that looked something like this:

It that actually worked and it worked well enough for a long time. It worked even better when you knew what you were looking for and looking at. If you didn’t, you’d scroll through tons of text in the terminal with no real visual cues to sort through the data. Today, there are better tools for this.

Enter KSystemLog:

Thankfully, there’s KSystemLog. KSystemLog’s man page describes it thusly:

Description: system log viewer
KSystemLog show all logs of your system, grouped by General (Default system log, Authentication, Kernel, X.org…), and optional Services (Apache, Cups,etc, …).
It includes many features to read nicely your log files:
* Colorize log lines depending on their severities

* Tabbed view to allow displaying several logs at the same time
* Auto display new lines logged
* Detailed information for each log lines

Which looks like this:

ksystemlog
KSystemlog UI – The images are old and can’t be expanded due to a sudden bout of laziness.

As you see in the image, KSystemLog is a handy GUI that lets view your various system logs. When you look at the image above, you’ll be able see that one of the lines is a darker blue than the previous lines. This is because it’s a new entry, an event that happened after the application had been opened.

That means you can open KSystemLog and then open the application that’s giving you trouble. Doing it this way will let you see what log entries are made and what errors are thrown as the application is opened and used. Of course, you can always examine the entire log of errors and events. 

Even better, the events in the logs can be color-coded, providing easy visual cues. The events range in color, indicating severity, of from a light gray (normal) to a bright red for emergency-level events. You can even filter and search for events.

error messages in kystemlog
Note the color change for errors.

KSystemLog is a KDE application but pulls in very, very few dependencies. It starts rapidly and will show the installed log files by default. In a pretty default configuration, it finds these:

ksystemlog logs available
Currently available logs on this system. More are available.

Getting KSystemLog:

Assuming you are using a major distro, it’s almost certain to be your default repositories. For example, if you’re using a Debian derivative (Ubuntu, Mint, etc.) then it can be installed by opening the terminal and entering:

Just adjust the above installation command for your distro’s package manager and you should be good to go. If KDE is an option for your distro, then KSystemLog can’t be far behind.

By the way, you don’t have to know what the errors mean. You can just take the logged errors and use them as search terms to help. Just copy and paste, using the errors verbatim, and search! It’s absolutely amazing how many errors can be resolved by doing just that. I’ve personally used this method to troubleshoot so many times that I’ve decided that it’s a tool we all need in our Linux toolbox.

Closure:

And there you have it, another article. This one is about KSystemLog, a tool that lets you graphically examine your system’s logs. It’s a great tool for wading through long logs and searching for the root cause of various problems. In an ideal world you’d not need such a tool, but this is not an ideal world. It’s a world with bugs and errors, and KSystemLog is a tool for just that.

Thanks for reading! If you want to help, or if the site has helped you, you can donate, register to help, write an article, or buy inexpensive hosting to start your own site. If you scroll down, you can sign up for the newsletter, vote for the article, and comment.

Dooble Browser: A Review

Today, I’m going to review the Dooble browser, so that you don’t have to. The Dooble browser is a browser that has no dependencies as long as your system has fits ‘latest Qt is supported’ requirement. It bills itself as:

Dooble is the scientific browser.

Many folks are aware that I’m a sucker for a new browser. I install browsers that interest me, even though I have no plans to use them as my regular browser. I install browsers just to see what’s going on in the browser world. Changing my browser isn’t actually something I plan on doing!

So, I first read about Dooble browser when I was browsing Reddit. It was some video that I didn’t watch, ’cause I don’t tend click many video links. Seeing a browser name that I didn’t recognize sent me immediately to a search engine, where I found what was once their home page. That, sadly, wasn’t the project’s page anymore. It sent me here.

Technically, the link I clicked sent me straight to the release page where I found it packaged as a .deb file. Being who I am, I immediately downloaded it – with some glee, as it had been a little while since I played with a new browser. It said it was a scientific browser and I’m a mathematician, so I was pretty sure that the browser and I would get along famously.

I was wrong. Oh, was I wrong.

Installing Dooble Browser:

As mentioned, from the releases page, I found the .deb packaged for my Lubuntu system. It downloaded well enough, but the first thing I noticed was this:

Yes, yes that’s verbatim. I just copied and pasted the output. No, I have no idea why it started off with the selection process like that. I also have no idea why it’d go on to ‘getting’ files. The files were already there. The good news is that it did install and that it was immediately available in the application menu under the Internet heading.

Using Dooble Browser:

So, I opened up Dooble browser and was greeted with what looked like a fairly regular browser. I typed in the address for this site and the site opened, complete with ads.

Curious, I looked for a way to add extensions and found none – more on this later. So, I typed ‘Dooble browser ad block’ into the address bar and pressed the enter button.

Nothing happened.

At this point, I opened a few more sites and decided to open the settings menu. There are like 4 first-level tier buttons that will take you to your browser history… In the settings menu, I found search engines. None of them worked for searching from the address bar. Right clicking on text? Nope… There’s no active ‘search’ feature there.

I found an option to enable ‘web plugins’. This did not enable anything noticable.

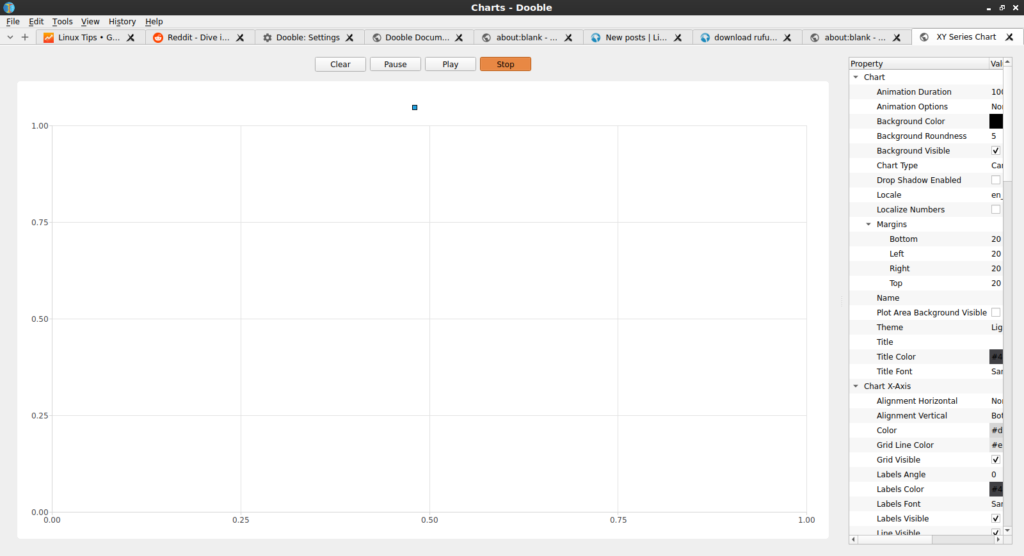
I decided to check out the ‘science’ aspect – which is just some sort of mystery graph. To do this, I clicked on ‘Charts’. It helpfully looks like this:

helpful charts from dooble browser
Yes, I pushed the buttons. No, it didn’t help. It wasn’t even remotely helpful.

I have no idea what they’re plotting on the chart. Pressing the buttons didn’t make it clear. I thought about investing some more time, but I don’t like throwing good time after bad.

In my effort to block ads, or at least to see if you could, I played with a feature that let me accept and block domains. I told it to only accept linux-tips.us, and refreshed. It still happily showed me ads from Google. Speaking of which, it’d be pretty sweet if you’d unblock ads on linux-tips.us!

Reviewing Dooble Browser:

Well, it does have an option for a floating clock and floating history. Oh, wait, there’s a 5th way to access history as a top-level option. They sure want you to be able to view your history.

I have no idea why it has ‘search engines’, because there’s no right click search menu and searching from the browser’s address bar does this:

Searching is not Dooble's strong point...
You can just keep clicking and waiting. Nothing happens… You can keep waiting…

Whatever it’s charting, I can’t tell. Usually an X and Y axis actually have labels. Without those, I can’t really tell what is going on. Is it me that’s making the mistakes? Once more, I can’t even tell!

Does it function as a browser? Well… You can technically browse sites. I browsed a number of them before giving up and noticed not one single rendering problem – which is a plus. I was able to login – but my username and password wasn’t remembered, meaning I couldn’t automatically log back in. 

One of the things I noticed was that the ‘cache size’ never increased – regardless of how much browsing was done. On the plus side, I told it to not allow Reddit to send push notifications and it appears to have remembered that.

So, on a scale of 1 to 10, I’m gonna give Dooble browser a solid 3.5. It stayed up and running, with no crashes. It didn’t require any dependencies, and installed cleanly. Technically, it does browse websites. The Gopher support amused me, though I didn’t bother testing it.

I find it laughable in its lack of functionality. That it has search features and then doesn’t let you search is amusing. I just can’t give it less than 3.5. I’m sure tons of hours are going into it, and I’ll assume that it’s going to improve. I’ll keep checking in on it. If you’re a developer and would like to offer some sort of rebuttal, I’m all ears. 

Closure:

Well… That’s a review. I don’t think I can recommend the Dooble browser to anyone at this time. They have lofty goals but are failing to meet them. When it becomes a usable browser, I’ll try to let people know. I’ll check in on it from time to time, even if just to get a chuckle from how laughably bad it is.

Thanks for reading! If you want to help, or if the site has helped you, you can donate, register to help, write an article, or buy inexpensive hosting to start your own site. If you scroll down, you can sign up for the newsletter, vote for the article, and comment.
How To: Install The Regular “non-Snap” Version of Chrome Browser In Ubuntu

Install Chrome browser on Ubuntu…

This article was authored while I was sick and pukin’. Well, I’d mostly stopped puking while writing.. Thanks to a fantastic @GGG_246 from Reddit (No thanks to you folks on Linux.org who normally catch this stuff!) the entire intro was meant for Chromium and not Chrome.

This is because I was moving it from the old site to the new one, splitting it into two articles. The old article covered both Chrome and Chromium. Also, I was sicker than I’m gonna describe…

So, here you go… This is how to install Chrome browser on Ubuntu. (I am still not quite back to normal. Ask me about my bowels!)

Install Chrome Browser:

Let’s just jump right into it. You know what Chrome Browser is, or you wouldn’t be here. It’s also not very complicated. Let’s bust open your default terminal emulator by pressing CTRL + ALT + T and enter the following:

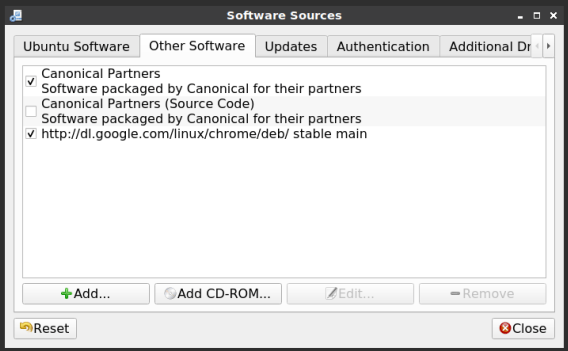
That’s it in the terminal. You’re done. When you finish the installation and start Chrome it will let you set it as the default in the terminal or GUI (if you want), among other things. Even better, the installation adds its own repository and will now automatically update the Chrome browser when the rest of the system is updated.

chrome repository

The repository contains the beta version as well, as well as the unstable version. With the repository added, you can install any of them easily. Be aware that beta may have bugs and that unstable is a nightly build that’s also prone to bugs. Using either means you understand the risks – and also kinda comes with the responsibility of reporting bugs.

google chrome other versions
Just use ‘apt install’ and they’re there for the taking. Install as you wish!

And, that’s about it really. There’s not a whole lot to this article and it’s intentionally short. I’ll do a very similar article about Chromium, so be prepared for that!

Closure:

One more article is in the books. This one is short for a couple of reasons. One of those reasons is that I’m not feeling well. That and power outages make me wonder if I’ll actually manage to do this for the full year. I should get a bunch of articles ahead! I’m eventually going to miss an article or two and I should probably prepare for that.

Thanks for reading! If you want to help, or if the site has helped you, you can donate, register to help, write an article, or buy inexpensive hosting to start your own site. If you scroll down, you can sign up for the newsletter, vote for the article, and comment.

Install An FTP Server With VSFTPD

FTP stands for File Transfer Protocol and is still a useful, if less secure, and quick way to transfer files from one computer to another. If you’ve enabled SSH, then SFTP (SSH File Transfer Protocol) is likely available and it’s truly a better option than FTP. If SFTP is an option, you should probably use it.

There are still people who prefer FTP and situations where FTP makes sense. I actually use it to transfer files around my home network with some regularity. Not only does it let me transfer files, I can also use the FTP application to do things like rename files, copy and move files, and even change file permissions. It’s more about the application at that point, I suppose. Of course, most FTP clients handle SFTP just fine these days.

FTP isn’t all that secure and, again, SFTP is likely a better option in every way, but VSFTPD is “VS” – meaning “Very Secure.” I mean, that’s what they claim – and they do have some security configuration options. So, it has that going for it.

Either way, this article is gonna tell you how to install it. What you do with that information is entirely up to you! If you do eventually want to use this information, there are a couple of previous articles that might suit your needs.

You might need to know about hostnames. Click here.
You may wish to know your IP address. Click here.

With that information read and at hand, let’s jump into installing VSFTPD!

Enable FTP with VSFTPD:

The reason I picked VSFTPD for this is because it’s pretty much universally available. It’s there for all the major distros, readily available in your default repositories. We’re not going to get deep into any configuration options, nor are we even going to discuss securing it. We’re simply going to install it and let you loose on the world!

To that end, why don’t we crack open our terminal? To do that, you can just use your keyboard – press CTRL + ALT + T and your default terminal should open. 

With that step done, let’s go ahead and install it:

Debian/Ubuntu:

Fedora/RHEL:

SEL/OpenSUSE:

Arch/Manjaro:

One of those should do the trick for the major distros. As much as I’d like to just leave it there, that’s not quite enough. I’ll also let you know that your configuration is largely done in  /etc/vsftpd.conf and you can use man vsftpd.conf to learn about configuring your new FTP server.

For the configuration basics, you’ll want to enable writing to the server (so that you can change files, including uploading them) and you’ll likely want to enable local access. Like other configuration files, you may need to remove the # from the start of the lines in order for them to be read and take effect. To comment out lines, you just add a # to the start of the line and the line will be ignored.

You can use nano, vim, or any plain text editor you want to edit the files. However, changes won’t take effect until after you restart the FTP server’s daemon. To do that, you use this command:

With this done, you can connect to your FTP server by using the hostname or the IP address, internal or external. There are links at the first section of the article that tell you how to find that information, though the site’s search works just fine. See? I actually DID have a reason for posting those!

Again, SFTP is a much better option. I actually plan on doing an article about SFTP, but that article requires linking to this sort of article and so I might as well write it first!

Closure:

And there you have it… Yet another article in the books. If you’d like to do a guest article, you can just write it and I’ll do the rest! Every other day as a publishing schedule isn’t too bad, but a break would be fun. Either way, enjoy your new FTP server and good luck!

Thanks for reading! If you want to help, or if the site has helped you, you can donate, register to help, write an article, or buy inexpensive hosting to start your own site. If you scroll down, you can sign up for the newsletter, vote for the article, and comment.
Linux Tips
Creative Commons License
This work is licensed under a Creative Commons Attribution 4.0 International License.