How To: Stop, Pause, and Resume Processes Running in Your Terminal

As you learn Linux, you’ll possibly find yourself using the terminal more often. You’ll run processes in the terminal because you need to or because you prefer to. This is how you stop, pause, and resume those processes running in your terminal.

There are any number of reasons why you’d need to do this. I’ll give you an example in the main part of the article, but there are all sorts of reasons to know and use this information. There are a few generic reasons to do so, of course.

First, you’d want to stop processes because you don’t just want them to keep running forever. That’s the easy one, though they’re all easy. Speaking of which, this article should be pretty short and easy.

Second, you’d possibly want to not stop but rather pause a running process because you expect to return to it. This is different than stopping the process. It’s very much like pausing a movie.

Third, obviously, will be resuming the above mentioned process. If you’ve paused a running process then it only makes sense to know how to resume said process. If you don’t intend to resume it, it doesn’t make much sense to pause it.

This article will explain how to do all three of these operations!

Stop, Pause & Resume Terminal Processes:

So, we’re going to need both a practice exercise and an open terminal. Let’s start by getting the terminal open by using your keyboard and pressing CTRL + ALT + T.

That should open your default terminal. Assuming it does open your terminal, I want you to run the following command:

Once started that command will keep running over and over again. I assume you don’t need to keep pinging forever, so you can stop it with CTRL + C. That’s it. Once you issue that command, the process will stop.

What if you don’t want to stop it – you just want to pause it for a little while? Well, run the ping command again and this time use CTRL + Z. When you issue that key combination, the running process will pause and be pushed into the background.

If you want to resume running that process in the terminal, in that same terminal, you just use the following command:

Unlike the first two, it’s text that you enter into the terminal before you press enter. There’s no CTRL + anything that you use. You just literally type ‘fg’ (think foreground) and press enter. That brings the paused process back into the foreground and resumes running it.

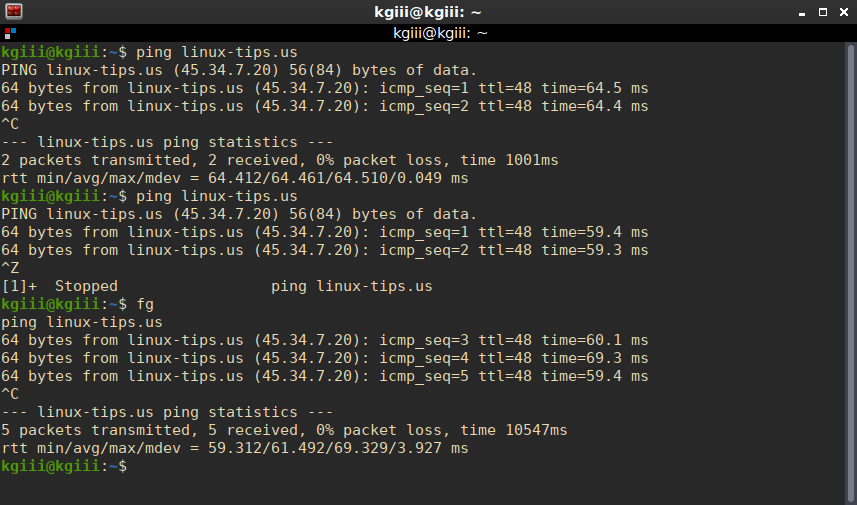
The above commands, when run in succession, should look a little something like this:
terminal
It should look a little something like that. Those are the commands from above.

You can do this with all sorts of applications that run in the terminal. You can stop, pause, or resume, as needed by moving the running process into the background and then bringing it back into the foreground.

If you look carefully at the above image, you’ll see that it counted five packets as being transferred. This indicates that the process doesn’t keep running in the background. It’s truly paused. Typing ‘fg’ and pressing return brought the process back to the foreground, where it continued pinging this site.

Closure:

There you have it. It’s another article in the books! This one tells you how to start, pause, and resume processes running in a terminal. Hopefully, you can find some use for it. If you have any ideas for articles, feel free to leave a comment. My publication schedule seems to be working, so you can expect another article every other day.

Thanks for reading! Your readership and feedback helps keep me motivated! If you want to help, or if the site has helped you, you can donate, register to help, write an article, or buy inexpensive hosting to start your own site. If you scroll down, you can sign up for the newsletter, vote for the article, and comment.
What You Need To Know About Linux’s Magic SysRq Key

The magic SysRq key can help you deal with a frozen and unresponsive system. It avoids doing a hard reboot along with, hopefully, avoiding potential loss of data. The SysRq key is actually a handy bit of knowledge to keep handy.

NOTE: The information in this article is for those who use the QWERTY keyboard. If you use Dvorak, AZERTY, etc., be sure to click the link in the opening paragraph because it will be different for you.

There are times when your system appears frozen but it actually isn’t. You can test this situation with the Shift Lock key. If the light (assuming you have one) comes on, the system isn’t technically frozen – it’s probably just not accepting inputs. But, if it’s so far gone that the light doesn’t change then it’s possible that this will not work.

There are all sorts of reasons why your system may appear to have halted. This article has nothing to do with that, nor is it about preventing a frozen session. It’s about using the magic SysRq key to get out of a situation where your system has stopped responding. 

The purpose, at least as far as this article is concerned, is to reboot without corrupting your data. This gives you a tidier reboot that reduces the risk of data loss. It’s quick and easy to learn and memorize.

The SysRq Key:

Look at your keyboard. Look carefully. The key we’re looking for is the ‘SysRq‘ key. You may not know why it is there, and may think it has no purpose, but it’s there and there for a reason.

The key is often doubled with the PrtScr (print screen) and doesn’t get used often. It’s used in combination with the Alt. If you’re using a keyboard with an Fn, you don’t normally need to use it to perform this keyboard function. Look around your keyboard and you should find the SysRq key. It’s bound to be there somewhere!

What you’re going to learn and is ‘REISUB’. This is easy to remember, because it’s ‘BUSIER’ backwards. When your computer is no longer responding, press (and hold) Alt, while holding SysRq, and then press R E I S U B in order shut everything down properly and reboot without (or with less chance of) data loss.

You can try it right now. However, you’re going to reboot if you do so. Leave about a second between each keypress.

You don’t actually need to use all the letters. If you give zero poops about data loss, you can go straight to Alt + SysRq +​ B​. But, that’s not giving the system the chance to perform all the shutdown processes.

If you want to (hopefully) not lose data, use REISUB. This is what those letters do:

R puts keyboard in raw mode.
E sends SIGTERM (except init).
I sends SIGKILL (except init).
S syncs mounted filesystems.
U (read-only) remount of mounted filesystems.
B reboots the system immediately.

Those should reboot the system for you, after sending all the other commands. Again, it’s easily remembered as being ‘BUSIER’ backwards and you should press them immediately after one another, allowing a second between each.

Closure:

This makes yet another article in the books, and now you know how to reboot your system when it is frozen. The magic SysRq key works well enough, even though there are some situations where it won’t work. A computer can be so frozen that it’s no longer accepting any input at all. It works well up until you’ve reached that point.

Thanks for reading! If you want to help, or if the site has helped you, you can donate, register to help, write an article, or buy inexpensive hosting to start your own site. If you scroll down, you can sign up for the newsletter, vote for the article, and comment.
Finally, an Answer to What is The Best Linux Distro?

Finally, an attempt to answer to the age old question: Which Linux distro is the best?

This question has been asked time and time again and debated from the moment more than one distro existed – so, pretty much since day one. It has been so hotly debated that it has caused true animosity and people rage-quitting entire sites. Some people have high conviction that their distro of choice is the best distro!

Hint: It’s not.

I’ve been using Linux exclusively for more than a decade.
Many years ago, I used Unix extensively.
I have dozens of virtual machines of current distros.
My Linux ISO folder is 250 GB in size.
If you can name it, I’ve probably installed it and used it.

I think that makes me pretty darned qualified to finally put this question to bed.

So, what is the best Linux distro?

There isn’t one.

There is No Best Linux Distro:

The best Linux distro is the one that is best one for you. It’s the distro (perhaps even plural, ‘distros’) that suits your individual needs best. The best Linux distro the one where you’re most able to get your work done, because that’s what an operating system is for. An operating system is a tool to help you accomplish a computational goal.

The best distro the one that’s suited to your personal workflow. It’s the one that makes you the most happy, and the one that best lets you use the applications you need to use. Basically, it’s the one that works for you.

You can look up Linux distro benchmarks.
And can check their popularity.
Or you can test them out virtually online.

You can download the images and use VirtualBox to test them for longer periods. You can download the various .iso images and test them on bare metal by using them live – without making any changes to your currently installed operating system.

But, at the end of the day, nothing beats experience.

It May Take a While:

The reality is, it may take you some time to find the right distro for you. Maybe you’ll start with something easy to install and maintain, and maybe your final destination ends with Gentoo. Who knows? Only you. Only you know.

When someone attempts to tell you the best Linux distro, what they really mean is what is best for them. That may not be the best for you. It could very well be, but you won’t know until you try. You still might not know until you’ve tried many distros.

There are many things to consider. Do you want a stable release? Maybe you want a rolling release with the most up-to-date software? Or, perhaps you want to use Aptitude or Zypper, or maybe no package manager at all? Which desktop environment do you want? What default software do you want? Which window manager is right for you? Do you want a fancy desktop or just the bare minimum? How about something in between?

TIP: You can do some really refined searches at DistroSea.

Do you want a distro that comes with just the basics so that you can add your own software? How about a distro that comes with the software you’re most likely to use? Maybe you want a specialist distro that comes with the tools you need, like Springdale Linux? Do you want to work with multimedia as a creator with Ubuntu Studio?

Then, what computer architecture are you using? Are you trying to keep your old 32 bit computer running? You can do that!

Do you want to use your SBC (Single-Board Computer) as your HTPC (Home Theater PC)? You can do that!

Do you want to set up your own router and firewall? You can do that!

Do you want to set up your own NAS (Network-Attached Storage)? You can do that!

There are unique Linux distros to do all of those things!

So Many Choices:

There are many, many choices. Odds are great that there’s a distro that’s just right for you. And, if you can’t find one that’s just right, you can make your own. On top of that, you can make pretty much any distro do the same thing that another distro does. So, you can start with one distro and turn it into whatever you want.

The choices are so many and so broad that you have practically limitless choices. That’s one of the things that makes Linux so great. You have a say in what your operating system does (and what it doesn’t) do. It’s your computer, you get to decide.

And that, that’s the answer to this age-old question. There is no right distro, there’s only the right distro for you.

Me? I’m old. I want stability and an environment that gets out of my way to let me get my work done with the smoothest possible workflow. The distro that does that is the distro that’s right for me. You do you and you decide what the best distro is for you.

Most of all, enjoy the wondrous journey of discovery, as  you too find the right Linux distro for you.  

Closure:

This article has been pulled over from the old site. It may look familiar to some of my readers. I cleaned it up and moved it, formatting it to match the current site. 

Thanks for reading! If you want to help, or if the site has helped you, you can donate, register to help, write an article, or buy inexpensive hosting to start your own site. If you scroll down, you can sign up for the newsletter, vote for the article, and comment.

NOTE: This article was updated on 06/19/2021.
NOTE: This article was updated on 05/13/2022.

How To: Disable Sleep And Hibernation on Ubuntu Server

For some reason, Ubuntu Server comes with ‘power management’ enabled. This is an article that tells you how to disable sleep and hibernation in Ubuntu Server. It’ll work just fine for non-server installs, but this is aimed specifically at the Ubuntu Server release.

I recently was working on my own router. For this, I used Ubuntu Server as the base operating system. For some reason, it was shutting itself down after periods of inactivity. This isn’t acceptable behavior for a device that’s meant to be running all the time.

I checked in my logs and I found entries like this one:

Apr 3 12:18:27 server systemd[1]: Reached target Sleep.

That was entirely unacceptable. I do not know why power management was installed, nor do I know why it was active by default. I merely know that it was and that I couldn’t have that behavior with a server, a device meant to be always powered on.

So, I did what anyone would do in my shoes. I disabled sleep and hibernation entirely. It’s quick and easy – and effective! I’ll show you how!

Disable Sleep/Hiberation:

Like most articles, you’re gonna need a terminal. If it’s actually a server, you’re likely already able to connect with SSH. So, add the step of connecting to the server if you’re doing this remotely. If not, just proceed.

Once you have your terminal open, you’re to kill everything that has to do with suspend, sleep, or hybrid-sleep. It’s actually pretty easy. Start by opening said terminal, by pressing CTRL + ALT + T and then enter the following commands:

First, you mask ‘sleep.target‘:

Then mask ‘suspend.target‘:

And mask ‘hibernate.target‘:

Finally, mask ‘hybrid-sleep.target‘:

Later, should you change your mind, you can unmask them and that’ll enable them again. Just change ‘mask’ to ‘unmask’ and run the commands again. See? Pretty easy!

If you want, you can verify the efficacy. Simply use the following:

(You can change ‘sleep.target’ to one of the above services and check them individually.) 

Closure:

That’s it! I told you that it’d be pretty easy. It’s not only easy, it’s easy to undo this should you change your mind. Again, I do not know why power management is enabled by default in a server release. Nobody asked me! So, that’s how you disable sleep and hibernation with Ubuntu. (It’ll surely work with other distros.)

Thanks for reading! If you want to help, you can donate, write an article, vote for articles you like, share this article on social media, buy cheap hosting, register to help, etc… Nobody ever reads the last paragraph anyhow. Still, you can help if you want!

Update 01.27.2020 Per comment.

‘vnStat’ A Tool For Monitoring Your Bandwidth Usage

‘vnStat’ is a wonderful tool for monitoring your bandwidth usage. This article will show you how to use vnStat effectively. For bonus points, we’ll also look at ‘vnstati’ so you can make pretty graphs to visualize your bandwidth usage. This article shouldn’t take too long!

vnStat‘ stands for ‘view network statistics’ and has been around for like 18 years at the time of this writing. It’s so common that it has its own Wikipedia page. Of course you know that already, you can see the handy link I already provided!

Anyhow, ‘vnStat’ is a tool that runs in the terminal, a console tool as it helpfully describes itself:

vnstat – a console-based network traffic monitor

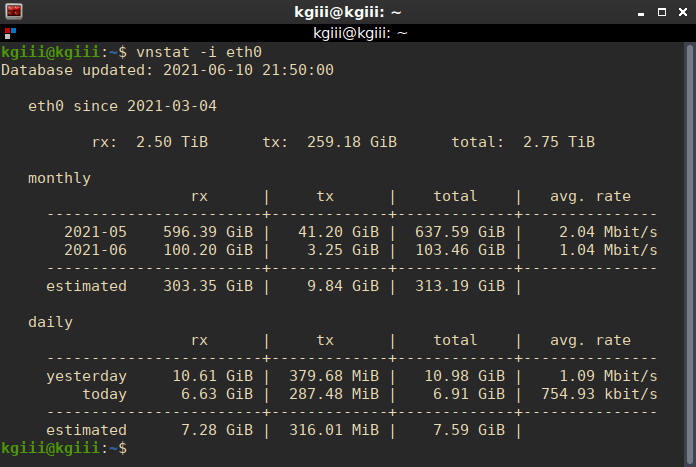
It’s a pretty great tool that generates some neat information and displays it in the terminal. It looks a little something like this:

vnStat in action!
See? I’ve stopped taking screenshots with a semi-transparent terminal! I’m pretty much a pro!

That image should save me a whole bunch of time! I trust that my readers are smart enough to figure out the gist of it with just a handy screenshot. For those not fluent in the ways of vnStat, ‘rx’ means received and ‘tx’ means sent. The rest should be pretty easy to figure out.

Install vnStat:

In order to get vnStat, you have to actually have to install it. It’s available in the default repositories in the popular distros (and even the BSD family). If it isn’t, you can always build it from source. But, you can probably install it much like you’d install anything else. For example, in a distro that uses apt you’d install it with:

(We might just as well install vnstati at the same time. Also, adjust that command for your own package management system.)

You can next go ahead and enable the service and start it next. That will be:

Once it is installed, you should set up database(s) for vnStat. This is done with:

Where you have “<device_name>” you replace it with the name of your internet adapter. For example, lots of Ethernet adapters are ‘eth0’. You can find the name of your adapter(s) by using either ‘ifconfig -a’ or ‘ip addr’. You can repeat this with all the names of the internet adapters you use, if you do in fact use more than one.

Then you can verify your vnStat installation with:

Assuming that spits out a version number you should be good to go.

Using vnStat (& vnstati):

So, by now you should have vnStat installed, and its sister app vnstati should also be installed. Let’s examine how you use them.

First, you can just call the application in the terminal. There’s nothing complicated about it and it may be your choice if you have more than one network interface. To do so, it’s just:

You can also be more specific, getting the data for just a single device:

Where ‘eth0’ is, change it to the name of your device. So, for a wireless device, it may look something like:

There are a ton of other options, so be sure to check the man page. Those are the options that I use most often, so those are the only ones we’ll be concentrating on.

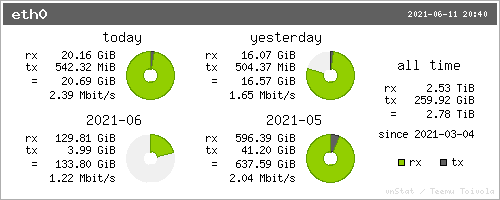
Now, you can also use vnstati to make a nifty graphic that will show you your bandwidth usage. It looks a little something like this:

vnstati in action
That’s the graphical outcome I prefer.

That’s the output of this command:

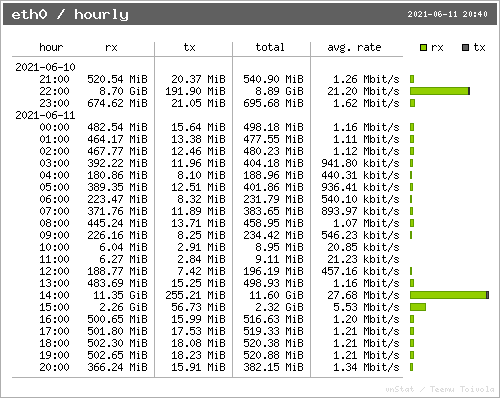
As you can guess, you can change the output path to anything you want (and have permissions for). I prefer that particular graphic, but there are a ton of options and you can gather all sorts of information. For example, there’s also this to show the hourly rate from the past 24 hours:

vnstati in action
This is an hourly output, which may be of value if you have limited bandwidth.

That is the output from this command:

And, again, you can modify the outputted .png to place it where you want. There are a whole lot more options and this article isn’t going to cover them all. That’s not the kind of article I write. There are tons more options in the man page, if you want to explore them.

Find what works for you and run with it. You should be able to find a format you like that has the information you’re looking for. I’m just introducing you, you decide how you use it.

Closure:

And there’s another article in the books! This one explains vnStat and vnstati. Both are pretty great tools that go well together, and they help you monitor your bandwidth usage. If you have any questions or comments, feel free to scroll down and leave a message.

Thanks for reading! If you want to contribute, you can donate, you can write an article, you can register to help, you can buy inexpensive hosting, you can rate the articles, you can scroll down to sign up for the newsletter, or you can share this site on social media. If you can think of anything else to help, jump right in and start doing it!

Linux Tips
Creative Commons License
This work is licensed under a Creative Commons Attribution 4.0 International License.