How To: Have Infinite Bash History

Today we’re going to have a good time because we’re learning how you can have infinite Bash history. There’s a bit more to it and not all of you will want an infinite Bash history. But, for those that do, we’re going to accomplish that right here in this article!

First, I’m assuming you’re using Bash as your shell. The odds are really good that you’d know if you’re not using Bash, as Bash is pretty much the default. Bash is the interactive shell you’re using, known as Bourne Again Shell. If you don’t know what shell you’re using, I covered that in an article about determining the shell you’re using.

Side Note: I sometimes write articles that are meant to preface another article, but then I forget and don’t write the additional article. I suppose that helps keep things interesting…

So, as you know, when you type a command into the terminal that command is stored in a file typically called ~/.bash_history – a hidden file in your home directory. Well, there’s a limit to how much history that file will retain and this is Linux – meaning that, of course, you can change that value. Today, we’ll be changing that value – making it ‘infinite’.

No, of course, it’s not really infinite. There’s a finite amount of disk space you have. This being a plain text file, it takes up very little space. While it’s not technically infinite you can store a whole lot of entries in your Bash history. We’ll set it to infinite, but I’ll show you how to set it to any value you want.

Ready?

Infinite Bash History:

As you can see, this is a Bash thing. That’s a good sign that you’ll need an open terminal. You can press CTRL + ALT + T and your default terminal should open. See? We’re already making progress!

With your terminal open, we’re going to edit another hidden file. The name of this file is .bashrc and it’s a file that stores things like terminal settings.

The tool we’ll be using is ‘nano‘. Click that link to learn about Nano, including how to install Nano should Nano not come preinstalled in your chosen distro. As you may know, Nano is one of my favorite text editors. We use Nano a lot around here.

Start with opening the ~/.bashrc file with nano, like so:

Scroll to the bottom and add the following lines:

Any negative value, in this case, -1, will result in an infinite history. However, you can make that value any number you want. When you’re done adding those lines, you have to save the file. Remember, to save a file in Nano, you just press CTRL + X, then Y, and then ENTER.

You could make the value 5000, for example. That’d simply look like this:

The sky is the limit. You can make that value any number you want, but all negative values will be treated the same. If the value is negative, it means you’ve got an infinite Bash history. Don’t forget to save any changes with Nano, as instructed above.

Now, you could reboot or log out to make the new settings take effect, or you can simply tell your system to reload the file to make the changes take immediate effect. That’s an easy command, simply use:

As you can see, infinite isn’t infinite (nothing is in the real world, according to current observations) and you don’t have to choose the infinite setting. You can pick whatever numbers you fancy and the process is the same.

Closure:

There you go, you now know how to set up your system to have an infinite Bash history. Well, an infinite ~/.bash_history if you prefer. With that setting engaged, you’re limited only by your creativity, fanaticism, and disk space. Go nuts with it! They make bigger disks! (Also, it takes up very little space.)

Thanks for reading! If you want to help, or if the site has helped you, you can donate, register to help, write an article, or buy inexpensive hosting to start your site. If you scroll down, you can sign up for the newsletter, vote for the article, and comment.

How To: Disable The Caps Lock Key

Today’s article is one that I used to scratch my own itch because I really like to disable the caps lock key. Of all the keys on the keyboard, that’s the only one that makes me want to disable it. The rest of the keys are fine, but I have no use for a caps lock key.

NOTE: This is probably not going to work if you use Wayland. I don’t know, I haven’t tested it. If you’re wanting to test it so that you can write paragraphs about how wrong I am, please do. I’m a little curious! I need to learn more about Wayland.

Sure, we could use the destructive (or at least awkward) method and physically rip the key off the keyboard. Some fancy keyboards have easily removed caps, meaning you can just remove them with a little caps-puller tool. Pretty much every time I’ve needed to remove keys, it has been a permanently destructive process, but I know it can be done.

By the way… This is why I’m a wasteful jerk sometimes and I just chuck that keyboard in the trash when I’m done with it. To be fair, I wear the letters off a cheap keyboard.  Where my thumb hits the space bar it wears down the plastic from repeated use. I’m not a ‘hard typer’, I’m a prolific typer. So, here we are…

Those of you with a keen memory may recall this article:

Disable The Caps Lock Key In Linux Mint

That was fine for Mint (Cinnamon)… It’s not a universal thing. I meant to write a more universal thing, so I guess this counts as that…

Disable The Caps Lock Key:

You’re gonna want a terminal window open for this. So, press CTRL + ALT + T and your default terminal should open. Tada!

Now, the tool we’ll be using is called ‘xmodmap’. See that ‘x’ in there? Yeah, that’s what (along with the description) makes me unsure if this is going to work for Wayland users. If you’re using a major distro, especially one using X, you’ve got this tool installed by default.

When xmodmap is not installed, the package name should be ‘x11-xserver-utils’ in Ubuntu and it’s fairly safe for other distros to assume the appropriate package will show up if you search your repositories for it. If you need to install it, say with a distro that uses apt (and you shouldn’t), then the incantation would look like this:

Got it? Is it installed? You can check if it’s installed with this command:

Now that you know you have xmodmap installed, you can just use the following command to disable the caps lock key:

Should you change your mind, which you shouldn’t because caps lock is evil and gets in the way of perfectly good typing technique, then you can undo this. Try this command, it should work:

That right there should get rid of your caps lock key’s functionality. You should be able to press the key and have exactly nothing happen, which is a good thing. 

Closure:

Yes, I know the Internet Wisdom© insists that “caps lock is cruise control for cool” but just don’t… No… Just don’t do that. Really, don’t do that!

Try as I might, I can’t think of a legitimate (for me) reason to use caps lock. I never use it on purpose. If I need a few capital letters, the regular shift key works just fine. I have two hands, after all.

So, if you’re like me and don’t want to be cool (and have fewer hassles) go right ahead and disable that caps lock key. I sometimes press it by accident while typing and not looking. It just makes a mess of things. While I type like a demon on fire, I don’t hold my hands in the correct position and don’t use the right fingers for the right keys. I press that ****ing caps lock key way too often, so disabling it makes my life easier.

Thanks for reading! If you want to help, or if the site has helped you, you can donate, register to help, write an article, or buy inexpensive hosting to start your site. If you scroll down, you can sign up for the newsletter, vote for the article, and comment.

How To: Prevent A File From Being Deleted*

Today, we have another simple article, where we discuss how to prevent a file from being deleted. It’s not quite true and I’ll explain in a moment, but for the most part, it makes it so you can’t remove a file by accident or the like.  So, if you want to prevent a file from being deleted* read on.

Now, let me be more clear. I’m a bit sorry for the cheesy headline, but there’s a reasonable character limit. I included an asterisk just to make sure. A user with root permissions (eg a user with sudo privileges) can still delete the file – but it takes an extra step to do so. They have to know and work at it to delete the file.

The tool we’re going to use is called chattr. While it looks like ‘chatter’ and I want to type ‘chatter’ every time I use it, it is a tool that you use to change a file’s attributes. It’s a handy tool but we’ll only be examining one specific use for chatter. If you’re curious, the man page defines chatter as:

chattr – change file attributes on a Linux file system

If you’re using a mainstream distro, you shouldn’t need to install chattr. You should find it already installed. Some of the more lightweight distros may not include it by default, but you can verify that it’s installed by running the following in your terminal:

If you do find that chattr isn’t installed, go ahead and install it. It’s in your default repos. I’m sure of it!

Prevent A File From Being Deleted:

You guessed it. You’ll need an open terminal for this one. That’s easy, just press CTRL + ALT + T and your default terminal should open. See? Pretty easy!

Now, I’m going to show you how to use chattr to set an immutable bit. It’s not difficult and just uses the +i flag. Let’s start with creating a file:

With the file created, let’s set the immutable bit with chattr:

Now, let’s try to remove it with the rm command:

No luck? Well, let’s grab a hammer. We’ll try to remove the file with sudo:

Surprise! You still can’t delete it, even with sudo or logging in as root. To delete the file, you have to first remove the immutable bit, like so:

After that, you can happily (and trivially) remove the file with:

In case that’s not very clear, I’ve made you an image. That should help!

prevent a file from being deleted
See? If the words aren’t useful, perhaps the picture will explain it better.

That should explain it well enough. The file can still be deleted, it just requires sudo and removing the immutable bit from the file’s attributes. Pretty neat, huh?

Closure:

Of course, there’s always a way for a root user to be able to remove a file. However, you can make it difficult should you want to prevent a file from being deleted. A skilled user will check the file’s attributes and know how to delete the file, so it’s more about protecting a file from being deleted unless you want to.

Thanks for reading! If you want to help, or if the site has helped you, you can donate, register to help, write an article, or buy inexpensive hosting to start your site. If you scroll down, you can sign up for the newsletter, vote for the article, and comment.

Make Applications Start Faster in Ubuntu

Today’s article is pretty specific as we discuss one way to make applications start faster in Ubuntu. However, I feel like I need to make you aware that this isn’t some sort of miracle software. The usage and results are pretty limited and I’m mostly covering this because it was in my notes and a question I saw recently on Reddit.

Now, for reasons, I’m not sure what format this article will take. I haven’t written it yet and the information I want to share is kinda mixed. I guess we could have a longer intro than normal.

So, the tool in question is called ‘Preload’. The man page describes Preload like this:

preload – Adaptive readahead daemon

Though I think it’s important to also quote this (also from the man page):

preload is an adaptive readahead daemon that prefetches files mapped by applications from the disk to reduce application startup time.

So, what is this Preload? It’s a daemon that runs in the background and monitors what you do. It pays attention to what applications you open (for example) and loads the various files into memory. Then, when you open the application it will open faster. This is mostly useful if you’ve opened the application, closed it, and wish to open it again. The second time you open the application, the theory is that it’ll open faster.

Does it work? I haven’t lied to you yet and I’m not going to start now. I haven’t tested it enough to claim it has any great benefits. Oh, I’ve installed it before and left it running. I just didn’t do any verification and I’m not going to cite my observations as factual without having data to back that up. I will say that I didn’t notice it slowing anything down. Of course, I have fast hardware, and using a stopwatch to test the results would be full of all sorts of inaccuracies. 

Do I recommend it? Well, it doesn’t seem to hurt anything. It does seem faster when I close Thunderbird and open it back up again. I use an NVMe M.2 SSD, which is already pretty speedy, so I doubt I’d see much. I’ve never tried with a slower SSD nor on an older spinning platter HDD – which is where I’d expect this Preload to work best. If you’re using older disks, it may be worth trying Preload. But, you won’t break anything if you install it on more modern hardware.

Make Applications Start Faster:

So, installing Preload is pretty simple. Once you’ve installed Preload, you are done. There’s no need to tinker with settings. There’s no need to configure it. It should even automatically set itself up as a self-starting daemon.

Crack open your terminal (you know how to do that by now) and enter the following to install Preload in Ubuntu:

Agree to install and enter your password. That’s it. That’s all you need to do. You can check the man page:

See? I told you this would look like a weird article.

Closure:

Have you had good luck with Preload? Have you been using it all along? Did you use it back when you were using a spinning hard drive? Did it help to make applications start faster? Let me know in a comment. I mean, it’s not snake oil, but how much could it help an average user with modern hardware? I’m not sure how much it’ll help those folks.

Thanks for reading! If you want to help, or if the site has helped you, you can donate, register to help, write an article, or buy inexpensive hosting to start your site. If you scroll down, you can sign up for the newsletter, vote for the article, and comment.

How To: Make Google Chrome Use Less RAM (UPDATED)

Today’s article is going to be a brief article about a previous article, where I gave you one way to make Google Chrome use less RAM. Consider this an updated article. So, if you’re trying to make Google Chrome use less RAM (and power, I guess) read on!

As tech goes, the situation has changed. As the tech changes, so too must we change our reactions to said changes. The thing with tech is that it never stands still, something that I (for one) appreciate.

The article in question is about making Google Chrome use less RAM. This applies to other browsers, but I concentrated on Chrome. Here is that article:

How To: Make Google Chrome Use Less RAM (And Other Browsers)

In that article, I recommended folks use the “Auto Tab Discard“ plugin. That recommendation has not changed. It’s a great add-on that will discard unused tabs, saving you both RAM and some power (which is useful for mobile devices).

Now, Google (along with other browsers) have enabled a new(ish) feature. Basically, to save power, the browser does what Auto Tab Discard does – it puts unused tabs to sleep. So, when you open those tabs that were sleeping you will need to wait a moment for them to reload.

That’s not a problem. The problem is, Google does this indiscriminately by default. Chrome does seem to make an exception for tabs that are playing audio or video, but all other tabs are fair game and will be put to sleep.

I repeat, all other tabs are fair game. They can and will be put to sleep. That’s downright annoying when you distinctly want to keep some tabs from going to sleep.

Fortunately, you have options.

You can disable this feature in your settings and continue using an extension like “Auto Tab Discard”. That’s a fine choice. That was my choice. It’s probably the wrong choice, but it is a choice.

Your other choice is to manually add sites to the whitelist, telling Google to keep those tabs open. So, you won’t need the extension if you choose to do it this way. This is probably the best choice. This is the choice I did not make.

I’ll show you how to make that choice, and kinda format this like a ‘regular article’…

Make Google Chrome Use Less RAM:

For once, you don’t need to open a terminal!

Instead, open Google Chrome. Then, click on the vertical three-dot menu in the upper right, and then you need to click on “Settings”. When that tab opens, click on “Performance” (on the left) and the rest should be fairly obvious.

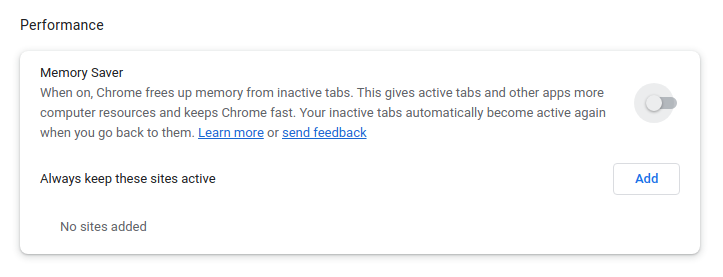
If you’re like me, you can just disable the feature. That looks like this:

disable the power saving feature for Google Chrome
At this stage you can modify your settings as you see fit. I’ve turned the feature off. Go me!

If you want, you can keep the feature enabled (it was enabled by default at my house) and just add your favorite sites to the list of sites that always remain active. I don’t feel like messing around with it, so I’ve simply disabled the feature and opted to keep the extension.

I suppose that might mean I use a little extra RAM, I haven’t tested but it’d be a very trivial amount and I quite like the GUI offered by the installed extension. When I next do a clean install, I’ll probably just let the browser deal with it instead of using the extension.

Other browsers may use similar tactics to save power (and free up RAM, the two are related). As of the time of this publication, this was not yet a feature that’s in Google’s opensource counterpart Chromium. Right now, this appears to just be a function in the proprietary version, but tech changes and that too may change.

Closure:

And, well, now you can see why this is an article all of its own. It was more than I could reasonably add as an update to the existing article and was enough information to make a new article. After publication, I’ll update the previous article to link to this article. I hope… Hopefully, I remember to do that.

Hmm… I think I forgot to do a ‘meta’ article in February. February is a pretty short month, plus I’ve been otherwise distracted. But, I’ve not been too distracted to skip a publication date! We’re rapidly approaching the two-year mark. It has been a pretty good ride!

Thanks for reading! If you want to help, or if the site has helped you, you can donate, register to help, write an article, or buy inexpensive hosting to start your own site. If you scroll down, you can sign up for the newsletter, vote for the article, and comment.

Linux Tips
Creative Commons License
This work is licensed under a Creative Commons Attribution 4.0 International License.