How To: Sanitize Exif Data From Your Digital Images For Privacy Sake

When you take a digital picture, the resulting file contains potentially personal information. It is known as ‘Exif‘ and it contains sensitive information. This article will explain how to sanitize Exif data to avoid leaking your personal information.

If this article looks familiar, I’ve previously authored an article on this subject. It’s at the old site, which will be redirected here. I might as well write it anew, using the current style.


UPDATE: I received an email one Morgan Kinney, inviting me to review and include a link to a study they (authored by one Paul Bishoff) had done regarding Exif data and the privacy implications. If this article wasn’t clear enough about the privacy aspect of sanitizing Exif data, then please consider reading the following link:

EXIF metadata privacy: A picture is worth a thousand data points

I’d not normally do this, but their work is well done and is a worthy addition to your understanding of Exif data and the privacy risks associated with Exif data. See the “Closure:” section for more updated information.


Moving on…

Exif is the additional information included in the file your digital camera makes, among other things. It can be as benign as color correction data to orientation settings. In some cases, it can also contain such privacy-wrecking gems as when and where (the GPS coordinates) and when  the picture was taken. It is defined as thus:

Exchangeable image file format (officially Exif, according to JEIDA/JEITA/CIPA specifications) is a standard that specifies the formats for images, sound, and ancillary tags used by digital cameras (including smartphones), scanners and other systems handling image and sound files recorded by digital cameras.

The Exif data can even contain information about the camera’s brand and, as you can see, isn’t limited to just a fancy digital camera. Your other devices, from smartphone to scanner, add this extra data to the file. Anyone who is aware of this can easily look for this data. Exif data has even been used as evidence by the judicial system.

Obviously, there are huge privacy implications with this. You can probably minimize some of the data that’s created by changing your phone/camera’s settings. That does nothing for existing files, and nothing for when your device has no such configuration options.

Let’s See This Exif Data

There are any number of ways to examine the Exif data. For example, this is some of that data and it is being drawn from a program called XNViewMP.

Exif data
Exif data sample. There’s not a whole lot of data with this one.

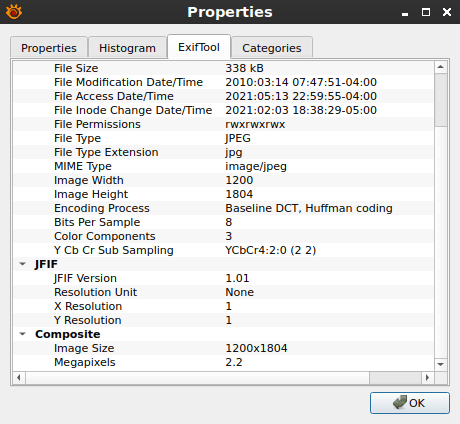
That one tells you how old the picture is, and not a whole lot more. But, it also now contains the information about the last time it was accessed. That could be of interest, perhaps giving away things like the age of the photo’s subject.

This next picture is the Exif data from one of my cellphone pictures. I have the GPS data turned off, so that wasn’t included. You’ll see a ton of additional information.

More detailed Exif data.
See? Now you can tell I don’t bother updating my phone often.

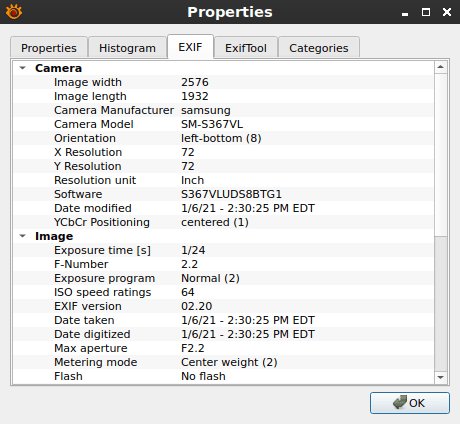
As you can see, there’s even more data in that file. There may well be even more data in your pictures. It tells you what camera I was using (a cell phone, and an old one at that) and that I took the picture at 14:30, in a well lit room. It even tells you the software version, which may be exploitable to an attacker.

Don’t worry too much about this. It’s a solved problem. You can sanitize Exif data and maintain a bit more privacy. It’s actually remarkably easy.

Many image hosting sites will automatically strip the Exif data when you upload your image.

Let’s Sanitize Exif Data

The tool we’re going to use for this is ‘exiftool‘ and it’s pretty simple. It’s quite likely already in your default repositories, or at least the repositories you can add trivially. In Debian/Ubuntu/Mint/similar, you can install it with:

You’ll need to adjust the command for your distro, of course. Once you have it installed, you can navigate to the directory where you store your images and run something like this to sanitize png files:

Or, if you’re trying to sanitize .jpg images, you’d run this command:

Depending on the number of files in the directory, it could take a little while to run. It’s pretty speedy and it does give you confirmation when it’s done. I’ve used it on large numbers of images at once and it took care of them all in less than a minute. I probably should have paid more attention, that way I’d have some actual numbers for you.

NOTE: The exiftool can actually strip data from other files, including files like PDFs and other such types of documents. A complete list can be found here. Yes, those documents contain data beyond that of the text contained in them. They may contain such data as the computer name, username, and dates and times of file creation and editing.

Personally, I combine both the .png and .jpg commands into one command and I run that command with an alias. We haven’t covered aliasing yet, so I’ll just go ahead and show you what I use.

That, if added to .bash_aliases, would let you use ‘picclean’ to sanitize an entire directory’s worth of png and jpg files. It comes in pretty handy if you’re sharing a bunch of files and want to make sure they’re all clean before you send ’em.

Closure:

Well, there you have it. Hopefully you’ll now know a little bit more about how to sanitize your image files, removing the private data from them as much as you can. If you don’t generate the data in the first place, you don’t have to delete it. So, disable embedding GPS coordinates in your phone (or some fancy cameras) and don’t take pictures of yourself while doing illegal activities.

UPDATE: As mentioned, I’d not normally do this – but there are exceptions. I don’t mind linking to other sites if the content is worth the attention of my readers. If you have your own content and would like to have it referenced here, don’t be afraid to contact me. Just be aware that I decline about 60% of these sort of requests. While I do love guest additions and guest articles, no I won’t be including articles about mortgage rates and the benefits of CBD oil. My readers aren’t interested in articles like that. So, your content needs to be both good and topical.

Thanks, as always, for reading. I always look forward to the feedback, here and on other sites. Don’t forget that you can unblock ads, sign up for the newsletter, donate, or contribute by writing an article or two. Don’t forget to share this site with your friends. Share the love!

UPDATED: (Updated on 01/23/2022)

My Three Favorite Text Editors, a Meaningless List

One of the things I hope to avoid on this site is lists and rankings. I hope to be creative enough to avoid what other sites do. You shouldn’t expect this site to have articles like, “The Top 10 Distros for Low-end Computers!” It’d be great if I were creative enough to not end up with articles like that. Though they do appear popular, I think we can do better than that!

Ah, yes… I see that paragraph coming back and biting me in the arse after I’ve run out of article ideas and am just publishing fluff content. Anyhow…

People have heard me say this before, and it’s just like how I do it with browsers, I use different text editors for different reasons. I do different things in each, using each for specific tasks. This article shares my three favorite text editors, along with the why and how I use them.

This isn’t a list of the best text editors, because I don’t know what needs you have and I don’t feel qualified to say what is best. (That’s another sentence that’s going to come back and bite me in the arse.) Instead, it’s a list of my favorite text editors – so you could say that they’re the best for me.

The order that I list these text editors in might as well be in the order that I use them. I can’t think of a better way to organize them. So, here they are from most-used to least-used.

Favorite Text Editor #1: FeatherPad

Link: FeatherPad

That’s right, FeatherPad comes in first. Why? Because I always have it open. It, along with a host of other software, gets opened immediately after booting and never gets closed. 

Maybe a picture will explain it:

FeatherPad with many files open.
As you can see, it’s a pretty busy application with many text files open.

See? I do a lot of things in plain text files. I keep track of many things, including ideas for articles for this site. When it comes to keeping many text files open and available, FeatherPad does great. FeatherPad doesn’t use a lot of resources, never crashes, and has adequate preferences for me to set it up how I like.

I use all those text files (fuzzed section on the left) on a regular basis. Not only can I save them as a session, FeatherPad can helpfully open all previously opened text files when it is started. I don’t use a clipboard manager, I use plain text files that can be easily managed and FeatherPad is one of my favorite text editors. The session feature is a great benefit.

Favorite Text Editor #2: gedit

Link: gedit

gedit, no caps, is a rather pompous application. When you install it, it boldly refers to itself as “Text Editor”, as though it is the only text editor out there. It’s also meant to be used in the Gnome desktop environment, and is actually the default Gnome DE text editor. You can trivially install it on other desktops and it doesn’t pull in a ton of dependencies.

The gedit text editor is one of my favorite text editors because of the plethora, yes an overabundance, of plugins available. It’s easily themed with colors that don’t burn my eyeballs, and the syntax highlighting works well enough. I even wrote an article about installing gedit with all the bells and whistles. (I know, it needs to be transferred to this site.)

gedit in action
See? It doesn’t scald my eyeballs and it highlights text just fine.

I use gedit when I’m editing files with my FTP client. I use gedit when I right click on a file and want to open it. The gedit text editor is good for that sort of stuff. It’s basically my default editor for plain-text files that I don’t already have opened in FeatherPad. 

It’s not the lightest editor out there, but it’s not all that heavy. gedit opens responsively even with reasonably large text files. It does what it says it does on the tin and, as such, is one of my favorite (or at least most frequently used) text editors.

Favorite Text Editor #3: nano

Link: nano

At the time of writing, nano is going on 22 years of age. Yeah, it has been around that long. While I have a passable familiarity with Vim, I don’t really need any advanced features when I’m editing files in the terminal.

nano is a GNU project, just like Emacs, but doesn’t have nearly as many features and runs in the terminal. You also don’t get to use the macros that you get to use in Emacs. It’s a much more simple application than Emacs.

While you can surely use nano for a lot of text editing, it’s not ideal for doing so. If you’re going to do a lot of text editing from the terminal, learn to use Vim. If you’re going to just do quick edits (like me), nano works just fine.

nano text editor in action
There aren’t many features. This is a very bare-bones editor. That”s intentional.

As I said, it’s really basic, and that’s by design. It’s meant to be basic and to just be used for editing text. Unlike some of the other editors that run in the terminal, this one probably came installed on your distro by default.

You’ll need to learn some keyboard shortcuts to make use of nano, but they’re easily learned and you’ll soon have a familiarity with the application. It’s great for quick edits, especially if you need elevated permissions – which is when you just open it with ‘sudo’ and it functions like normal but with the ability to edit things like system files.

Closure:

There are a ton of editors out there. Feel free to leave comments telling us about your favorite text editors. You too many find that it’s easier to use different editors for different tasks, and I’d encourage folks to try it. I’ve been doing it this way for years. It seems to actually save time, because each application is used for the tasks it is most suited for.

I also use other text editors, such as Sublime, Bluefish, and Notepadqq. Those get used with less frequency and only for more specific tasks. They aren’t included here, because I use them far less often. 

As always, thank you my wonderful readers. Traffic is starting to pick up on this site. That’s a good thing! Don’t forget that you unblock ads. If you want to support this project, you can also sign up for the newsletter, donate, or even write articles.

Keyboard Shortcuts to Browser Bookmarks

I open a lot of URLs in the course of a day, especially during the pandemic when there’s naught to do but while away my time online. Seriously, I open a whole lot of addresses – many of them the same and opened often. I thought it’d be great to have keyboard shortcuts to browser bookmarks.

The answer isn’t to open more tabs, I already have too many tabs open. With 100+ tabs open across three browsers almost all the time, I have too many tabs already.

The address bar is helpful – but not as much as one might think. For example, I have multiple sites with Google Analytics. The URLs in the drop down menu are cryptic and bookmarking them all just extra steps to my workflow. They look like:

https://analytics.google.com/analytics/web/#/report/visitors-overview/a178003867w269232012p241267937/overview-dimensionSummary.selectedGroup=demographics&overview-dimensionSummary.selectedDimension=analytics.country

When I start typing in the address bar, my ‘drop-down’ menu has all sorts of URLs that look exactly like that. That’s not too helpful.

Looking for plugins to solve this issue wasted so much time that I’m writing this now, because sleeping is futile.  I need to be awake in few hours. No sleep for me…

I searched high and low, hoping to find a browser plugin/extension/add-on that’d let me assign keyboard shortcuts to my bookmarks. None of them met my needs – and I’m pretty sure I tried them all. 

By the time I had tried the last of them, I realized that I don’t actually need any help from a plugin or extension. No, my desktop environment takes care of this for me. I just hadn’t thought of it.

Make Keyboard Shortcuts to Browser Bookmarks

Pretty much all the major desktops have resolved this problem. You just have to look at it from the right perspective. So, I write this in hopes of saving someone else the time I spent searching for solutions.

‘Member all those keyboard shortcuts you use for doing things like opening the menu, opening the terminal, showing your desktop, maximizing windows, and things like that? 

Well, they work just fine for other commands. Keyboard shortcuts work just fine for opening browser tabs and windows. Your keyboard shortcuts can do more than just turn the volume up or down, and they can do more than enable typing things things like ©, Ø, or ¶. These shortcut things can do more than open menus!

Other people may have thought this obvious. You may think it obvious after the fact. I am unashamed to admit that it took quite a while for me to realize that I already had the tools for this. Again, I hope writing this saves someone else some time. It’d be great if this had been obvious from the start.

For this, we’re going to be using Lubuntu (LXQt) and Google Chrome. For other desktop environments, you’ll have to adjust. You almost certainly have a similar function, just look in your menu.

In Lubuntu, you’d be looking for Menu > Preferences > LXQt settings > Shortcut Keys. 

Yup, we’re going to use those. We’re going to fix this oversight – by using system shortcuts as keyboard shortcuts to browser bookmarks!

I admit, it’s a bit of a sledgehammer method, but it works!

Making it Work

It will vary for you, but for me it looks like this:

assign keyboard shortcuts
By now, the method should be becoming self-evident.

Then it looks like:

add keyboard shortcut
Figure it out yet? Yup, the solution is that easy.

In this case, and you’ll have to change it for your desktop environment. In LXQt you set the shortcut by clicking where the first arrow is and then pressing the keyboard combination before the timer runs out. Me? I used CTRL + SHIFT[keybt] +[keybt]A for the first one and then I went across the home row adding more.

An  example of the command I used, and I needed to tick the circle to make it a command based shortcut, was this:

I could/should have used ‘google-chrome-stable’ for the command, but why follow the rules when you’re already breaking them? I’m pretty sure these type of shortcuts are meant to be used as system shortcuts and I’m pretty sure that we’re ‘not supposed to’ turn them into shortcuts for browser bookmarks! For that reason, you’ll see that I picked an unusual set of key combinations for them.

I used the CTRL and SHIFT modifiers because they are not used in tandem for many things. You should probably adjust accordingly for your system. Try to make up key combinations that aren’t likely to be claimed by your system, your desktop environment, and the applications you use. These new shortcuts will almost certainly overwrite any application-specific shortcuts as they’re truly system shortcuts!

If you use a different browser, you’ll also have to adjust accordingly. You can test the commands by trying them in the terminal first. If they work in the terminal, you can probably assign keyboard shortcuts to them.

For example, if you use Firefox, then it is ‘firefox <url>’, just like it is ‘vivaldi <url> for Vivaldi. Your browser may even have additional modifiers to open it in a new tab, in an existing window, or maybe open the URL in an incognito session! Look it up and find out – or use ‘man <browser>’ for more information. Try ‘firefox –new-tab –url https://linux-tips.us’ if you want to see an example.

While this is pretty heavy-handed, and probably not something they suggest doing, it works. Sure, it will take some time to remember which keyboard shortcut is which, but I doubt that’ll take long before it’s muscle memory.

It’s a bit like pounding in thumbtacks with a framing hammer, but it works – and there are many, many possible keyboard combinations that aren’t already in use. Given enough time and effort, you could have a ton of bookmarks that open with a simple set of keyboard presses.

Like always, thanks for reading! This has been a pretty fun project and the goal-reaching feels pretty great on the ego-muscle! It’s not all that easy to come up with article ideas, so feel free to suggest some. Don’t forget that you can unblock ads, sign up for the newsletter, donate, contribute by writing an article, register to participate, help edit, etc…

You can also scroll to the bottom of the page to check the copyright that has been there since Day One. This blog is itself opensource, so you can use these articles as you want.

Prevent Application Updates With ‘YUM-VERSIONLOCK’

I recently wrote a similar article, illustrating how you can use ‘apt-mark’ to prevent application updates. While that was handy, it only applied to those who use APT as their package manager. It offered nothing of value to those who use YUM.

This article will explain how you can prevent application updates with ‘yum-versionlock’. You will learn how you can temporarily prevent application updates when you have no choice but to.

In the previous article, I explained that you should always use the most up-to-date software that you can, at least if your system is connected to the public internet. Software updates provide security fixes, not just bug fixes.

Not updating means you’re vulnerable and your vulnerabilities may impact other users. For example, your computer may become a part of a botnet, a spam relay, or even be used as a command and control device for those things. As a global citizen of the ‘net, you’re obligated to do what you can to minimize harm.

So, it is possible to prevent application updates, but you really should only do so when it’s absolutely necessary. In an ideal world, you’d be able to always use the updated version, but we don’t live in that world. We live in the real world, where we have things like compliance and compatibility issues. 

YUM, what is it? YUM stands for Yellowdog Updater, Modified. It’s a package management utility for RPM based distros. You’ll find YUM in distros like RHEL, Fedora, and even OpenSUSE. It’s fairly widely used, though many of the RPM-based distros are more prominent in the server space than they are in the desktop space.

These days there’s actually DNF (which stands for Dandified YUM – don’t blame me, I don’t name these things) but that’s not important today. Today, we’ll be using ‘YUM-VERSIONLOCK‘ to prevent application updates.

Prevent Updates with ‘yum-versionlock’

Unlike ‘apt-mark’, you’ll need to install something in order to do this. It should also be mentioned that there are other ways to accomplish this, but this is the easiest way to prevent application updates. Using versionlock is the most straightforward way of accomplishing this.

First, you’re gonna need to crack open your terminal. You can do that by using your keyboard. Just press CTRL + ALT + T

Once your terminal is open, you’ll need to install ‘yum-versionlock’. You can try this first:

If that gives you an error, I can’t figure out where the name changed, then you can most likely install it with:

Once you have it installed, you can check the man page to see how you use it. Even if you installed it with the second command, the man page is still found at:

The one-liner quite accurately defines versionlock as:

yum-versionlock – Version lock rpm packages

Anyhow, to use it to hold a package at its current version, you simply use:

NOTE: The command supports wildcards. You can use an asterisk with this command. The command will give you feedback. You can also use ‘add’, but it’s redundant.

If you want to remove the lock, which you should do as soon as realistically possible, then the command is fairly evident. It’s just:

If you, like me, don’t always keep the best notes and don’t have the greatest memory, then you can list the locked packages with this command:

There’s no need for elevated permissions with that command, but it will take a little while for it to complete. It will output any locked packages and you can unlock them individually. Again, you can use wildcards in this command.

However, you can remove all the locks with just one command:

As you might expect, that removes all the locks and your system will resume updating normally. You should not keep software locked to one version for long. Though you may be using a LTS-type distro, only getting minor point release upgrades, you are still getting security updates. Keeping your system secure makes you a good netizen. 

Closure:

And there you have it. Another article in the books, this one explaining how to stop updates for specific applications. Thanks for reading and feel free, nay encouraged, to leave feedback. If you have any ideas for articles, feel free to share them. You can also contribute by writing your own article. I’ll even edit it up for you!

Don’t forget that there’s a newsletter (we never spam or share your address with anyone, it’s all in-house) and you can even donate. I’d kinda like the site to at least pay for itself, simply out of principle. If not, there are ads you can unblock! Even if you do none of those things, there are good odds that I’ll keep this site up, running, and interesting.

Prevent Application Updates With ‘APT-MARK’

While unwise, there are times when you need to prevent application updates. You can do this with ‘apt-mark’ and this article will explain how. Obviously, this method is only effective if you use a Linux distro that has an APT-based package manager.

For the most part, you should always keep your software updated. However, that’s a rule for the Ideal World®. For the rest of us, those of us that live in the Real World®, you’ll almost certainly run into an eventuality that requires you to keep an existing, specific version of software.

While entirely stupid and irresponsible, I kept a version of Thunderbird past its due date because the update simply ruined my existing installation. I only kept that outdated version long enough to make the leap to a more recent distro version. The tool I used to prevent application updates was apt-mark.

You will have your own reasons, from compliance to stability to functionality, for keeping the same version of your installed software. You should only use this sparingly, only as necessary, when there’s simply no other solution. This should also be a temporary measure. You should always try to use the upgraded software because there are (possibly) security implications if you don’t.

A little about APT

While we’ll technically be using ‘apt-mark‘, it should be mentioned that APT stands for Advanced Package Tool. It’s the default package manager that is used in many distros, mostly Debian and those of Debian descent. So, you’ll see it in everything from Ubuntu to Linux Mint. 

In the desktop scene, I suspect it’d be the most common of all package management tools. Even if you use a different distro with a different package manager, you should probably have a basic familiarity.

Using ‘apt-mark’ hold and unhold

The tool we’ll be using is ‘apt-mark’, and the man page helpfully defines it as:

apt-mark – show, set and unset various settings for a package

We’ll only be concentrating on a couple of commands, those necessary when you want to prevent application updates, plus one extra command that will help you keep track of the two commands we’ll be focusing on.

The first of those two commands is ‘hold’. This command is used when you want to ‘hold’ a package at its current version, preventing upgrades. Remember, this should really be used only when there’s no other solution, as many upgrades fix security issues as well as bugs. It’s actually a fairly simple command.

When you enter this command, you’ll get a confirmation message. It will tell you that the application is now being held. It will remain held until you ‘unhold’ it. So, it’s a set-it-and-forget-it type of deal, though you shouldn’t really forget it. You should undo it as soon as you realistically can.

To reverse the restriction, resuming your normal updates, you simply need to ‘unhold’ it. The command is fairly obvious, and it looks like this:

That will free the hold on the package and tell you that the hold has been lifted. The package should then upgrade as necessary and as issued. If new upgrades show up in the repositories, it should function as normal and upgrade like it did prior to the hold.

If you are like me, you may well forget that you’ve held packages back. The package names are often long and nonsensical, so they’re easy to forget. In the heat of the moment, you may have forgotten to make a note of the package(s) you’ve held.

Don’t worry, ‘apt-mark’ has you covered! When you want to know what packages are being held, just run this command:

Note the lack of ‘sudo’ in that command. You don’t need sudo because you don’t need elevated permissions to list held packages. You only need elevated permission if you want to change something. As that command only lists them, you can run it as a normal user.

The apt-mark command has a ton of other uses, this is not an all-inclusive article. You can always see the man page for more help and the rest of the features. This article is only covering the ‘hold’ and ‘unhold’ functions. Maybe there will be another article covering other aspects, but this limited in scope – preventing application updates.

Like always, thanks for reading and I appreciate the feedback! Don’t forget that the site has ads enabled and that you can donate. So, if this article helped you learn how to prevent application updates then show some love! Otherwise, sign up for the newsletter or share this article with your friends on social media. Thanks!


Subscribe To Our Newsletter
Get notified when new articles are published! It's free and I won't send you any spam.
Linux Tips
Creative Commons License
This work is licensed under a Creative Commons Attribution 4.0 International License.