How do I ‘Boot to USB’? (Or CD/DVD, if Such is Available)

In order to install Linux, you need to be able to boot to USB (or CD/DVD – with USB being more common these days and many devices not even having CD/DVD drives). The goal of this article is to help you boot to USB or to optical media, so that you can install or repair your Linux system.

To install Linux you pretty much have to boot to USB or to a CD or DVD. It’s true, you can actually install directly from your regular disk drive, but that’s a convoluted method that few people will ever need. I may cover that method at some point, but today is not that day!

You may also need to boot to a live Linux instance for other reasons. Maybe you need to repair your installation? Perhaps you need to grow your partition because you have run out of room? Or, just maybe, you need to recover your data so that you can do a fresh installation – or so that you can start the recovery from your backed up data?

It’d be rather pointless to enumerate the many reasons why you’d want to boot to USB. There are many reasons and it’s a skill you’re going to need. Trust me, you need to know this stuff.

I say USB because that’s the most common today, but you may also need to boot to CD or DVD. Your hardware may actually be so old that it won’t even let you boot to USB. So, for the sake of this article, let’s just assume you’re booting to some form of external media, be it USB, optical media, or even an SD card. No matter what you’re trying to boot as an alternative media, the process is pretty much the same.

Booting to USB

Booting to USB, what’s the purpose? The purpose is to install or repair an already running system. It means booting to something other than your default internal drive (under normal configurations) and using that booted media to effect change on your system.

As I said above, there are many reasons why you’d want to do this. It’s a pretty common thing, especially among Linux users. There are many questions asked about this process and I’ve decided to document the methods here.

However, there’s no way I can possibly make this article truly definitive. In fact, I’d appreciate it if you’d help. In the comments section, fill in the blanks for me. You have hardware that I may not have access to, so you can tell us what works for your hardware and the article will be a more complete source of information. It’s your time to shine!

How to Boot to USB

In order to boot to USB, you have to have fairly good timing – or a willingness to sit there and pound on the same key over and over again. In a traditional sense, you’re aiming for a boot selection menu that you can access after POST (Power On Self-Test) and that split-second before the OS starts its boot sequence.

You’re not trying to access the BIOS, you’re trying to access the boot selection menu and there’s a narrow window to get it right. The good news is that the key to access the BIOS is different than the key to access the alternative boot menu. So, a good working strategy is to press the right key on your keyboard over and over again during boot while hoping for the best.

The question is, which is the right key? You don’t want the BIOS menu, unless you plan on changing it permanently. You only want the temporary boot menu, which another animal entirely.

So, I have a bunch of hardware. I also have a search engine. I’ve made an attempt to find the temporary boot menu keys and to document them all in one place.

The list of keys!

     Acer: ESC, F2, or F12
     Apple/Mac: OPTION
     Asus: F8 or ESC
     Compaq: ESC or F9
     Dell: F12
     HP: ESC or F9
     Lenovo: F8, F10, or F12
     MSI: F11
     NEC: F5
     Packard Bell: F8
     Samsung: ESC, F2, or F12
     Sony: F1, F2, or F3
     Toshiba: F12

NOTE: This list isn’t exhaustive nor is it completely accurate. In some cases, you may need to actually enable this in your BIOS. Samsung, for example, will not show the temporary boot selection menu unless you’ve first disabled “Fast Boot”. Other OEMs may require similar changes.

The above keys should get you into the temporary boot menu, where you can choose to boot to USB, CD/DVD, an external drive, a microSD card, or whatever. It’s an essential step in both booting and repairing your Linux computer. It’s a good idea to memorize it once you know which one works for you.

As I mentioned above, you can help. If you have a device that’s not listed, please let me know in the comments. Some manufacturers have more than one way to access the screen, so be sure to let me know if your device is different. The more data we get, the more people we can help.

Thanks for reading! As always, feedback is fantastic, you can sign up for the newsletter, and you can donate. You don’t have to donate. The site will remain online regardless, but you can help cover the costs. If I keep this schedule up, we should have a new article in two more days – so stay tuned!
Is My System Capable of 32 or 64 Bit Linux?

There are a number of situations where you may not be sure if your CPU supports 32 or 64 bit Linux. If you want to know, it’s pretty easy to see if it supports 32 or 64 bit. If nothing else, it’s always good to know what your CPU architecture is and thus know which distros are compatible with your hardware.

You simply might not know this information. You wouldn’t be alone in that. These sort of questions pop up fairly regularly at the various support sites.

Maybe you were still new to Linux when you installed? Or maybe you’re working on a system that you yourself didn’t install? Perhaps you just don’t remember? There are a number of reasons why you’d want to know and why you might not already know.

Anyhow, this should be a relatively short article. There’s only so much fluff that I can add! I’m gonna tell you how to know for sure what architecture you can use.

Is my CPU 32 or 64 bit?

It was not that long ago that I saw someone asking this question at a forum I frequent. They wanted to know if their CPU supported 64 bit. The answer, which was well intended, was that they should run this command:

Which would indeed output this sort of text:

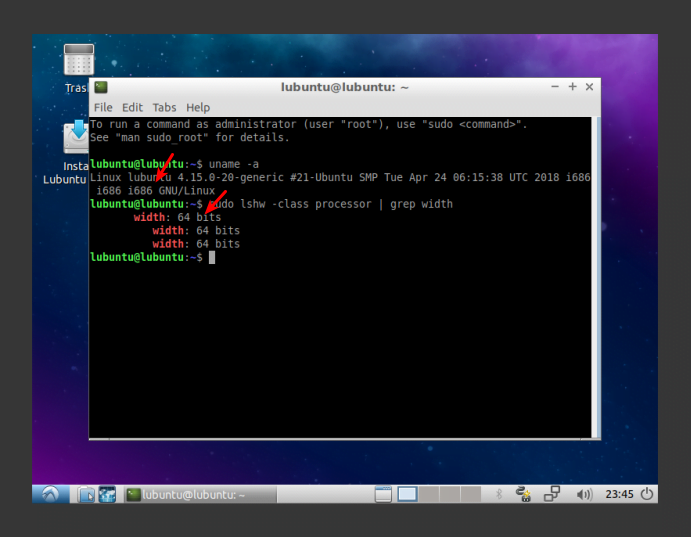
That’s great, but it’s not actually informative – as an answer to this specific question. What that command and output determine is that you’re using a specific variation of Linux. Granted, it’s true for those CPUs that support 62 bit and have a 62 bit CPU installed. It’s not always certain to be true, however.

For example, if you were using a 32 bit distro then the output from the ‘uname’ command would be 32 bit. You can run 32 bit Linux versions on 64 bit CPUs and the output will only be accurate so far as the version installed. After all, a 32 bit distro will run just fine on 64 bit hardware. Even if your hardware supports 64 bit, the uname command will output something about i686 if you have a 32 bit distro installed.

So, you could realistically have an output that says something about 32 bit while being perfectly capable of running 64 bit Linux versions. Using the uname command doesn’t tell you the hardware capability (necessarily). It tells you what is currently in use.

How do we know for sure? Well, there are a number of ways, but the easiest way that I can think of and it requires the terminal. Go ahead and open your terminal emulator by pressing CTRL + ALT + T on your keyboard.

Next, enter this ‘lshw‘ command:

In the output you will find something about ‘width’ and that’s your answer.

If you want, you can use ‘grep‘ to process the output and get an even easier, or at least more concise answer. Just use this command:

With any luck, that won’t lie to you. That won’t tell you what you’re using, that will tell you what CPU architecture you can use. If your CPU architecture supports it, it will tell you right then and there.

I’ve prepared a graphical demonstration of when it may present inaccurate information. The CPU is capable of 64 bit, but the OS in question is actually just a 32 bit OS.

32 vs 64 bit demonstration
See? The 32 bit OS is in use and it could use 64 bit.

There’s no doubt with the ‘lshw’ command, you learn if you can use 32 or 64 bit versions of Linux. That’s why it’s important to use that command rather than relying out the output of ‘uname’, as the ‘uname’ output only only tells you what CPU architecture you are currently using and not what CPU architecture you could be using.

And, there you have it. Thanks for reading! Don’t forget that you can sign up for the newsletter, donate, or simply opt to contribute to the site with articles of your own. If you want to lend a hand, let me know. I’m receptive to such things, as I am receptive to feedback!

Disable Ubuntu Snaps

People have a variety of reasons why they want to disable and remove Snap apps from Ubuntu. It’s relatively easy to disable Snaps and this article shows you how.

Let’s start with the basics. What is a Snap? It’s another form of packaging software and Canonical’s Snapcraft page describes it like this:

Snaps are app packages for desktop, cloud and IoT that are easy to install, secure, cross‐platform and dependency‐free. Snaps are discoverable and installable from the Snap Store, the app store for Linux with an audience of millions.

Canonical is the company that makes Ubuntu and if you’ve been using Linux for any length of time, you’ve probably heard of them and Snaps. The reality is that, if you want to use Ubuntu or official Ubuntu flavors, you might want to make your peace with them. They’re going to be everywhere.

Right now, you can find Snaps being more or less mandatory in current Ubuntu Core versions. If you want to use Livepatch to keep your running system protected then you’ll need to use snaps. The list of places Snaps are in use goes on, but more and more applications are being packaged exclusively as Snaps and that trend looks likely to continue.

To be frank, I can’t blame the developers. Package it once and it runs everywhere – or it can run everywhere. This saves time, presents a single point of contact, and helps to ensure uniformity across the myriad distros out there. It does away with things like ‘Dependency Hell’. It even makes it more secure.

In an ideal world, it’d be great!  Maybe you don’t live in that ideal world? Maybe you don’t want Snaps? I don’t need to know your reason. Let’s just disable them.

Removing/Disabling Snaps

Let’s start by cracking open your terminal. You’re gonna want to start there for this. It’s as easy as using your keyboard to press CTRL + ALT + T. Then, enter the following commands into your terminal, one by one and pressing ENTER after each one:

The first command will completely purge ‘snapd’ – the service that controls and installs Snaps. The next three commands remove any remnants of Snaps that you have on your system. The final command will reboot your system, so that everything is cleared out of memory and so that you start fresh and without Snaps.

And, there you go. You can disable Ubuntu snaps! You’re Snap free! Everything is now just as you wanted it. You no longer have any Snaps on your system, nor do you have to worry about installing them by mistake. 

At the same time, it may well be time for dedicated Ubuntu users to adjust and learn to use Snaps. They do have their benefits. They do things like auto-update, automatically revert to the previous version if it’s broken, and keep applications isolated from the rest of the system. For the most part, they just work, without you needing to worry about anything.

So, before you decide to completely remove Snaps from your system, you might just want to take a minute to make peace with them and learn to use them. Yeah, they take up more space, their permissions are wonky, and they’re still a work in progress. You’re probably going to end up using them eventually. The sooner you get used to managing them, the easier it’s probably going to be.

Anyhow, thanks for reading. I appreciate the readers and welcome you to contribute. There’s a whole host of ways you can do so, from joining to donating. You can even write articles without registering, share this article at your favorite sites, and you can sign up for the newsletter so that you know you’re getting these articles (and no spam) in your inbox.

Use an RPM on a DEB-based System

Once in a while, you’ll come across a piece software that’s only in RPM format. It’s possible to convert RPM to DEB and you may be able to install that software on your DEB-based system.

You’ll find that it’s not unusual to come across software packaged in a format that you can’t use. That’s just the name of the game. Developers and package maintainers are going to concentrate on the stuff they themselves use. It’s not selfishness that prevents them from packaging it in different formats, it’s just a matter of time and priorities. 

It’s times like these when you can use a nifty little tool called ‘alien‘. Alien has been around for a long time and is really useful. It can actually be used in both directions, converting between .deb and .rpm interchangeably. 

Convert With ‘alien’

So, let’s get started. This won’t take very long and will be a valuable tool for your tool-chest. If you don’t need it today, put it aside for a future date. As you progress along your Learning Linux Journey, it may well prove valuable.

As you know, the tool we’ll be using is ‘alien’ and the man-page defines it as this:

alien – Convert or install an alien binary package

You’ll install it with your package manager. As we’re using an apt-based system, we’ll be using apt to install the software. Crack open your terminal with CTRL + ALT + T and enter the following:

That’s going to pull in quite a few dependencies. On a stock Lubuntu installation, it pulls in about 200 MB worth dependencies, so you should be aware of this.

Now that you have it installed, there are a couple of ways you are most likely to use it. The first, given that we’re talking about Debian/Ubuntu/derivatives, would be converting an .rpm to a .deb. That’s pretty easy. Just do this:

That will convert the package to .deb and you can install it in the normal ways. Seeing as you’re right there in the terminal already, you can just use:

You can skip all that and do the conversion and installation all at the same time. To do this, you simply use the -i switch. It looks like this:

NOTE: This won’t always work. The package you converted may not work, usually due to dependencies that can’t be satisfied. If it doesn’t work, you’ll have to look for other solutions.

If you want to go the other direction, you can use this:

There are other ways to use alien, but those are the most common ways that I see it being used – and the ways I’ve historically used it. It has been effective most of the times I’ve tried it, but I am just a single data point and anecdotes aren’t really data.

If you’re interested in other uses (such as tgz or slp), you can consult the man-page or read the online man page. It’s a fairly versatile application and one that all Linux users should know about.

Once again, thanks for reading. Don’t forget that there’s a newsletter and that you can now donate to help cover any hosting costs. If you want to contribute, there are all sorts of ways that you can help – just let me know.

Quickly Reset Ubuntu’s Default Repositories

Is your software not updating? Are you getting repository errors when you try to upgrade? There’s a quick and easy way to reset the Ubuntu repositories to the defaults.

Ubuntu, like all Linux distros, uses repositories for distributing software. This provides a central location for curated, standardized software that’s almost certain to work on your system. These repositories are not just where you install software from, they’re also where you get your software updates.

If you want to see them in action manually, open your terminal and enter the following:

That will show you the system checking the repositories, updating your internal database of software and software versions. There aren’t a whole lot of defaults, so it’s usually a pretty quick process. If you’ve been adding PPAs or other repositories, it could take a while to get through the list.

Of course, if you see errors with that command then this might actually be the article you’re looking for! There are a variety of reasons why one might want to set the system back to the defaults, and it’s actually pretty easy once you know how.

Reset Ubuntu’s Repos

Like many articles and exercises, this one is gonna start with you cracking open your terminal. You should already know how to do that, but you can just use your keyboard and press CTRL + ALT + T.

Once you have that open, just go ahead and run this horribly destructive (I kid, I kid) command.

NOTE: That command could have a horrible outcome if you mess it up. Be sure to double-check it, or use copy/paste. If you screw this up, you can delete files that you really don’t want to delete. You have been warned!

That command will erase all the entries in your ‘sources.list’ file, technically deleting the file itself, which is not necessarily a good thing. Fortunately, it’s a necessary step and only the first step. The next step is also easy – and more or less mandatory.

Just run the following command:

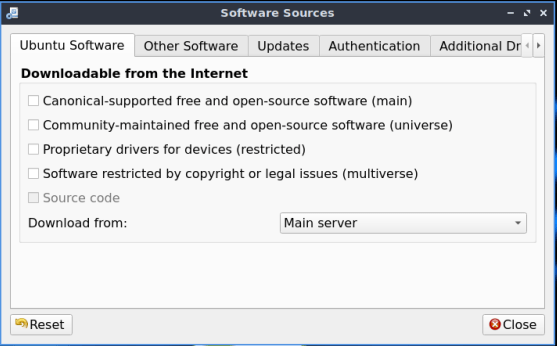
Up should pop a window that looks a whole lot like this:

software properties
Note the lack of any selected repositories. The next step should be obvious.

There you go. You have a blank slate. Select from those four (or five, if you want the source code and have selected at least one other repository) and then click close. When you close it, the system will ask you if you want to update the database and you should agree, of course. You can also change the server from which you download, and most people pick a server that’s geographically close.

That’s it. That’s all it takes to reset your Ubuntu repositories to the defaults. There’s no wizardry involved. You’re simply removing one file and recreating it with the defaults. You could do it all with a file manager if you opened it as root, but the terminal is faster and easier.

Thanks for reading. Feedback is always appreciated. You can sign up for the newsletter and get a notification when new articles are published. A couple of people asked, so I’ve set it up so that you can donate to help fund the site. I’m not going to try to guilt you into donating. The site will remain online and continue to grow even without donations. Still, I had some interest and figured I’d add it as an option. 

Subscribe To Our Newsletter
Get notified when new articles are published! It's free and I won't send you any spam.
Linux Tips
Creative Commons License
This work is licensed under a Creative Commons Attribution 4.0 International License.