Temporarily Set A Static IP Address

Today we’ll have a fairly simple article that may not generate much interest as we’re just learning how to temporarily set a static IP address. This isn’t all that difficult, as I’ll just show you the syntax, but it’s something you might find worth knowing. So, if you’re interested in learning how to temporarily set a static IP address, read on!

What is an IP address?

If you have to ask that question, this article isn’t one that you need to try. You can, it’s just usually something reserved for specific circumstances.

Every networked computer is assigned a numerical IP address. You may have more than one address, including a public and a private IP address. It’s possible to have an IP address on multiple network interfaces, but every connected computer has an IP address. That’s what we use for the web – you just don’t see it as we use domain names that get resolved to IP addresses.

Some links you should read:

How To: Find Your IP Address Through Your Terminal
Find Your Network Interface Name
A Couple More Ways To Find Your Network Interfaces

Those articles aren’t all on the same subject, but they’re articles where I discuss things like IP addresses and DNS. If you’re new to this, you should read the first link, about how to find your IP address. 

The IP address we’re concerned with is our private IP address. This is different than our public IP address and is used on your local network. It’s the address your router sends data, for example. If you remotely control devices on your network, that IP address is what goes on behind the scenes as it denotes the device.

Each private IP address will almost certainly resolve to just one device. This is not true everywhere. One IP address can have many websites and some ISPs are doing IP address subnets for public IP addresses because they’ve run out of IPv4 IP addresses. You needn’t concern yourself with that and that’s just for some random information.

So, the IP address we’ll be setting as a static IP address will be your internal, that is private, IP address. I sometimes do this when I don’t want to have to hunt around for an IP address and device.local isn’t working.

This will only be a temporary change. When you reboot your computer, you may have an entirely different IP address. I don’t want to add complexity, but some routers may already assign a device the same IP address every time it sees it. While this isn’t a static IP address per se, it’s effectively the same.

We’ll be setting that private IP address locally, establishing it on the computer itself. Any modern router should handle the change just fine. However, this may prove problematic for those who have equipment that strays from normal behavior. If that’s the case for you, either reboot or just change your IP address back to what it was originally and everything should be good. However, I can’t see this being a problem, because your original IP address will still work just fine.

Got all that figured out? Well, good! Let’s jump into the article!

Temporarily Set A Static IP Address:

Yes, you’re going to need an open terminal for this. There might be a way to do this with a GUI, but I’ve never tried it. Route around in your network manager and there might be a way. Specifically, check for DHCP and see if there’s a way to change that to a manually configured IP address. It might be the ticket. I’m seeing something similar to that in my network manager, but I haven’t tested it.

Anyhow, as you’re going to need an open terminal, you can probably just press CTRL + ALT + T to open your default terminal. If that doesn’t work, just open it from the application menu. You’ll probably find a terminal application listed under your administration (or system) tools. That’s a good spot to start looking.

With your terminal now open, we need to find the name of your network interface. I shared a link in the opening section, but the command is just this (assuming you’re using a modern distro):

Your network interface names will look something like enp2s0 (for an ethernet/wired connection) or maybe something like wlxe4beed0e5f5c for a wireless network interface. You can assume ‘en’ is ethernet and ‘we’ is wireless. That seems to be fairly consistent. 

Now, while you’re there, you need to determine your IP address, specifically your private IP address. This may look something like this:

That’s the number you’re going to change.

NOTE: Unless otherwise noted, you want to stick to Class C private network addresses. These are addresses reserved for your private networking and are 192.168.0.0 to 192.168.255.255.

So, let’s say your private IP address is indeed 192.168.1.4 and you want to change it to 192.168.1.42 (because 42 is indeed the answer). You can do that. The syntax needed to temporarily set a static IP address is as follows:

So, it’d look like this:

Next, you verify that it worked:

What this does is it adds a static IP address. Your original IP address will still work, but you’ll have designated and set a static IP address that will also work.

You can add all sorts of static IP addresses by this means. If you run the ip addr command again, you’ll see that the static IP address has been added under the fixroute <network_interface_name> heading.

For example, see this image:
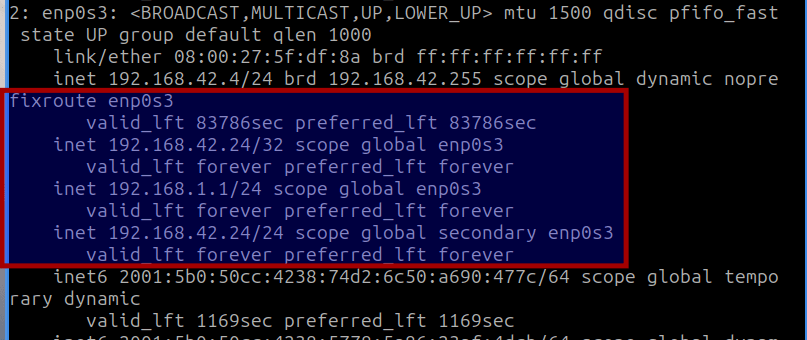
setting a static ip address
Any and all of those private IP addresses will now work and remain static.

You can just reset it to the same original IP address but you shouldn’t need to. This shouldn’t break anything because the original IP address remains the same and remains usable. You can connect to that computer with any one of those private IP addresses, each of them a static IP address.

It’s possible to make this change a permanent thing, which might make an interesting future article. I don’t think anyone will find it complicated. These things are easier to do than they are to explain. I spent more time with the verbiage than anything else. It’s hard to include all that you need to know because I don’t know what you know. 

Closure:

Well, there’s another article. If you’ve ever wondered how to set a static IP address, this is the answer. It’s not complicated. Anyone should be able to figure it out, using the syntax above. I hope that I’ve made it clear. Sometimes it’s not all that easy to explain stuff in plain English without going too deep.

Thanks for reading! If you want to help, or if the site has helped you, you can donate, register to help, write an article, or buy inexpensive hosting to start your site. If you scroll down, you can sign up for the newsletter, vote for the article, and comment.
Some Opinions (News?) About Purism.

Today’s article isn’t like a regular article, it’s just some news about Purism. There’s not going to be much written about this company by me, as I’m not wanting to get sued by angry people. I’m mostly going to give you some information and then share a video. With that information, you’ll be free to make your own choices.

Let’s start with the basics…

I have been paying a little bit of attention to Purism for quite some time. I have considered giving them money, but there were already enough complaints that I never felt comfortable doing that.

Purism SPC, the company, is located in San Francisco, California. They have been around since 2014 and they sell products that are based on ‘opensource’, hardware such as laptops and phones.

Their site can be found at https://puri.sm/

Purism claim to be interested in protecting your privacy and liberties, by using open-source software. There are lots of thoughts about this.

I have seen a few people mention this company lately, as though they were interested in their products. I feel an obligation to inform, thus this news article about Purism.

I will not be offering my opinions on the matter. As much as free speech exists in my country, I don’t really feel like spending money on legal fees and I don’t want to deal with a cease-and-desist notice that tells me to take the site down.

What I am going to do is share a video with you.

Warning, this video uses adult language – but provides sources for their claims. I would suggest watching this video if you’re interested in Purism products.

Now, you take that information and do with it what you will. You can view a bunch of old/current complaints at the Purism Subreddit. There are also a number of topics over on HackerNews but I don’t have links to those. I’m not trying to do an expose, I’m trying to help people make wise choices. This means doing your research – and real research.

Closure:

My opinions are my own, though I’m sure it’s okay to say that I do not now own any Purism products and I do not intend to buy any in the near future. This is simply one of many videos, articles, and comment chains that finally made me realize that I should probably share this with others – as we don’t all dive deep into things prior to making a purchase decision.

What you do with this information is up to you.

I will further suggest that any comments on this matter should be left here. It’s well known that I share my articles elsewhere but I don’t know if Purism is lawsuit happy and I don’t think I’d like to put other sites at risk. I’m sure it’s fine, but we’ll see…

Thanks for reading! If you want to help, or if the site has helped you, you can donate, register to help, write an article, or buy inexpensive hosting to start your site. If you scroll down, you can sign up for the newsletter, vote for the article, and comment.

Extract Files From .DEB Files

Today we’ll be discussing a rather simple subject, limited to just the curious and tinkerers, about how you extract files from .deb files. The folks who want to know this information will likely be the intellectually curious or those who are doing so for scholarly, academic approaches. Then, of course, the folks who like to tinker might also be curious.

Let’s get this out of the way first…

The .deb file extension is also a format of the files. These files are software packages, handled by dpkg I suppose, and valuable only for those systems that are based on Debian (though I’m sure there’s an exception out there, it won’t be with a popular distro).

You see and use these files quite often if you’re using a distro based on Debian. Some examples of distros derived from Debian would be Ubuntu (and the Ubuntu family of official flavors), Linux Mint, elementaryOS, and a whole lot more. If you’re using ‘apt’ or ‘dpkg’ in the terminal, you’re almost certainly using a Debian derivative.

This means that this article isn’t appropriate for everyone. If you’re using a distro with a different package manager, this article won’t apply to you. Should you want me to cover that distro and think it’d make a good article, you can contact me. If you’re unfamiliar with Debian and its derivatives, you can read this Wikipedia page about the .deb file format.

The tool we’ll use to extract files from .deb files is known as ‘ar’ and should be installed by default. Any distro using .deb files, unless it’s a very stripped-down version, will contain the ar application. If you check the man page (man ar), the naming section should indicate that it’s a suitable application for this task. More specifically, it says:

ar – create, modify, and extract from archives

If you check the actual description on the man page, it says this:

The GNU ar program creates, modifies, and extracts from archives. An archive is a single file holding a collection of other files in a structure that makes it possible to retrieve the original individual files (called members of the archive).

So, we have the right tool for the job. It’s a pretty useful tool that doesn’t get used all that much. The chance to introduce it to some new people is quite a privilege and I appreciate all of you who read this blog.

By the way, it has come to my attention (thanks to WizardFromOz from Linux.org’s forums) that you’ll not have ar installed by default. You’ll need to install it. Seeing as we know you’re using this package manager, you can install it by installing binutils. The command to do so is:

Speaking of this blog, I’ve been getting a great deal of ‘blog comment spam’. Automated attempts are pretty well locked down and prevented, so this means that people are doing this manually. They’re possibly even solving reCAPTCHA to do this and this is entirely a waste of time. It takes me mere seconds to deny the comments and the comments are never published.

I only publish comments that are acceptable (and I’ve even published some derogatory comments, just because I didn’t want to censor someone’s opinion – but I will censor spam). So, they’re not getting any return on their time and labor. Removing them annoys me. I get so few comments that I could almost justify disabling them entirely, but I want folks to be able to discuss any of my articles – and to correct me when I’m wrong or when I omit something important.

Anyhow, enough of that… Let’s just get into the article itself…

Extract Files From .deb Files:

Yes, we’ll be using the terminal. If you do not want to use the terminal, this is quite easy to do in the GUI. Simply open up your file manager, navigate to where you’ve stored the .deb file, right-click on the file, and choose to extract the files. You can also choose to open the file with your GUI archive manager and then extract just the files you want to extract. It’s pretty simple!

Now, for those of us who want to do this in the terminal, just press CTRL + ALT + T, and your default terminal should open. Not every distro has this keyboard shortcut as a default, and that’s just horrible. It really should be universal and your distro (should this shortcut not already work) will likely have a way to map those keys to open a terminal. 

With your terminal now open, navigate to where you’ve downloaded a .deb file. If you do not have a .deb to play with, you can do this:

With your existing .deb file, or with your freshly downloaded .deb file, we can now extract files from .deb files. The command would look similar to this:

If you use the v flag (notice the lack of the - part of the flag) then it’ll be verbose – meaning it will tell you the output. If you don’t need the output, you can skip it, just know that each .deb file should contain three files and that these three files should all be consistently named.

Should we put this all together, your command would look something like this:

Or, if it’s in a folder of its own, without any other .deb files, you can cheat and just use a wildcard – like this:

The output of that command would look something like this:

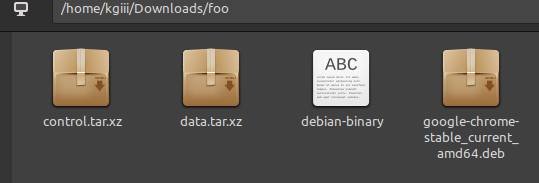
And, if you navigate to the directory with your GUI file manager, you should see something that looks quite similar to this:

the results if you extract the files from the Google Chrome .deb
Assuming the .deb follows standards, it’ll look just like that, regardless of the application.

This should be consistent across all the various .deb files you extract. They’ll contain those two additional compressed files and a ‘debian-binary’ file. If you’re interested in what’s inside those ‘tar.xz’ files, you’ll have to use a search engine or wait for another article, because that’s more than I am going to get into.

I may still write a full article, but the way to extract those ‘tar.xz’ files is to do it like this:

I trust you can figure it out from there. It’s a bit different from how you extract files from a .tar.gz file. So, it should maybe get an article all its own. This tiny bit of information won’t get indexed properly, so a whole article will make it easier to find and follow. 

Closure:

Well, this appears to be another long article. It doesn’t take all that much more time to write articles of this length. I’m kind of doing this as an experiment. I am interested in seeing how Google reacts to these longer articles, with more information and with more code and pictures as examples. I’m being optimistic because I don’t mind making the articles longer. 

I have a ‘secret weapon’ I’ve been using since January of this year. That makes it much easier. I plan on doing an article about said secret weapon at some point, but I need to get my ducks in a row first. I hope it’ll be interesting and I’ll likely publish it on a day off so that it doesn’t stop the flow of regular articles. (The spice must flow!)

As always…

Thanks for reading! If you want to help, or if the site has helped you, you can donate, register to help, write an article, or buy inexpensive hosting to start your site. If you scroll down, you can sign up for the newsletter, vote for the article, and comment.

How To: Decompress tar.bz2 Files

Today’s article will be simple enough, though it will have limited application, as we discuss how to decompress tar.bz2 files. While this is certainly suitable for a newbie and easy enough to learn, many folks will just choose the GUI route.

Of course, you’re not always able to use a GUI. Sometimes there’s no way to do this graphically and you’ll have to do this in the terminal – perhaps over SSH. In fact, with my crappy bandwidth, I like to upload compressed files and then extract them on the server itself. This sort of thing works for me.

We have already talked about how you go about compressing and decompressing .bz2 files. You can read that article here:

How To: Compress And Decompress .bz2 Files

This time we’re going to be working with ‘tar.bz2’ files – and decompressing these files is different than what you’ll have learned from the previous article.

What is ‘tar’?

A tar file stands for ‘Tape Archiver’ and is a compression method as old as time itself. Well, probably not that long – but a very long time. It’s sometimes referred to as a ‘tarball’ and Wikipedia tells me that it has been around since early 1979.

Here’s a good quote from Wikipedia:

The archive data sets created by tar contain various file system parameters, such as name, timestamps, ownership, file-access permissions, and directory organization.

The blurb goes on to mention that POSIX has supplanted tar in favor of pax, but when was the last time you saw a .pax file? So, tar is still widely in use.

The man page describes tar as:

tar – an archiving utility

Which is exactly the kind of thing we’re looking for. Imagine that?

What is .bz2?

If you read the link above, you’d know the answer to this question. I assume my readers are creatures of habit, so they’ve done no such thing. They’re probably skipping this section entirely and reading just the middle of the article.

Anyhow, in the previous .bz2 article, I mentioned this:

If you don’t already know, .bz2 files are bzip2 files. You’ll find that bzip2 is an opensource compression program that gets some regular usage, and you’ll sometimes find downloaded files that are compressed with this format. You may also, for compatibility reasons, want to compress files with bzip2 to share with other users who are already set on using the .bz2 format.

That sums it up nicely, though you don’t have to worry about that. See, with this particular command and these particular tar.bz2 files, you can decompress (extract) the files in one fell swoop. 

Just for the record, you should also know that the bzip2 man page defines itself like so:

bzip2, bunzip2 – a block-sorting file compressor, v1.0.8

Your man page might be different, saying that it’s a different version. Either way, that’s what bzip2 is and that’s what it’s used for. 

So, with all that in mind, we can get to the important bits of the article…

Decompress tar.bz2 Files:

As I mentioned in the intro, you can likely do this with your built-in GUI file extraction tool (often file-roller) easily enough. However, again as suggested in the intro, we’ll be doing this in the terminal. In most cases, you can press CTRL + ALT + T to open the terminal.

With your terminal open in the correct directory, you can start by listing the files in the archive without actually decompressing them. That command would look like this:

That will happily spit out a list of all the files included. If you want, you can make the output more verbose by adding the -v flag, so that it’d be tar -tvf for example.

Next, I assume you want to decompress the tar.bz2 files, that is to extract the files within. To do that, you’d want this command:

Finally, I’ll give you a fun command. Let’s say you only want to extract files of a certain type, that is with a certain extension, from your tar.bz2 file. Well, you can do that and it’s easily done. Just use this command:

That command would decompress and extract all the files with .jpg as their extension. You can use any extension there, being sure to use the * to indicate a wildcard even though you already specified it with the –wildcard flag. It is what it is.

There’s more that you can do, but those are the ways I figure most folks are going to decompress tar.bz2 files. Just be sure to check the man page (man tar) to learn more about the command.

Closure:

Well, for better or worse, my articles have been pretty verbose lately. Yes, yes it does tell me how many words are in each article. I’m not sure why I ended up being more verbose lately, but I think it’s a good trend.

Anyhow, today we learn how to decompress tar.bz2 files in the Linux terminal. It’s a useful skill to have and a good tool to toss into your Linux toolkit. You never know when you’re going to need to use these commands, but there may come a time when you do – and you can refer back to this article to learn how.

Thanks for reading! If you want to help, or if the site has helped you, you can donate, register to help, write an article, or buy inexpensive hosting to start your site. If you scroll down, you can sign up for the newsletter, vote for the article, and comment.

How To: List Mounted Partitions

Today we’ll have a nice and simple article, simply because we can, about how to list mounted partitions in Linux. Like so many of these articles, we’re going to need an open terminal. On the other hand, we’ll just be exploring a couple of tools to help us along the way.

Your disk drives, be they solid state or hard disk drives, will be separated into partitions. It can get confusing until you realize that the outputs from these commands won’t always just represent what I’ll call physical partitions. Sometimes, there are virtual partitions – sometimes with their fun file systems.

You may have everything from mounted temporary partitions to software designed to run in its own mounted partition space. When you run these bellow commands, you’ll learn that there are all sorts of mounted partitions. This is completely normal. It’s also pretty easy to weed out the physical partitions.

Why would you want to do this? Well, I’m having a goofy error when I boot one of my computers and I need to narrow it down to which disk it is that’s giving me the error. Once I take the time to do that, I can move on to troubleshooting the problem and finding a solution for the problem.

The tools we’ll be using are ‘findmnt’ and ‘df’. They’re described as the following:

finding:

findmnt – find a filesystem

df:

df – report file system disk space usage

As you can see from the description, both of those have something to do with getting information about a file system. That makes them good tools for the job.

NOTE: There are multiple ways to list mounted partitions. You have GUI and CLI-based tools available to you. One of the goals surrounding this whole project is not just to make people more familiar with Linux but also to help them get comfortable working within the terminal. You’ll be just fine!

List Mounted Partitions:

As I mentioned above, we’ll be using a terminal for this. I do not mind which terminal you’re using but you can usually open the default terminal by pressing CTRL + ALT + T. That works most of the time.

With your terminal now open, you can try the following command:

The output from that command will list your mounted partitions. It’s a lot of text, but most folks are probably only interested in the start of the line. The output of the findmnt command may look a little something like this:

The next command you’re going to want to try will be the ‘df’ command. We’ll be using a few flags. It’s not very complicated, though it may look like it. The command is a simple ‘df’ command and looks like this:

We use the -a flag for ‘all’. Then we use the -T flag because that means type. Finally, we use the -h flag because that means the output will be “human readable” (or more easily read by us mortals.) The output of which looks something like this:

No matter which of those commands you use, it will make your terminal list mounted partitions. If you need to know which partitions are mounted, these are the tools you can start with. They’re easy enough to work with.

Closure:

Well, it’s a bit late in the evening. I almost forgot that there was an article due tomorrow. This happens when I get a lot of responses (elsewhere) on the wrong day. My brain just doesn’t click. I should probably set an automated notification to let me know which days require articles, but I haven’t failed yet. In fact, you get an interesting article about how you can list mounted partitions.

Thanks for reading! If you want to help, or if the site has helped you, you can donate, register to help, write an article, or buy inexpensive hosting to start your site. If you scroll down, you can sign up for the newsletter, vote for the article, and comment.

Linux Tips
Creative Commons License
This work is licensed under a Creative Commons Attribution 4.0 International License.