How To: Find Linux News

Today’s article will be really easy for anyone to follow, as I share how it is I find Linux news. It’s amazing how many people don’t keep up with any Linux news. Read on, as this is sure to be a fairly short article. 

I might even speculate that most Linux users don’t keep up with Linux news. I’d speculate that it’s an even smaller group that does things like read the release notes for their updates and upgrades. They don’t read the notes about software upgrades and they don’t definitely don’t pay attention to what’s going on at the project(s) level(s).

This is too bad. There’s a lot to learn and gathering information is good.

These are the people who are then surprised by things that were covered in the release notes, just as people are surprised by changes that have been covered by the journalists. (Well, I’m going to call them journalists for the sake of this article, and to avoid unneeded complexity.)

Now, I admit that I’m not always as diligent as I would suggest others be. I can be pretty lazy. I might even move to a new distro point release without actually reading the release notes. So, do as I say, not as I do!

Or not…

Just keep up with what you want to keep up with. For the most part, you’ll be just fine. Anyhow, I am not feeling all that great and I need a quick/easy article. So, you get this article about finding Linux news.

How I Find Linux News:

Below, you’ll find some links to news sites that I use when I want to keep up with Linux news. If you have your own sites, feel free to add them as a comment below. If you want your site added, feel free to ask in a comment below and I’ll take a look.

My first stop is quite often just an aggregator. It’s not complete, but it’s useful. I’ll often visit some of their aggregated URLs in person. If you just visit one site, this is a good choice:

tuxurls.com

My next choice is a site that tends to have plenty of content. I try to catch them daily, but obviously don’t always have time to do so:

linuxtoday.com

This next choice also has a ton of content. In theory, you can comment on the stories, but there’s not a lot of community involvement in those regards. Still, they tend to have a bunch of Linux news:

lxer.com

This next one doesn’t always have the same amount of content as some of the others, but it’s usually pretty good. Plus the site is well-designed and it even looks like a proper news site:

linuxinsider.com

If you want less content, but things like tech data and well-thought-out articles that tend to be a bit more in-depth, then you would do well to consider this site long-lived Linux news site:

phoronix.com

This next site tends to have some good content – and it’s reader-supported. As such, you will find there’s some decent commentary here. If you don’t know what to think about an article, you can head to the comments and someone will tell you what to think! See:

lwn.net

There are more but this is the final one I’ll list. I know, not everyone likes Google. But, their news section is usually pretty good at finding Linux news that might not have been covered elsewhere. I actually tend to check this one fairly frequently. The link should work for you, regardless of where you live:

news.google.com/search?q=Linux

So, those are a few of the places I go to for news. You should also consider finding your distro’s news outlet (often a blog of sorts). There you can keep up with distro-specific things and find stuff like release notes. You should be able to find that on your own.

Closure:

There you have it, you have another article. This time, we’ve seen a few of the places I go to when I want to find Linux news. I try to keep up with a bunch of it, and some subjects interest me more than others. If nothing else, you may want to consider keeping up with the news published by the distro you’re using. You’ll know more and not be surprised when changes happen.

Thanks for reading! If you want to help, or if the site has helped you, you can donate, register to help, write an article, or buy inexpensive hosting to start your own site. If you scroll down, you can sign up for the newsletter, vote for the article, and comment.
How To: Make Google Chrome Use Less RAM (UPDATED)

Today’s article is going to be a brief article about a previous article, where I gave you one way to make Google Chrome use less RAM. Consider this an updated article. So, if you’re trying to make Google Chrome use less RAM (and power, I guess) read on!

As tech goes, the situation has changed. As the tech changes, so too must we change our reactions to said changes. The thing with tech is that it never stands still, something that I (for one) appreciate.

The article in question is about making Google Chrome use less RAM. This applies to other browsers, but I concentrated on Chrome. Here is that article:

How To: Make Google Chrome Use Less RAM (And Other Browsers)

In that article, I recommended folks use the “Auto Tab Discard“ plugin. That recommendation has not changed. It’s a great add-on that will discard unused tabs, saving you both RAM and some power (which is useful for mobile devices).

Now, Google (along with other browsers) have enabled a new(ish) feature. Basically, to save power, the browser does what Auto Tab Discard does – it puts unused tabs to sleep. So, when you open those tabs that were sleeping you will need to wait a moment for them to reload.

That’s not a problem. The problem is, Google does this indiscriminately by default. Chrome does seem to make an exception for tabs that are playing audio or video, but all other tabs are fair game and will be put to sleep.

I repeat, all other tabs are fair game. They can and will be put to sleep. That’s downright annoying when you distinctly want to keep some tabs from going to sleep.

Fortunately, you have options.

You can disable this feature in your settings and continue using an extension like “Auto Tab Discard”. That’s a fine choice. That was my choice. It’s probably the wrong choice, but it is a choice.

Your other choice is to manually add sites to the whitelist, telling Google to keep those tabs open. So, you won’t need the extension if you choose to do it this way. This is probably the best choice. This is the choice I did not make.

I’ll show you how to make that choice, and kinda format this like a ‘regular article’…

Make Google Chrome Use Less RAM:

For once, you don’t need to open a terminal!

Instead, open Google Chrome. Then, click on the vertical three-dot menu in the upper right, and then you need to click on “Settings”. When that tab opens, click on “Performance” (on the left) and the rest should be fairly obvious.

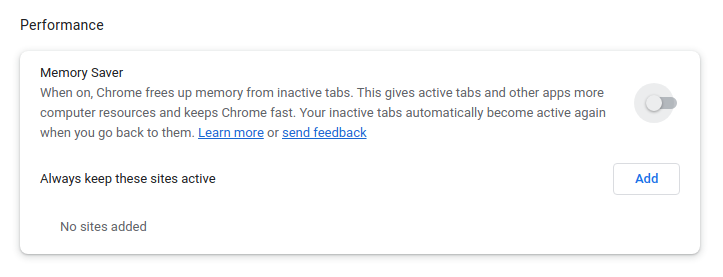
If you’re like me, you can just disable the feature. That looks like this:

disable the power saving feature for Google Chrome
At this stage you can modify your settings as you see fit. I’ve turned the feature off. Go me!

If you want, you can keep the feature enabled (it was enabled by default at my house) and just add your favorite sites to the list of sites that always remain active. I don’t feel like messing around with it, so I’ve simply disabled the feature and opted to keep the extension.

I suppose that might mean I use a little extra RAM, I haven’t tested but it’d be a very trivial amount and I quite like the GUI offered by the installed extension. When I next do a clean install, I’ll probably just let the browser deal with it instead of using the extension.

Other browsers may use similar tactics to save power (and free up RAM, the two are related). As of the time of this publication, this was not yet a feature that’s in Google’s opensource counterpart Chromium. Right now, this appears to just be a function in the proprietary version, but tech changes and that too may change.

Closure:

And, well, now you can see why this is an article all of its own. It was more than I could reasonably add as an update to the existing article and was enough information to make a new article. After publication, I’ll update the previous article to link to this article. I hope… Hopefully, I remember to do that.

Hmm… I think I forgot to do a ‘meta’ article in February. February is a pretty short month, plus I’ve been otherwise distracted. But, I’ve not been too distracted to skip a publication date! We’re rapidly approaching the two-year mark. It has been a pretty good ride!

Thanks for reading! If you want to help, or if the site has helped you, you can donate, register to help, write an article, or buy inexpensive hosting to start your own site. If you scroll down, you can sign up for the newsletter, vote for the article, and comment.
Let’s Let AI Write An Article About ‘sed’

Today’s article is going to be about ‘sed’. However, I’ll be letting AI write it, just so we have an excuse to play with ChatGPT. I love new tech and I’m going to go against the advice given and just post the resulting article directly. 

Also, I picked ‘sed’ as an article topic because it’s a pain in the butt to explain even the basics. It’s such a powerful tool that knowing where to start can be tough. As such, I’ve decided it’s a perfect article for testing AI. I will only be formatting the suggested article.

Hey, it was this or write a meta article. I hadn’t written one for February and this will be the last article in February. Not much had changed, though we did cross some milestones, and I figured this article would be even more interesting to my readers.

Again, if there are errors, I am not to blame. I am posting the entire output after asking ChatGPT to write the article. I am only editing for the format. So, read on to see how AI is coming along. Hint: It’s doing well! It’s coming along nicely!

About ‘sed’:

“sed” is a stream editor in the Unix-like operating systems. It is used to perform basic text transformations on an input stream (a file or input from a pipeline). The sed command reads the specified files, or standard input if no files are specified, and applies the transformations which have been specified.

The syntax for using sed is:

Where OPTIONS can be any of the options available in the man page and COMMANDS are the instructions that tell sed what transformations to perform on the input.

One of the most common uses of sed is to replace strings. The basic syntax for string substitution is:

Where old-text is the text you want to replace, and new-text is the text you want to replace it with. For example, to replace the word “apple” with “banana” in the file “fruits.txt”, the following command could be used:

You can also use regular expressions in the old-text argument to match a more complex pattern. For example, to replace all occurrences of “apple” or “Apple” with “banana”, the following command could be used:

Another common use of sed is to delete lines. To delete a line, you can use the d command. For example, to delete the first line of the file “fruits.txt”, the following command could be used:

To delete multiple lines, specify the line numbers separated by a comma. For example, to delete lines 1 to 3 in the file “fruits.txt”, the following command could be used:

sed also supports multiple commands in a single execution. Simply separate the commands with a semicolon (;). For example, to delete the first line and replace “apple” with “banana” in the file “fruits.txt”, the following command could be used:

In addition to the commands mentioned above, there are many other powerful commands available in sed, such as inserting text, printing selected lines, and more. To learn more about these commands and other features of sed, consult the man page by running man sed in your terminal.

In conclusion, the sed command is a useful tool for performing basic text transformations on files or input from a pipeline. Its syntax is straightforward, and its wide range of commands makes it versatile enough to handle a variety of text manipulation tasks.

Closure:

There you have it. You have an article about sed – and it wasn’t written by me. So, what do you think of it? Do you think I can hang up my hat and just let AI write my articles from here on out? Do you spot any mistakes? It’s supposed to be an overview, not a complete dissertation. I think it does surprisingly well!

Thanks for reading! If you want to help, or if the site has helped you, you can donate, register to help, write an article, or buy inexpensive hosting to start your own site. If you scroll down, you can sign up for the newsletter, vote for the article, and comment.

Visualize Your Network Traffic With ‘darkstat’

Today’s article is a fun one, an article where you’ll learn how to visualize your traffic with darkstat. It’s a fun little tool that lets you graphically visualize your network traffic in your browser. While it’s likely more of an enterprise-level tool, there’s no reason you can’t use it as a home user.

So, if you’d like to learn how to visualize your traffic with ‘darkstat‘, read on and I’ll do my best to explain it. 

There’s a lot to the tool, but darkstat defines itself in the man page as:

darkstat – network statistics gatherer

We’ll only be using darkstat to visualize your network traffic in the browser, but there are quite a few options available. You’ll want to check the man page after you’ve got darkstat installed and have learned its basic usage.

I’ve previously covered tools like VNstat, which lets you monitor your bandwidth usage. You can even helpfully draw some graphs with the tool. This is quite different. You’ll see…

Visualize Your Network Traffic With ‘darkstat’:

This article requires an open terminal, like many other articles on this site. If you don’t know how to open the terminal, you can do so with your keyboard – just press CTRL + ALT + T and your default terminal should open.

First, you need to install darkstat. It should be in your default repositories for many of you. To save time, I’ll show you how to install it in Debian/Ubuntu-based distros. Just adjust the command to suit your system’s package manager:

With darkstat now installed, you need to start it – so that it monitors your network traffic. To do that, you’ll need to know the name of your network interfaces. It just so happens that I wrote that article last time:

How To: Show Your Network Interfaces

Armed with that data, you want to start darkstat and the format is:

So, for example, you might end up with one of the following commands:

Or maybe this type of command for a wireless connection:

After running that command, you’ll then want to open the following URL with your preferred browser:

http://0.0.0.0:<port_number>

If you used the port above, you’d connect to:

http://0.0.0.0:8080

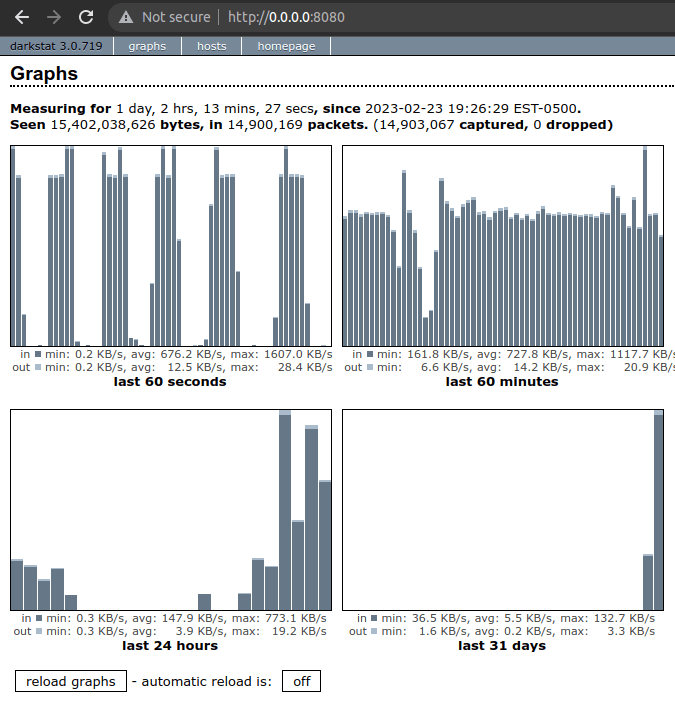
The results should look something like this:

darkstat in operation
The output of the graph should be easy enough to understand.

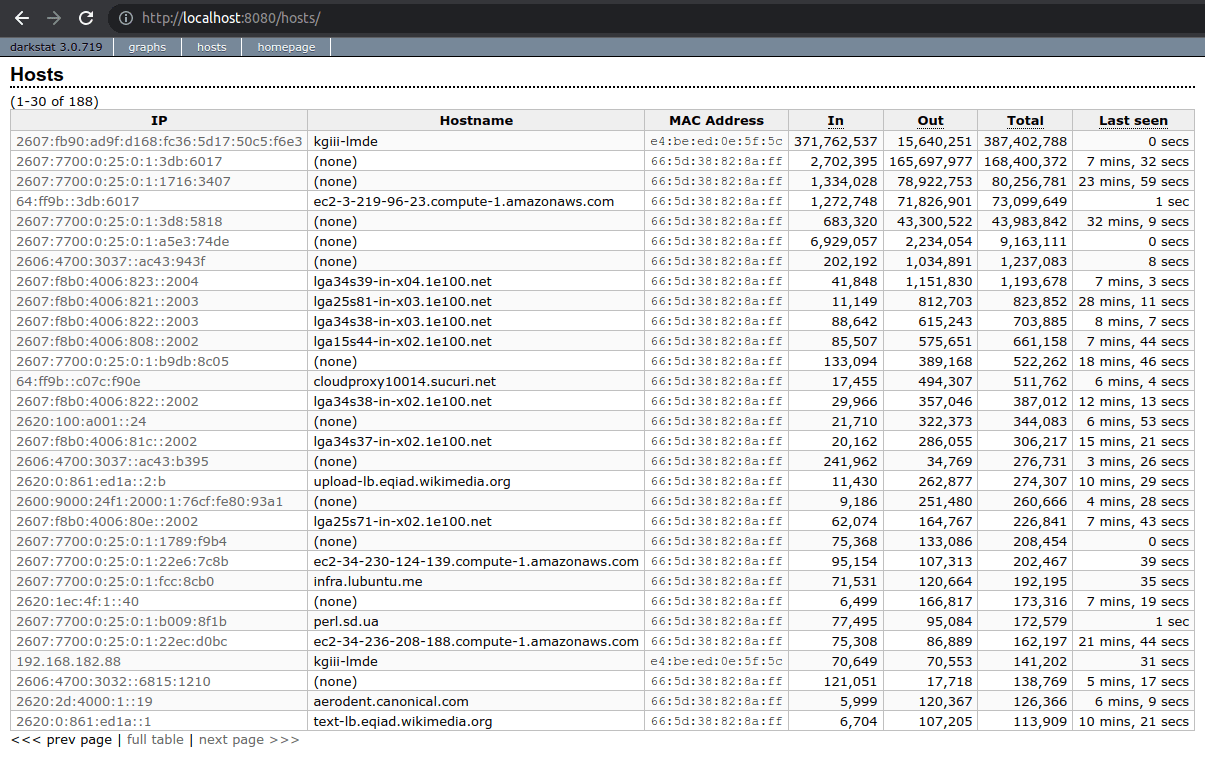
You can also opt to see the hosts, those servers you’ve connected to, by simply clicking on the ‘hosts’ link. That’d look something like:


darkstat in action, showing the hosts
As you can see, this one shows the hosts you’ve connected to.

The darkstar application will run quietly in the background. It’ll keep running until you tell it not to. One way to kill darkstat would be:

As I mentioned above, darkstat has a number of different options. There’s a bunch more to it, but this is about all your regular user will need to visualize their network traffic. Of course, run man darkstat to view those options.

Closure:

There you go. You have another article, this one less short than the recent articles. I am not well, but I presume I will be. In the mean time, we’ll continue to have articles for as long as I’m able. This time, we learned about how you can visualize your traffic with darkstat. Who knows what the next article will be about.

Thanks for reading! If you want to help, or if the site has helped you, you can donate, register to help, write an article, or buy inexpensive hosting to start your own site. If you scroll down, you can sign up for the newsletter, vote for the article, and comment.

How To: Show Your Network Interfaces

Today’s article will be fairly simple, where we learn a couple of ways how to show your network interfaces. It won’t be a very long article, nor will it be all that complicated. Like almost always, today’s article will involve the terminal. So, if you want to learn how to show your network interfaces, read on!

A network interface is what’s used to connect your computer to a network. Depending on your configuration, you may have both real and virtual network interfaces. The real network interfaces will be things like your ethernet (the wired connection to the network) and a wireless device (a radio-controlled network interface).

There are times when you’ll want to know your network interface, be it for debugging or monitoring. For example, you’ll probably want to know about your network interfaces if you’re playing around with VNStat.

We’ve probably touched on this subject in a few articles. However, we might as well have an article specifically answering the question of how to show your network interfaces. Well, then, that’s what this article will cover.

Show Your Network Interfaces:

As mentioned in the intro, we’re going to be using the terminal. If you’re a regular reader, you’re probably used to it and a little tired of the same old text. Not all my readers are going to be as proficient, so they should know that they can just press CTRL + ALT + T and your default terminal should open.

With your terminal now open, your next step mostly depends on your chosen distro and the age of the default installed tools. If you’re using an older distro, you can go with this command:

If you’re using a distro with more current tools, you will likely find that ‘ifconfig’ has been deprecated, that is no longer current and in use. For you folks, you’ll need a slightly longer command:

So, if you want to show your network interfaces, one of those two commands will likely get you there. You should check the information carefully, to make sure you’re using the correct information, such as when you want to use a network interface name for another command.

Closure:

There you have it… You have another article! This time, we’ve decided to spend some time learning how to show your network interfaces. It’s nothing complicated, but it’s still useful information. It is indeed a fairly short and simple article, but that means newer users can follow along – which is a good thing. I’m sure there are other ways to gather this information, but one of those two commands should do the trick!

Thanks for reading! If you want to help, or if the site has helped you, you can donate, register to help, write an article, or buy inexpensive hosting to start your own site. If you scroll down, you can sign up for the newsletter, vote for the article, and comment.

Linux Tips
Creative Commons License
This work is licensed under a Creative Commons Attribution 4.0 International License.