Kill Frozen Applications The Easy Way

Linux is an operating system and, like every operating system, you sometimes need to kill frozen applications. Computers are not now, nor will they ever be, perfect devices with perfect software. Sometimes, crap happens and you find yourself in a situation where you need to kill a frozen application or two. (Even if it were perfect, your RAM is bombarded with EMR and will eventually knock a bit loose, even with ECC RAM.)

There are all sorts of ways to deal with frozen applications. You can do everything from sigterm to pkill. Worst case scenario, you always have RIESUB to fall back on – for a completely frozen system. All of those are great and have their place, as does this method.

As this is meant to be quick and simple, so we’re just going to jump into it – and have a relatively brief article today.,,

Kill Frozen Applications:

Let’s say you’ve somehow managed to make your browser freeze. It is unresponsive, though the rest of the system seems to work just fine. You could open a terminal and try the pkill and sigterm types of resolutions or you can use xkill. It’s literally point and click!

So, open your terminal and enter the following (read the rest before doing this):

When you do, your terminal will look a little like this:
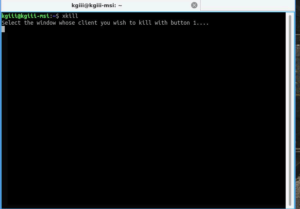
xkill in action
The icon will change as well, but I can’t seem to capture that.

Your cursor might also change. In one test my cursor is an X and on another test, with a different OS, it’s a red skull and crossbones. I couldn’t caputer either in a screenshot, so you get what you get.

NOTE: If you change your mind and don’t want to click-to-close, you can still type in the terminal. You can use sudo pkill <terminal-name> to get back to normal.

Anyhow, take that cursor and click on the application you want to close. This sends a shutdown command to the frozen process and things should go back to normal after the frozen application closes. Of course, sending the shutdown command to a process in no way indicates a certainty of it listening, it may still fail and stay frozen – perhaps depending on how exactly frozen the application is.

NOTE: It has come to my attention that I should warn you. If you click on it after typing xkill, it WILL close it. It’s pretty indiscriminate. It doesn’t care if you’ve saved. It will kill it. I’m also told that CTRL + ALT + ESC is a shortcut in Mint for this, but I can’t seem to make it work. 

Closure:

See? I told you that it’d be a quick and easy article. This one is about you you can kill frozen applications – but there are all sorts of ways to do that. You can expect future articles to cover this very subject, but with different methods. I just figured this would be quick and easy for everyone.

Thanks for reading! If you want to help, or if the site has helped you, you can donate, register to help, write an article, or buy inexpensive hosting to start your own site. If you scroll down, you can sign up for the newsletter, vote for the article, and comment.

Review: It Appears That uMatrix Is Back Under Development

This article is a bit of a review of some software called ‘uMatrix’. If you’ve never heard of it, it’s an impressive piece of software – especially considering it’s a browser extension.

I was nosing around some old projects in my GitHub when I decided to look upstream. Lo and behold, Ray Hill (gorhill of uBlock Origin fame) has picked up developing uMatrix again. (Install through your browser’s extension manager. Links below.)

What is uMatrix? GitHub page here.

Well, do you remember old school firewalls where you could not just block things by application, you could be even more refined – like narrowing it down to which port, ingress or egress, and even which domains that application could connect with?

Imagine something similar to that, except it’s for your browser. For each page, you can elect to block images, CSS, cookies, scripts. Then, you can decide which scripts and which CSS to allow through. You can elect which third party assets load, from cookies to images – and you can do so on a domain name basis.

There’s a learning curve. It’s a pretty big learning curve for a browser extension. Plan on a couple of hours to really get used to it – and to get your favorite sites configured. You need only configure them once and then you can backup the settings so that you can use it on multiple devices or put it aside for safekeeping. 

It WILL break sites. You WILL get frustrated.

More About uMatrix:

If I took privacy serious and were more security focused, I would not use the internet without uMatrix. As it stands, I have an older version (now updated) configured in one browser for when I want to visit stuff I absolutely don’t trust. If you take privacy serious (and cross-domain scripting, third party cookies are a huge no-no, but so shouldn’t images and CSS files) then you really, really should take a look at this extension.

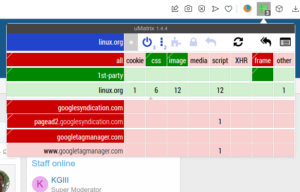
Take a look at this:

uMatrix in Opera.
Look a little daunting? You can figure it out. I have faith in you!

In each of those columns, you can click to block it everywhere or to allow it on this one specific domain. As you can see, there’s everything from cookies to CSS, from media to scripts. The refinement you can achieve is amazing. It will take some work and time for you to ‘get good’ with uMatrix.

Now, you basically want it to operate in the default configuration you have it in right after installing, only allowing CSS and images from the domain you’re visiting.

When a site refuses to work properly, you can start by allowing scripts on an individual basis – on the per-site basis you see from the domains listed on the left. You can click on two areas in each column to give fine-grained permissions. After a while, you can get pretty quick at deducing why it doesn’t work. It’s usually a script from another site that needs to be enabled.

You’ll also learn how much cruft the web has, browsing much faster and having fewer scripts chew up your CPU and RAM. If you have a low-end computer, this is also a must-have.

At one point, Hill had stopped working on the project and shuttered it. I’m not sure when he started working on it again. I’m glad they did because it’s the best privacy and security browser extension I’ve ever seen in my life. Now that he’s working on it again, I feel comfortable recommending it.

uMatrix Review:

Really, I wrote this to share my joy. If I had to review it, and I guess I have to, I’d give it a solid 9.5 out of 10. I’ve deducted a half point because there’s no effort to make it all that intuitive to new people and this makes the learning curve harder. It’s hard to explain, but once you see what it does you will understand it better.

Not even I can make it all that intuitive until you actually test it out and start browsing the web with it. If you get frustrated, settle down and relax. You can make it work. It will take some time to get used to the new paradigm. You can browse much faster (more so than from just blocking ads) when you’re not loading a bunch of 3rd party cruft.

You might as well know where to get it. It’s available for the two major browsers, plus in Opera’s own little extension store. These extensions work fine on same-family browsers, like Pale Moon or Google Chromium.

You can pick it up for Opera here.

Of course, you can pick it up for Firefox here.

And you can pick it up for Google Chrome here.

Give it a shot. Commit to browsing with it for a full day and see for yourself what the web is like when  you’re not loading tracking cookies, scripts, ad images loaded from other domain names, and so much more.

By the way…

I worried more about these things years ago, back when I was a Windows user and for the times when broadband wasn’t a realistic option. I was more concerned with my security and letting scripts load in the browser, so I’d use uMatrix. It had the added benefit of doing a great deal to protect my privacy by making it extremely difficult to track my movements across the web. These days, browsers are much more secure and run in their own containers and I care less about privacy.

Even just blocking remote scripts, media, and images will speed up your browsing noticeably. By the time you have it configured for the sites you visit, you’ll have a pretty secure and private browsing experience. You should also consider making it work in incognito mode if you make regular use of private browsing.

Closure:

There you have it, another article. This one is a review of uMatrix, one of my favorite browser extensions even though I don’t actually bother with it for most of my browsing. I used to browse with it exclusively, but I’ve given up caring. If you care, and many of my readers do, then I highly recommend trying it for a full day. Commit to a full day and then leave a comment telling us of your experiences.

Thanks for reading! If you want to help, or if the site has helped you, you can donate, register to help, write an article, or buy inexpensive hosting to start your own site. If you scroll down, you can sign up for the newsletter, vote for the article, and comment.
FTP From The Linux Terminal

Why would you want to use FTP from the Linux terminal? It’s quick, easy, consistent, and works well enough as an FTP client. If it’s not already installed, it’s just a quick installation command away. In my experience, it’s usually already there.

If I’m going to be transferring a bunch of files or editing files, I’ll just use a GUI FTP client. My choice FTP client has been Filezilla for quite a long time now. It does the trick and I just keep moving my profile/config to new computers as I get them. Being easy to migrate is a definite selling point for me.

So, what is FTP? It stands for File Transfer Protocol. It’s not encrypted, so many folks have moved to SFTP – which is actually not related to FTP at all. It just shares similar functionality. Even though FTP traffic isn’t secure, it’s still fairly widely used. 

An FTP server is probably not installed by default on your desktop Linux system. However, I’ve written how to Install An FTP Server With VSFTPD which should get you sorted if you need one.

The application will be using is “FTP” which describes itself like:

ftp — Internet file transfer program

And you may find that your version of terminal-based FTP is maintained by your distro maintainers. The FTP command and flagsr should still be pretty universal throughout. Still, be sure to check the man page – especially if things seem weird.

FTP From The Linux Terminal:

Obviously, this requires an open terminal.

Press CTRL + ALT + T and your terminal should pop right open.

Once you have the terminal open the command is basically this:

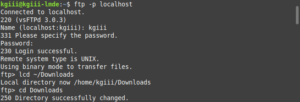
You can connect via domain name, hostname, or even IP address. It’ll look like this, or pretty close:

ftp from the terminal
See: You can use FTP from the Linux terminal.

There are many commands available, so you should probably check man ftp to see what’s on offer. We’re just going to cover a few of the more useful commands.

You’ll find that ‘ls’ works to list files, just like you’re used to, as does ‘cd’. If you want to change your local directory, that is your working directory on your machine and not the working directory on the server, you need to use the ‘lcd’ command – like so:

Note: Read More About Paths

After you’ve logged in and learned to navigate, it’s time to do something. If you want to download something, you use the ‘get’ command:

That will download the file from the server to the local directory. To do the opposite, that is upload something from your current local directory, you would use the ‘put’ command, like so:

If you want to get or put more than one file, the commands are ‘mget’ and ‘mput’ respectively. They look like this:

Note: It may give a warning about using passive mode. If that’s the case, add the -p flag to your connection command – like ftp -p hostname.

Just like with your regular terminal file management, you can ‘mkdir’, ‘rmdir’, and even use ‘pwd’ to be reminded of your present working directory. Files can also be deleted with the delete <file_name> command.

Closure:

And there you have it, an article that explains how to use FTP from the Linux terminal. It is important to note that the FTP command transmits data without encryption. If security is a concern, use SCP or SFTP.

Thanks for reading! If you want to help, or if the site has helped you, you can donate, register to help, write an article, or buy inexpensive hosting to start your own site. If you scroll down, you can sign up for the newsletter, vote for the article, and comment.

What Exactly Is A Linux Distro?

You’ll hear the phrase “Linux distro” tossed around quite a lot and this article will explain what exactly is a Linux distro. It’s not overly complicated and this article shouldn’t take a whole lot of time.

You should also be aware that I’m writing this article in a way that is aimed at the lowest common denominator. I’ll be trying hard to make it simple to read and easy to understand. I don’t want to overwhelm folks with details. I want folks to understand the general concepts.

On to the article…

What Is Linux:

The term ‘Linux Distro’ is short for ‘Linux distribution’. 

I don’t suppose that’s all that helpful…

So, what is Linux? We use the term loosely, but Linux is just the kernel. That’s all Linux is – by itself.

Again, that’s probably not all that helpful.

Then, well, what is a kernel? The kernel is an interface between hardware and software. It also schedules tasks, such allocating memory and keeping track of the memory space where things are stored. It manages processes, memory, and device drivers – interfacing hardware with software.

You really shouldn’t need to interact with the kernel at a personal level, at least not directly. At the same time, everything you do requires kernel participation. Without it, hardware would be useless.

Okay, so now we know what the kernel is – and we know that it is called Linux. Well, that’s all Linux is – and, by itself, the kernel is not all that useful.

Introducing GNU:

Instead, we have some tools around the kernel that make the kernel useful. These tools are often from GNU. Many of these tools existed before the kernel was invented, actually. They’re (many of them) clean-room implementations of Unix tools that were just waiting for the right kernel to come along.

In 1991, Linus Torvalds released his kernel to the world at large. The GNU tools already existed. People put the two together and we started to have the basics of a working operating system.

See, an operating system is much more than just the kernel. At bare minimum, it must have some tools to interact with the kernel. The GNU tools will let you do that *(and more). As GNU tools predated the kernel and because the kernel is newer, many advocate calling it “GNU/Linux”.

That is not an argument without merit as all the major Linux distros make use of tools from the GNU Project. Without one, the other is useless. While there was an expected GNU kernel (for GNU Hurd), that has not had much attention and success.

And Now, A Linux Distro:

You could actually accomplish quite a bit with just GNU/Linux but it still didn’t have tools like a useful browser, a graphical text editor, a graphical desktop, or anything like that. By itself, it’d have limited appeal and you’d need to write any software you needed that wasn’t already included. A lot of what people expect would not have been included with just the GNU tools.

And so the concept of a ‘distro’ is born. 

Enterprising people, people who’d join others with their efforts, would combine GNU/Linux with a bunch of other tools – creating a concept of  a set of tools fit for a purpose. You’d have distros meant to be used for running servers, distros for home use, distros for security purposes, distros for privacy reasons, etc… 

And those distros would all be built around the GNU/Linux tools.

Each Linux distro out there was made for a reason. If there were already distros that filled that roll, then the distro author’s reasons were that they could do it better or in a different way. 

Today, there are like 500 active Linux distributions out there. Each one of them fills a niche, scratches an itch, performs a task (or set of tasks), at least a little bit different from the others. So, finding a Linux distro that suits your needs can be either easy or hard. It all depends on what you need.

Why Call It Linux:

Well, we call it Linux because that’s the most important bit. Without it, none of the rest of the system works. Without the Linux kernel, you’re stuck looking for a different kernel. (Note: Other kernels do exist.)

There’s absolutely some merit in calling it GNU/Linux. The GNU tools are in most every distro and without the GNU tools the kernel is pretty useless. At the same time, the GNU tools are older than the kernel. Combined, the provide a great deal of the functionality that is an operating system.

I don’t call it GNU/Linux because it’s unwieldy and everyone who needs to know that GNU is involved already knows that GNU is in there. I find those that insist on it are mostly okay people, they’re just pedantic and want to highlight the distinction. They’re not bad people, they just want to make sure GNU is recognized. 

When important, I’ve been known to refer to Linux as GNU/Linux. I just don’t make a habit of it. Also, really, not too many people care. Though, I suppose calling it GNU/Linux can be confusing for some new folks. Not my readers though, they’re witty, intelligent, and eager to learn!

Closure:

Well, it’s an article… This one tells you about the Linux distro. It explains what a Linux distro is and why we call it that. Hopefully this is enough information for a layperson. If not, you can always ask for more information and I’ll do what I can to oblige. Like I said, this is written for the lowest common denominator. It’s not written for the folks who have used Linux for a decade. Those people have been using Linux for a decade, they should darned well know what the Linux kernel is!

Thanks for reading! If you want to help, or if the site has helped you, you can donate, register to help, write an article, or buy inexpensive hosting to start your own site. If you scroll down, you can sign up for the newsletter, vote for the article, and comment.

How To: Change Ubuntu Into Lubuntu

Today’s article is going to teach you how to change Ubuntu into Lubuntu. Why? Because you can! Because you might want to try a different desktop environment, or because you’d like to have them both on one computer. It’s remarkably easy to change Ubuntu into Lubuntu – and, of course, would work with other official Ubuntu flavors with just slight modifications

As you know, Ubuntu is a distro. Lubuntu is also Ubuntu, but it is an official flavor of Ubuntu. They are not actually different distros. Lubuntu is Ubuntu, with different Ubuntu software installed to provide a different experience.

Ubuntu is Canonical’s flagship operating system. It ships with a suite of useful software and uses the GNOME desktop environment. If you say Ubuntu, that’s the distro you’re talking about. Lubuntu is a separate project under the same umbrella, based on Ubuntu. Lubuntu, once known for being lightweight, is now using the LXQt desktop environment where it once used LXDE. The latter dropped for the former for a whole host of reasons, including maintenance improvements. Comparatively speaking, it’s still fairly lightweight.

Full Disclosure: I’m an “Official Lubuntu Member” and, by extension, also an Official Ubuntu Member. I’m quite biased with regards to Lubuntu, but my biases are open and I still strive to be objective (or at least not objectionable!).

So, if you have Ubuntu installed and you’d like to experience Lubuntu, then this is the article for you, as it will teach you how to …

Change Ubuntu Into Lubuntu:

Like oh so many articles, if you want to change Ubuntu into Lubuntu, you’re going to want to start off with an open terminal. You can use your menu to open a terminal, or you can just press CTRL + ALT + T and your default terminal should open.

Once you have your terminal open, you need to enter just one command, really. The command you’ll enter is:

That will run its course and then pause on a screen where you can read about your display manager. There are no real options on that page, so you can just press the enter button after reading it.

This won’t actually take all that long. When you’re done, you can logout and then login to Lubuntu or, more effectively, just reboot and you’ll boot into the Lubuntu environment. 

When you reach your new login menu, you can pick which desktop session you want to login with by using the dropdown menu in the upper left, with Lubuntu being the new default. Of course, you can login to the regular Ubuntu session still (as well as Ubuntu on Wayland). Most things will still work in when you’re logged into an Ubuntu session, except for blanking the screen. That fails because you’re no longer using GNOME-display-manager (GDM3). (You’re now using SDDM.)

That was it. That’s all you have to do. However, if you don’t like it and want to change it back, it’s slightly more complicated – but not terribly so – to reverse this change. To reverse it, you need to …

Change Lubuntu Into Ubuntu:

Once again, open your terminal. It’s not hard, as described in the 2nd section of this article. Heck, it’s described in almost every article.

You can start with just this command:

And that’ll get you almost all the way back to normal. You’ll still have the splash screen and boot logos that belong to Lubuntu. You could leave those and learn to accept them, or you can fully restore the original setup.

Assuming you want things back the way they were, we need to get your display manager reconfigured – restored to what it was. That’s a very easy command. It looks like:

You’ll get another one of those warning screens and, once again, there are no options. The only thing you can do is press the enter button. Fortunately, that’s exactly the button you want to press!

Finally, you need to change the boot screens. It’s a pretty easy command, but it is interactive. Just run this to get it started:

That will ask you which theme you want to use. In this case, you’ll pick 1 and press the enter key. Basically, you want the option that isn’t “Lubuntu” and this will fix the final visual issue.

When you next reboot, you’ll have the default Ubuntu logo and theme during the whole boot process (assuming everything went as expected). Your login theme will have been restored to Ubuntu’s default, as will have the Ubuntu splash screen while the system boots.

Of course, you could always opt to keep Lubuntu installed alongside Ubuntu, that is LXQt alongside Gnome, if you’d prefer. Then again, if you like your Lubuntu installation, maybe you’ll just want to use it. It’s easy enough to remove GNOME or to even just clean install Lubuntu.

Closure:

And there it is! It’s an article that teaches you how to change Ubuntu into Lubuntu. It’s not a very complicated affair and you can restore it easily enough, should you not like it. You can more or less do this with any other official flavor. Swapping back to just the old Ubuntu will potentially use different commands, but it’ll otherwise be quite similar.

Thanks for reading! If you want to help, or if the site has helped you, you can donate, register to help, write an article, or buy inexpensive hosting to start your own site. If you scroll down, you can sign up for the newsletter, vote for the article, and comment.

Subscribe To Our Newsletter
Get notified when new articles are published! It's free and I won't send you any spam.
Linux Tips
Creative Commons License
This work is licensed under a Creative Commons Attribution 4.0 International License.