Turn Your Man Pages Into HTML

Today’s article is going to teach you how to turn your man pages into HTML. It’s a relatively straightforward process and handy if you want your man pages to be more easily read. It should be a quick article, as I have preexisting work to help along the way. 

Again, making your man pages easier to read is really the only reason why I can think of for doing this – other than preparing them for uploading to share on a web site. I’m not entirely sure why you’d want to upload them, when there are already uploaded and maintained versions of man pages.

If you recall, the last article was about showing you how to find your man page’s location on disk. In that article, you learned about the whereis command. The reason that article was done first was so that I can save some time and just refer you to the first article. 

So, yeah, click that last link and learn about the whereis command, saving me a bunch of time and typing! After all, I planned ahead! I swear, half these articles are so that I can refer to ’em later, I just forget that I wrote ’em. Wine might just be a factor.

Anyhow, with you having refreshed your memory by reading the previous article, let’s just jump right into it. Let’s learn how to…

Turn Your Man Pages Into HTML:

Like many other articles on this site, you’re gonna need an open terminal. If you don’t know how to open the terminal, you can do so with your keyboard – just press CTRL + ALT + T and your default terminal should open.

Once you have a terminal open, you’ll want to install man2html. That should be in your default repositories, so I’ll save some time and just share how to install it in Debian/Ubuntu/derivatives. It’s just:

Once installed, we can check the man page and see that it defines itself as:

man2html – format a manual page in html

Which is, well, a pretty good description. That’s what it does. That’s what we’ll be using it for. Imagine that?!?

Now, the first step in the operation is finding the location of your man pages. To do that, we’ll use the whereis command – like so:

The 3rd field is what we’re actually after, so you can use awk to help you out. That’d look more like this:

That’s the actual path to the man page for ls.  You’ll need it for the next command. That’d look like:

Now, as you can see, the command first needs to know the path of the man page and then needs to know the path where you wish to save the output HTML file. You can adjust each according to your needs, using the > operand to determine where the resulting file is saved. 

If you need a refresher on how to output the terminal to a file, click and read:

How To: Write Text To A File From The Terminal with “>” and “

(See, more foreshadowing!)

The output from your command should end up looking something like this:
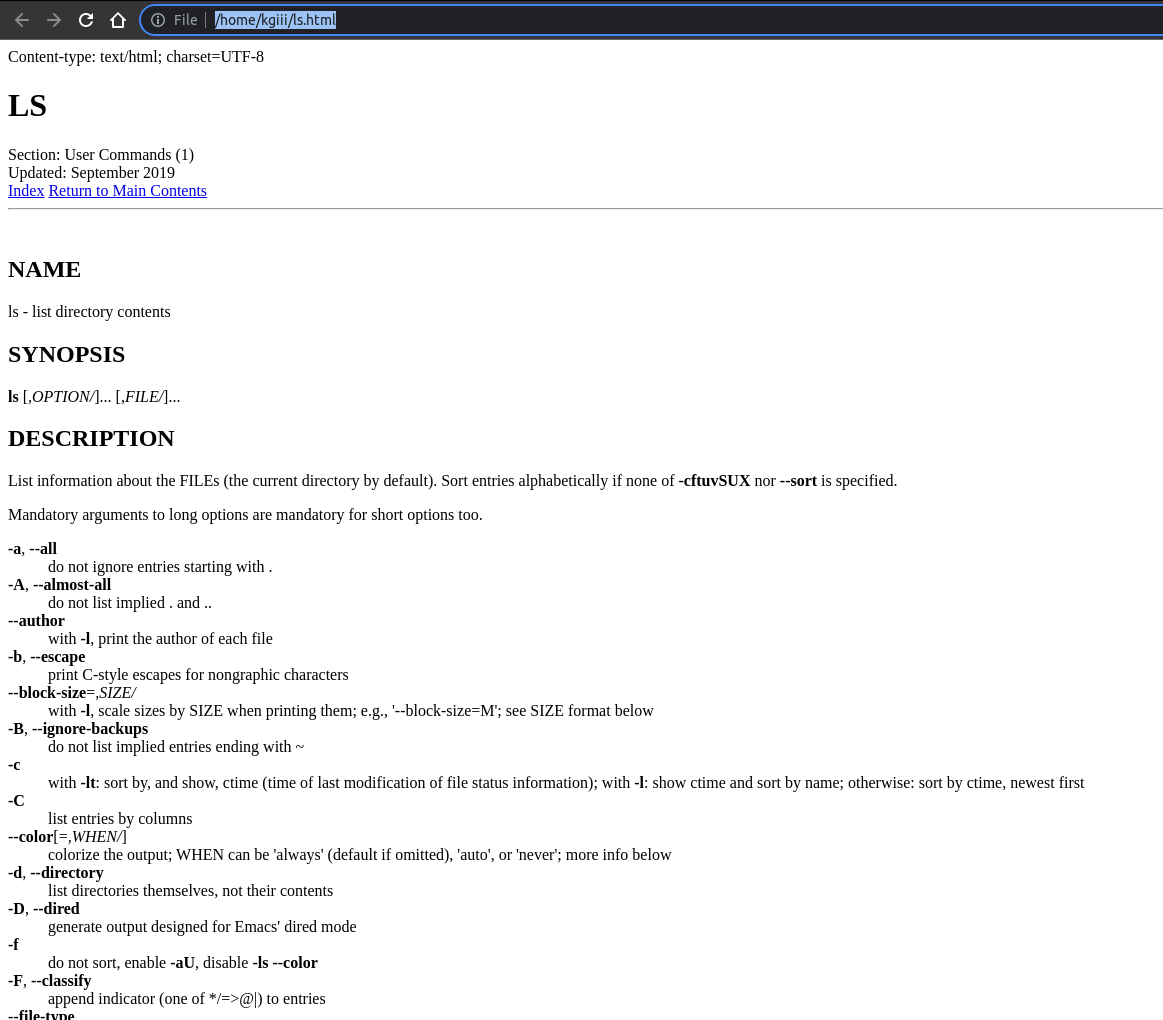
man2html does its magic with the ls command
See? You get HTML as your output when you turn your man pages into HTmL! Tada!

Anyhow, that’s actually all there is to it. Use the whereis to find the location of the man page. With that information you use man2html to write the HTML to a directory of your choosing. ‘Snot all that difficult, now is it? And to think, there are people afraid of the terminal!

Closure:

Well, there you have it. It’s a pretty simple article, mostly thanks to having written a lot of the information ahead of time – in other articles. Sometimes I plan on another article to follow an article, but I forget or it just gets lost in the shuffle. The good news is that the search function works well enough and I now have a whole lot of articles to reference! If nothing else, you now know how to turn your man pages into HTML – should you want to do so.

Until next time…

Thanks for reading! If you want to help, or if the site has helped you, you can donate, register to help, write an article, or buy inexpensive hosting to start your own site. If you scroll down, you can sign up for the newsletter, vote for the article, and comment.

How To: Find Your Man Pages’ Location On Disk

Today’s article is going to teach you how to find your man pages’ location on disk. It may not be a very useful skill, but it’s one that will come in handy in a future article. (That’s called ‘foreshadowing’!) Well, it seems likely that it’ll come in handy with a future article.

By the way, if you’re curious about why the first lines in these articles are often ‘forced’, it’s because of search engine optimization. You can blame the search engines, but it works.

Many of you will be familiar with the which command. You can use that to locate a binary for an application. For example, you can go with:

Which will output something along the lines of:

And that’s great. If that’s what you need to know, that’s what you need to know. However, what if you want to also know where your man page file is located? 

It should come as no surprise that Linux will happily spit that information out, so long as you know the correct incantations. And, for that, you have Linux Tips – where I’m gonna tell you how to find your man pages’ location.

Man Pages Location:

This article requires an open terminal, like many other articles on this site. If you don’t know how to open the terminal, you can do so with your keyboard – just press CTRL + ALT + T and your default terminal should open.

The tool we’re going to be using is similar to which, and even spits out the same information. The tool in question whereis and the man page describes it as:

whereis – locate the binary, source, and manual page files for a command

As you can see, it’s a pretty simple command. It will also only show you the source if you actually have the source. In most cases, you have compiled binaries and that’s what your system uses. It’ll happily locate the binary just like the which command does.

So, let’s test it… Hmm… Let’s test it with the ‘ls’ command:

whereis command in action
See? It does exactly what i told you it would do! That’s why I make the big bucks!

So, if you want to know where your man pages are located for a specific applications, this is an easy way to do that. Obviously, it’s the 2nd bit of information. Though, I suppose if you only want the output to contain the path to the man pages, you could use a command like this:

That will just spit out the path to the man page, if that’s all you want to see. Try it with a few different commands and you’ll lock it into your memory – ’cause you never know when it’s going to come in handy.

Closure:

And there you have it… You have another article! This is just one of many articles, so feel free to browse around. You might even learn something new! I’ve officially written so many of these things that I can’t actually remember them all. I legit need to search first and make sure I haven’t already written the article. (I probably should have devised a system to avoid this, but the search function appears to be pretty good and effective.)

Thanks for reading! If you want to help, or if the site has helped you, you can donate, register to help, write an article, or buy inexpensive hosting to start your own site. If you scroll down, you can sign up for the newsletter, vote for the article, and comment.
Remove The Firefox Title Bar

If you, like me, appreciate clean and simple layouts then the Firefox title bar is annoyance. Firefox’s title bar wastes space, adding unneeded clutter. I have a dislike for that sort of stuff. If you too happen to dislike it as much as I do, this article will tell you how to remove the title bar from Firefox.

If this site’s aesthetics doesn’t make it obvious, I really like my layouts to be simple. I don’t like wasted space that doesn’t give me information that I need. That’s one of the reasons I use Linux – I can make the OS get out of my way and get my work done. If I had the skills, I’d make this site ‘responsive’ so that it filled wider screens better – just to avoid that wasted space.

I admit, it’s pretty picky and maybe a bit over the top, but I really do like the entire screen to have information I need on it. Other than a few applications, everything I do is in full screen. I sometimes don’t even bother with a desktop background – because I never see the desktop.

I believe the more technical term would be that I like an ‘information dense’ working environment. It’s not for everyone, but it works for me. For example, as I write this, I have 92 tabs open. See:

92 open tabs

See? I wasn’t kidding. That’s a bit more than normal, but not much. It’s what I do. Firefox isn’t usually among my open apps, actually. Oh well…

I also have multiple browsers open. Yeah, I have a problem… (My other main browser has ~60 tabs open.)

Remove The Firefox Titlebar:

So, what am I talking about? How can you fix this in Firefox? Well, a picture is worth 1,000 words… 

firefox title bar
That. That there is wasted space. That’s the kind of thing that annoys me.

It’s actually easy to get rid of, if you know where to look. So, this won’t be a taxing article – it’s an article that anyone can follow!

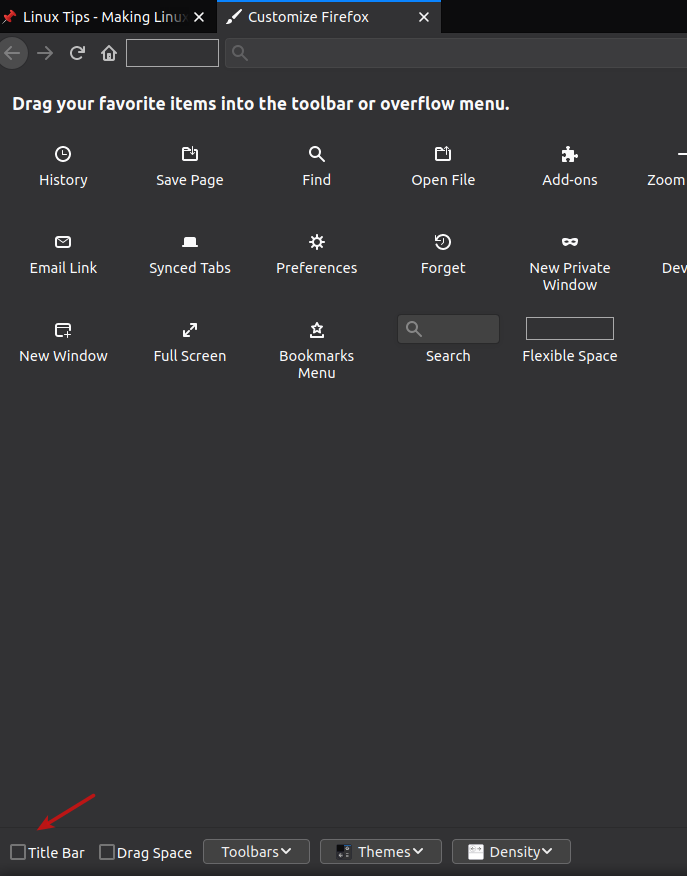
Firefox needs to be open, of course. Once open, look in the upper-left. You’ll see three vertical dots and those open the menu for customization. Click that and then click on “Customize”. Then, simply scroll down and untick the box for Title Bar.

disable firefox title bar
It’s easy, once you know where to look. Also, I suck at editing images. I seriously suck…

You don’t even have to restart the browser. It really is that easy to get rid of this annoyance. While you’re there, you can also customize a few other visual elements, so you might as well do that while you’re there. That and a theme and you’ve made your Firefox browser into your own.

Closure:

And there you have it, a nice and simple article that tells you how to remove the title bar from Firefox. It’s not dreadfully difficult, but it is an article! Maybe I should do one for Chrome/Chromium? That’d be another simple article that might be useful for people looking to maximize their screen’s real estate.

Thanks for reading! If you want to help, or if the site has helped you, you can donate, register to help, write an article, or buy inexpensive hosting to start your own site. If you scroll down, you can sign up for the newsletter, vote for the article, and comment.

Meta Article: The State Of Linux Tips?

I like to do a meta article once in a while, a bit of a break from the normal writing and the chance to just speak about whatever is going on with the site itself. Today, today is one of those meta articles.

More than a year ago, I set out to put my notes online. More than a year later, I’m not even close to complete – and I’ve consistently published an article every other day for just about a year. I still have tons of notes.

The site started off on a .gq domain – a free domain – that was universally hated by every search engine on the planet. On top of that, getting a .gq TLD email through spam filters was pretty much impossible.

At one point, I decided I’d take the project a little more seriously and moved to a .us domain name. You could say that that’s when Linux Tips was truly born. I also decided to reset the clock and to start the year over again. I figured the new site would be motivation and that I could probably keep it going without missing too many days. (Note: I’ve so far missed no days!)

And, like all good things, that year is coming to an end. The very first article on the new domain was Welcome To Our New Home! – on April 16th, 2021. For those who can’t use a calendar, or use a different calendar, that means we’re just about 2 weeks from the official end of this project.

Many of you will have read the comments in my “Closure” sections and already have guessed what I’m going to say next.

The Future: 

I plan on keeping the site going. I plan on continuing to put my notes online and the interesting things I discover.

You might ask why, and I think I’d point to a few reasons (among the many).

  1. I am learning so much.
  2. I am still having fun.
  3. The results have been amazing.

Not a day goes by these days without at least a couple hundred unique visitors. It’s not unique to get twice that many – enough so that I’m now crossing into a position where I am just going to pay for CDN services. (I’m happy with the company I’m currently using and their rates are reasonable.)

Technically, assuming my cost for my time was zero, the site has made a few bucks with the Google Ads. It’s reaching the point where it’s likely to cover expenses – including covering the CDN. I’ve long since come to grips with the fact that it’ll never pay me for my time – and I’m okay with that.

By the way, the CDN isn’t because I worry about bandwidth, it’s because it makes the site faster to load. Google loves a site that loads quickly and this site now ranks pretty high for a bunch of keywords and phrases. Making sure the site is responsive is a definite part of modern SEO. (These are things I’ve mostly had to learn on the fly. Like I said, it has been pretty educational.)

Actually, for the month of March, the site averaged ~250 unique visitors per day. It chewed through about 10 GB (not much) bandwidth – but most of that was CDN bandwidth. The CDN company lets me pay for what I use and not some flat rate, which is nice.

So, you can assume I’ll still keep the site going. Granted, I still have a couple of weeks to decide and may change the publication schedule – but the site’ll remain here and get additional content.

Some Meta Stuff:

Seeing as I’m here, I might just as well give you some other numbers. It seems like the thing to do, and I’ve done something like this in past meta articles. Traffic has steadily increased. Traffic has steadily improved by every metric, with people spending more and more time on the site. Truth be told, I’m quite amazed at the success. At one point, I was legitimately happy when I’d get 25 visitors in a single day.

The three busiest articles this month were:

  1. Disable Hibernation/Sleep On Ubuntu Server
  2. Screenfetch vs. Neofecth
  3. Quickly Reset Ubuntu’s Repositories

I mentioned search engine traffic above and, like the most recent norms, the vast majority of unique visitors came from search engines. Google alone sent me ~5200 visitors – surprisingly some of them were repeat visitors.

A much smaller number of visitors – but still the most from any site other than a search engine – was (of course) Linux.org. It’d be nice to get some more traffic from other places (while not losing traffic from Linux.org). You can help with that!

You Can Help!

I know y’all have social media accounts. Well, some of you… You can easily share to the major social media sites. I made it really, really easy. There are quick links to do so at the top of every article. If your favorite social media site isn’t there immediately – it might be in the menu under the plus arrow –  pointed to in the following image.

Help out Linux-Tips.us by sharing the articles on social media!
The big ones are listed (I can add more at request) and the rest are hidden.

There are literally like 100 social media sites hidden under the arrow and by clicking on the more option. When they say ‘more’, they aren’t kidding. There are sites in there I’ve never even heard of before!

If you participate on Reddit, you can share it in the Linux subredits without making me look like a spammer! I’d do it myself, but that’s just bad form. Actually, I have done it myself – and had some solid results – but it felt kinda icky and one subreddit banned me without warning.

There are still other ways to help… You can donate, you can write articles, you can just vote on the articles, you can leave comments with additional information, and you can sign up for the newsletter – that only sends messages when new articles are published.

If you want to help in some way, just let me know. I hate proofreading but I do it anyhow. A skilled editor would be pretty sweet. Some more guest articles would be fun. Oddly, I get emails asking me if they can pay me for a guest article (and the nofollow links in it), but I decline those offers.

I’d accept the articles if they were topical, but I just can’t seem to figure out how investing strategy would be topical on this site. So, I don’t get to charge for those. I’m told they pay pretty well for a site such as this – like a few digit sum worth of money. I just really don’t want to sully the site with guest articles that don’t fit the subject.

Closure:

So, yeah… The site’s almost certainly going to keep going. I might relax a little and take a day off now and then, but that’s fine. Heck, I still have articles on the original site that haven’t migrated to this site. I suspect I have many articles left in me and I’m not yet bored to tears with the project.

It hasn’t always been easy. But, I’ve not missed a single day, even with a pandemic and internet outages. Even when sicker than a dog, you’ve had an article every other day. A couple of ’em weren’t all that good – but there were articles. I’ve even made a few mistakes along the way, but I love all the feedback I get that tells me when I messed up.

If the site is missing features, let me know. I might be able to do something. I’d toss up a forum, but I don’t want to be seen as competing with other forums. I have thought about chatting and setting up a few chat rooms. All the acceptable scripts are a bit more than I feel like paying, so I’ve never done much with it other than research it.

Anyways… One year is pretty much done. I don’t know what the future holds, but you can help shape that future. All you gotta do is step up and opine or offer to help.

Thanks for reading! If you want to help, or if the site has helped you, you can donate, register to help, write an article, or buy inexpensive hosting to start your own site. If you scroll down, you can sign up for the newsletter, vote for the article, and comment.

Find A Program’s PID (Process Identification)

Today’s article is going to tell you how to find a program’s PID. PID stands for “Process Identification” and every running process has one. It’s in numeric format and knowing the PID makes it easy to manage processes. So, today we’ll be covering that. It’s a quick and easy article, useful perhaps for a future article to reference or as just a quick note as a reminder.

We’ll mostly be using a program called ‘pidof’ and you can figure out why it is named what it is pretty easily. It defines itself as:

pidof — find the process ID of a running program.

As we will just be covering general usage, we really won’t have to be all that verbose. There’s a man page for pidof, which you can (and possibly should) reference. The usage we’ll be covering is just that of a lone admin on their bog-standard home computers. If you have anything other than that, you might want to read the man page.

So, with that in mind, let’s learn how to…

Find A Program’s PID:

This article requires an open terminal, like many other articles on this site. If you don’t know how to open the terminal, you can do so with your keyboard – just press CTRL + ALT + T and your default terminal should open.

With that terminal now open, you can find a program’s PID with the following command:

That should spit it out. It looks like this:

output from pidoff
That’s a nice and easy one!

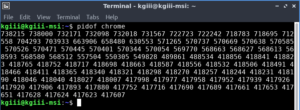
On the other hand, it can look like this:

pidof chrome browser with a whole lot of tabs open
That’d be the PIDs of Google Chrome when you have a ton of crap open.

Now, you can do a lot with that information – things best suited for another article perhaps. Either way, you’ve learned how to find a program’s PID. It really was that easy! You’re welcome and thanks for reading!

But wait, there’s more! 

I’m not sure where I came across the gem, but it’s pretty awesome. There are some variations (I tried to find my source for this to give credit where credit is due, but it’s out there in a few places – none older than my notes on the matter) but this one is nice and easy.

Ready? Enter this into your terminal:

That should turn your cursor into a cross-hairs. Go ahead and click on an application and then check the output in the terminal. It should, among a few other tidbits of information, help you find a program’s PID with just a simple point and click. (Useful mostly on applications that only have one or two instance running.)

By the way, if you’re looking to find a script’s PID that you have running, you just need to add the -x flag. It’d look like this:

Which is pretty much all a basic home-user is ever going to need to know. Again, check the man page if it’s more complicated than that.

Closure:

Congratulations! You now know how to find a program’s PID. From there you can do stuff like kill it! I’d expect an article in the future that reaches back to this one, using it as a reference, that makes it all come together a little better. Until then…

Thanks for reading! If you want to help, or if the site has helped you, you can donate, register to help, write an article, or buy inexpensive hosting to start your own site. If you scroll down, you can sign up for the newsletter, vote for the article, and comment.
Linux Tips
Creative Commons License
This work is licensed under a Creative Commons Attribution 4.0 International License.