Monitor Progress With RSYNC

When you’re moving a lot of files around you might want to know the progress, so here’s how you monitor progress with rsync. This will likely be an intentionally short article, an easy article, as it’s another weekend article – this time about rsync and how you can monitor the progress.

The rsync application is a tool for transferring and synchronizing files between two places. It’s a very handy application and rsync has a whole lot of features. It’s possible to write a half-dozen rsync articles and not even scratch the surface. We’ve had rsync available since the mid-90s and you can visit the rsync project page.

You’ll almost certainly not need to install anything to use rsync. It’s pretty much available with every distro though I’ll mention ahead of time that this is a terminal-based application. By the way, if you’re not happy with your terminal, you can change to a new default terminal easily enough.

There are frontends for rsync, such as luckyBackup, but we’ll just be using a plain old terminal for this article. If you play with luckyBackup, you’ll discover that you can use it to spit out the actual rsync command you’ve configured and use it in the terminal without any additional overhead.

RSYNC:

If it’s not obvious, the tool we’ll be using is rsync. Specifically, we’re going to monitor the progress as rsync synchronizes your data from one place to another. It’s going to be a very easy article, I promise. Well, I think it’s easy. I suppose I could be wrong and you find it more difficult.

You shouldn’t need to install anything to follow along. You can first verify that you have rsync installed and available. Use this command:

If you don’t have rsync available immediately, I’m sure you can install it from one of your default repositories. If it’s not installed by default, let me know. I’m curious…

Anyhow, you can check the man page (with man rsync) to learn more about this application. It’s a rather long and complicated man page, but rsync is described as:

rsync – a fast, versatile, remote (and local) file-copying tool

And that’s what we want to do. We want to monitor the progress of file transfers. So, that’s what we’re going to do.

Except, I’m also going to show you how to make a simple backup of your data as a bit of bonus information. Let’s get on with it!

Monitor Progress With RSYNC:

Now, I did tell you that you’ll need an open terminal for this. That’s easily done. More often than not, you can open your default terminal by pressing CTRL + ALT + T. Otherwise, you can find it in your application menu.

With your terminal now open, your standard command would be something like this following rsync command:

To monitor progress with rsync, you’d add the --progress flag, like so:

That’s all well and good, but let’s pretend you want to make a backup of your home directory with rsync and that you want to monitor the progress. Well, you can happily use rsync with directories. This is going to be pretty easy!

The -r flag means ‘recursive’. That means it will include the files in the directory you specified, find the additional directories within that directory, and include those files. It will keep digging until there are no more directories unless you decide to specify a maximum depth.

Let’s further assume you have a USB device plugged in and you want to store your home directory on that USB. Let’s also assume that the USB’s called ‘backup’. The command for that would just be something very close to this command:

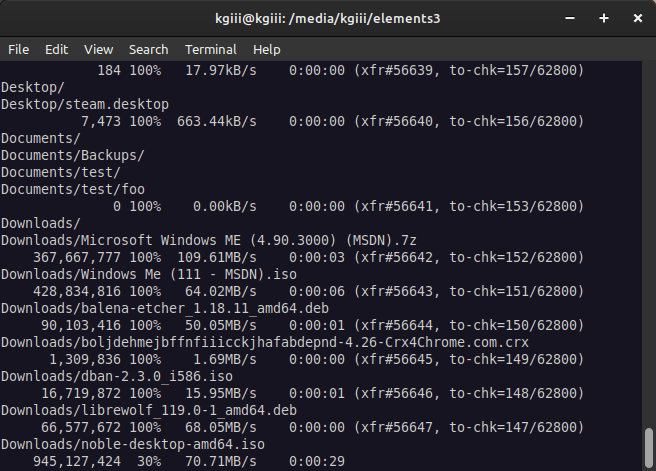
That might look something like this:

showing the progress of rsync
As you see, it’s easy to monitor the progress of rsync. Yes, that’s Windows ME. Don’t judge me!

That command will move all the files from your home directory (as we know that ~/ is a short way to say your /home/user directory) to your USB device. You’ll have then backed up your personal data. The second time you run it, it will sync those files – only replacing those files that have changed since the last time you ran the command.

You can easily use that command (modified for your needs, of course) to make a backup of your home directory. This is the most important data on your system. The rest is just system files and those are easily restored with a fresh installation.

While it would be possible to use rsync to backup the entire drive, it’d try to do stupid things like backup the /media directory. You’d need an advanced command for that and that’s beyond the scope of this article.

As it stands, the backup bit is extra. This article is just about how you can monitor the progress with rsync. It’s a pretty trivial thing, but something you can learn about quickly.

Closure:

Yeah, it’s a pretty short and easy article. At least I hope it’s easy. I did make a promise, after all! This one should be easy enough for anyone because it’s not all that hard to learn how to monitor progress with rsync. Also, with a reasonably large file, you can do things like check transfer rates, be it over a network or from one drive to another. There’s all sorts of fun!

Thanks for reading! If you want to help, or if the site has helped you, you can donate, register to help, write an article, or buy inexpensive hosting to start your site. If you scroll down, you can sign up for the newsletter, vote for the article, and comment.
Find A File While Ignoring Case Sensitivity

Today we’ll have a fairly short article as we’re simply discussing a way to find a file while ignoring case sensitivity. This can be a pretty handy command to have in your toolbox, so I’ll do what I can to turn this into an article. If you’re into finding files, especially with the terminal, you might just want to read this article!

I might even give you a bonus method! Maybe… It depends on how well you behave yourself! Don’t make me pull this car over!

Alright… Back on topic…

So, what is case sensitivity? We usually have lowercase files and commands. Linux is case-sensitive. If you type sudo APT update nothing is going to happen. Why? Because apt is lowercase. Similarly, a file named  FOO.bar is not the same as foo.bar.

If you try to perform an operation on a file with the wrong case, the operation will not take place. The file isn’t found, because you’ve used the wrong case. In the above command, not even SUDO apt update will work. You have to use lowercase.

Much of Linux is in lowercase. You can’t even use capital letters in your username, by default. Sure, you can force Linux to accept a bad username, but that’s not what the system is expecting.

So too are filenames. Well, mostly… Sometimes you will come across files that use mixed case or maybe all capital letters. You might even have created a file yourself with mixed case letters. When performing an operation on those files, you need to use the correct case.

Now, you can find files while ignoring the case. That’s what this article is all about accomplishing. It shouldn’t be too long.

The Find Command:

The find command is used in the terminal, so we will have to open the terminal to follow along with today’s article. However, on the plus side, you absolutely shouldn’t need to install anything. This find command should be available by default – unless you’re on an extremely stripped-down version of Linux.

If you check the man page, you’ll see that find is the right application for this.

find – search for files in a directory hierarchy

As we’re trying to find files (while ignoring case sensitivity) that seems like one of the good tools for the job – and it is.

Find A File While Ignoring Case Sensitivity:

As mentioned above, we do this in the terminal. More often than not, you can just press CTRL + ALT + T and your default terminal should open. Otherwise, you can open your terminal via your application menu.

With your terminal now open, let’s change directories and create a file.

You can confirm that the file exists by running the ls command.

Next, try this command:

Unless you have another file with that name, you will not get any results from that command. That’s why you need the -iname flag. Simply add that to your command and you can find the file while ignoring case sensitivity.

So, in our case, it’d be:

Sure enough, that finds HeLLo.txt.

If you don’t feel like changing the directory, you can change the command up a bit. The syntax would look like this:

So, in our example:

And, sure enough, that finds the file while ignoring case sensitivity! 

Pretty neat and pretty easy, right?

How about that bonus?

Find A File While Ignoring Case Sensitivity (with locate):

You probably don’t have locate installed by default. You’ll need to install it.

To that end, read this previous article:

And Still Another Way To Find Files By Extension

Specifically this part is of interest (saving you a click):

With your terminal open, we can get mlocate installed with one of the following commands:

Debian/Ubuntu:

Arch/Manjaro/etc:

RHEL/CentOS/etc:

OpenSUSE/GeckoLinux/etc:

There are other package managers. If your package manager isn’t covered, just go ahead and search for “mlocate” and you’ll likely find that it’s available by default.

So, with locate now installed, the syntax is also very simple. You simply need the -i flag to find files while ignoring case sensitivity.

First, we should update the locate database:

Next, try this command:

That will not find the file in your ~/Documents directory. Add the flag and run the command again, like so:

If you want to run that locate command in a specific directory, you can do that. The syntax is a little different than many other commands, but it’s easy enough.

Or, in our case, it’d look like this:

Sure enough, that outputs the information exactly as planned. It will happily ignore the case sensitivity and find your file named HeLLo.txt.

And now you’ve learned two ways to find a file while ignoring case sensitivity. One of the ways is even a nice bonus way to do accomplish this goal.

Closure:

As the headline and opening paragraph suggested, you can find a file while ignoring case sensitivity. It’s not particularly taxing and there are multiple ways to accomplish this goal. I figured I’d give some ‘bonus’ information with this one and share how to find a file while ignoring case sensitivity with the locate command used in the previous article. Why not?

Thanks for reading! If you want to help, or if the site has helped you, you can donate, register to help, write an article, or buy inexpensive hosting to start your site. If you scroll down, you can sign up for the newsletter, vote for the article, and comment.

And Still Another Way To Find Files By Extension

Today we will cover a subject we’ve covered before, as we discuss yet another way to find files by extension. This is Linux! We have options! There are so many ways to find files by extension – and this is one of the more interesting of those ways. So, if you want to find files by extension, this might be the article for you.

You might be interested in previous articles that covered this topic:

Another Way To Locate Files By Extension
Yet Another Way To Find Files By Extension

You can search to find more. This is a task that has all sorts of ways to accomplish it. Some ways are easier than others. I’d say that the method we use to find files by extension in this article will be fairly easy. There’s not a whole lot to it.

We will be installing software. We’ll be installing mlocate but the man page will refer to it as plocate while the command we’ll be using will just be locate. Sound confusing? Well, it is. Don’t worry, the directions are still simple.

mlocate:

We’ll be installing mlocate as our tool to find files by extension. We’ll do this in the terminal, a fairly universal way to do things. Pretty much every distro is going to have at least one terminal available. You can usually open your default terminal by pressing CTRL + ALT + T on your keyboard.

When you do get mlocate installed, you can check the man page with ( man locate). There, you’ll see that locate is described like so:

plocate – find files by name, quickly

Yes, it has now been called mlocate, plocate, and locate. No, I do not know why. I do not think I’ll try to find out why. This is just one of those things you sort of accept and move on. Please feel free to research this and leave a comment. I’m not terribly curious, but other people might be.

With your terminal open, we can get mlocate installed with one of the following commands:

Debian/Ubuntu:

Arch/Manjaro/etc:

RHEL/CentOS/etc:

OpenSUSE/GeckoLinux/etc:

There are other package managers. If your package manager isn’t covered, just go ahead and search for “mlocate” and you’ll likely find that it’s available by default.

Configure mlocate:

Now that you have mlocate installed on your system, you need to update the database. The locate command requires a database. On slow systems with many files, this can take a few seconds. It should not take long on a modern system.

The only command you need to run at this stage is this:

Let that finish. It should not take very long. If it’s taking a long time, something might be amiss.

That’s all you have to do. The database will happily keep itself updated, though may take a short while to do so. If you add a new file, it might not be in the database immediately. In theory, this lag could mean you miss something – but the odds of that are rather low unless you’re constantly generating additional files.

I guess that means we should talk about using the locate command.

Find Files By Extension With The ‘locate’ Command:

As the title indicates, our goal is to find files by extension. We’ll be using the newly installed and updated locate database. The syntax is really simple. You’d just run a command like this:

For example,  you can find .iso files this way. That command would look like this:

That command will find everything with .iso in the name. If you have a foo.bar.isotext file that’s not really an .iso file, you’ll have to ignore that result because the locate command is going to find it.

But wait, there’s more!

You can limit the search to just a single directory. The command may not look conventional, but the syntax is as follows:

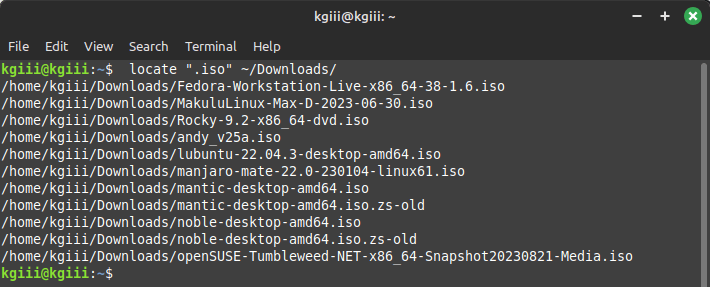
Let’s say that I want to find all the files ending with .iso in my ~/Downloads/ directory. That command would be simple. It’d look like this:

An example output might be something like this:

using the locate command to find files with a certain extension
It’s not hard to use the locate command to find files by extension. You’ve got this!

See? It’s not too hard to use the locate command. You can do more with the locate command, but this is just using it to find files by extension. Read the man page to learn more about it.

EDIT: Closed parentheses thanks to @Osprey.

Closure:

Well, this is a fairly short article. This time around, we just used a different method to find files by extension. There are lots of tools at your disposal and we use the locate command for this one. Just remember to update your database before you use it. Other than that, it’s pretty simple. It’s easy enough for new folks to use it!

Thanks for reading! If you want to help, or if the site has helped you, you can donate, register to help, write an article, or buy inexpensive hosting to start your site. If you scroll down, you can sign up for the newsletter, vote for the article, and comment.

Yet Another Way To Find Files By Extension

You might look at the title and think that you’ve seen this before, and you have, but this is another way to find files by extension. That’s right! This is Linux! There’s almost always a variety of ways to think about this. There are almost always a variety of ways to accomplish the same task!

Well, this article will touch on a theme we’ve seen before. We’ve seen it recently. I’ve even explained why you might want to find files by their extension type. Fortunately, I’ve even explained the limitations this has.

See a shell script file could have a .txt extension but still work just fine as a script. Linux cares about the file itself more than it cares about the extension. If you have files mislabeled as an .iso file, this operation will still list them as .iso files. This is only about the extension and using that as a search category. It has limitations.

You can read these articles for more:

Another Way To Locate Files By Extension
Find Multiple Filenames By Extension – With Locate
How To: Find Multiple Filenames By Extension

See? It might seem that this article is like beating a dead horse, but it’s not. There are use cases for all of these options, including the option I’ll give you in this article.

Also, it seems like a good day to take it easy. Life has sent me a bit of extra stress. That won’t stop me from writing this article. It seems nothing will stop me from writing these articles!

The ‘ls’ Command:

This is kind of the sledgehammer way to find files by their extension. It’s a good way. It’s even an easy way to remember, without needing extra commands. At the same time, it’s a pretty basic way to do so.

The first command we’ll work with is one you have installed already. You won’t need to add any software to follow along with this article. We’re simply going to use the ls command to list directory contents. 

If you check the man page for the ls command, you’ll see this:

ls – list directory contents

What did I say in the paragraph before that? I said we’re going to list directory contents. Sure enough, Linux provides the perfect tool for this. 

As an aside, what you can accomplish with a basic Linux install is amazing. You can accomplish a whole lot of work without actually adding any additional software. This is awesome. Thank you, Linux.

The ‘grep’ Command:

The second command we’ll be using is the grep command. If you’re a regular on this site, you’ll have used the grep command many times. You can think of the grep command as a filter. You use the grep command to process the output of another command (more often than not) and, more specifically, you use it to filter that output.

You want to use grep when you’re trying to isolate some information. Well, sure enough, we can check the man page for grep. If you do so, you’ll find that grep accurately describes itself like this:

grep, egrep, fgrep, rgrep – print lines that match patterns

You’ll see that grep comes in many forms. You’ll also see that it’s used to print lines that match patterns. The command is filtering out those lines that don’t match the prescribed pattern.

In fact, I used it as an example in the previous article:

Find Out When A File Was Created

Scroll down to see how you can use the grep command to filter out the lines that aren’t important when you simply want to find out when a file was created. Simple, eh? Yes… Simple!

Find Files By Extension:

As you can guess, we’ll be using both the ‘ls’ command and the ‘grep’ command to find files by extension. As those are terminal-based commands, this will be a terminal-based article. You’ll need to open a terminal and you can (more often than not) do so by pressing CTRL + ALT + T.

With your terminal now open, this is the syntax I want you to use for this exercise. We’ll keep it simple:

If you’ve used mix-case, maybe having extensions of .TXT (in capital letters), you can add the -i flag to the grep command. That will (don’t forget to check the man page) tell the grep command to ignore the case. So, an example of the syntax for that command might be:

For example, I might want to search my ~/Downloads directory for .iso files, finding the various distros I’ve downloaded on this computer. If I wanted to do that, my command would look like this:

And, sure enough, here’s an example output from that very command:

See? That output shows you all the .iso files that I have in my ~/Downloads directory. There’s no fuss. There’s no muss. It’s just a simple way to find files by extension.

Anyone can do it and they won’t need any additional software to do so. Everyone (except maybe someone with a very light embedded Linux system – and probably still them) can find files by extension without adding anything to their system. It’s maybe a bit creative, but it’s effective. I’m not sure about you, but I like effective things. This meets that definition squarely – it’s effective.

Closure:

Well, I guess this is still a fairly long article. I’ve been making them longer and this one just got written that way. My style of longer writing isn’t without thought. I have altered the format of these articles a half-dozen times.

Each time I do so, I do so for you. The goal of altering the format is to make it easier for you to digest and to offer more information than previous articles – even for the more basic articles like this one. I do not know if I’ll settle on this style. Evidence would suggest that I’ll improve upon it as I go.

I welcome feedback on this. I don’t suppose you’ll give me that feedback. The odds are good that you won’t even read this far down. Still, please let me know if you like the current writing style. I’ve consistently written to a formula, but that formula has changed over time. This is the most recent iteration, so please let me know what you think. Thanks!

Thanks for reading! If you want to help, or if the site has helped you, you can donate, register to help, write an article, or buy inexpensive hosting to start your site. If you scroll down, you can sign up for the newsletter, vote for the article, and comment.

Subscribe To Our Newsletter
Get notified when new articles are published! It's free and I won't send you any spam.
Linux Tips
Creative Commons License
This work is licensed under a Creative Commons Attribution 4.0 International License.