Another Way To Locate Files By Extension

I figure that today is a good day for a shorter article, so we’ll look at another way to locate files by extension. This is something that you can do in so many different ways. We’ll just cover another one, simply because we can.

You might want to locate files by extension when you’re doing file management tasks. When you have a directory containing many files, the output from the ls command can be pretty cluttered. For example, you might want only to list the files with a .txt extension. This article will help with that.

It should be noted that Linux doesn’t much care about file extensions. If you create a plain text file without any extension at all and add some text to the file, Linux will know that it’s a text file. See this article on Wikipedia about magic bytes:

List of file signatures

See also this article:

Magic Number on Wikipedia

About a year ago, I wrote a couple of articles on this same subject – that is finding files by extension. Of course, those articles are different than this article. This is a different way to locate files by extension. Those previous articles were:

Find Multiple Filenames By Extension – With Locate
How To: Find Multiple Filenames By Extension

So, finding files by their extension type has been covered before. We’re just going about it another way. The previous examples were a bit convoluted and this is just going to be an “easier” way. (I suspect that it’ll be easier. I guess that depends on what you consider to be easy!)

Locate Files By Extension:

Yes, we’ll be doing this in the terminal. I’m sure there’s a GUI way to do so, but that’s going to be a matter of the file manager you use. They will not all have the same features and not all of them will access those features in the same way. So, let’s get started by opening your terminal – just press CTRL + ALT + T and your default terminal should open.

With your terminal now open, we’ll use the find command again. You almost certainly won’t need to install anything but you can confirm that you have find installed with this command:

See? You have the find application installed already. 

If you check the man page (with man find), you’ll see find is described as:

find – search for files in a directory hierarchy

We’ll also be using grep and a pipe “ |” in this article. You should know that grep helps you sort stuff and that the pipe lets you take the output from one command and use it in another. The pipe is a very underrated tool by people who don’t know much about the terminal.

The command we’ll be using is a find command. The syntax is quite simple and would look something like this:

For example:

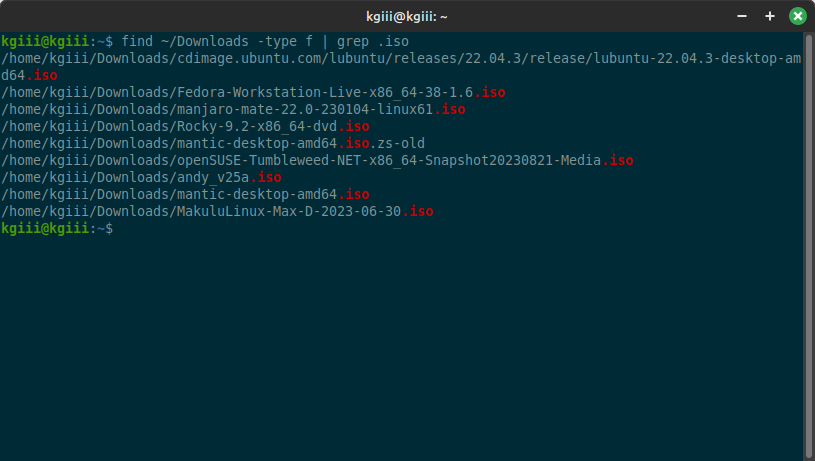
The -type f is telling the find command to only look for regular files. Then, the output from that command is then piped to the grep command. After that, the grep command looks for file names that contain a . and the specific extension you’re looking for. The output might look like this:

using find and grep to locate files by extension
This is a fairly new installation and most of my .iso files are stored on the network.

Now, this isn’t going to work if you just use wonky file names. This isn’t going to find files without that extension name. Remember, we’re trying to locate files by extension. We are not determining if the extension is correct and we are not determining what the file really is.

See? Pretty simple!

Closure:

Well, I said today’s article would be shorter. It’s also fairly simple. If you need to locate files by extension, there are many ways to do it. Some methods are easier than others. Perhaps some are more robust than other methods. Either way, you can now locate files by extension type. 

You might also be interested in this article:

Find Out What A File Is

Otherwise…

Thanks for reading! If you want to help, or if the site has helped you, you can donate, register to help, write an article, or buy inexpensive hosting to start your site. If you scroll down, you can sign up for the newsletter, vote for the article, and comment.
How To: Sort Text Alphabetically

Today’s article is mostly just a fun article, one suitable for a beginner, as we learn how to sort text alphabetically. We’ll be doing this in the terminal, of course. If you’re a new user and want to get acclimated to using the terminal, this might be a good article to read. It won’t be short, but it should be easy.

I dimly recall watching an old video about the Unix operating system. Of course, this was all terminal activity. I want to say that it was Dennis Ritchie or some other Unix founder, but they did things like cut and paste along with stuff like piping the output to a new document.

Even though I’d used Unix (and then Linux) before this, I still appreciated the demonstration video. It was indicative of how powerful the terminal can be. If I was less lazy, I’d go hit up YouTube to find the video again. I haven’t seen it in years.

Anyhow, we’ll be learning how to sort text alphabetically. It’ll be fun!

The Sort Command:

As I said, we’ll be doing this text sorting in the terminal. The tool we’ll be using is the sort tool. You won’t need to install anything to use the sort command. It’ll be there by default.

The sort command has a man page. You can access the man page with this command:

If you do that, you’ll see how powerful the sort command can be when used by someone who knows what they’re doing. We’ll just cover some basics. You can also see that the sort command is described as this:

sort – sort lines of text files

That description says that we’re using the right tool for the job. We want to sort lines of text files alphabetically. It’s not hard. You have to learn which tool is the best for the job you want to do. (Also, the tools I think are the best are the best for me, the tools you prefer are the tools that are best for you. This being Linux, there are always multiple ways to accomplish the same goal!)

While not necessarily a part of this article, you might also want to read this article to learn about using the output from these commands.

How To: Write Text To A File From The Terminal with “>” and “>>”

So then, let’s get into the meat of the article…

Sort Text Alphabetically:

For this exercise, we’re going to need an open terminal. This is quickly done. You can, more often than not, just press CTRL + ALT + T to open the terminal. 

With the terminal open, we need to do a little file preparation. This way, we’re all on the same page. I hope that it’ll be easier this way.

Create A Text File:

With your terminal open, I want you to enter the following commands…

You’ll first move to a directory and create a file:

Now, let’s populate that sort.txt file. We’ll edit the file with Nano.

Copy and paste the following text into that sort.txt file:

And, of course, we’ll now save the file. To save a file in Nano, you just need to press CTRL + X, then Y, and then ENTER. That should save the file as sort.txt. You can verify this with this command:

When the output from that command matches your expectations, you’re free to go to the next step. If it doesn’t, repeat the above commands carefully, following them one by one. If you still can’t manage to do this, you can download a copy of sort.txt here.

Using The Sort Command:

Now that you have a file called sort.txt in your ~/Documents directory, you can start to sort it. We’re just going to sort text alphabetically as a way to expose you to the sort command. 

If you want to sort the text alphabetically, you use this command:

It will send the results to standard output, that is it’ll post the sorted output to the terminal. (You can save this output as I’ll show in a minute.) The output of that command should look like this:

If you want to sort the content of the sort.txt file backward, you can do that. You just use the -r flag. That looks like this:

As an example, the output from that command should look like this:

I linked an article above and it’s worth reading if you’re new. But, if you want to output any of this output to a new file, you’d do so like this:

The command’s syntax would be:

That’s not very clear, so you can use this example to figure it out:

That will take the alphabetically sorted output and write it to a file named sorted.txt. It’s a good way to sort text and there’s quite a bit more to the sort command.

Please consider reading the ‘Closure’ bit, thanks!

Closure:

Well, this is a long article – but it should still be an easy article. I’m hopeful that this is written in a way that even a new user can follow. Please consider leaving a comment letting me know if this is easy to follow. Seriously…

See, as the author, I have no flippin’ idea if this stuff is really easy to follow. I legit have no idea if it’s as easy as I think it is to follow along in this article. One of the things I’ve done is play around with formatting and making the articles more verbose. I’ve tried to not increase the verbosity just for verbosity’s sake, but rather to explain more.

I mean, it’s easy enough for me to follow. After all, I wrote it.

Thanks for reading! If you want to help, or if the site has helped you, you can donate, register to help, write an article, or buy inexpensive hosting to start your site. If you scroll down, you can sign up for the newsletter, vote for the article, and comment.

How To: Zip Files In Lubuntu

Today’s article will be relatively short and fairly easy as we talk about how to zip files in Lubuntu. This seems like a nice and easy article and something folks might want to know. If you’re in this category, by all means, read on!

NOTE: This is written for Lubuntu, but will work in other distros. I’m just trying something new, specifically doing some distro-specific articles to see how well they do.

If you’re unfamiliar with Lubuntu, it’s a lovely distro that’s fairly lightweight and easily configurable. Lubuntu is an official Ubuntu flavor. The purpose of Lubuntu has changed. The focus has changed from being lightweight (which it still is) to getting out of your way. You can read some of the history on Wikipedia’s Lubuntu article.

I’m biased because I’m an official Lubuntu member. I’m on the team that brings you this distro and have written a few Lubuntu-specific articles.

Disable Window Grouping In Lubuntu
Change Snap Application Privileges In Lubuntu
Change Your DNS Servers To Google’s In Lubuntu

(There are more, of course!)

I’m definitely a fan.

Anyhow, we’ll be learning to zip files in Lubuntu today. When you zip a file, you compress the file and make a new file. Some files don’t compress while other files (such as plain text files) can be compressed quite a bit. There are many different compression tools, methods, and algorithms. I’ve covered some RAR stuff in the past, for example.

Zip Files In Lubuntu:

We’ll be using the zip application in the terminal to zip files in Lubuntu. You can compress files graphically, but we’ll be doing this in the terminal. You can do almost anything in the terminal. So, let’s start by pressing CTRL + ALT + T to open the terminal.

The tool we’ll be using is the zip application, defined simply as:

zip – package and compress (archive) files

For the record, the zip application should be installed by default. I don’t like to assume the default is still true, so I’ll also explain how to install the application, also in the terminal.

You can install the zip application with this command:

You can check the man page for zip with this command:

To zip a file in Lubuntu, you would run this command:

If you want to zip multiple files in Lubuntu, you can just add them to the command by tagging them on the end. That looks like this:

See? It’s just that easy to zip files in Lubuntu – specifically in the terminal. Of course, this is true for all sorts of other distros. The only thing that would change would be the process for installing the application should it not be installed by default.

Closure:

Yup… I told you that this would be a quick and easy article. I will actually (probably) cover more of this very topic. It’s a way to keep fresh articles on the site, by being distro/distro-family specific. Yeah, I know that it’s more convenient to have big articles that cover a lot of information. At the same time, writing them all is a lot like work – largely because you start running out of ideas for new articles.

By the way, I could so use a break. You should write an article for me! In fact, you should write a whole series of articles!

Thanks for reading! If you want to help, or if the site has helped you, you can donate, register to help, write an article, or buy inexpensive hosting to start your site. If you scroll down, you can sign up for the newsletter, vote for the article, and comment.

Extract Multi-Part rar Files In Ubuntu

Today’s article is limited to just a subset of users as there aren’t that many people who want to extract multi-part rar files in Ubuntu. This isn’t something you’re going to face often (unless you’re still pirating stuff from Usenet) but it’s something some folks will face. So, this article is for all of those people, all three of you!

I suppose we first need to talk about WinRAR. For those that do not know, WinRAR is a proprietary company that uses a proprietary compression method. Even though it’s proprietary, it has some pretty great features. You have to give credit where credit is due. There are multiple versions of compression used over the years but they all share the same .rar file extension and are all reasonably compatible with one another.

The GUI version of WinRAR is a Windows-only trialware application but there’s a command-line version that can be installed in most distros. While this article is Ubuntu-specific, it’s sure to work with other distros though the installation method may be different. On top of that, many Linux tools (such as file-roller) are capable of extracting files compressed with WinRAR.

This isn’t going to be a very complicated article. It also shouldn’t be all that difficult. I figure folks can follow along if they need to when they need to. This isn’t something the average Linux user is going to face daily. After all, the majority of our software is free! There’s no reason to pirate it! (Seriously, I’m sure there are legitimate uses for multi-part rar files but I’ve only really seen them in frequent use with software piracy.)

Install unrar In Ubuntu:

To extract these multi-part rar files in Ubuntu, you’ll want to install the unrar application. That makes sense, after all. So, like so many things, we’re going to do this in the terminal. You can certainly install unrar with the GUI software installation tools, but we might as well do so in the terminal.

With that in mind, and with this unrar process also being in the terminal, we might as well go ahead and get unrar installed in Ubuntu. First, you can press CTRL + ALT + T to open your terminal. You should also be aware that this is going to pretty much work with any Debian (or Ubuntu) derivative out there. So, this works just as well with Mint, ElementaryOS, or the like…

I suppose we should update first, and you can do that easily enough:

If you trust your upgrades and don’t want to have to manually approve them, then you can just add the -y flag to the end of that, like so:

The next step is going to be installing unrar. You do so like this:

At this point, you can check the man page (man unrar) where you’ll learn that the unrar application describes itself like so:

unrar – extract files from rar archives

That’s a good description and, as you can see, is exactly the tool we want for this operation. If you’re going to extract multi-part rar files in Ubuntu, this is a good tool to do it with. (You can just as easily find a GUI application that will take care of this.)

Extract Multi-Part rar Files In Ubuntu:

I hope you left your terminal open after the installation phase. If not, you’re going to need to open it again. I envision people searching for this specific process and following along. I don’t envision people doing this just for the sake of following along. After all, it’s not like I made multiple-part rar files for you to test this with. You’ll want this article when you need this article.

Anyhow, the process is quite simple.

First, move all of the files into a single directory. This is going to make it much easier. In theory, you could specify the individual paths, but we’re not going to be doing that. No, move all the multiple parts to a single directory. Trust me on this one.

The syntax you’re going to use will be as follows:

No,  you do not include all the other parts. You only need to unrar the first file and the unrar tool will realize that it’s multiple parts and extract them sequentially. It will even tell you that it’s doing so, as it writes that data to the standard output.

This is why you move all the files to their own directory. Again, you only need to tell unrar to extract the very first of the files. It’ll happily find and extract the rest. Of course, you need ownership of the files or you’ll need elevated permissions (such as sudo) to extract the files.

Closure:

So, if you ever need to extract multi-part rar files in Ubuntu, you now know there’s an article that covers this. I don’t expect all that many people to need this information. I do anticipate those who need this information will be able to find this site (or another, I suppose) through a search engine. This isn’t something you’re likely to need every day, even though it’s relatively simple.

Thanks for reading! If you want to help, or if the site has helped you, you can donate, register to help, write an article, or buy inexpensive hosting to start your site. If you scroll down, you can sign up for the newsletter, vote for the article, and comment.

Linux Tips
Creative Commons License
This work is licensed under a Creative Commons Attribution 4.0 International License.