Let’s Determine The Number of RAM Slots Without Opening The Case

Today’s article is going to show you how to determine the number of RAM slots without actually opening up your case. It’s actually a pretty easy task, consisting of just a single command. 

But, wait! There’s more! You may want to know than how many RAM slots you have, you may want to know a lot more about the RAM you have already installed, how many slots are filled, if your RAM has ECC (error correction), the speed, the quantity of RAM per stick, etc…

Well, you can do all that and you can do it all with just a single command. The command in question is dmidecode. While dmidecode isn’t guaranteed to be 100% accurate, it’s usually pretty close. It pulls its data from tables in the DMI (SMBIOS) and presents them to you. Hardware manufacturers aren’t always as nice to Linux users as they could be, so there’s some risk of bad information – or wrongly interpreted information.

While dmidecode has partially been covered previously, it defines itself as:

dmidecode – DMI table decoder

And dmidecode is a pretty handy tool. In a previous article we used it with some success, and we’ll be using it again today, this time to determine the number of RAM slots available to you. On a scale of 1 to 10, I’d say this is a solid 2 – meaning even a rank beginner can follow along.

Determine The Number of RAM Slots:

This article requires an open terminal. If you don’t know how to open the terminal, you can do so with your keyboard – just press CTRL + ALT + T and your default terminal should open.

With your terminal open, enter the following command:

The line that is important is, “Number of Devices”. On my laptop, the output looks like this:
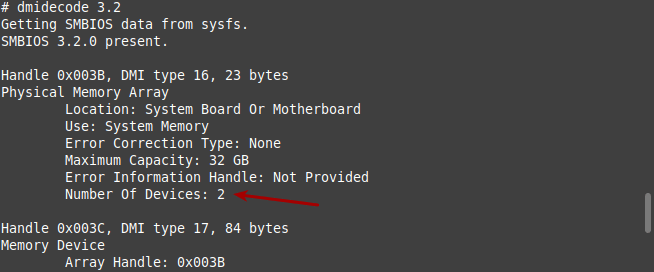
using dmidecode to determine the number of RAM slots available
The answer is two. Two slots. Ah ah ah ah! Oh how I love to count things!

So, from that, we can determine the number of RAM slots is equal to two. If you want, you can then scroll down and it will show you what RAM is installed. You can see if you have the same number of devices as you have slots. You can even see the size, number of slots, location, vendor. You can use it to learn a great deal about your RAM. 

As I mentioned above, it’s not necessarily going to be 100% accurate. With bleeding edge of hardware, you’ll find it may be less accurate. If your hardware has been around for a bit, you can be pretty sure of the accuracy.

One of the things I notice is the “Maximum Capacity”. That may mean OEM suggested max capacity. I’ve sure seen more RAM than the claimed maximum. On the system, I see a max capacity of 8 GB of RAM. The box has 16 GB of RAM. I’ve seen it claim a maximum of 4 GB of RAM but had 16 GB of RAM in that box. 

Otherwise, it is usually pretty accurate. In the above, I suspect some OEMs are less than honest and would rather you not know that you can add as much RAM as you can. They’d rather you buy a more expensive device, so report the maximum RAM as less than it really supports. However, that’s just a guess and I have zero evidence to support it. It does seem pretty common, however.

Closure:

And there you have it, another article said and done. This one will help you determine the number of RAM slots that you have available. It’s a pretty easy article and a good tool to have in your toolbox. 

As you may have surmised, the antibiotics are kicking in. I’m feeling quite a bit better. Hopefully the articles reflect that. For the past few, I’ve kinda been phoning it in. My goal is to get ahead again. I can probably do that over the coming weekend. 

… Also, anyone reading this out of sequence probably has no idea what half of these closure comments are about. Then again, how many of those folks keep reading after the important bits? Probably not a whole lot. I could write darned near gibberish down here and nobody would be the wiser.

Thanks for reading! If you want to help, or if the site has helped you, you can donate, register to help, write an article, or buy inexpensive hosting to start your own site. If you scroll down, you can sign up for the newsletter, vote for the article, and comment.
Benchmark Your Linux Box With Geekbench 5

Today’s article will teach you how to benchmark your Linux box with Geekbench 5. It’s a fairly simple exercise, even for a beginner. Parts of the directions for this exercise will change with time, so I hope to make it obvious how you would make said command changes.

What is a benchmark? It’s a measure of your system’s performance. In this case, it tests things like CPU performance, graphics performance, and memory performance. When done, it gives you a handy URL where you can see the results online and share them with your friends.

For example, I have a benchmark result here. That one isn’t as good as it could have been. For example, I had a pile of applications open and hadn’t even been rebooted in about 60 days. See?

Ideally, you’ll run your benchmark with a clean slate. That’ll give you the best results. Be sure to reboot and make sure you’re running as few processes as is reasonable to get the best result.

Why benchmark? Well, it’s good to know how your hardware stacks up. It’s also good for bragging rights, if you’re into that sort of thing. It’s a valuable bit of information if you’re into overclocking. (Overclocking is tweaking at the hardware level to make your system run faster than it is designed for.) It’s a way to measure the performance gains from overclocking.

Well, this article will tell you how to benchmark, using Geekbench 5. It’s not as challenging as one might think!

Benchmark Linux With Geekbench 5:

This article requires an open terminal. If you don’t know how to open the terminal, you can do so with your keyboard – just press CTRL + ALT + T and your default terminal should open.

Once you get your terminal open, run the following commands:

That’s going to download the Geekbench 5 benchmarking software for Linux. However, that URL is going to change because the name of the download is going to change when Geekbench releases new versions.

If it has changed – and it WILL change eventually – you can get the new address by clicking on this link. The name of the file is also going to change the following command. It’s an obvious change that you’ll need to make. The current next command is:

That will extract all the files into their own directory. The directory name will also change. So, for this particular file, the next command is this:

Oddly, I didn’t need to make the “geekbench5” file executable, I just ran it with sudo. It looks like:

Now, you wait…

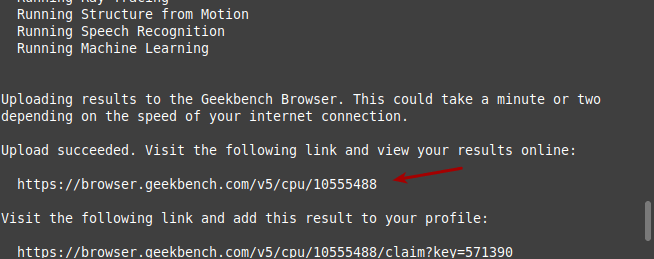
It shouldn’t take very long, though it may take a while on older computers. It will tell you what it’s checking as it checks it and, when done, it will give you a URL to check your results. It’ll look something like this:

geekbench click to see results
That address is where you’ll be able to see your results. Uploading is mandatory with the free version.

You can pay for a copy of Geekbench 5 and get your results locally, or so I understand. I’ve not actually tried it. The free version uploads the results, which I presume they use to crunch additional data, gauging the computers currently in use. They may even provide said data to others, but I’m sure it’s reasonably anonymous. Their privacy policy is located here.

Closure:

And there you have it. You now have your benchmark results in a handy web-page. You can also register to keep track of your previous benchmarks, even adding new results to your collection as you go. Me? I only bothered benchmarking my test laptop and it turned out better than I had expected.

There are other benchmarking utilities. You can use ‘hardinfo’ for some benchmarks, even comparative benchmarks – but older ones, by reading my hardinfo article. If you do benchmark your systems, feel free to leave some comments here or wherever you find this on social media.

Thanks for reading!

If you want to help, or if the site has helped you, you can donate, register to help, write an article, or buy inexpensive hosting to start your own site. If you scroll down, you can sign up for the newsletter, vote for the article, and comment.

Subscribe To Our Newsletter
Get notified when new articles are published! It's free and I won't send you any spam.
Linux Tips