Today’s article will just be a fun one, where we cover yet another way to find a website’s IP address. It’s mostly for fun but it’ll also introduce you to another tool for your terminal-toolbox. After all, there’s almost always more than one way to do things in Linux, including finding a website’s IP address.
So, today we’ll be using a tool I don’t think I’ve covered before. While we have done the website IP address thing before, I don’t see the ‘nslookup’ tool anywhere in the site’s history. We might as well, as I could use a quick and easy article today, as I’ve been busy making a delicious ham.
Odds are good that you have nslookup installed by default. If you don’t, it’ll be easy enough to install with your package manager. If you check the man page, you’ll find the tool describes itself as:
nslookup – query Internet name servers interactively
And, yeah, that’s what we’ll do with nslookup. We will use it to do what it’s designed to do. We do that often around here and, of course, we’ll be doing all this in the terminal. I’m sure there’s some GUI tool you could use, but every Linux distro that I know of comes with a terminal. It just makes good sense for most articles!
Well, that’s enough blathering about what you’re going to read…
Find A Website’s IP Address:
As the intro mentioned, we’ll be doing this in the terminal. So… Open a terminal of your choosing. If you don’t know how to open the terminal, you can do so with your keyboard – just press
With your terminal now open, the syntax is simple:
1 | nslookup <domain_name> |
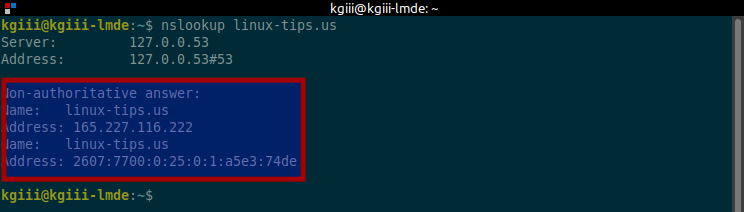
You’ll often get more than one IP address in the answer, but that’s because sites will often respond on more than one IP address. For example (and considering that I’m behind a CDN), this site would look like this:
Go ahead and try using nslookup to find the IP addresses of your favorite sites. There’s no harm in doing so and it can be a useful bit of information – though usually, that’s more useful for the site’s admin. Still, it can be a handy bit of information.
Closure:
There! See? Another quick and easy article. This time, we’ve shown another way to find a website’s IP address. It’s not complicated and the output is easy enough to process. Enjoy the tool and have fun with it.
Thanks for reading! If you want to help, or if the site has helped you, you can donate, register to help, write an article, or buy inexpensive hosting to start your site. If you scroll down, you can sign up for the newsletter, vote for the article, and comment.