Let’s Use ‘netstat’ To Find Out What Process Is Listening On A Specific Port

Today’s article is going to teach you how to use ‘netstat’ to find out what process is listening on a specific port. If you have open ports and don’t know why – and what’s listening on that port, you’re not making good security choices.

Let’s say you followed an article about how to monitor TCP/UDP in real time. If you’re new, or even just not all that advanced with Linux and networking, you might not know why there are all those ports and all that activity. Well, one of the things you should know is how to identify what process is listening on a specific port.

There are a number of ways to do this, but we’ll be using ‘netstat’. The ‘netstat’ application can be pretty advanced, but what we’ll be doing is pretty straightforward. If you’re curious, ‘netstat’ defines itself thus:

Print network connections, routing tables, interface statistics, masquerade connections, and multicast memberships

As you can see, it’s a pretty advanced application. It has a rather expansive man page, and we’ll largely ignore that as we really only need some limited functionality. All we really need to do, for this exercise, is find out what process is listening on a specific port.

With that in mind, let’s leap into the meat of the article…

What Process Is Listening On A Specific Port:

This article requires an open terminal. If you don’t know how to open the terminal, you can do so with your keyboard – just press CTRL + ALT + T and your default terminal should open.

Once you have that open, you’ll need to find out if you have ‘netstat’ already installed. There are many ways to do this, I prefer:

If you do not have ‘netstat’ installed, it’s certainly available for all mainstream distros and easily installed from your default repositories. Here’s how to install on a few distros:

Debian/Ubuntu/Mint/etc:

RHEL/CentOS/Fedora/Rocky Linux/etc:

SUSE/OpenSUSE/etc:

If you’re using a different distro, root through the default repositories. It’s a pretty common tool and I’d like to imagine it’s easily available to anyone.

Once you have ‘netstat’ installed, the command we’re going to use is really, really, simple. In fact, I wrote this whole darned article mostly for just one command. I probably could have made it shorter. Still, it might as well be long enough to give some extra information along the way.

Anyhow, the command you run is this:

For example, you might have an open port 22 and want to know what process is listening on that specific port. So, you’re command would look like this:

The end result will look something like this:

netstat being used to find out which process is listening at a specific port
While not completely clear, you can deduce that it’s just the SSH daemon listening on port 22.

It may not be completely clear, but you can use this to deduce what process is listening on a specific port. If it’s not completely clear, you can get actually dig a little deeper. See the “1100” in there? Well, that’s the PID (Process ID) and you can use the following command to get more informtion. It looks like this:

The output from that in this case is:

Which, as we know, is the daemon for SSH and thus nothing unexpected is running on port 22. See? Security!

Closure:

And there you have it, another article. This one is a pretty handy one, especially for when you want to know what process is listening on a specific port. If you have things running that you can’t identify, you can always stop by Linux.org and ask for help. Someone there will try to find out what’s going on for you.

Thanks for reading! If you want to help, or if the site has helped you, you can donate, register to help, write an article, or buy inexpensive hosting to start your own site. If you scroll down, you can sign up for the newsletter, vote for the article, and comment.

Change Your DNS Servers To Google’s In Lubuntu

This article will show you how to change your DNS servers from your default servers to the DNS servers run by Google, specifically while you’re using Lubuntu. If  you’re not using Lubuntu, the process is likely fairly similar. Either way, it should be a nice and fun article, and we’ll even do it in the GUI instead of the terminal.

So, what is DNS? DNS stands for ‘Domain Name System’. As you know by now, machines are identified by their IP address. It’d suck to have to remember numbers instead of names. It’s also possible to route multiple domain names to the same IP address. So, we have domain names and use those domain names to resolve to IP addresses.

If you’re like most people, right now the DNS servers you’re using have come from your ISP – the folks who provide your internet service. This means that they can see which sites you visit, based on the requests you make to the DNS service.

Some folks don’t like this and prefer to find another DNS provider. (There’s also Secure DNS which this article will not be touching on.) One of those companies that provides free DNS servers is Google. Like them or not, their DNS servers are robust and consistently updated, often making domain propagation quicker for you.

This article is for Lubuntu, as stated above, but you may very well be able to follow the same exact steps with your distro of choice. And, now that you have a general idea of what’s going on, let’s learn how to…

Change Your DNS Servers:

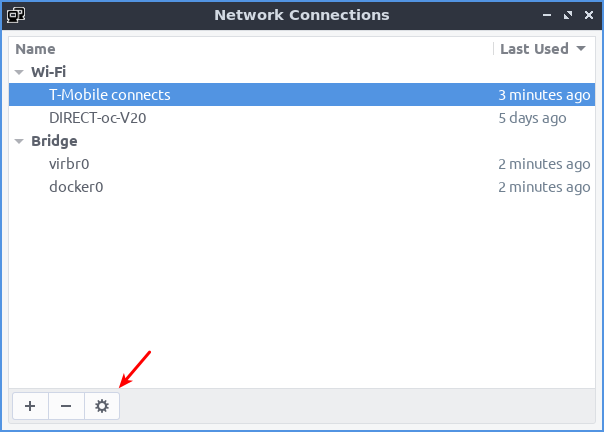
To get started with changing your DNS servers, you need to find your networking icon in your system tray. It’ll be down on the right, not far from the clock. Once you have found it, right click on it so that it brings up the menu to let you “Edit Connections”. It will look something like this:

change network settings
Of course, your version won’t have the nifty arrow.

You’ll want to click the gear icon. That’s why I put the arrow there! 

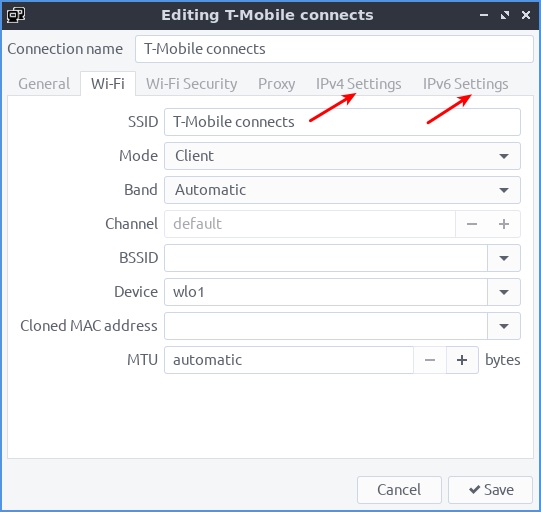
That will open another window. This window will have tabs  you need to worry about – or a tab you need to know about. You probably shouldn’t need both. The tabs you’re interested in will look like this:

changing the network connections
You should need one of those, probably not both of those…

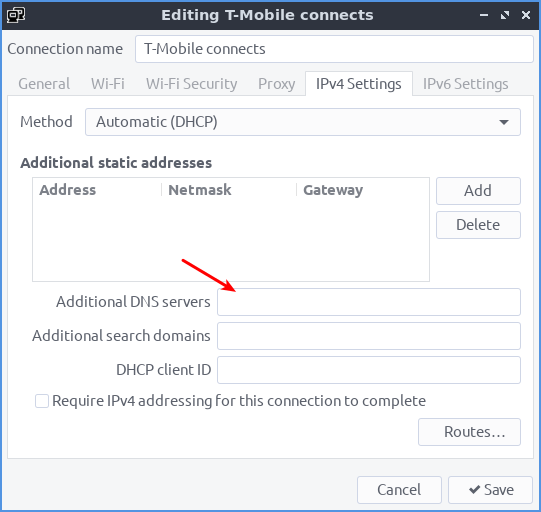
Now,  you should only need to edit one of those. If you’re still using IPv4 then you use that tab. If you’re using IPv6 then you’ll obviously want to use the appropriate tab. For example, the IPv4 would look like this:

screen to edit dns servers
This would be the tab you’re looking for, pretty much…

Now, where that arrow is is where you want to enter the new DNS server information. You separate them with a comma, though you can use a comma and a space – there will need to be a comma.

For Google’s IPv4 addresses, your choices for 8.8.8.8 and 8.8.4.4.

For Google’s IPv6 addresses, your choices are 2001:4860:4860::8888 and 2001:4860:4860::8844.

Note: The ifconfig or ip addr will help you tell if you have IPv4 or IPv6.

When you’re done, be sure to click the save button to ensure your new settings take effect. Remember the screen and changes, should things go pear shaped. You can undo this easily enough.

This will, of course, work with any set of DNS servers out there. You can use it with other servers if you aren’t a fan of Google. This can serve as a general guideline for other servers, should you wish.

Closure:

Yup… There it is. You have another article. This time, it tells you how to change your DNS servers if you use Lubuntu. Again, it’ll work for other distros, but I’m only including pictures/vouching for it with Lubuntu.

Thanks for reading! If you want to help, or if the site has helped you, you can donate, register to help, write an article, or buy inexpensive hosting to start your own site. If you scroll down, you can sign up for the newsletter, vote for the article, and comment.
FTP From The Linux Terminal

Why would you want to use FTP from the Linux terminal? It’s quick, easy, consistent, and works well enough as an FTP client. If it’s not already installed, it’s just a quick installation command away. In my experience, it’s usually already there.

If I’m going to be transferring a bunch of files or editing files, I’ll just use a GUI FTP client. My choice FTP client has been Filezilla for quite a long time now. It does the trick and I just keep moving my profile/config to new computers as I get them. Being easy to migrate is a definite selling point for me.

So, what is FTP? It stands for File Transfer Protocol. It’s not encrypted, so many folks have moved to SFTP – which is actually not related to FTP at all. It just shares similar functionality. Even though FTP traffic isn’t secure, it’s still fairly widely used. 

An FTP server is probably not installed by default on your desktop Linux system. However, I’ve written how to Install An FTP Server With VSFTPD which should get you sorted if you need one.

The application will be using is “FTP” which describes itself like:

ftp — Internet file transfer program

And you may find that your version of terminal-based FTP is maintained by your distro maintainers. The FTP command and flagsr should still be pretty universal throughout. Still, be sure to check the man page – especially if things seem weird.

FTP From The Linux Terminal:

Obviously, this requires an open terminal.

Press CTRL + ALT + T and your terminal should pop right open.

Once you have the terminal open the command is basically this:

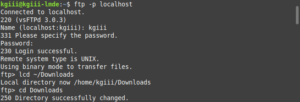
You can connect via domain name, hostname, or even IP address. It’ll look like this, or pretty close:

ftp from the terminal
See: You can use FTP from the Linux terminal.

There are many commands available, so you should probably check man ftp to see what’s on offer. We’re just going to cover a few of the more useful commands.

You’ll find that ‘ls’ works to list files, just like you’re used to, as does ‘cd’. If you want to change your local directory, that is your working directory on your machine and not the working directory on the server, you need to use the ‘lcd’ command – like so:

Note: Read More About Paths

After you’ve logged in and learned to navigate, it’s time to do something. If you want to download something, you use the ‘get’ command:

That will download the file from the server to the local directory. To do the opposite, that is upload something from your current local directory, you would use the ‘put’ command, like so:

If you want to get or put more than one file, the commands are ‘mget’ and ‘mput’ respectively. They look like this:

Note: It may give a warning about using passive mode. If that’s the case, add the -p flag to your connection command – like ftp -p hostname.

Just like with your regular terminal file management, you can ‘mkdir’, ‘rmdir’, and even use ‘pwd’ to be reminded of your present working directory. Files can also be deleted with the delete <file_name> command.

Closure:

And there you have it, an article that explains how to use FTP from the Linux terminal. It is important to note that the FTP command transmits data without encryption. If security is a concern, use SCP or SFTP.

Thanks for reading! If you want to help, or if the site has helped you, you can donate, register to help, write an article, or buy inexpensive hosting to start your own site. If you scroll down, you can sign up for the newsletter, vote for the article, and comment.
Monitor Network Usage On A Per-Application Basis

Today’s article is going to tell you how to use Nethogs to monitor network usage on a per-application basis. It’s actually easier than one might think and we’ll even show you how to install Nethogs on a variety of distros.

Why would you want to monitor this? Well, you may want to know which applications are eating up most of your bandwidth. Not everyone has unlimited bandwidth after all. You might also be looking for rogue applications/malware that’s using up some of your bandwidth. There are all sorts of reasons to monitor your network usage at this level. Feel free to leave a comment telling us how you intend to use Nethogs.

As stated, we’ll be using Nethogs. The man page describes it as:

nethogs – Net top tool grouping bandwidth per process

I suppose that’s mostly useful to those who know what ‘top‘ is. (There’s a future article about top and htop, when I get to it.) But, Nethogs is like a system monitor, except it’s a network monitor with some visual similarity with top. (Yes, that’s an ugly, ugly sentence.)

We’ll be using ‘sudo’ for all of these commands. It’s possible to use Nethogs without sudo, but we won’t be covering that here. If that’s something you’re interested in doing, a search engine will help you get there.

Monitor Network Usage:

Nethogs is a terminal-based application. As such, you’ll need an open terminal. Just press CTRL + ALT + T and your default terminal emulator should open right up.

Once your terminal is open, you can go ahead and install Nethogs. Pick the command that works with your system’s package manager.

Debian/Ubuntu:

RHEL/CentOS (will need to enable EPEL):

Fedora:

Arch/Derivatives: 

Once you have Nethogs installed, you can check the help files. In this case, the help files are better than the man files (I think) so just enter the following into your terminal:

Now, to run Nethogs, we’ll use sudo and just run it in the terminal. Believe it or not, this mode is generally just fine for anything you’re going to do.

That’ll open Nethogs and start monitoring your network usage on a per-application basis. It looks something like this:

Nethogs running in the terminal.
As you can see, bandwidth monitoring on a per-application basis. Tada!

Now, if you’re going to leave it open, you can change the refresh rate. That’s done with the -d <seconds> flag. If you want it to refresh every 15 seconds, your command would look like this:

By the way, if you want to exit Nethogs, you just press Q and it closes – like top and htop do.

If you want, you can specify the network interface you want to use. It doesn’t require any flags, just the network interface name. (Read Also: how to change your network interface name.) An example of that command would be:

While the application is running, you can do some sorting/display changes with the M, R, and S keys. But it’s usually not all that complicated and sorting isn’t needed. If you’re dealing with hundreds of collections, then you may want to start sorting. Really, that’s about all you’ll ever need.

Closure:

And there you have it! You have another article to read. This one is about monitoring your network usage on a per-application basis, a pretty handy skill/tool to have. It’s pretty easy and the output is clear enough for all but the newest Linux users. If you find the tool useful, or already use the tool, please feel free to comment.

Thanks for reading! If you want to help, or if the site has helped you, you can donate, register to help, write an article, or buy inexpensive hosting to start your own site. If you scroll down, you can sign up for the newsletter, vote for the article, and comment.
Better Network Diagnostics With MTR

This article will show you how to get better network diagnostics with MTR, a tool called “My Traceroute” that combines both traceroute and ping into a single tool. MTR is a pretty handy tool that’s likely installed by default and a tool that even regular users should have in their toolbox.

You may remember that I wrote an article about traceroute. If you don’t know what traceroute is, it’d be in your best interest to go read that article, as I will not really be duplicating the work that went into writing that article.

As of yet, I have not yet written an article about ping. Ping is a terminal-based tool, used to time how long it takes for your device to send and receive packets to and from another device. It’ll also tell you if there are packets being dropped along the way. You can use it pretty easily. Here’s a very basic ping command:

(You can use CTRL + C to stop the running process.)

The output from that command is pretty self-explanatory. The numbers you’re probably most interested in are all the way on the right, and denote how long it took for a round-trip message to complete in milliseconds. Online gamers are often interested in their ping times. This is because a higher ping may mean they may lag behind their competitors. In this case, lower is better.

Well, MTR combines the two, traceroute and ping. It’s pretty awesome. You’ll see!

Network Diagnostics With MTR:

So long as you understand both ping and traceroute, there’s not much more this article can teach you. MTR is pretty basic in its output, easily understood by all but the novice users. Anyone with any networking history will immediately grasp the importance of MTR.

MTR isn’t a new tool, having been around since 1997. I won’t be covering how to install it. MTR’s likely already installed. If not, it’ll be easy enough to install it. If anything, this article is largely just an excuse to make people aware of it.

This article requires an open terminal. If you don’t know how to open the terminal, you can do so with your keyboard – just press CTRL + ALT + T and your default terminal should open.

Now, with your terminal open, try:

It should look something like this:

mtr in action
I really don’t need to explain the columns, do I? I’m sure you can figure it out!

There’s some options while it is running. The H, D, R, O, and Q keys all have functions, listed right there after “Keys:”! There are a few options when starting MTR, a whole lot of options. You can find those options by running man mrt. I’ll cover a couple of interesting options here.

If you want to limit the number of pings, you use the -c flag and then add the number. In the example below, I have chosen 5.

You can also just show IP addresses, not resolving the hostname. Like so:

If you want to show both IP addresses and resolved hostnames, the flag is -b.

There’s more that you can do with it, but mostly you can use it to find where along the line the traffic stops. If it’s on your end, you get to do something about it. Otherwise, I suppose you’re at the whim of the MITM. So, give the man pages a look and let me know in a comment if you already use this tool and how you use it.

Closure:

And there’s another article. Woohoo! It’s not just another article, but it’s an article about doing network diagnostics with MTR. It’s not as hard as one might think to come up with ideas for articles. Sometimes, I just use a tool and then realize it may make for a good article. That’s what happened in this case.

Thanks for reading! If you want to help, or if the site has helped you, you can donate, register to help, write an article, or buy inexpensive hosting to start your own site. If you scroll down, you can sign up for the newsletter, vote for the article, and comment.

Subscribe To Our Newsletter
Get notified when new articles are published! It's free and I won't send you any spam.
Linux Tips
Creative Commons License
This work is licensed under a Creative Commons Attribution 4.0 International License.