Today’s a good day for a short article, like one on how to upgrade Fedora from the terminal. It’s a pretty easy task, yet one I have in my notes. I see no reason to not turn it into a nice, short article. After all, you might not know how to upgrade Fedora from the terminal!
Obviously, you’re going to need Fedora installed for this. Though, technically, I’m sure you could do this if you were trying the live instance of Fedora. I mean, you could…
Anyhow, all operating systems should get updates. If you’re not getting updates, something is wrong. The most obvious ‘wrong’ in this is that you’re using an operating system that’s no longer supported. By doing so, and doing so online, you are not just a risk to yourself – but you’re a risk to other users.
For example, you could be compromised and become a part of a botnet. That’d be bad. So, stay updated – not just for yourself but to be a good member of the community. Use a distro that’s still supported.
Lest you think this is a weird article, I’ve actually also written:
See? ‘Snot the first time we’ve had this sort of article.
Well, let’s get into it. Let’s learn how to …
Upgrade Fedora From The Terminal:
This article requires an open terminal, like many other articles on this site. If you don’t know how to open the terminal, you can do so with your keyboard – just press CTRL + ALT + T and your default terminal should open.
With your terminal open, you can start with a very simple command:
1
sudo dnf update
That’s “it”, I guess… Well, no… That’s all you need to do to upgrade your system. If your system requires a reboot, you do that with:
1
sudo reboot
Now, here’s a little trick…
Let’s say your upgrade screwed something up. You upgraded to a new version of Thunderbird and you want to roll back to a previous version. You can do that without much effort.
1
sudo dnf history list | grep thunderbird
Obviously, change the name of the application to the application you’re having problems with. Well, each upgrade will have a number assigned to it and it’ll show that number when you run the above command. You use that number in this command:
1
sudo dnf history undo <application_number>
That will undo the most recent upgrade to that application, restoring a usable application for you. You can then try it again when the application is next upgraded.
See? It’s a neat little trick with ‘dnf’. Feel free to check the man page, with man dnf, to see what other little gems you can find.
Closure:
See? I told you that it’d be a nice and easy article. This one isn’t difficult – but does have a neat feature not everyone knows about, that is how to rollback upgrades with DNF when you have chosen to upgrade Fedora from the terminal.
Thanks for reading! If you want to help, or if the site has helped you, you can donate, register to help, write an article, or buy inexpensive hosting to start your own site. If you scroll down, you can sign up for the newsletter, vote for the article, and comment.
Today, we’re going to learn to clear the terminal screen. This is generally done for privacy’s sake. You don’t want people to be able to scroll up and see what you’ve been reading in the terminal. This probably isn’t as important if you’re the only user and you’re in your house, but you may still like to keep things clean and tidy.
We’ll go ahead and cover two ways to clear the terminal in this article. They’re both rather easy commands and you’ll find this article is definitely not all that complicated, or even very long. This is pretty much one of the first things folks should have learned when they started using the terminal. We might as well cover it here.
Rather than make this long-winded, we’ll just make this into a short and easy article to read. Let’s all learn how to…
Clear The Terminal:
To be clear, this just erases the text in the terminal. It clears the scrollback content so that folks can’t scroll up and see the previous terminal contents. Again, it’s a good idea to do if you’re in a multi-user environment where people may have access to your screen and you don’t want them to know what has been written to the terminal.
Obviously, you need a terminal for this article. Just press CTRL + ALT + T and your default terminal should open.
I suppose we’ll need some content, so let’s try using this command:
1
ls -la
That should fill your terminal up.
Now, to clear it you can use either of the two following commands:
1
clear
Or you can also use:
1
reset
(Though reset may leave a little text at the top, it still removes the terminal’s scrollback history.)
Both of those will do the job, with ‘clear’ being the obvious winner = but it’s nice to have options. They’ll clear the scrollback in the terminal, preventing folks from scrolling up to read what has previously been written there. Of course, they could potentially still press the arrow up button and see what commands you’ve written, so you can try to prevent that as well.
Closure:
See? I told you that it’d be a quick and easy article. It’s not all that taxing to learn how to clear your terminal and that’s all that this article is meant to cover. Both of the two commands have a man page, but they’re not very useful commands for anything else but clearing the terminal. Have an easy day, a day where you can (maybe) say you learned something and not have to read a long article. After all, it was a quick and easy day for me!
Thanks for reading! If you want to help, or if the site has helped you, you can donate, register to help, write an article, or buy inexpensive hosting to start your own site. If you scroll down, you can sign up for the newsletter, vote for the article, and comment.
Today’s article is about one of my favorite terminal emulators, Terminator.Terminator is one of my favorite terminal emulators, and I’d like to use this opportunity to expose more users to it. For lack of a better category, we’ll say this is a review. Why not? It’s my site, I’ll call it a review if I wanna! I’ll make it a review!
So, we call it a terminal emulator because it emulates the terminals of old, back when terminals were the main way for a person to interface with their computer. They are not true terminals, but they perform similar functions. Long gone are the days of just green-screens. Today, we have graphical user environments and there’s less focus on the terminal for some folks. From here on out, I’ll just be calling it ‘terminal’ for simplicity and brevity sake.
There are some die-hard folks who still cling to the terminal – and I’m one of them, at least for certain tasks. At any given moment, I have at least two terminal instances open, each a different piece of software. One of those is usually Xfce4 and the other is often Terminator. Today’s article is about the latter.
Chances are good that you can install Terminator with ease. It’s likely in your default repositories. For example, on Ubuntu you’d install it with this command:
1
sudo apt install terminator
Go ahead, give it a shot… If not immediately available, you can look here for more information. If you’re really energetic, you can read the documentation. In this case, it’s going to be a positive review (obviously), so I’d not recommend it (such as I am) if I wasn’t a fan… So…
Why Terminator:
You’ll not be even remotely surprised when you open Terminator for the first time, and that’s a good thing. You’ll see your standard terminal looking thing, complete with a title bar. Truthfully, it’s kinda ugly looking until you make it your own (more on that in a minute). It looks like this:
Terminal (terminal emulator) without any customizations.
What you’re looking for is in the right mouse-button click – the preferences menu. Once you open that, you’ll see all sorts of options.
Once in the options, you’ll start to understand why I like Terminator. You can make it visually appealing, use multiple tabs, group tabs, auto-run commands when opened, and have all the various profiles you could possibly want. If you’re working on multiple servers at the same time, this is definitely a great help.
You have infinite theme options, but there are a number of them that are built in – the standard types like solarized dark or light. If I’m not taking screenshots, I like mine to look like this:
As I’m often in a dark room, this is excellent for my eyes.
That is so much nicer on my eyes. And, if the Terminator theme didn’t clue you in, yes I am using a computer that I don’t normally use. It’s a long story, but nothing is broken beyond my ‘net connection. But, that’s why the screenshots look different. I am also using Flameshot instead of my beloved Shutter.
So, that’s not enough? Seriously – go through and check the preferences. You have global options and then you have all sorts of preferences that you can pick – each contained in their own distinct profiles. When you get to the profiles, you’ll see how much customization is really possible. Allow me to show you:
As you can see, there are a whole lot of options with Terminator.
What does Terminator offer? A whole lot… Not only are there tabs, you can set it up in a more traditional grid fashion. These layouts can be moved with drag-and-drop. The list of keyboard shortcuts is extensive – and you can probable tell I’m just reciting the documentation. Layouts are even saved from session to session.
But Wait, there’s more!
Anyhow, all those preferences, not just layouts, can be saved from session to session. Once you get it configured the way you want, it’ll let you retain those settings. Many of these are all extensions of the profiles feature, so it’s highly customized if you want it to be.
I especially like the individual profiles – not seen on this computer’s screenshot. If I paid a bit more attention, I could just copy the config from ~/.config/terminator, but I’m slacking and this situation is temporary. (I’m amazed that I’ve still been able to keep up my publication schedule!) I did not, so you get a different set of screenshots.
If you want, you can even find plugins for Terminator. You can write your own, if such is your desire. If you click here, you’ll see a bunch of plugins that you can use to extend Terminator even further. (Quite a few plugins exist, so do check the link.)
As I said, there are quite a few plugins and some of them are quite useful – especially for system admins and programmers, or DevOps folks I guess. They’re universally free, in every sense of the word. They’re also easy to install – just drop them into ~/.config/terminator/plugins/ and they’ll be available to enable from the preferences menu.
If nothing else, go ahead and install Terminator to see if you like it. I dare say that you won’t be disappointed, unless you’ve got some weird edge-case and even then it’s about the best you’re going to get.
Rating Terminator:
Terminator does everything you can want in a terminal, more or less. If it doesn’t do what you want, plugins are easily developed and someone else may have scratched that itch for you already.
I honestly can’t think of anything it’s missing that I personally need or want. It can be a bit boxy and the look is dated, but it should match your theme fairly well, or better if you do some work customizing it.
I appreciate how easy it is to configure it to work with my eyesight. I’m partially colorblind (not the way you’re probably thinking) and have difficulties with the spaces between the primary colors. I can see green, but yellow-green may appear as either yellow or green to me. So, some of the themes (again, you can customize them as much as you desire) are wonderful for my eyes.
Yeah, try as I might, I just can’t think of anything bad to say about it. I’m reluctant to give anything a 10/10, but this is really close to being the perfect application for the task it is designed for. I’d even go so far as saying that it’s feature-complete, but some folks must not agree ’cause they keep writing plugins and that means they want more features.
So, I’m going to give this a 9.5 out of 10. That’s the highest I’ve ever rated anything on this site and I’d not expect to see that score for anything else. I knock the 0.5 because obviously people expect more from it – options they feel should be defaults. A few of the plugins are indeed handy (even to me, a simplistic user). Yeah, I’ll knock off the points for that. That sounds good. It gets a 9.5/10. That’s pretty much a gold medal winner, right there!
Closure:
And there you have it… You have another article – this one a review, and a review of not just one of my favorite pieces of software but of a piece of software I use many, many times a day. Even if you have a favorite terminal, give Terminator a try. You won’t be disappointed – probably… If you are, you’re just weird!
Thanks for reading! If you want to help, or if the site has helped you, you can donate, register to help, write an article, or buy inexpensive hosting to start your own site. If you scroll down, you can sign up for the newsletter, vote for the article, and comment.
You might not know it, but you actually have a calendar in the terminal. It’s surprisingly handy. Though, to be clear, I pretty much only use it when I’m already in the terminal – such as when I’ve used SSH to connect to a remote server.
So, it’s useful (to me) while I’m already in the terminal. The rest of the time, I’m in a GUI desktop environment and there’s a calendar to be had just by mousing over the time. There’s also Thunderbird’s calendar and I use that a great deal. It cal command is of limited value, which is just fine.
The tool we’ll be using is called ‘cal‘. The cal command is in wide use today and has been with us for, at the time of this writing, more than fifty years. It’s a pretty straightforward command and its longevity speaks towards its usefulness for a subset of Unix/Linux users. It describes itself like:
cal, ncal — displays a calendar and the date of Easter
And it does (sorta) tell you when Easter is – for both western churches and the Orthodox churches. See? It’s already doing what it says on the tin! It only gets better from here!
We won’t really be covering ncal, which is useful if you’re trying to find things like the number for the day of the year. While that might be useful to some, it’s not useful to most and those folks can easily read the man page to learn more about it.
Anyhow, on to the article about the calendar in the terminal!
Calendar In The Terminal:
As you can see, this has to do with the calendar in the terminal, so you’re going to need an open terminal. If you want, you can just press CTRL + ALT + T and your default terminal should open right up.
With your terminal now open, you can start with the absolute basic command, which will show you a calendar with today’s date highlighted. It’s really easy, it’s just:
1
cal
If you want to show the last month, this month, and next month, you can do that too. The command to do that is:
1
cal -3
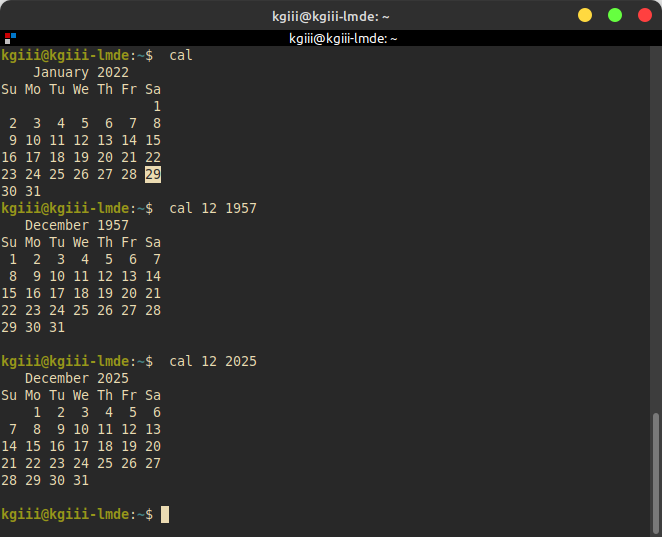
If you want to see a month from time past, or in the future, you can do that. The format for that is <mm> <yyyy> and it’s useful for both months past and months future. It looks something like this:
1
cal 12 3030
The previous commands (sans cal -3) will give an output similar to this:
Well, you don’t need to be a police detective to tell what day it was when I wrote this.
But wait! There’s more! You can show the entire year in the calendar by just using the -y flag. It looks like this:
1
cal -y
That command can be modified. To show a different year, it’d look a little something like:
1
cal -y 2028
By default, the calendar in your terminal uses the Gregorian calendar. If you want the calendar in your terminal to use the Julian format then you just use the -J flag.
On top of that, it really will tell you when it’s time to celebrate (assuming you do) Easter. For some reason, I can’t get ‘cal’ to show Easter – but you can still make it work. To show it in Gregorian (western churches) format, it’s just ncal -o or for Julian dates you’ll just use ncal -j.
Closure:
See? I told you that you had a calendar in the terminal! It’s not entirely useless and can be useful when you’re full-screening your SSH sessions, or something of that nature. If you regularly work in the terminal, this is a handy tool to add to your toolbox. Most of the time, you’ll probably only need three letters to have a useful calendar appear in your terminal.
Thanks for reading! If you want to help, or if the site has helped you, you can donate, register to help, write an article, or buy inexpensive hosting to start your own site. If you scroll down, you can sign up for the newsletter, vote for the article, and comment.
In today’s article, we’ll teach you how to create a custom welcome message in your terminal. This could be useful or playful. What you do with this power is entirely up to you. After all, that’s the whole point of ‘custom’!
It’s not terribly difficult and there’s some fun to be had with this exercise. Basically, we’ll be making it so that you get a custom message (including action) that is output whenever you open up a new terminal.
You can make the terminal do all sorts of things by editing your ~/.bashrc file. That’s how we’ll create a custom welcome message in your terminal. It’s not dreadfully difficult but it will help make your system feel like your own and, to some people, that’s one of the greatest things about Linux.
So, how about I show you how I customized my welcome message in the terminal? You can use my example as a brief template to use yourself, when you create your own custom welcome message. It’s something even a new Linux user can do!
Create Custom Welcome Message
The file we’re going to be using for this is .bashrc, located in your home directory. So, the path to that file will be ~/.bashrc. If you don’t know, dot files (those starting with a period) are considered hidden. Unless you’ve opted to do so, these files will not show up in your file manager. We can still access ’em just fine in the terminal, when we use their path.
The tool we’re going to use is ‘nano‘. It’s an acceptable tool for this, and many other things, but you could just as easily substitute a GUI text editor. In this case (so long as you can see the hidden files) you don’t need to edit in the terminal – and you don’t even need to use ‘sudo’ for anything, because the files you’re editing belong to you in the first place!
Let’s get to editing – as it’s easy and I need to show only a couple of commands in order to demonstrate the feature. We’ll do it in nano, of course. That requires an open terminal, so just press CTRL + ALT + T and your default terminal should open.
With your terminal open, enter the following command:
1
nano ~/.bashrc
Once that’s open, add the following lines:
1
2
3
# My custom welcome message
echo "Welcome to the terminal, Master. How can I help you today?"
uptime
Then you’ll save that with nano – which is done by pressing CTRL + X, then Y, and then ENTER. That’ll save the file – but you still need to tell the system how to use it. You need to tell bash to look for the new source and that’s done with:
1
source ~/.bashrc
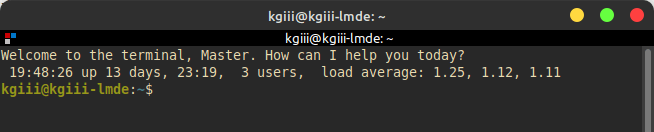
That reloads the changed file. Close your terminal and open it again to see the new custom welcome message. In this case, it’d look a bit like this:
See? You now have a custom welcome message in the terminal! Tada!
Obviously, you can customize those two commands, add more commands, and generally craft the custom welcome message you want to see when you open the terminal.
Just remember… You have to save the changes and then you need to reload the changes with source ~/.bashrc in order to make sure they work. You have to save the changes and reload the source with every change. You’ll see the changes when you next open the terminal. The two commands I chose should be self-explanatory, you can use them as an example for the commands you want to use to make your custom welcome message.
Closure:
There you have it, another article said and done! This one shows you how to make a custom welcome message in your terminal. Is this a useful skill? Well, not necessarily – but it is a way to make Linux a little more your own. It’s an easy way to customize Linux. Enjoy!
Thanks for reading! If you want to help, or if the site has helped you, you can donate, register to help, write an article, or buy inexpensive hosting to start your own site. If you scroll down, you can sign up for the newsletter, vote for the article, and comment.