Today’s article might look like a funny headline, where the subject would be how to list USB devices. Today, we’ll have a relatively short article. It’s not complicated and you’ve already learned how to list USB devices! Wait-a-minute!
After all, you’ve already been told how to do this. In fact, I’ve written an article on this very subject! See:
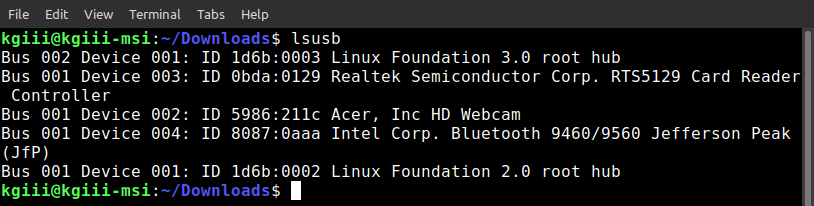
A Little About The ‘lsusb’ Command.
That article covered how to list USB devices, using the lsusb command. Right?
Yes. Yes, it did.
But, this is Linux and there’s another command that doesn’t get enough attention. In fact, I’d wager (a small amount) that many of you wouldn’t have used this command before.
What is this mystery command? It’s really easy to remember. It’s not complicated, it’s simply “usb-devices”. On the man page, the command describes itself as:
usb-devices – print USB device details
Sure enough, that’s what it does. But, unlike the ‘lsusb’ command, this command spits out a whole lot more information by default. There’s not a whole lot more to say about it, and I’m making this article extra short. So…
List USB Devices:
As implied in the opening part of this article, you’re going to need an open terminal. If you don’t know how to open the terminal, you can do so with your keyboard – just press
With your terminal now open, simply run the command:
1 | usb-devices |
If you check the man page, you’ll find that that’s it. There’s nothing special to do with this command, you just run it. The man page contains this:
usb-devices is a (bash) shell script that can be used to display details of USB buses in the system and the devices connected to them.
It might be the easiest command you’ll ever run – and it’s also easy to remember. So, why is it so unknown? Well, we use ‘lsusb’ for listing USB devices and the command doesn’t rank well in search engines, but it’s at the bottom of many such articles. It also doesn’t do much more than list USB devices, as it’s just some sort of a built-in bit of shell scripting.
Closure:
So, I figured I’d do an extra short article today. Why not? We’ve done some longer articles lately, so we might as well try the super-short format. It helps that I didn’t dive off-topic or the like, but simply explained how to list USB devices. Do you have any thoughts on articles in this shorter format?
Thanks for reading! If you want to help, or if the site has helped you, you can donate, register to help, write an article, or buy inexpensive hosting to start your site. If you scroll down, you can sign up for the newsletter, vote for the article, and comment.